
CentOS7.2安装Vim8和YouCompleteMe
1.环境
本文使用VMWare虚拟机进行实验,客户机系统是CentOS 7.2最小安装(CentOS-7-x86_64-Minimal-1511.iso)
最终实现效果:安装vim8 + python2.7(自带)+ ycm,实现C/C++的智能提示、补全、跳转。
2.需求
- Git
- GCC
- CMake(3.10以上)
- Vim
- Vundle
- YouCompleteMe
- 各种依赖库
3.安装
3.1 下载安装必要的组件
yum install -y gcc gcc-c++ ruby ruby-devel lua lua-devel  \

    ctags git python python-devel \

    tcl-devel ncurses-devel \

    perl perl-devel perl-ExtUtils-ParseXS \

    perl-ExtUtils-CBuilder \

    perl-ExtUtils-Embed
3.2 安装Vim8
访问https://github.com/vim/vim/releases,下载最新的release版本,我这里是vim-8.0.1645.tar.gz
然后解压配置编译安装
tar zxvf vim-8.0..tar.gz

cd vim-8.0.

./configure --with-features=huge \

            --enable-multibyte \

            --enable-rubyinterp=yes \

            --enable-pythoninterp=yes \

            --with-python-config-dir=/usr/lib64/python2./config \

            --enable-perlinterp=yes \

            --enable-luainterp=yes \

            --enable-cscope \

            --prefix=/usr/local

make VIMRUNTIMEDIR=/usr/local/share/vim/vim80

make install
注意: --with-python-config-dir这项要看自己的实际路径,是python-devel带的目录
更改下系统编辑器
sudo update-alternatives --install /usr/bin/editor editor /usr/local/bin/vim

sudo update-alternatives --set editor /usr/local/bin/vim

sudo update-alternatives --install /usr/bin/vi vi /usr/local/bin/vim

sudo update-alternatives --set vi /usr/local/bin/vim
3.3 安装YouCompleteMe
3.3.1 下载Vundle
git clone https://github.com/VundleVim/Vundle.vim.git ~/.vim/bundle/Vundle.vim
配置~/.vimrc文件,填入如下内容
set nocompatible              " be iMproved, required

filetype off                  " required

" set the runtime path to include Vundle and initialize

set rtp+=~/.vim/bundle/Vundle.vim

call vundle#begin()

" alternatively, pass a path where Vundle should install plugins

"call vundle#begin('~/some/path/here')

" let Vundle manage Vundle, required

Plugin 'VundleVim/Vundle.vim'

Plugin 'Valloric/YouCompleteMe'

" All of your Plugins must be added before the following line

call vundle#end()            " required

filetype plugin indent on    " required

" To ignore plugin indent changes, instead use:

"filetype plugin on

"

" Brief help

" :PluginList       - lists configured plugins

" :PluginInstall    - installs plugins; append `!` to update or just :PluginUpdate

" :PluginSearch foo - searches for foo; append `!` to refresh local cache

" :PluginClean      - confirms removal of unused plugins; append `!` to auto-approve removal

"

" see :h vundle for more details or wiki for FAQ

" Put your non-Plugin stuff after this line
3.3.2 下载YouCompleteMe
打开vim,输入如下命令
:PluginInstall
注意:这里很考验网速,可能会比较慢,下载好后,整个.vim文件夹大约150~250MB(根据时间版本不同)。
3.3.3 下载CMake(yum安装的2.8版本不行)
访问https://cmake.org/download/,我这里是cmake-3.10.3.tar.gz
解压编译安装
tar zxvf cmake-3.10..tar.gz

cd cmake-3.10.

./bootstrap && make && make install
3.3.4 编译YouCompleteMe(支持C/C++)
cd ~/.vim/bundle/YouCompleteMe/

./install.py --clang-completer
编译完成后,整个.vim文件夹大约350MB。
注意:如果使用--clang-completer选项,脚本会判断当前是否有upstream pre-build libclang.so库(不建议用系统的libclang):
如果有则用缓存的(见缓存位置);如果没有则会去下载库(见下载地址)。
看网络状况,可能会下载不全(sha256值不对),导致下面编译YouCompleteMe时出错。可以先用迅雷下载,再替换过去。
下载地址:https://dl.bintray.com/micbou/libclang/libclang-6.0.0-x86_64-linux-gnu-ubuntu-14.04.tar.bz2
缓存位置:.vim/bundle/YouCompleteMe/third_party/ycmd/clang_archives/
3.3.5 配置YouCompleteMe
编辑~/.vimrc,增加以下内容
let g:ycm_global_ycm_extra_conf='~/.ycm_extra_conf.py'  "设置全局配置文件的路径

let g:ycm_seed_identifiers_with_syntax=    " 语法关键字补全

let g:ycm_confirm_extra_conf=  " 打开vim时不再询问是否加载ycm_extra_conf.py配置

let g:ycm_key_invoke_completion = '<C-a>' " ctrl + a 触发补全,防止与其他插件冲突

set completeopt=longest,menu    "让Vim的补全菜单行为与一般IDE一致(参考VimTip1228)
nnoremap <leader>jd :YcmCompleter GoToDefinitionElseDeclaration<CR> "定义跳转快捷键
第一行所需的.ycm_extra_conf.py,可以从自带的复制一份过来,再根据需要进行配置
cp .vim/bundle/YouCompleteMe/third_party/ycmd/cpp/ycm/.ycm_extra_conf.py ~
4.运行
现在运行vim已经可以对C++进行提示补全了(因为刚才是从cpp子目录下拷贝的配置样例),
打开~/.ycm_extra_conf.py可以看到其中flags变量,就是配置项目代码补全提示的
比如(C++项目)
flags = [

'-Wall',

'-Wextra',

'-Werror',

'-fexceptions',

'-DNDEBUG',

'-std=c++11',

'-x',

'c++',

'-isystem',

'/usr/include',

'-isystem',

'/usr/local/include',

'-I',

'/root/my_proj',

]
如果是C项目,需要调整
-std=c99,-x下面的参数改为c。
解析C/C++相关的符号提示(系统的、三方库的、自己的),需要配置-isystem,'-I',参数为头文件所在目录。
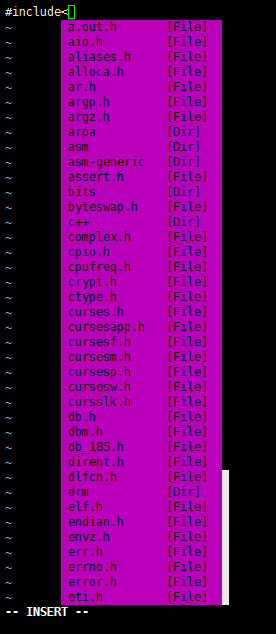
配置好后,用vim编辑一个C文件,
输入#include<会自动弹出提示窗
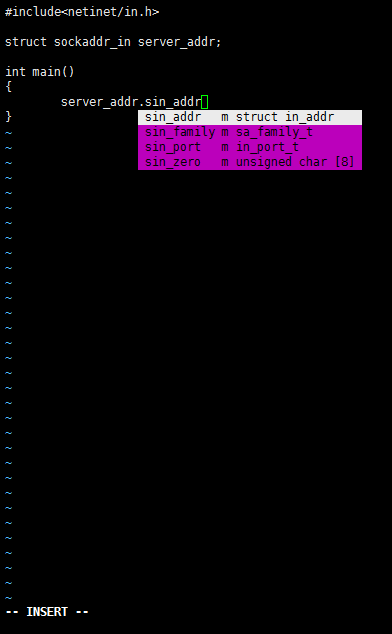
结构体输入.时会提示成员,
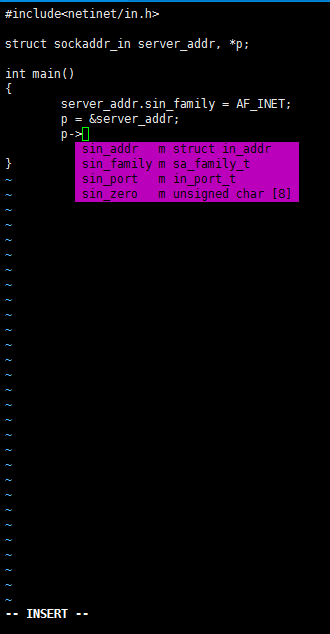
结构体指针输入->时会提示成员
YouCompleteMe默认不会像IDE那样主动提示符号补全(如输入pri提示printf),想要补全时按Ctrl+A(见上面配置)。
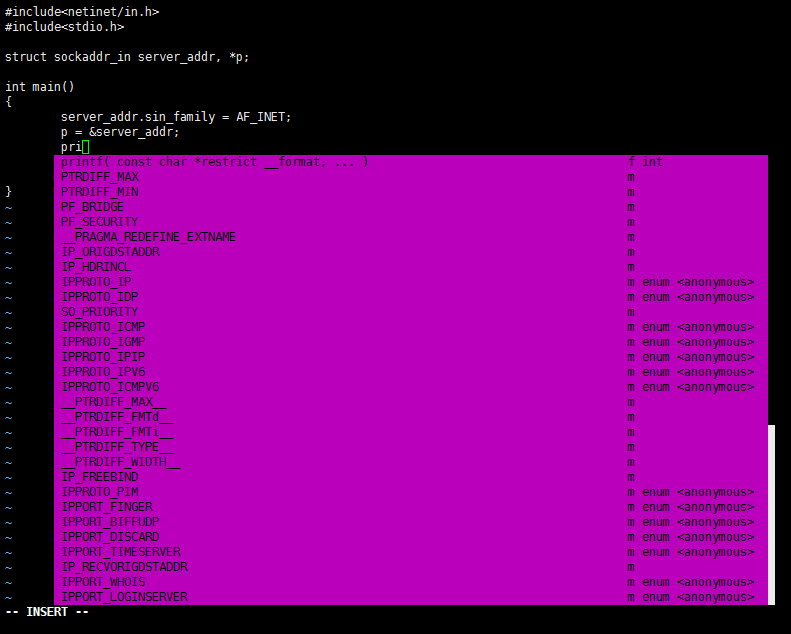
以上弹出提示窗,按Ctrl+N、Ctrl+P上下选择补全。
符号跳转
光标定位到需要跳转的符号上,输入\jd(\是默认leader),实现跳转(该跳转有条件,不一定100%成功,可见官网说明)
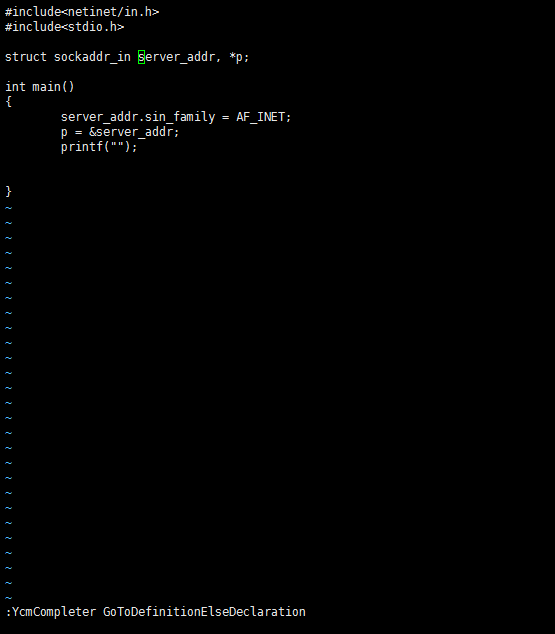
在printf上按\jd,跳转到定义
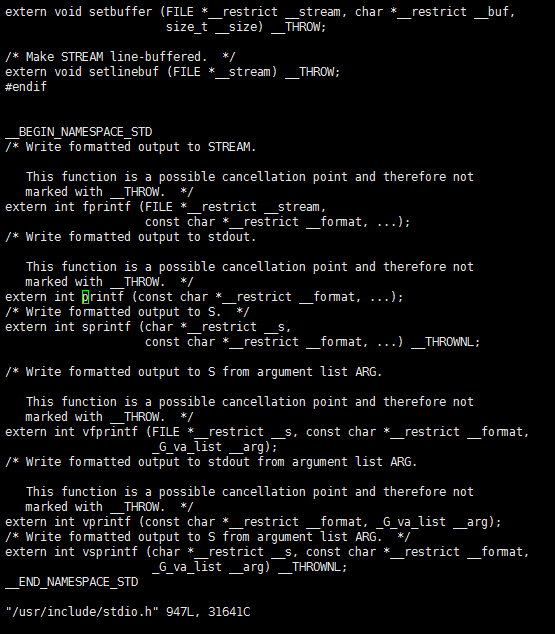
按Ctrl+o跳回之前的位置。
5.其他
实际使用每个项目单独一个.ycm_extra_conf.py配置,GitHub上有个项目可以自动生成配置文件, 有需要可以参考下。
CentOS7.2安装Vim8和YouCompleteMe的更多相关文章
- Centos7安装vim8.0 + YouCompleteMe
更新yum sudo yum upgrade sduo yum update 下载git sudo yum install git 升级vim以及gcc 升级gcc sudo yum install ...
- 学以致用八---centos7.2 安装vim8+支持python3
目的:打造基于python的vim环境 也是在地铁上突然产生的一个想法,平时都是在pycharm上练习python,但有时候会提示激活码过期,又得上网找激活码,够折腾的.那何不在linux环境下来搭建 ...
- ubuntu16.04下编译安装vim8.1
之前写过一篇centos7下编译安装vim8.0的教程,ubuntu16.04相比centos7下安装过程不同在于依赖包名字的不同,其余都是一样.下面给出ubuntu16.04编译安装vim8.0需要 ...
- Ubuntu16.04安装vim8
Ubuntu16.04安装vim8 在Ubuntu16.04下编译安装vim8,并配置vim-plug插件管理器,以及安装YouCompleteMe等插件. 安装依赖 sudo apt-get ins ...
- Ubuntu 16.04安装Vim8.0
Ubuntu 16.04安装Vim8.0 https://www.aliyun.com/jiaocheng/131859.html sudo add-apt-repository ppa:jonath ...
- 在centos7上安装Jenkins
在centos7上安装Jenkins 安装 添加yum repos,然后安装 sudo wget -O /etc/yum.repos.d/jenkins.repo http://pkg.jenkins ...
- CentOS7 Jenkins安装
CentOS7 Jenkins安装 CentOS7 Jenkins安装 Download 从Jenkins下载apache-tomcat-8.0.18.tar.gz Install 安装 上传RPM文 ...
- 在 CentOS7 上安装 zookeeper-3.4.9 服务
在 CentOS7 上安装 zookeeper-3.4.9 服务 1.创建 /usr/local/services/zookeeper 文件夹: mkdir -p /usr/local/service ...
- 在 CentOS7 上安装 MongoDB
在 CentOS7 上安装 MongoDB 1 通过 SecureCRT 连接至 CentOS7 服务器: 2 进入到 /usr/local/ 目录: cd /usr/local 3 在当前目录下创建 ...
随机推荐
- uva 11178二维几何(点与直线、点积叉积)
Problem D Morley’s Theorem Input: Standard Input Output: Standard Output Morley’s theorem states tha ...
- ftrace的使用
This article explains how to set up ftrace and be able to understand how to trace functions. It shou ...
- android 完美退出应用程序。
Android 程序在点击回退键时,如果只有一个activity,调用finish()方法就能退出界面,如果有多个界面,在调用该方法时,只会销毁当前的activity,显示栈顶的其它activity, ...
- python学习之-requests模块基础
安装版本:2.18 模块导入:import requests l 发送请求 发送GET请求: 获取GITHUB的公共时间线 r = requests.get(url='https://api.git ...
- Gradle讲解
简介: Gradle是一个基于Apache Ant和Apache Maven概念的项目自动化构建工具.它使用一种基于Groovy的特定领域语言(DSL)来声明项目设置,抛弃了基于XML的各种繁琐配置. ...
- 洛谷 P2613 【模板】有理数取余
P2613 [模板]有理数取余 题目描述 给出一个有理数c=\frac{a}{b}c=ba,求c\ \bmod 19260817c mod19260817的值. 输入输出格式 输入格式: 一共两行. ...
- Java中Class.this和this的区别(转)
当inner class(内部类)必顺使用到outer class(外部类)的this instance(实例)时,或者匿名内部类要使用外部类的实例. 例: class Outer{ String d ...
- ArcCatalog中通过ArcSDE向Oracle数据库中导入数据
将数据导入到Oracle指定的表空间的具体内容如下: 首先,在ArcCatalog中建立指定表空间的数据库连接(要以指定表空间的用户登录): 然后,在ArcCatlog中定位到数据源,选中并拷贝图层; ...
- 【kotlin】基本语法when的使用,类似于java中的switch,但是又青出于蓝而胜于蓝
when(要判断的参数){ 参数值为1 ->做这种事情 参数值为2 ->做另一种事情 else -> 类似于switch中的default } 扩展使用:https://www.cn ...
- Python 基础教程之包和类的用法
Python 基础教程之包和类的用法 建立一个文件夹filePackage 在filePackage 文件夹内创建 __init__.py 有了 __init__.py ,filePackage才算是 ...