ngx-bootstrap使用03 Alerts组件、利用Object.assign复制对象
1 Alerts
该组件用于给用户操作提供反馈信息或者提供一些警告信息
2 用法
2.1 下载ngx-bootstrap依赖
参考博文:点击前往
2.2 在模块级别导入AlertModule模块
技巧01:由于AlertModule是一个工具组件,在实际开发中一般都是在共享模块进行导入的
import { BrowserModule } from '@angular/platform-browser';
import { NgModule } from '@angular/core';
import { AppComponent } from './app.component';
import { TestComponent } from './test/test.component';
import {FormsModule, ReactiveFormsModule} from '@angular/forms';
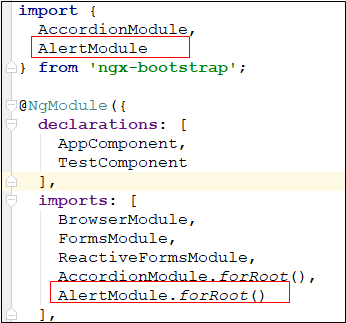
import {
AccordionModule,
AlertModule
} from 'ngx-bootstrap';
@NgModule({
declarations: [
AppComponent,
TestComponent
],
imports: [
BrowserModule,
FormsModule,
ReactiveFormsModule,
AccordionModule.forRoot(),
AlertModule.forRoot()
],
providers: [],
bootstrap: [AppComponent]
})
export class AppModule { }
2.3 在需要用Alerts组件的地方直接使用alert选择器即可
    <alert type="success">

      hello boy

    </alert>
2.4 效果展示

3 实例讲解
3.1 基本使用结构
Alert组件可以包含任意长度的文本内容,还可以包含一个按钮来控制alert组件的隐藏;alert组件通过制定type属性的值来设置样式,type属性的值只能是success、info、warning、danger中的一个
3.1.1 alert组件样式
可以利用alert-*来给alert组件内的其他元素制定样式,aler-*样式列表如下

3.1.2 alert组件基本结构
    <alert type="类型名称">

      内容

    </alert>
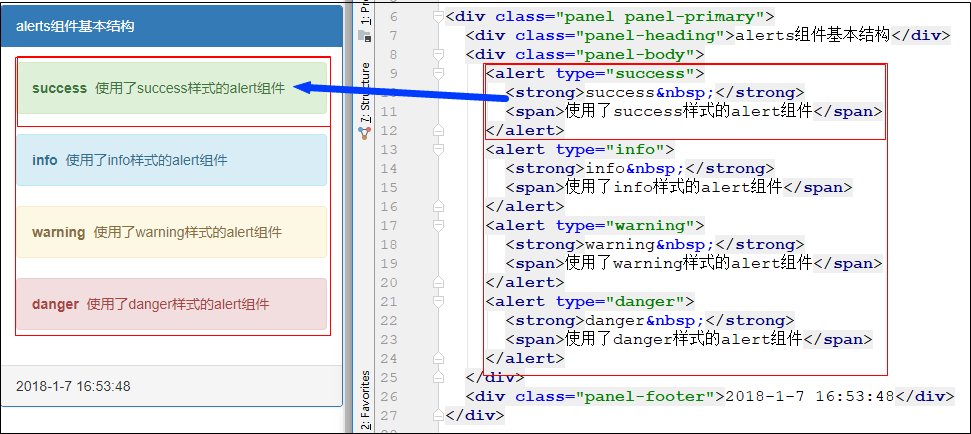
<div class="panel panel-primary">
<div class="panel-heading">alerts组件基本结构</div>
<div class="panel-body">
<alert type="success">
<strong>success </strong>
<span>使用了success样式的alert组件</span>
</alert>
<alert type="info">
<strong>info </strong>
<span>使用了info样式的alert组件</span>
</alert>
<alert type="warning">
<strong>warning </strong>
<span>使用了warning样式的alert组件</span>
</alert>
<alert type="danger">
<strong>danger </strong>
<span>使用了danger样式的alert组件</span>
</alert>
</div>
<div class="panel-footer">2018-1-7 16:53:48</div>
</div>
HTML
import { Component, OnInit } from '@angular/core';

@Component({

  selector: 'app-test',

  templateUrl: './test.component.html',

  styleUrls: ['./test.component.scss']

})

export class TestComponent implements OnInit {

  constructor() { }

  ngOnInit() {

  }

}
TS
3.2 自动匹配颜色
为alert组件内部的其它元素添加alert-link类去自动根据alert组件的类型进行颜色匹配
技巧01:如果alert组件内部的元素不指定alert-link类,会自动进行颜色匹配
技巧02:如果alert组件内部的其他元素制定了alert-link类,不仅会进行颜色自动匹配还会进行加粗设置
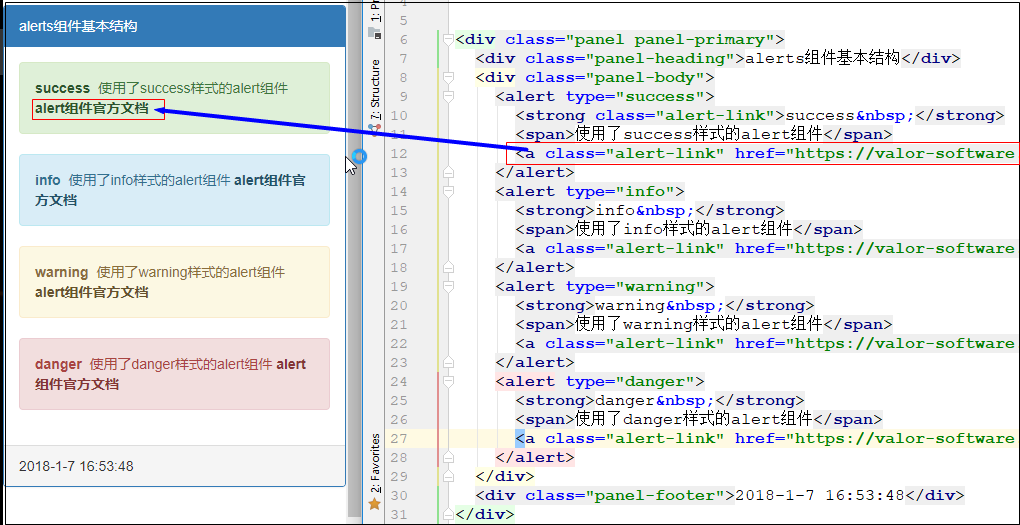
<div class="panel panel-primary">
<div class="panel-heading">alerts组件基本结构</div>
<div class="panel-body">
<alert type="success">
<strong class="alert-link">success </strong>
<span>使用了success样式的alert组件</span>
<a class="alert-link" href="https://valor-software.com/ngx-bootstrap/#/alerts">alert组件官方文档</a>
</alert>
<alert type="info">
<strong>info </strong>
<span>使用了info样式的alert组件</span>
<a class="alert-link" href="https://valor-software.com/ngx-bootstrap/#/alerts">alert组件官方文档</a>
</alert>
<alert type="warning">
<strong>warning </strong>
<span>使用了warning样式的alert组件</span>
<a class="alert-link" href="https://valor-software.com/ngx-bootstrap/#/alerts">alert组件官方文档</a>
</alert>
<alert type="danger">
<strong>danger </strong>
<span>使用了danger样式的alert组件</span>
<a class="alert-link" href="https://valor-software.com/ngx-bootstrap/#/alerts">alert组件官方文档</a>
</alert>
</div>
<div class="panel-footer">2018-1-7 16:53:48</div>
</div>
HTML
import { Component, OnInit } from '@angular/core';

@Component({

  selector: 'app-test',

  templateUrl: './test.component.html',

  styleUrls: ['./test.component.scss']

})

export class TestComponent implements OnInit {

  constructor() { }

  ngOnInit() {

  }

}
TS
3.3 包含其它元素
alert元素可以包含其它的HTML元素
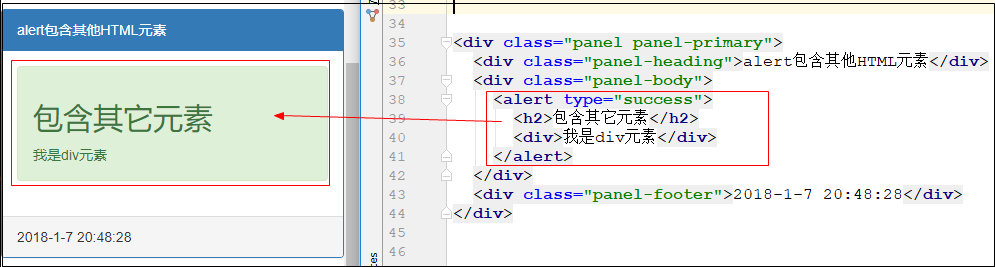
<div class="panel panel-primary">

  <div class="panel-heading">alert包含其他HTML元素</div>

  <div class="panel-body">

    <alert type="success">

      <h2>包含其它元素</h2>

      <div>我是div元素</div>

    </alert>

  </div>

  <div class="panel-footer">2018-1-7 20:48:28</div>

</div>
HTML
import { Component, OnInit } from '@angular/core';

@Component({

  selector: 'app-test',

  templateUrl: './test.component.html',

  styleUrls: ['./test.component.scss']

})

export class TestComponent implements OnInit {

  constructor() { }

  ngOnInit() {

  }

}
TS
3.4 输入属性dismissible
当alert组件的dismissible属性值为真时就会出现一个关闭按钮,点击就可以关闭alert组件
技巧01:在typescript中利用Object.assign实现对象的复制
参考博文:点击前往

<div class="panel panel-primary">

  <div class="panel-heading">输入属性diamissible</div>

  <div class="panel-body">

    <alert type="success" dismissible="true">

      <span class="alert-link">Dismissible</span>

      <span>当alert组件的dismissible属性值为真时就会出现一个关闭按钮,点击就可以关闭ale rt组件</span>

    </alert>

    <button class="btn-primary" (click)="onDismissible()">dismissible功能切换</button>

    <span *ngIf="dismissible">dismissible功能开启<button class="btn-info" (click)="onReset()">Reset</button></span>

    <span *ngIf="!dismissible">dismissible功能关闭</span>

    <alert *ngFor="let alert of alerts;" [dismissible]="dismissible">

      <span class="alert-link">{{alert.title}}</span>

      <span>{{alert.content}}</span>

    </alert>

  </div>

  <div class="panel-footer">2018-1-7 20:55:33</div>

</div>
HTML
import { Component, OnInit } from '@angular/core';

@Component({

  selector: 'app-test',

  templateUrl: './test.component.html',

  styleUrls: ['./test.component.scss']

})

export class TestComponent implements OnInit {

  alerts: Alert[];

  dismissible = false;

  constructor() { }

  ngOnInit() {

    this. alerts = [

      new Alert('标题01', '内容01'),

      new Alert('标题02', '内容02'),

      new Alert('标题03', '内容03')

    ];

  }

  onDismissible() {

    this.dismissible = !this.dismissible;

  }

  onReset() {

    this.alerts = this.alerts.map((alert: Alert) => Object.assign(new Alert('', ''), alert));

  }

}

export class Alert {

  private _title;

  private _content;

  constructor(title, content) {

    this._title = title;

    this._content = content;

  }

  get title() {

    return this._title;

  }

  set title(value) {

    this._title = value;

  }

  get content() {

    return this._content;

  }

  set content(value) {

    this._content = value;

  }

}
TS
3.5 在alert组件内动态显示HTML代码
alert组件内部可以放其它的元素,如果我们想在alert组件内部动态地添加HTML代码,只需要利用ts将HTML代码进行封装即可
技巧01:在TS中的HTML代码需要利用DomSanitizer服务进行处理
技巧02:innerHtml和innerText的区别
innerHTML可以识别HTML标签和汉字
innerText会将所有的当成文本处理,而且不能识别汉字
技巧03:DomSanitizer服务可以实现跨站脚本攻击
参考博文:点击前往

<div class="panel panel-primary">

  <div class="panel-heading">在alert组件内部显示HTML代码</div>

  <div class="panel-body">

    <div *ngFor="let alert of alerts;">

      <alert type="success" [type]="alert.type">

        <span [innerHtml]="alert.content"></span>

      </alert>

    </div>

  </div>

  <div class="panel-footer">2018-1-7 22:05:05</div>

</div>
HTML
import { Component, OnInit, SecurityContext } from '@angular/core';

import { DomSanitizer} from '@angular/platform-browser';

@Component({

  selector: 'app-test',

  templateUrl: './test.component.html',

  styleUrls: ['./test.component.scss']

})

export class TestComponent implements OnInit {

  alerts: Alert[];

  dismissible = false;

  constructor(

    private domSanitizer: DomSanitizer

  ) { }

  ngOnInit() {

    this.alerts = [

      new Alert('success', `<strong>内容01</strong>`),

      new Alert('info', `<i>内容02</i>`),

      new Alert('warning', '内容03')

    ];

    this.alerts = this.alerts.map((alert: Alert) => new Alert(alert.type, this.domSanitizer.sanitize(SecurityContext.HTML, alert.content)))

  }

}

export class Alert {

  private _type;

  private _content;

  constructor(type, content) {

    this._type = type;

    this._content = content;

  }

  get type() {

    return this._type;

  }

  set type(value) {

    this._type = value;

  }

  get content() {

    return this._content;

  }

  set content(value) {

    this._content = value;

  }

}
TS
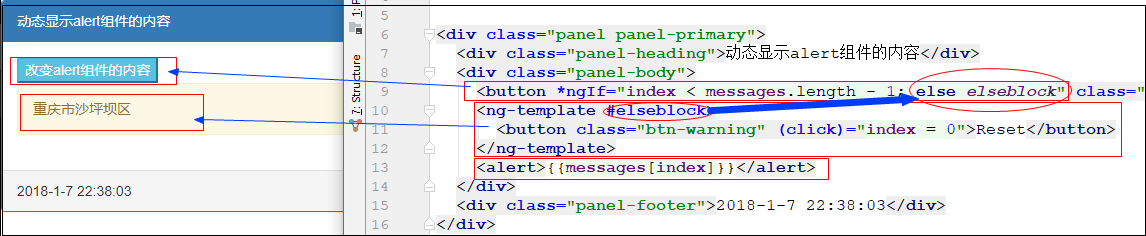
3.6 动态改变alert组件的内容
通过一个单机按钮来动态改变alert组件的内容,用一个列表来存储alert组件的内容
技巧01:*ngIf指令的使用
官方文档:点击前往
<div class="panel panel-primary">

  <div class="panel-heading">动态显示alert组件的内容</div>

  <div class="panel-body">

    <button *ngIf="index < messages.length - 1; else elseblock" class="btn-info" (click)="onAdd()">改变alert组件的内容</button>

    <ng-template #elseblock>

      <button class="btn-warning" (click)="index = 0">Reset</button>

    </ng-template>

    <alert>{{messages[index]}}</alert>

  </div>

  <div class="panel-footer">2018-1-7 22:38:03</div>

</div>
HTML
import { Component, OnInit, SecurityContext } from '@angular/core';

import { DomSanitizer} from '@angular/platform-browser';

@Component({

  selector: 'app-test',

  templateUrl: './test.component.html',

  styleUrls: ['./test.component.scss']

})

export class TestComponent implements OnInit {

  messages: string[];

  index = 0;

  constructor(

  ) { }

  ngOnInit() {

    this.messages = [

      '重庆市大足区',

      '重庆市沙坪坝区',

      '重庆市合川区'

    ];

  }

  onAdd() {

    if (this.index !== this.messages.length - 1) {

      this.index++;

    }

  }

}
3.7 定时消失
当alert组件的dismissOnTimeout属性的值设置了数值后,该alert组件就会在相应的时间后消失,例如
    <alert type="success" [dismissOnTimeout]="5000">

      <span class="alert-link">Success</span>

      <div>Welcom to the city of Chongqing. <- 5秒钟后我会消失哟</div>

    </alert>
代码解释:该alert组件会在5秒钟后消失
技巧01:alert组件的dismissOnTimeout属性值的单位是毫秒
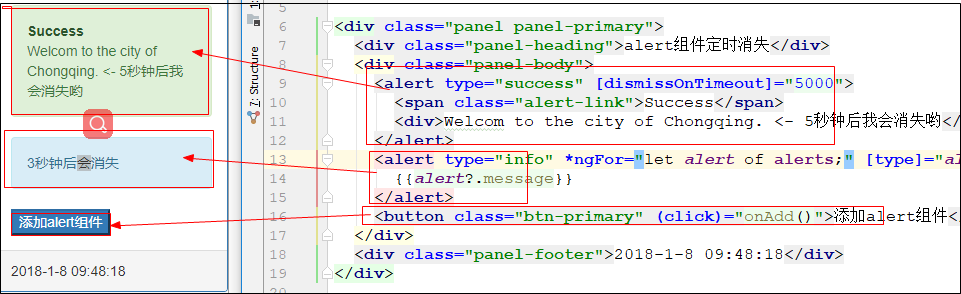
<div class="panel panel-primary">

  <div class="panel-heading">alert组件定时消失</div>

  <div class="panel-body">

    <alert type="success" [dismissOnTimeout]="5000">

      <span class="alert-link">Success</span>

      <div>Welcom to the city of Chongqing. <- 5秒钟后我会消失哟</div>

    </alert>

    <alert type="info" *ngFor="let alert of alerts;" [type]="alert?.type" [dismissOnTimeout]="alert?.timeOut">

      {{alert?.message}}

    </alert>

    <button class="btn-primary" (click)="onAdd()">添加alert组件</button>

  </div>

  <div class="panel-footer">2018-1-8 09:48:18</div>

</div>
HTML
import { Component, OnInit, SecurityContext } from '@angular/core';

import { DomSanitizer} from '@angular/platform-browser';

@Component({

  selector: 'app-test',

  templateUrl: './test.component.html',

  styleUrls: ['./test.component.scss']

})

export class TestComponent implements OnInit {

  alerts: Alert[];

  alert = new Alert('info', '3秒钟后会消失', 3000);

  constructor(

  ) { }

  ngOnInit() {

    this.alerts = [];

  }

  onAdd() {

    this.alerts.push(this.alert);

  }

}

export class Alert {

  private _type: string;

  private _message: string;

  private _timeOut: number;

  constructor(type: string, message: string, timeOut: number) {

    this._type = type;

    this._message = message;

    this._timeOut = timeOut;

  }

  get type(): string {

    return this._type;

  }

  set type(value: string) {

    this._type = value;

  }

  get message(): string {

    return this._message;

  }

  set message(value: string) {

    this._message = value;

  }

  get timeOut(): number {

    return this._timeOut;

  }

  set timeOut(value: number) {

    this._timeOut = value;

  }

}
TS
4 Alert API
4.1 alert组件选择器
<alert></alert>
4.2 输入属性
4.2.1 dismissible
类型:Boolean
默认值:false
说明:如果设置了dismissible属性值为true,alert组件就会出现一个关闭按钮,点击他就可以关闭该alert组件

<div class="panel panel-primary">

  <div class="panel-heading">alert组件的输入属性dismissible</div>

  <div class="panel-body">

    <alert type="success" dismissible="true">hello boy</alert>

  </div>

  <div class="panel-footer">2018-1-8 11:23:02</div>

</div>
4.2.2 dismissOnTimeout
类型:string/number
说明:单位是毫秒,在设定的毫秒后alert组件会自动关闭
<div class="panel panel-primary">

  <div class="panel-heading">alert组件的dismissOnTimeout</div>

  <div class="panel-body">

    <alert type="success" dismissOnTimeout="3000">

      3秒钟后我会消失

    </alert>

  </div>

  <div class="panel-footer">2018-1-8 13:31:05</div>

</div>
4.2.3 isOpen
类型:boolean
默认值:true
说明:isOpen属性值为true时alert组件会显示,为false就会消失
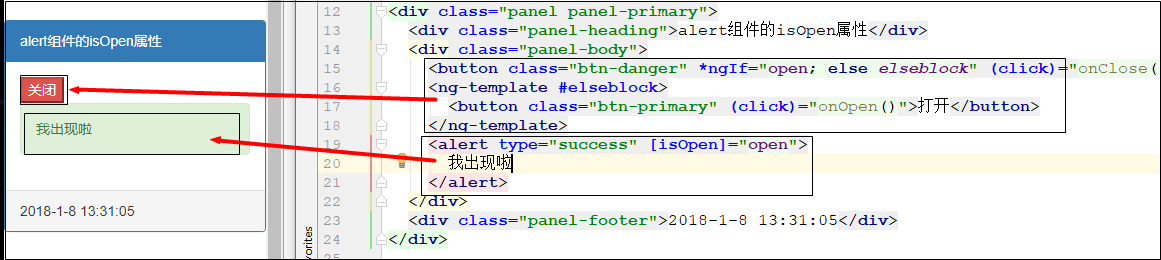
<div class="panel panel-primary">

  <div class="panel-heading">alert组件的isOpen属性</div>

  <div class="panel-body">

    <button class="btn-danger" *ngIf="open; else elseblock" (click)="onClose()">关闭</button>

    <ng-template #elseblock>

      <button class="btn-primary" (click)="onOpen()">打开</button>

    </ng-template>

    <alert type="success" [isOpen]="open">

      我出现啦

    </alert>

  </div>

  <div class="panel-footer">2018-1-8 13:31:05</div>

</div>
HTML
import { Component, OnInit, SecurityContext } from '@angular/core';

import { DomSanitizer} from '@angular/platform-browser';

@Component({

  selector: 'app-test',

  templateUrl: './test.component.html',

  styleUrls: ['./test.component.scss']

})

export class TestComponent implements OnInit {

  open = true;

  constructor(

  ) { }

  ngOnInit() {

  }

  onClose() {

    this.open = false;

  }

  onOpen() {

    this.open = true;

  }

}

export class Alert {

  private _type: string;

  private _message: string;

  private _timeOut: number;

  constructor(type: string, message: string, timeOut: number) {

    this._type = type;

    this._message = message;

    this._timeOut = timeOut;

  }

  get type(): string {

    return this._type;

  }

  set type(value: string) {

    this._type = value;

  }

  get message(): string {

    return this._message;

  }

  set message(value: string) {

    this._message = value;

  }

  get timeOut(): number {

    return this._timeOut;

  }

  set timeOut(value: number) {

    this._timeOut = value;

  }

}
TS
4.2.4 type
类型:string
默认值:warning
说明:该属性是用来指定的alert组件的样式的,只能是primary,info,warning,danger
4.3 输出属性
4.3.1 onClose
说明:调用相关方法关闭alert组件时触发该事件,此时alert组件的isOpen属性值为true

<div class="panel panel-primary">

  <div class="panel-heading">alert组件的isOpen属性</div>

  <div class="panel-body">

    <button class="btn-danger" *ngIf="open; else elseblock" (click)="onClose()">关闭</button>

    <ng-template #elseblock>

      <button class="btn-primary" (click)="onOpen()">打开</button>

    </ng-template>

    <alert

      dismissible="true"

      type="success"

      [isOpen]="open"

      (onClosed)="closed($event)"

      (onClose)="close($event)">

      我出现啦

    </alert>

  </div>

  <div class="panel-footer">2018-1-8 13:31:05</div>

</div>
HTML
import { Component, OnInit, SecurityContext } from '@angular/core';

import { DomSanitizer} from '@angular/platform-browser';

@Component({

  selector: 'app-test',

  templateUrl: './test.component.html',

  styleUrls: ['./test.component.scss']

})

export class TestComponent implements OnInit {

  open = true;

  constructor(

  ) { }

  ngOnInit() {

  }

  onClose() {

    this.open = false;

  }

  onOpen() {

    this.open = true;

  }

  close(event: any) {

    alert('将要执行关闭操作');

    // console.log(JSON.stringify(event));

    console.log(event);

  }

  closed(event: any) {

    alert('关闭操作执行完毕');

    // console.log(JSON.stringify(event));

    console.log(event);

  }

}

export class Alert {

  private _type: string;

  private _message: string;

  private _timeOut: number;

  constructor(type: string, message: string, timeOut: number) {

    this._type = type;

    this._message = message;

    this._timeOut = timeOut;

  }

  get type(): string {

    return this._type;

  }

  set type(value: string) {

    this._type = value;

  }

  get message(): string {

    return this._message;

  }

  set message(value: string) {

    this._message = value;

  }

  get timeOut(): number {

    return this._timeOut;

  }

  set timeOut(value: number) {

    this._timeOut = value;

  }

}
TS
4.3.2 onClosed
说明:alert组件关闭完成后触发该事件,此时alert组件的isOpen属性为false
<div class="panel panel-primary">

  <div class="panel-heading">alert组件的isOpen属性</div>

  <div class="panel-body">

    <button class="btn-danger" *ngIf="open; else elseblock" (click)="onClose()">关闭</button>

    <ng-template #elseblock>

      <button class="btn-primary" (click)="onOpen()">打开</button>

    </ng-template>

    <alert

      dismissible="true"

      type="success"

      [isOpen]="open"

      (onClosed)="closed($event)"

      (onClose)="close($event)">

      我出现啦

    </alert>

  </div>

  <div class="panel-footer">2018-1-8 13:31:05</div>

</div>
import { Component, OnInit, SecurityContext } from '@angular/core';

import { DomSanitizer} from '@angular/platform-browser';

@Component({

  selector: 'app-test',

  templateUrl: './test.component.html',

  styleUrls: ['./test.component.scss']

})

export class TestComponent implements OnInit {

  open = true;

  constructor(

  ) { }

  ngOnInit() {

  }

  onClose() {

    this.open = false;

  }

  onOpen() {

    this.open = true;

  }

  close(event: any) {

    alert('将要执行关闭操作');

    // console.log(JSON.stringify(event));

    console.log(event);

  }

  closed(event: any) {

    alert('关闭操作执行完毕');

    // console.log(JSON.stringify(event));

    console.log(event);

  }

}

export class Alert {

  private _type: string;

  private _message: string;

  private _timeOut: number;

  constructor(type: string, message: string, timeOut: number) {

    this._type = type;

    this._message = message;

    this._timeOut = timeOut;

  }

  get type(): string {

    return this._type;

  }

  set type(value: string) {

    this._type = value;

  }

  get message(): string {

    return this._message;

  }

  set message(value: string) {

    this._message = value;

  }

  get timeOut(): number {

    return this._timeOut;

  }

  set timeOut(value: number) {

    this._timeOut = value;

  }

}
TS
4.4 官方文档
点击前往
ngx-bootstrap使用03 Alerts组件、利用Object.assign复制对象的更多相关文章
- Object 对象方法学习之(1)—— 使用 Object.assign 复制对象、合并对象
作用 Object.assign() 方法用于把一个或多个源对象的可枚举属性值复制到目标对象中,返回值为目标对象. 语法 Object.assign(target, ...sources) 参数 ta ...
- JS面向对象组件(五) -- 复制对象(拷贝继承)
研究到这儿,竟然出现了一个面试题目 var a = { name : '小明' }; var b = a; b.name = '小强'; alert( a.name ); 结果必然是“小强”,原因是对 ...
- Object.assign(o1, o2, o3) 对象 复制 合拼
Object 对象方法学习之(1)—— 使用 Object.assign 复制对象.合并对象 合并对象 var o1 = {a: 1}; var o2 = {b: 2}; var o3 = {c: 3 ...
- ES6之Object.assign()详解
译者按: 这篇博客将介绍ES6新增的Object.assign()方法. 原文: ECMAScript 6: merging objects via Object.assign() 译者: Funde ...
- ES6学习--Object.assign()
ES6提供了Object.assign(),用于合并/复制对象的属性. Object.assign(target, source_1, ..., source_n) 1. 初始化对象属性 构造器正是为 ...
- es6新语法Object.assign()
1.介绍 Object.assign用于对象的合并,将源对象的所有可枚举属性复制到目标对象,只拷贝源对象自身的属性继承属性补考呗 Object.assign(target,source1,...)第一 ...
- bootstrap学习之二-组件
一.bootstrap字体图标 以span的形式出现,通常可以用于一个button或者其他元素的内文本, <span class="glyphicon glyphicon-sort-b ...
- 循序渐进BootstrapVue,开发公司门户网站(1)---基于Bootstrap网站模板构建组件界面
在前面随笔<使用BootstrapVue相关组件,构建Vue项目界面>概括性的介绍了BootstrapVue的使用过程,其实选用这个主要就是希望能够用来构建一些公司门户网站的内容,毕竟基于 ...
- Bootstrap 中的 Typeahead 组件 -- AutoComplete
Bootstrap 中的 Typeahead 组件就是通常所说的自动完成 AutoComplete,功能很强大,但是,使用上并不太方便.这里我们将介绍一下这个组件的使用. 第一,简单使用 首先,最简单 ...
随机推荐
- hdu 5242 Game(树链剖分,贪心¥)
Game Time Limit: 3000/1500 MS (Java/Others) Memory Limit: 32768/32768 K (Java/Others)Total Submis ...
- keras中无法下载 https://s3.amazonaws.com/img-datasets/mnist.npz 解决方法
网址:https://s3.amazonaws.com/img-datasets/mnist.npz,由于显而易见的原因,无法访问. npz实际上是numpy提供的数组存储方式,简单的可看做是一系列n ...
- lucene搜索之facet查询原理和facet查询实例——TODO
转自:http://www.lai18.com/content/7084969.html Facet说明 我们在浏览网站的时候,经常会遇到按某一类条件查询的情况,这种情况尤以电商网站最多,以天猫商城为 ...
- Git_学习_01_ git 安装与配置
参考:windows下Git BASH安装 二.参考资料 1. windows下Git BASH安装
- session 丢失问题
1. 存到memcached中, 十分简单, 在使用session之前, 加入下面两行代码 int_set('session.save_handler', 'memcache'); int_set(' ...
- Python 2.7_爬取妹子图网站单页测试图片_20170114
1.url= http://www.mzitu.com/74100/x,2为1到23的值 2.用到模块 os 创建文件目录; re模块正则匹配目录名 图片下载地址; time模块 限制下载时间;req ...
- SQL夯实基础(二):连接操作中使用on与where筛选的差异
一.on筛选和where筛选 在连接查询语法中,另人迷惑首当其冲的就要属on筛选和where筛选的区别了,如果在我们编写查询的时候, 筛选条件的放置不管是在on后面还是where后面, 查出来的结果总 ...
- loj 6083.「美团 CodeM 资格赛」数码
题目: 给定两个整数\(l\)和\(r\),对于任意\(x\),满足\(l\leq x\leq r\),把\(x\)所有约数写下来. 对于每个写下来的数,只保留最高位的那个数码.求\([1,9]\)中 ...
- Python函数-int()
int(x, [base]) 作用: 将一个数字或base类型的字符串转换成整数. int(x=0) int(x, base=10),base缺省值为10,也就是说不指定base的值时,函数将x按十进 ...
- (转)C#正则表达式Regex类的用法
原文地址如下:http://www.studyofnet.com/news/297.html 一.C#正则表达式符号模式 字 符 描 述 \ 转义字符,将一个具有特殊功能的字符转义为一个普通字符,或反 ...