
python之 matplotlib模块之绘制堆叠柱状图
我们先来看一个结果图
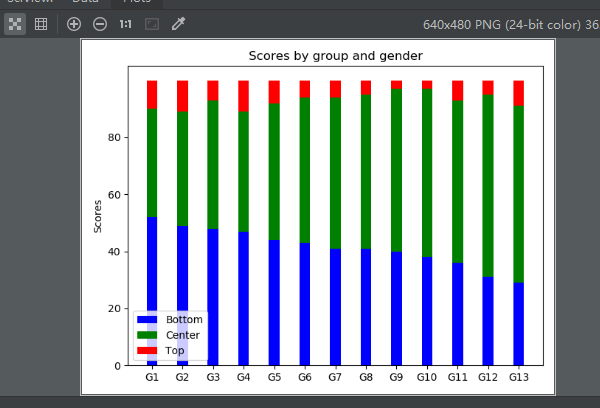
看到这个图,我个人的思路是
1 设置标题
import numpy as np

import matplotlib.pyplot as plt

plt.title('Scores by group and gender')
2 x坐标的间隔设置和文字设置
N = 13

ind = np.arange(N)  #[ 0  1  2  3  4  5  6  7  8  9 10 11 12]

plt.xticks(ind, ('G1', 'G2', 'G3', 'G4', 'G5', 'G6', 'G7', 'G8', 'G9', 'G10', 'G11', 'G12', 'G13'))
3 y坐标的文字设置和间隔设置
plt.yticks(np.arange(0, 81, 20)) #0到81 间隔20

plt.ylabel('Scores')
4 开始绘制主题条形图
Bottom = (52, 49, 48, 47, 44, 43, 41, 41, 40, 38, 36, 31, 29)

Center = (38, 40, 45, 42, 48, 51, 53, 54, 57, 59, 57, 64, 62)

Top = (10, 11, 7, 11, 8, 6, 6, 5, 3, 3, 7, 5, 9)

d = []

for i in range(0, len(Bottom)):

    sum = Bottom[i] + Center[i]

    d.append(sum)

width = 0.35  # 设置条形图一个长条的宽度

p1 = plt.bar(ind, Bottom, width, color='blue')

p2 = plt.bar(ind, Center, width, bottom=Bottom,color='green')  #在p1的基础上绘制,底部数据就是p1的数据

p3 = plt.bar(ind, Top, width, bottom=d,color='red')    #在p1和p2的基础上绘制,底部数据就是p1和p2
5 设置legend区分三部分数据
plt.legend((p1[0], p2[0], p3[0]), ('Bottom', 'Center', 'Top'),loc = 3) #loc=3 表示lower left 也就是底部最左
loc的设置参数
'best'         : 0, (only implemented for axes legends)(自适应方式)

'upper right'  : 1,

'upper left'   : 2,

'lower left'   : 3,

'lower right'  : 4,

'right'        : 5,

'center left'  : 6,

'center right' : 7,

'lower center' : 8,

'upper center' : 9,

'center'       : 10,
6 绘制出图形
plt.show()
7 最终代码为:
import numpy as np

import matplotlib.pyplot as plt

plt.title('Scores by group and gender')

N = 13

ind = np.arange(N)  #[ 0  1  2  3  4  5  6  7  8  9 10 11 12]

plt.xticks(ind, ('G1', 'G2', 'G3', 'G4', 'G5', 'G6', 'G7', 'G8', 'G9', 'G10', 'G11', 'G12', 'G13'))

plt.ylabel('Scores')

plt.yticks(np.arange(0, 81, 20))

Bottom = (52, 49, 48, 47, 44, 43, 41, 41, 40, 38, 36, 31, 29)

Center = (38, 40, 45, 42, 48, 51, 53, 54, 57, 59, 57, 64, 62)

Top = (10, 11, 7, 11, 8, 6, 6, 5, 3, 3, 7, 5, 9)

d = []

for i in range(0, len(Bottom)):

    sum = Bottom[i] + Center[i]

    d.append(sum)

width = 0.35  # 设置条形图一个长条的宽度

p1 = plt.bar(ind, Bottom, width, color='blue')

p2 = plt.bar(ind, Center, width, bottom=Bottom,color='green')

p3 = plt.bar(ind, Top, width, bottom=d,color='red')

plt.legend((p1[0], p2[0], p3[0]), ('Bottom', 'Center', 'Top'),loc = 3)

plt.show()
python之 matplotlib模块之绘制堆叠柱状图的更多相关文章
- Python使用matplotlib模块绘制多条折线图、散点图
用matplotlib模块 #!usr/bin/env python #encoding:utf-8 ''' __Author__:沂水寒城 功能:折线图.散点图测试 ''' import rando ...
- python之 matplotlib模块之基本三图形(直线,曲线,直方图,饼图)
matplotlib模块是python中一个强大的绘图模块 安装 pip install matplotlib 首先我们来画一个简单的图来感受它的神奇 import numpy as np impo ...
- 为python安装matplotlib模块
matplotlib是python中强大的画图模块. 首先确保已经安装python,然后用pip来安装matplotlib模块. 进入到cmd窗口下,执行python -m pip install - ...
- Python中matplotlib模块解析
用Matplotlib绘制二维图像的最简单方法是: 1. 导入模块 导入matplotlib的子模块 import matplotlib.pyplot as plt import numpy as ...
- Python之matplotlib模块安装
numpy 1.下载安装 源代码 http://sourceforge.net/projects/numpy/files/NumPy/ 安装 python2.7 setup.py install 2. ...
- python: 使用matplotlib的pyplot绘制图表
工作中需要观察数据的变化趋势,用python写了一段小程序来用显示简单图表,分享出来方便有同样需求的人,matplotlib是个很不错的库. #!encode=utf8 from matplotlib ...
- Python的matplotlib模块的使用-Github仓库
import matplotlib.pyplot as plt import numpy as np import requests url='https://api.github.com/searc ...
- Python 使用matplotlib模块模拟掷骰子
掷骰子 骰子类 # die.py 骰子类模块 from random import randint class Die(): """骰子类""&quo ...
- python导入matplotlib模块出错
我的系统是linux mint.用新立得软件包安装了numpy和matplotlib.在导入matplotlib.pyplot时出错.说是没有python3-tk包. 于是就在shell中装了一下. ...
随机推荐
- 晋江年下文爬取【xpath】
''' @Modify Time @Author 目标:晋江年下文 爬取6页 ------------ ------- http://www.jjwxc.net/search.php?kw=%C4%E ...
- PB TB级数据
Byte.KB.MB.GB.TB.PB.EB.ZB.YB. 1KB=1000B1MB=1000KB1GB=1000MB1TB=1000GB 1TB=240B=1024MB 1PB=250B k M G ...
- Codeforecs Round #425 D Misha, Grisha and Underground (倍增LCA)
D. Misha, Grisha and Underground time limit per test 2 seconds memory limit per test 256 megabytes i ...
- Linux之虚拟机里的REHL7的IP
RHEL7最小化安装之后(桥接模式),我们查看本机IP, ip addr ifconfig 我们要修改配置文件 找到目录 找到文件,用vi编辑器打开修改配置文件 保存退出后,需要重启网络服务 只有我们 ...
- flutter输入颜色枚举卡顿假死
AndroidStudio 3.3.2 遇到 flutter输入颜色枚举卡顿假死,目前没好的解决方案,可以设置显示时间或者关闭popup窗口显示文档,这样就不会卡顿了 下面示例代码在输入 Colors ...
- 术语-BLOB:BLOB
ylbtech-术语-Blob:Blob 计算机视觉中的Blob是指图像中的一块连通区域,Blob分析就是对前景/背景分离后的二值图像,进行连通域提取和标记.标记完成的每一个Blob都代表一个前景目标 ...
- Python 操作 mongodb 亿级数据量使用 Bloomfilter 高效率判断唯一性 例子
工作需要使用 python 处理 mongodb 数据库两亿数据量去重复,需要在大数据量下快速判断数据是否存在 参考资料:https://segmentfault.com/q/101000000061 ...
- Bootstrap 学习笔记8 下拉菜单滚动监听
代码部分: <nav class="navbar navbar-default"> <a href="#" class="navba ...
- 机器学习实战笔记-2-kNN近邻算法
# k-近邻算法(kNN) 本质是(提取样本集中特征最相似数据(最近邻)的k个分类标签). K-近邻算法的优缺点 例 优点:精度高,对异常值不敏感,无数据输入假定: 缺点:计算复杂度高,空间复杂度高: ...
- Run Your Tensorflow Deep Learning Models on Google AI
People commonly tend to put much effort on hyperparameter tuning and training while using Tensoflow& ...