002.OpenShift安装与部署
一 前置条件说明
1.1 安装准备概述
- 第一种方法使用快速安装程序,可用于简单的集群设置。
- 第二种方法是较为精细的安装方式,并使用Ansible playbook来自动化该过程。
1.2 节点准备
二 实验一:前置条件操作
2.1 环境准备
2.2 安装Ansible
2.3 验证Ansible
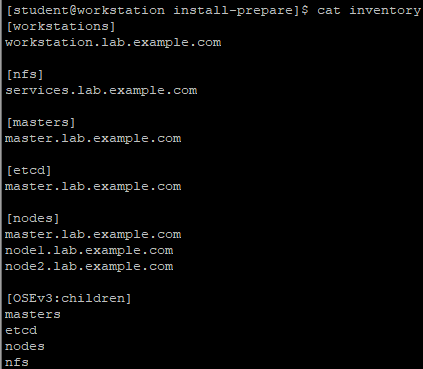
- workstations:为developer节点,即运行playbook的节点;
- nfs:为集群存储提供nfs服务的环境中的vm;
- masters:OpenShift集群中用作master角色的节点;
- etcd:用于OpenShift集群的etcd服务的节点,本环境中使用master节点;
- node:OpenShift集群中的node节点;
- OSEv3:组成OpenShift集群的所有接待,包括master、etcd、node或nfs组中的节点。
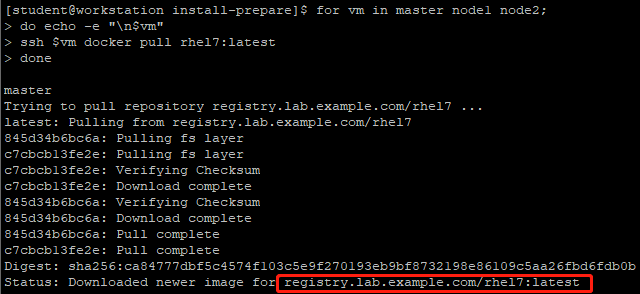
2.4 检查节点连通性
  1 ---

  2 - name: Verify Connectivity

  3   hosts: all

  4   gather_facts: no

  5   tasks:

  6     - name: "Test connectivity to machines."

  7       shell: "whoami"

  8       changed_when: false
[student@workstation install-prepare]$ ansible-playbook -v ping.yml
2.5 确认yml

  1 ---

  2 - block:

  3   - name: Customize default /etc/sysconfig/docker-storage-setup

  4     template:

  5       src: docker-storage-setup

  6       dest: /etc/sysconfig/docker-storage-setup

  7       owner: root

  8       group: root

  9       mode: 0644

 10     when: not use_overlay2_driver

 11   - name: Customize /etc/sysconfig/docker-storage-setup using overlay2 storage driver

 12     template:

 13       src: docker-storage-setup-overlay2

 14       dest: /etc/sysconfig/docker-storage-setup

 15       owner: root

 16       group: root

 17       mode: 0644

 18     when: use_overlay2_driver

 19   - name: Verify existence of /dev/docker-vg/docker-pool

 20     stat:

 21       path: /dev/docker-vg/docker-pool

 22     register: p

 23   - name: Stop docker

 24     service:

 25       name: docker

 26       state: stopped

 27     when: p.stat.exists == False

 28   - name: Remove loopback docker files

 29     file:

 30       dest: /var/lib/docker

 31       state: absent

 32     when: p.stat.exists == False

 33   - name: Run docker-storage-setup

 34     command: /usr/bin/docker-storage-setup

 35     when: p.stat.exists == False

 36   - name: Start and enable docker

 37     service:

 38       name: docker

 39       state: started

 40     when: p.stat.exists == False

 41   when: docker_storage_device is defined

 42
[student@workstation install-prepare]$ cat roles/docker-storage/templates/docker-storage-setup
  1 DEVS={{ docker_storage_device }}

  2 VG=docker-vg

  3 SETUP_LVM_THIN_POOL=yes
docker-registry-cert内容如下,该role定义相关docker的使用私有仓库,并且导入了相关crt证书。
  1 ---

  2 - name: Enable the Trust

  3   shell: update-ca-trust enable

  4 - name:  Retrieve the certificate

  5   fetch:

  6     src: "{{ cacert }}"

  7     dest: "{{ local_destination }}"

  8   delegate_to: "{{ registry_host }}"

  9 - name:  Copy the certificate

 10   copy:

 11     src: "{{ source }}"

 12     dest: "{{ destination }}"

 13     owner: root

 14     group: root

 15     mode: 0755

 16 - name: Update the Trust

 17   shell: update-ca-trust extract

 18 - name: Restart Docker

 19   service:

 20     name: docker

 21     state: restarted

 22
[student@workstation install-prepare]$ cat roles/docker-registry-cert/vars/main.yml
  1 registry_host: services.lab.example.com

  2 cacert: /etc/pki/tls/certs/example.com.crt

  3 local_destination: /tmp/

  4 source: "/tmp/{{ ansible_fqdn }}/etc/pki/tls/certs/example.com.crt"

  5 destination: /etc/pki/ca-trust/source/anchors/example.com.crt
openshift-node内容如下,该role定义相关安装OpenShift所需的所有依赖包任务。
  1 ---

  2 dependencies:

  3   - { role: docker }
[student@workstation install-prepare]$ cat roles/openshift-node/tasks/main.yml
  1 ---

  2 - name: Deploy ssh key to root at all nodes

  3   authorized_key:

  4     user: root

  5     key: "{{ item }}"

  6   with_file:

  7     - id_rsa.pub

  8 - name: Install required packages

  9   yum:

 10     name: "{{ item }}"

 11     state: latest

 12   with_items:

 13     - wget

 14     - git

 15     - net-tools

 16     - bind-utils

 17     - iptables-services

 18     - bridge-utils

 19     - bash-completion

 20     - kexec-tools

 21     - sos

 22     - psacct

 23     - atomic-openshift-clients

 24     - atomic-openshift-utils

 25     - atomic-openshift

 26
2.6 运行playbook

- 在每个节点上安装并运行Docker;
- 在每个节点上Docker使用一个逻辑卷存储;
- 每个节点使用自签名证书信任私有Docker仓库;
- 在每个节点上都会安装基本包。
2.7 确认验证
三 正式安装说明
3.1 安装步骤
- 编写一个目录文件来描述所需的集群特性和体系结构;
- 执行prerequisites.yml的playbook;
- 执行deploy_cluster,yml的playbook;
- 验证安装。
3.2 安装和配置节点
- 安装所需版本的OpenShift容器平台;
- 用户使用htpasswd身份验证对集群进行身份验证;
- DNS条目apps.lab.example.com用作OpenShift应用程序的子域;
- NFS存储用于OpenShift etcd服务和OpenShift 内部仓库;
- classroom container registry用作仓库。
- 一个内部容器仓库;
- Gluster、Ceph等以便于提供持久性存储;
- 集群日志;
- 自定义集群证书。
3.3 配置OpenShift版本
3.4 配置验证
- HTTP Basic,外部单点登录(SSO)系统;
- 使用GitHub和GitLab帐号;
- OpenID连接,使用OpenID-compatible SSO和谷歌帐户;
- OpenStack Keystone v3;
- LDAP v3服务器。
3.5 配置htpasswd验证
  1 openshift_master_identity_providers。

  2 openshift_master_identity_providers=[{'name': 'htpasswd_auth', 'login': 'true',

  3 'challenge': 'true', 'kind': 'HTPasswdPasswordIdentityProvider',	#配置后端驱动

  4 'filename': '/etc/origin/master/htpasswd'}]				#制定master主机上
  1 [student@workstation ~]$ htpasswd -nb admin redhat

  2 [student@workstation ~]$ openssl passwd -apr1 redhat
3.6 网络要求
3.7 master服务端口
四 配置持久化存储
4.1 持久存储配置
4.2 container仓库
  1 openshift_hosted_registry_storage_kind=nfs

  2 openshift_hosted_registry_storage_nfs_directory=/exports

  3 openshift_hosted_registry_storage_volume_name=registry

  4 openshift_hosted_registry_storage_nfs_options='*(rw,root_squash)'

  5 openshift_hosted_registry_storage_volume_size=40G

  6 openshift_hosted_registry_storage_access_modes=['ReadWriteMany']
4.3 OpenShift Ansible Broker
  1 openshift_hosted_etcd_storage_kind=nfs

  2 openshift_hosted_etcd_storage_nfs_directory=/exports

  3 openshift_hosted_etcd_storage_volume_name=etcd-vol2

  4 openshift_hosted_etcd_storage_nfs_options="*(rw,root_squash,sync,no_wdelay)"

  5 openshift_hosted_etcd_storage_volume_size=1G

  6 openshift_hosted_etcd_storage_access_modes=["ReadWriteOnce"]

  7 openshift_hosted_etcd_storage_labels={'storage': 'etcd'}
五 OpenShift其他配置
5.1 配置离线本地registry
  1 #Modifications Needed for a Disconnected Install

  2 oreg_url=registry.lab.example.com/openshift3/ose-${component}:${version}

  3 #可访问image仓库的位置,必须以ose-${component}:${version}结尾。

  4 openshift_examples_modify_imagestreams=true

  5 #OpenShift安装了用于部署示例应用程序的模板。这个变量指示playbook修改所有示例的IS,使其指向私有仓库,而不是registry.access.redhat.com。

  6 openshift_docker_additional_registries=registry.lab.example.com

  7 #此变量用于将本地可访问仓库添加到每个节点上的docker配置中。

  8 openshift_docker_blocked_registries=registry.access.redhat.com,docker.io

  9 #此变量用于在OpenShift节点上配置docker的blocked_registries。
  1 #Image Prefix Modifications

  2 openshift_web_console_prefix=registry.lab.example.com/openshift3/oseopenshift_cockpit_deployer_prefix='registry.lab.example.com/openshift3/'

  3 openshift_service_catalog_image_prefix=registry.lab.example.com/openshift3/osetemplate_service_broker_prefix=registry.lab.example.com/openshift3/oseansible_service_broker_image_prefix=registry.lab.example.com/openshift3/oseansible_service_broker_etcd_image_prefix=registry.lab.example.com/rhel7/
5.2 配置NODE labels
  1 [nodes]

  2 ...output omitted...

  3 nodeX.example.com openshift_node_labels="{'zone':'west', 'gpu':'true'}"

  4 ...output omitted...
  1 [nodes]

  2 master.lab.example.com

  3 node1.lab.example.com openshift_node_labels="{'region':'infra'}"

  4 node2.lab.example.com
六 执行剧本
6.1 剧本说明
6.2 验证OpenShift
七 正式安装OpenShift
7.1 前置准备
7.2 安装atomic
7.3 创建Inventory
7.4 配置相关安装版本
  1 [student@workstation install-run]$ vi general_vars.txt

  2 #General Cluster Variables

  3 openshift_deployment_type=openshift-enterprise			#配置为openshift-enterprise版本

  4 openshift_release=v3.9						#配置版本为v3.9

  5 openshift_image_tag=v3.9.14

  6 openshift_disable_check=disk_availability,docker_storage,memory_availability	#禁用check
7.5 设置htpasswd认证
  1 [student@workstation install-run]$ openssl passwd -apr1 redhat

  2 $apr1$/d1L7fdX$duViLRE.JG012VkZDq8bs0

  3 [student@workstation install-run]$ openssl passwd -apr1 redhat

  4 $apr1$rUMMfQfD$J8CEqQK.YenyNwYwKN1lA1				#创建两个用户密码都为redhat

  5 [student@workstation install-run]$ vi authentication_vars.txt

  6 #Cluster Authentication Variables

  7 openshift_master_identity_providers=[{'name': 'htpasswd_auth', 'login': 'true', 'challenge': 'true', 'kind': 'HTPasswdPasswordIdentityProvider', 'filename': '/etc/origin/master/htpasswd'}]

  8 openshift_master_htpasswd_users={'admin':'$apr1$/d1L7fdX$duViLRE.JG012VkZDq8bs0', 'developer':'$apr1$rUMMfQfD$J8CEqQK.YenyNwYwKN1lA1'}
7.6 配置集群网络
  1 [student@workstation install-run]$ vi networking_vars.txt

  2 #OpenShift Networking Variables

  3 os_firewall_use_firewalld=true					#开启firewall防火墙

  4 openshift_master_api_port=443					#启用端口

  5 openshift_master_console_port=443				        #启用控制端口

  6 openshift_master_default_subdomain=apps.lab.example.com		#指定subdomain
7.7 配置NFS
  1 [student@workstation install-run]$ vi persistence_vars.txt

  2 #NFS is an unsupported configuration

  3 openshift_enable_unsupported_configurations=true

  4

  5 #OCR configuration variables

  6 openshift_hosted_registry_storage_kind=nfs

  7 openshift_hosted_registry_storage_access_modes=['ReadWriteMany']

  8 openshift_hosted_registry_storage_nfs_directory=/exports

  9 openshift_hosted_registry_storage_nfs_options='*(rw,root_squash)'

 10 openshift_hosted_registry_storage_volume_name=registry

 11 openshift_hosted_registry_storage_volume_size=40Gi

 12

 13 #OAB's etcd configuration variables

 14 openshift_hosted_etcd_storage_kind=nfs

 15 openshift_hosted_etcd_storage_nfs_options="*(rw,root_squash,sync,no_wdelay)"

 16 openshift_hosted_etcd_storage_nfs_directory=/exports

 17 openshift_hosted_etcd_storage_volume_name=etcd-vol2

 18 openshift_hosted_etcd_storage_access_modes=["ReadWriteOnce"]

 19 openshift_hosted_etcd_storage_volume_size=1G

 20 openshift_hosted_etcd_storage_labels={'storage': 'etcd'}
7.8 配置离线仓库
  1 #Modifications Needed for a Disconnected Install

  2 oreg_url=registry.lab.example.com/openshift3/ose-${component}:${version}	#添加内部仓库

  3 openshift_examples_modify_imagestreams=true					#修改IS

  4 openshift_docker_additional_registries=registry.lab.example.com		#内部仓库至docker配置

  5 openshift_docker_blocked_registries=registry.access.redhat.com,docker.io	#禁止外部官方仓库

  6 #Image Prefixes

  7 openshift_web_console_prefix=registry.lab.example.com/openshift3/ose-

  8 openshift_cockpit_deployer_prefix='registry.lab.example.com/openshift3/'

  9 openshift_service_catalog_image_prefix=registry.lab.example.com/openshift3/ose-

 10 template_service_broker_prefix=registry.lab.example.com/openshift3/ose-

 11 ansible_service_broker_image_prefix=registry.lab.example.com/openshift3/ose-

 12 ansible_service_broker_etcd_image_prefix=registry.lab.example.com/rhel7/
7.9 设置label
  1 ……

  2 [nodes]

  3 master.lab.example.com

  4 node1.lab.example.com openshift_node_labels="{'region':'infra', 'node-role.kubernetes.io/compute':'true'}"

  5 node2.lab.example.com openshift_node_labels="{'region':'infra', 'node-role.kubernetes.io/compute':'true'}"
7.10 合并并校对Inventory
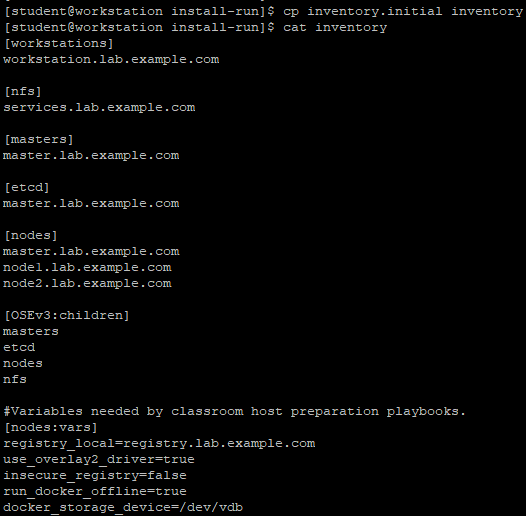
  1 [student@workstation install-run]$ cat general_vars.txt networking_vars.txt authentication_vars.txt persistence_vars.txt disconnected_vars.txt >> inventory

  2 [student@workstation install-run]$ lab install-run grade		#本环境提供检查Inventory的脚本

  3 [student@workstation install-run]$ cat inventory

  4 [workstations]

  5 workstation.lab.example.com

  6

  7 [nfs]

  8 services.lab.example.com

  9

 10 [masters]

 11 master.lab.example.com

 12

 13 [etcd]

 14 master.lab.example.com

 15

 16 [nodes]

 17 master.lab.example.com

 18 node1.lab.example.com openshift_node_labels="{'region':'infra', 'node-role.kubernetes.io/compute':'true'}"

 19 node2.lab.example.com openshift_node_labels="{'region':'infra', 'node-role.kubernetes.io/compute':'true'}"

 20

 21 [OSEv3:children]

 22 masters

 23 etcd

 24 nodes

 25 nfs

 26

 27 #Variables needed by classroom host preparation playbooks.

 28 [nodes:vars]

 29 registry_local=registry.lab.example.com

 30 use_overlay2_driver=true

 31 insecure_registry=false

 32 run_docker_offline=true

 33 docker_storage_device=/dev/vdb

 34

 35

 36 [OSEv3:vars]

 37 #General Cluster Variables

 38 openshift_deployment_type=openshift-enterprise

 39 openshift_release=v3.9

 40 openshift_image_tag=v3.9.14

 41 openshift_disable_check=disk_availability,docker_storage,memory_availability

 42 #OpenShift Networking Variables

 43 os_firewall_use_firewalld=true

 44 openshift_master_api_port=443

 45 openshift_master_console_port=443

 46 openshift_master_default_subdomain=apps.lab.example.com

 47 #Cluster Authentication Variables

 48 openshift_master_identity_providers=[{'name': 'htpasswd_auth', 'login': 'true', 'challenge': 'true', 'kind': 'HTPasswdPasswordIdentityProvider', 'filename': '/etc/origin/master/htpasswd'}]

 49 openshift_master_htpasswd_users={'admin':'$apr1$/d1L7fdX$duViLRE.JG012VkZDq8bs0', 'developer':'$apr1$rUMMfQfD$J8CEqQK.YenyNwYwKN1lA1'}

 50

 51 #NFS is an unsupported configuration

 52 openshift_enable_unsupported_configurations=true

 53

 54 #OCR configuration variables

 55 openshift_hosted_registry_storage_kind=nfs

 56 openshift_hosted_registry_storage_access_modes=['ReadWriteMany']

 57 openshift_hosted_registry_storage_nfs_directory=/exports

 58 openshift_hosted_registry_storage_nfs_options='*(rw,root_squash)'

 59 openshift_hosted_registry_storage_volume_name=registry

 60 openshift_hosted_registry_storage_volume_size=40Gi

 61

 62 #OAB's etcd configuration variables

 63 openshift_hosted_etcd_storage_kind=nfs

 64 openshift_hosted_etcd_storage_nfs_options="*(rw,root_squash,sync,no_wdelay)"

 65 openshift_hosted_etcd_storage_nfs_directory=/exports

 66 openshift_hosted_etcd_storage_volume_name=etcd-vol2

 67 openshift_hosted_etcd_storage_access_modes=["ReadWriteOnce"]

 68 openshift_hosted_etcd_storage_volume_size=1G

 69 openshift_hosted_etcd_storage_labels={'storage': 'etcd'}

 70

 71 #Modifications Needed for a Disconnected Install

 72 oreg_url=registry.lab.example.com/openshift3/ose-${component}:${version}

 73 openshift_examples_modify_imagestreams=true

 74 openshift_docker_additional_registries=registry.lab.example.com

 75 openshift_docker_blocked_registries=registry.access.redhat.com,docker.io

 76

 77 #Image Prefixes

 78 openshift_web_console_prefix=registry.lab.example.com/openshift3/ose-

 79 openshift_cockpit_deployer_prefix='registry.lab.example.com/openshift3/'

 80 openshift_service_catalog_image_prefix=registry.lab.example.com/openshift3/ose-

 81 template_service_broker_prefix=registry.lab.example.com/openshift3/ose-

 82 ansible_service_broker_image_prefix=registry.lab.example.com/openshift3/ose-

 83 ansible_service_broker_etcd_image_prefix=registry.lab.example.com/rhel7/
7.11 执行安装剧本

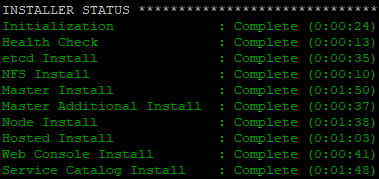
八 验证测试
8.1 确认验证说明
- 建议通过以下方式完整验证OpenShift:
- 检查所有OpenShift节点状态;
- 检查相应的OpenShift registry和router的pod;
- 使用OpenShift从源代码构建一个应用程序,OpenShift从构建结果生成容器image,并从该映像启动pod;
- 创建一个service,以便可以从内部容器网络和OpenShift节点访问应用程序;
- 创建一个route,以便可以从OpenShift集群外部的计算机访问应用程序。
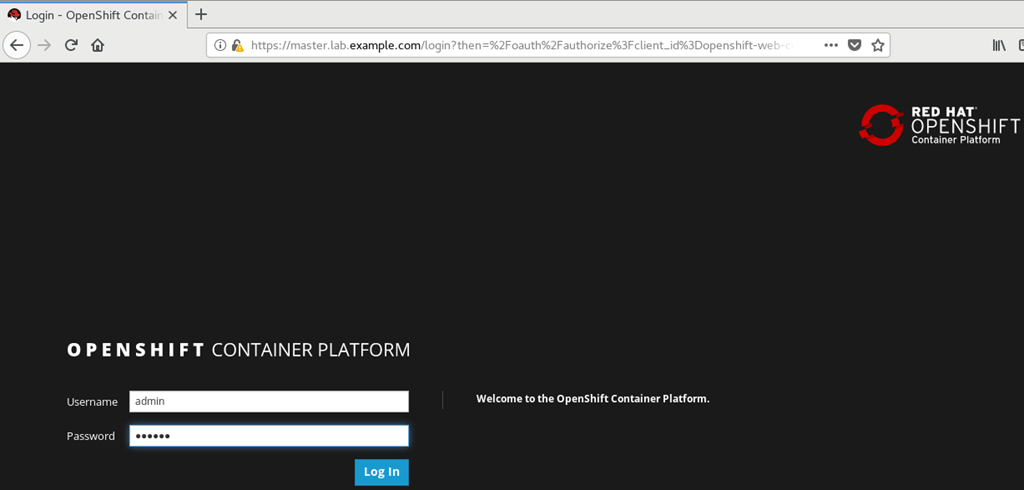
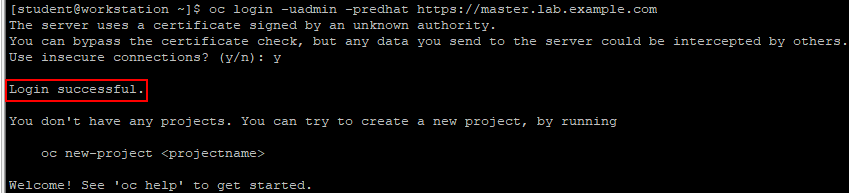
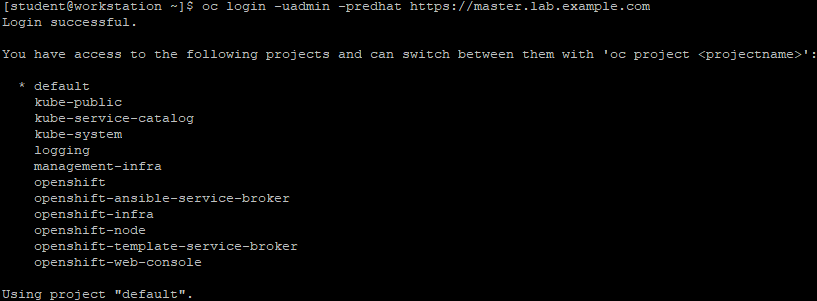
8.2 登录测试
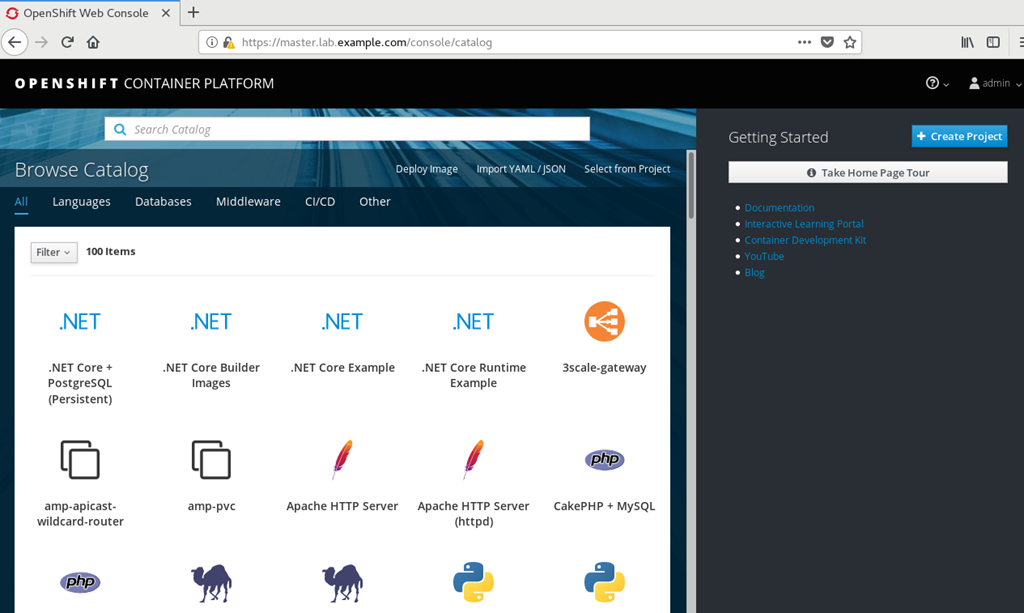
8.3 验证OpenShift功能
8.4 授予权限
8.5 查看节点状态
8.6 创建项目
8.7 创建应用
8.8 查看route
8.9 公开服务
8.10 测试服务
8.11 测试developer
002.OpenShift安装与部署的更多相关文章
- Flume1.9.0的安装、部署、简单应用(含分布式、与Hadoop3.1.2、Hbase1.4.9的案例)
目录 目录 前言 什么是Flume? Flume的特点 Flume的可靠性 Flume的可恢复性 Flume的一些核心概念 Flume的官方网站在哪里? Flume在哪里下载以及如何安装? 设置环境变 ...
- Windows Server 2012 虚拟化实战:SCVMM的安装和部署
本篇大概介绍一下在Windows Server 2012 R2上安装和部署SCVMM的过程及其注意事项.下图是我们数据中心SCVMM的基本架构,其中 SCVMM Database 是用于存储了所有配置 ...
- Linux下Redis的安装和部署
一.Redis介绍 Redis是当前比较热门的NOSQL系统之一,它是一个key-value存储系统.和Memcache类似,但很大程度补偿了Memcache的不足,它支持存储的value类型相对更多 ...
- 他山之石——vs2013 安装与部署及程序打包
C#打包需要这个:InstallShield 2013 Limited Edition for Visual Studio .下载地址: InstallShield 2013 Limited Edi ...
- 阿里云服务器Linux CentOS安装配置(六)resin多端口配置、安装、部署
阿里云服务器Linux CentOS安装配置(六)resin多端口配置.安装.部署 1.下载resin包 http://125.39.66.162/files/2183000003E08525/cau ...
- Kafka的安装和部署及测试
1.简介 大数据分析处理平台包括数据的接入,数据的存储,数据的处理,以及后面的展示或者应用.今天我们连说一下数据的接入,数据的接入目前比较普遍的是采用kafka将前面的数据通过消息的方式,以数据流的形 ...
- Redis的安装与部署
为了解决公司产品数据增长过快,初始化太耗费时间的问题,决定使用redis作为缓存服务器. Windows下的安装与部署: 可以直接参考这个文章,我也是实验了一遍:http://www.runoob.c ...
- Office web app server2013详细的安装和部署
转自:http://blog.csdn.net/u011355311/article/details/9360293 SharePoint 2013集成Office web apps server20 ...
- Lucene/Solr搜索引擎开发笔记 - 第2章 Solr安装与部署(Tomcat篇)
一.安装环境 图1-1 Tomcat和Solr的版本 我本机目前使用的Java版本为JDK 1.8,因为Solr 4.9要求Java版本为1.7+,请注意. 二.Solr部署到Tomcat流程 图1- ...
随机推荐
- 你确信 X-Forwarded-For 拿到的就是用户真实 IP 吗?
X-Forwarded-For 拿到的就是真实 IP 吗? 1.故事 在这个小节开始前,我先讲一个开发中的小故事,可以加深一下大家对这个字段的理解. 前段时间要做一个和风控相关的需求,需要拿到用户的 ...
- [PHP学习教程 - 日期/时间]001.月份第一天&最后一天(Month First Day & Last Day)
引言:在时间处理上,对于前/后台人性化的展示当前月份最大天数,这个是网站必须要处理的一个方面.但通常这一块会由第三方类库直接包装,这里我们做一个简单的Mark. 今天,我们就为大家提供一个函数,获得指 ...
- 创建执行线程方式三:实现Callable接口
Callable接口 ① Java 5.0 在 java.util.concurrent 提供了一个新的创建执行 线程的方式:Callable 接口② Callable 接口类似于 Runnable, ...
- CELF算法原理
影响力传播模型中的独立层叠模型(independent cascading model,IC模型),影响力传播过程中,种子的影响力具备子模性(submodularity),即种子的边际影响力增量会呈现 ...
- 学习scrapy框架爬小说
一.背景:近期学习python爬虫技术,感觉挺有趣.由于手动自制爬虫感觉效率低,了解到爬虫界有先进的工具可用,尝试学学scrapy爬虫框架的使用. 二.环境:centos7,python3.7,scr ...
- Rocket - devices - TLBusBypass
https://mp.weixin.qq.com/s/WviVHxlZvsNm8mea2VpfTw 简单介绍TLBusBypass的实现. 1. TLBypassNode TLBypassNode定义 ...
- Rocket - spec - RISC-V规范整理
https://mp.weixin.qq.com/s/xP8JRhkmgUQf0QRm3S2mjA 根据RISC-V规范整理的几个文档. 1. 原文链接 https://risc ...
- Java实现 LeetCode 775 全局倒置与局部倒置(分析题)
775. 全局倒置与局部倒置 数组 A 是 [0, 1, -, N - 1] 的一种排列,N 是数组 A 的长度.全局倒置指的是 i,j 满足 0 <= i < j < N 并且 A ...
- (Java实现) 最大团问题 部落卫队
首先介绍下最大团问题: 问题描述:给一个无向图G=(V,E) ,V是顶点集合,E是边集合.然后在这顶点集合中选取几个顶点,这几 个顶点任意两个之间都有边在E中.求最多可以选取的顶点个数.这几个顶点就构 ...
- Java实现 蓝桥杯VIP 算法训练 水仙花数
这道题有两个方法,第一个就相对来说通俗易懂 第二个可以用到Java的一些方法 public class 水仙花数1 { public static void main(String[] args) { ...