
abp(net core)+easyui+efcore实现仓储管理系统——出库管理之一(四十九)
abp(net core)+easyui+efcore实现仓储管理系统目录
abp(net core)+easyui+efcore实现仓储管理系统——EasyUI前端页面框架 (十八)
一.前言
出库单的功能。能学习了出库单管理之后,WMS的 最基本的功能算是完成了。当然一个成熟的WMS还包括了盘点,报表,策略规则,移库功能及与其他系统(ERP、TMS等)的接口,实现无缝集成,打破信息孤岛,让数据实时、准确和同步。
二、出库单的流程
1.一般情况下会有一个前置的OMS系统——即订单管理系统。主要功能之一是由客户填写订单。
2.客户把订单下第三方物流公司时,第三方物流公司会生成出货单推送到仓库时,系统会自动生成拣货单,理货员根据拣货单拣货,并制作出库单,然后打印标签,粘贴条码标签,分配托盘,核验条码标签,货物装箱,订舱出库,并在系统中对出库单进行审核通过。整个流程如下图。
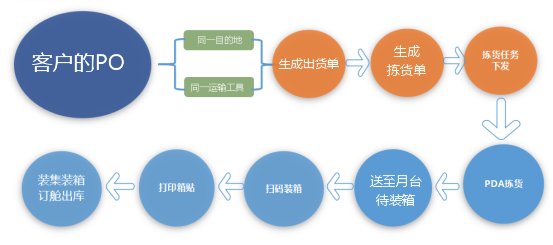
当然我们接下来要实现的出库单功能,没有这么复杂。
三、创建出库单实体
1. 做为一个出库单,在数据库中一般存在两张表,表头OutStockOrder,表体OutStockDetail
2.在Visual Studio 2017的“解决方案资源管理器”中,右键单击“ABP.TPLMS.Core”项目的“Entitys”文件夹,在弹出菜单中选择“添加” >
> “类”。 将类命名为 OutStockOrder,然后选择“添加”。
3.创建OutStockOrder类继承自Entity<int>,通过实现审计模块中的IHasCreationTime来实现保存创建时间。代码如下:
using Abp.Domain.Entities;

using Abp.Domain.Entities.Auditing;

using System;

using System.Collections.Generic;

using System.ComponentModel.DataAnnotations;

using System.Text;

 namespace ABP.TPLMS.Entitys

{

    public class OutStockOrder: Entity<int>, IHasCreationTime

    {

        public const int MaxLength = ;

        public OutStockOrder()

        {

            No = string.Empty;

            CustomerCode = string.Empty;

            CustomerName = string.Empty;

            WarehouseNo = string.Empty;

            DeliveryNo = string.Empty;

            TallyClerk = string.Empty;

            TallyTime = string.Empty;

            CreationTime = DateTime.Now;

            Oper = string.Empty;

            Checker = string.Empty;

            CheckTime = string.Empty;

            Gwt = ;

            Nwt = ;

            PackageQty = ;

            OwnerCode = string.Empty;

            OwnerName = string.Empty;

            Remark = string.Empty;

            Status = ;

            PreOutStockTime = string.Empty;

        }

        [StringLength()]

        [Required]

        public string No { get; set; }

        /// <summary>

        /// 客户名称

        /// </summary>

        [StringLength(MaxLength)]

        [Required]

        public string CustomerName { get; set; }

        /// <summary>

        /// 车牌号

        /// </summary>

        public string VehicleNo { get; set; }

        /// <summary>

        /// 客户代码

        /// </summary>

        [StringLength()]

        [Required]

        public string CustomerCode { get; set; }

        /// <summary>

        /// 收货人代码

        /// </summary>

        public string ConsigneeCode { get; set; }

        /// <summary>

        /// 收货人

        /// </summary>

        public string Consignee{get ;set;}

        /// <summary>

        /// 收货人社会信用代码

        /// </summary>

        public string ConsigneeSCCD { get; set; }

        /// <summary>

        /// 托运人,发货人

        /// </summary>

        public string Shipper { get; set; }

        /// <summary>

        /// 托运人,发货人代码

        /// </summary>

        public string ShipperCode { get; set; }

        /// <summary>

        /// 托运人,发货人社会信用代码

        /// </summary>

        public string ShipperSCCD { get; set; }

        /// <summary>

        /// 通知人

        /// </summary>

        public string Notify { get; set; }

        /// <summary>

        /// 通知人代码

        /// </summary>

        public string NotifyCode { get; set; }

        /// <summary>

        /// 通知人社会信用代码

        /// </summary>

        public string NotifySCCD { get; set; }

        /// <summary>

        /// 出货单号

        /// </summary>

        public string DeliveryNo { get; set; }

        /// <summary>

        /// 仓库号

        /// </summary>

        public string WarehouseNo { get; set; }

        /// <summary>

        /// 货主

        /// </summary>

        [StringLength(MaxLength)]

        [Required]

        public string OwnerName { get; set; }

        public decimal Gwt { get; set; }

        public decimal Nwt { get; set; }

        public int PackageQty { get; set; }

        /// <summary>

        /// 理货时间

        /// </summary>

        [StringLength()]

        public string TallyTime { get; set; }

        /// <summary>

        /// 理货员

        /// </summary>

        [StringLength()]

        public string TallyClerk { get; set; }

        [StringLength()]

        public string Oper { get; set; }

        public int Status { get; set; }

        [StringLength()]

        public string OwnerCode { get; set; }

        /// <summary>

        /// 预计出库时间

        /// </summary>

        [StringLength()]

        public string PreOutStockTime { get; set; }

        /// <summary>

        /// 审核人

        /// </summary>

        [StringLength()]

        public string Checker { get; set; }

        [StringLength()]

        public string CheckTime { get; set; }

        [StringLength()]

        public string Remark { get; set; }

        public DateTime CreationTime { get; set; }

        [StringLength()]

        public string LastUpdateTime { get; set; }

        [StringLength()]

        public string LastOper { get; set; }

    }

}
4. 重得第2,3步,我们在“ABP.TPLMS.Core”项目的“Entitys”文件夹,创建OutStockOrderDetail类。代码如下:
using Abp.Domain.Entities;

using Abp.Domain.Entities.Auditing;

using System;

using System.Collections.Generic;

using System.ComponentModel.DataAnnotations;

using System.ComponentModel.DataAnnotations.Schema;

using System.Text;

namespace ABP.TPLMS.Entitys

{

    public class OutStockOrderDetail : Entity<int>, IHasCreationTime

    {

        public const int MaxLength = ;

        public OutStockOrderDetail()

        {

            this.Qty = ;

            this.CargoCode = string.Empty;

            this.CargoName = string.Empty;

            this.Brand = string.Empty;

            this.Country = string.Empty;

            this.CreationTime = DateTime.Now;

            this.Curr = string.Empty;

            this.GrossWt = ;

            this.Height = ;

            this.HSCode = string.Empty;

            this.Length = ;

            this.SecdLawfQty = ;

            this.LawfQty = ;

            this.NetWt = ;

            this.Package = string.Empty;

            this.Price = ;

            this.Spcf = string.Empty;

            this.Unit = string.Empty;

            this.InStockNo = string.Empty;

            this.LawfUnit = string.Empty;

            this.Vol = ;

            this.Width = ;

            this.LawfUnit = string.Empty;

            this.SecdLawfUnit = string.Empty;

            this.Batch = string.Empty;

            this.InStockOrderDetailId = ;

        }

        public int SupplierId { get; set; }

        [MaxLength()]

        public string CargoCode { get; set; }

        [MaxLength()]

        public string HSCode { get; set; }

        [MaxLength(MaxLength)]

        public string CargoName { get; set; }

        [MaxLength(MaxLength)]

        public string Spcf { get; set; }

        [MaxLength()]

        public string Unit { get; set; }

        /// <summary>

        /// 目的国

        /// </summary>

        [MaxLength()]

        public string DestCountry { get; set; }

        /// <summary>

        /// 原产国

        /// </summary>

        [MaxLength()]

        public string Country { get; set; }

        [MaxLength()]

        public string Brand { get; set; }

        [MaxLength()]

        public string Curr { get; set; }

        [MaxLength()]

        public string Package { get; set; }

        public decimal Length { get; set; }

        public decimal Width { get; set; }

        public decimal Height { get; set; }

        public decimal Vol { get; set; }

        public decimal Price { get; set; }

        public decimal TotalAmt { get; set; }

        public decimal GrossWt { get; set; }

        public decimal NetWt { get; set; }

        public DateTime CreationTime { get; set; }

        [MaxLength()]

        public string InStockNo { get; set; }

        public int InStockOrderDetailId { get; set; }

        public decimal Qty { get; set; }

        public decimal LawfQty { get; set; }

        public decimal SecdLawfQty { get; set; }

        [MaxLength()]

        public string LawfUnit { get; set; }

        [MaxLength()]

        public string SecdLawfUnit { get; set; }

        [MaxLength()]

        public string Batch { get; set; }

        public string  Loc { get; set; }

    }

}
5.定义入库单的实体之后,我们去“ABP.TPLMS.EntityFrameworkCore”项目中的“TPLMSDbContext”类中定义实体对应的DbSet,以应用Code First 数据迁移。添加以下代码
using Microsoft.EntityFrameworkCore;

using Abp.Zero.EntityFrameworkCore;

using ABP.TPLMS.Authorization.Roles;

using ABP.TPLMS.Authorization.Users;

using ABP.TPLMS.MultiTenancy;

using ABP.TPLMS.Entitys;

namespace ABP.TPLMS.EntityFrameworkCore

{

    public class TPLMSDbContext : AbpZeroDbContext<Tenant, Role, User, TPLMSDbContext>

    {

        /* Define a DbSet for each entity of the application */

        public TPLMSDbContext(DbContextOptions<TPLMSDbContext> options)

            : base(options)

        {

        }

        public DbSet<Module> Modules { get; set; }

        public DbSet<Supplier> Suppliers { get; set; }

        public DbSet<Cargo> Cargos { get; set; }

        public DbSet<Org> Orgs { get; set; }

        public virtual DbSet<InStockOrder> InStockOrder { get; set; }

        public virtual DbSet<InStockOrderDetail> InStockOrderDetail { get; set; }

        public virtual DbSet<InStockOrderDetailLoc> InStockOrderDetailLoc { get; set; }

        public virtual DbSet<OutStockOrder> OutStockOrder { get; set; }

        public virtual DbSet<OutStockOrderDetail> OutStockOrderDetail { get; set; }

    }

}
6.从菜单中选择“工具->NuGet包管理器器—>程序包管理器控制台”菜单。
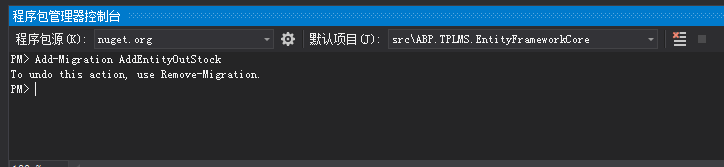
7. 在PMC中,默认项目选择EntityframeworkCore对应的项目后。输入以下命令:Add-Migration AddEntityOutStock,创建迁移。如下图。
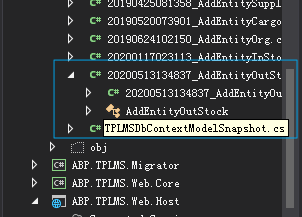
8. 在上面的命令执行完毕之后,创建成功后,会在Migrations文件夹下创建时间_AddEntityOutStock格式的类文件,这些代码是基于DbContext指定的模型。如下图。
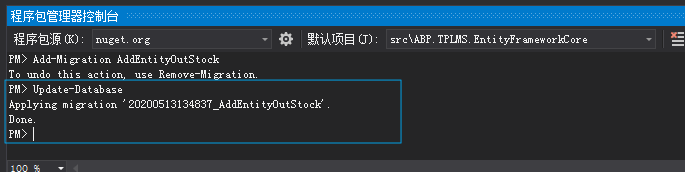
9.在程序包管理器控制台,输入Update-Database,回车执行迁移。执行成功后,如下图。
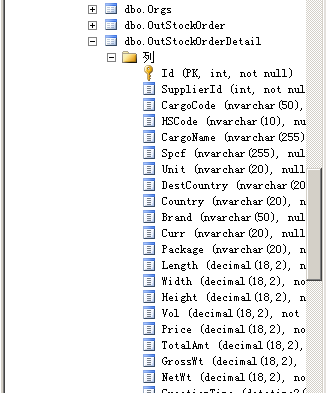
10. 在SQL Server Management Studio中查看数据库,OutStockOrder、OutStockOrderDetail两张表创建成功。
abp(net core)+easyui+efcore实现仓储管理系统——出库管理之一(四十九)的更多相关文章
- abp(net core)+easyui+efcore实现仓储管理系统——出库管理之三(五十二)
abp(net core)+easyui+efcore实现仓储管理系统目录 abp(net core)+easyui+efcore实现仓储管理系统--ABP总体介绍(一) abp(net core)+ ...
- abp(net core)+easyui+efcore实现仓储管理系统——出库管理之五(五十四)
abp(net core)+easyui+efcore实现仓储管理系统目录 abp(net core)+easyui+efcore实现仓储管理系统--ABP总体介绍(一) abp(net core)+ ...
- abp(net core)+easyui+efcore实现仓储管理系统——出库管理之六(五十五)
abp(net core)+easyui+efcore实现仓储管理系统目录 abp(net core)+easyui+efcore实现仓储管理系统--ABP总体介绍(一) abp(net core)+ ...
- Abp(net core)+easyui+efcore实现仓储管理系统——出库管理之七(五十六)
abp(net core)+easyui+efcore实现仓储管理系统目录 abp(net core)+easyui+efcore实现仓储管理系统--ABP总体介绍(一) abp(net core)+ ...
- abp(net core)+easyui+efcore实现仓储管理系统——出库管理之二(五十)
abp(net core)+easyui+efcore实现仓储管理系统目录 abp(net core)+easyui+efcore实现仓储管理系统--ABP总体介绍(一) abp(net core)+ ...
- abp(net core)+easyui+efcore实现仓储管理系统——出库管理之三(五十一)
abp(net core)+easyui+efcore实现仓储管理系统目录 abp(net core)+easyui+efcore实现仓储管理系统--ABP总体介绍(一) abp(net core)+ ...
- abp(net core)+easyui+efcore实现仓储管理系统——出库管理之四(五十三)
abp(net core)+easyui+efcore实现仓储管理系统目录 abp(net core)+easyui+efcore实现仓储管理系统--ABP总体介绍(一) abp(net core)+ ...
- Abp(net core)+easyui+efcore实现仓储管理系统——出库管理之八(五十七)
abp(net core)+easyui+efcore实现仓储管理系统目录 abp(net core)+easyui+efcore实现仓储管理系统--ABP总体介绍(一) abp(net core)+ ...
- abp(net core)+easyui+efcore实现仓储管理系统——入库管理之六(四十二)
abp(net core)+easyui+efcore实现仓储管理系统目录 abp(net core)+easyui+efcore实现仓储管理系统——ABP总体介绍(一) abp(net core)+ ...
随机推荐
- 面试被问为什么使用Spring Boot?答案好像没那么简单
面试官:项目中有使用Spring Boot吗? 小小白:用过. 面试官:说一下为什么要使用Spring Boot? 小小白:在使用Spring框架进行开发的过程中,需要配置很多Spring框架包的依赖 ...
- CSS的基础使用
一,css是什么? CSS全称为“层叠样式表” ,与HTML相辅相成,实现网页的排版布局与样式美化 二,CSS使用方式 1.行内样式/内联样式(单一页面中使用) 借助于style标签属性,为当前的标签 ...
- Oracle的pl/sql变量类型
pl/sql定义 sql是结构化查询语言.sql是不是一个编程语言?编程语言一般都能够声明变量,写条件判断,循环.sql不具备这些特征,所有sql不是一门编程语言.我们在实际的开发中,有这种需要,把s ...
- Spring官网阅读(十六)Spring中的数据绑定
文章目录 DataBinder UML类图 使用示例 源码分析 bind方法 doBind方法 applyPropertyValues方法 获取一个属性访问器 通过属性访问器直接set属性值 1.se ...
- 测试开发专题:spring-boot统一异常捕获
java异常介绍 异常时相对于return的一种退出机制,可以由系统触发,也可由程序通过throw语句触发,异常可以通过try/catch语句进行捕获并处理,如果没有捕获,则会导致程序退出并输出异常栈 ...
- Qt和JS的交互
参考文章:https://www.cnblogs.com/lgxZJ/archive/2017/12/31/8158132.html Qt和JavaScript的交互 Qt提供了对JS的良好支持,有两 ...
- 【Elasticsearch学习】文档搜索全过程
在ES执行分布式搜索时,分布式搜索操作需要分散到所有相关分片,若一个索引有3个主分片,每个主分片有一个副本分片,那么搜索请求会在这6个分片中随机选择3个分片,这3个分片有可能是主分片也可能是副本分片, ...
- python工业互联网应用实战1—SQL与ORM
从sql到ORM应该说也是编程体系逐步演化的结果,通过类和对象更好的组织开个过程中遇到的各种业务问题,面向对象的解耦和内聚作为一套有效的方法论,对于复杂的企业应用而言确实能够解决实践过程中很多问题. ...
- [hdu5396 Expression]区间DP
题意:给一个表达式,求所有的计算顺序产生的结果总和 思路:比较明显的区间dp,令dp[l][r]为闭区间[l,r]的所有可能的结果和,考虑最后一个符号的位置k,k必须在l,r之间,则l≤k<r, ...
- 【hdu1030】“坐标表示法”
http://acm.hdu.edu.cn/showproblem.php?pid=1030 算法:以顶点为原点,建立坐标系,一个数可以唯一对应一个三元组(x, y, z),从任意一个点出发走一步,刚 ...