
abp(net core)+easyui+efcore实现仓储管理系统——出库管理之五(五十四)
abp(net core)+easyui+efcore实现仓储管理系统目录
abp(net core)+easyui+efcore实现仓储管理系统——EasyUI前端页面框架 (十八)
在上一篇文章中我们已经实现了控制器的代码,在今天我们来实现前端页面的代码。
九、使用EasyUI创建出库单管理页面
1. 在Visual Studio 2017的“解决方案资源管理器”中,右键单击在领域层“ABP.TPLMS.Web.Mvc”项目中的Views目录。 选择“添加” > “新建文件夹”。并重命名为“OutStock”。
2. 在Visual Studio 2017的“解决方案资源管理器”中,鼠标右键单击“OutStock”文件夹,然后选择“添加” > “新建项…”。 在“添加新项-ABP.TPLMS.Web.Mvc”对话框中,选择“Razor视图”,并将名称命名为Index.cshmtl。
3.在Startup目录中找到PageNames.cs文件,在这个文件中添加OutStock定义。代码如下。
namespace ABP.TPLMS.Web.Startup

{

    public class PageNames

    {

        public const string Home = "Home";

        public const string About = "About";

        public const string Tenants = "Tenants";

        public const string Users = "Users";

        public const string Roles = "Roles";

        public const string Module = "Module";

        public const string Supplier = "Supplier";

        public const string Cargo = "Cargo";

        public const string Org = "Organization";

        public const string InStock = "InStockOrder";

        public const string OutStock = "OutStockOrder";

    }

}
4. 在我们刚才创建的Index.cshmtl文件中,编写如下代码:
@using ABP.TPLMS.Web.Startu

@{

    ViewData["Title"] = PageNames.OutStock;

}

@section scripts{

  <script src="~/view-resources/Views/OutStock/Index.js" asp-append-version="true"></script>

  <script src="~/lib/easyui-1.8/datagrid-detailview.js" asp-append-version="true"></script>

    <script type="text/javascript">

          $(function () {

            initable();

            init();

             reloaded();

           updOutSOInfo();

           showOutOdDialog();

           deleteOutSO();

              $('#box').tabs({

                width: 780,      //选项卡容器宽度

                height: 465,      //选项卡容器高度

                onSelect: function (title, index) {

                    var rcv = $("#RcvUpdate").val();

                }

            });

        });

    </script>

    }

    <div data-options="region:'center'" style="overflow: hidden;">

        <div id="containter" style="width: 1000px; height: auto; margin: 0px auto;">

            <!--toolbar-->

            <div style="margin-bottom:1px;font-weight:bold;">

                <a href="#" id="add" class="easyui-linkbutton" data-options="iconCls:'icon-add'"
style="width:100px; height:30px; ">创建</a>

                <a href="#" id="del" class="easyui-linkbutton" data-options="iconCls:'icon-remove'"
style="width:100px; height:30px; ">删除</a>

                <a href="#" id="edit" class="easyui-linkbutton" data-options="iconCls:'icon-edit'"
style="width:100px; height:30px; ">修改</a>

                <a href="#" id="submits" class="easyui-linkbutton" data-options="iconCls:'icon-ok'"
style="width:100px; height:30px; ">提交</a>

                <a href="#" id="reload" class="easyui-linkbutton" data-options="iconCls:'icon-reload'"
style="width:100px; height:30px; ">刷新</a>

            </div>

            <!--panel-->

            <div data-options="region:'center',split:false" style="height:500px;">

                <!--表格-->

                <table id="dgOutSO"></table>

            </div>

        </div>

    </div>

    <!---------------------------导入货物信息弹出窗体------------------------------------------->

    <div id="divImportCargo" class="easyui-dialog" closed="true" style="top:10px;" data-options="buttons: '#dlg-buttons-po'">

                <!--panel-->

                <div data-options="region:'center',split:false" style="height:460px;">

                    <!--表格-->

                    <table id="dgCargo"></table>

                </div>

    </div>

    <div id="dlg-buttons-po">

        <input type="submit" id="btnImportDO" value="导入" class="btn btn-primary" />

        <input type="submit" id="btnCancleDO" value="取消" class="btn btn-info" />

    </div>

    <!---------------------------新增修改出库单信息------------------------------------------->

    <div id="divAddUpdINO" class="easyui-dialog" closed="true" style="top:10px;" data-options="buttons: '#dlg-buttons'">

        <div id="box">

            <div title="出库单">

                <table>

                    <tr>

                        <td><input type="hidden" name="ID" id="IDUpdate" /></td>

                    </tr>

                    <tr>

                        <td>出库单号:</td>

                        <td><input type="text" id="UpdNO" name="UNO" class="form-control input-sm" /></td>

                        <td>预计出库日期:</td>

                        <td>

                            <input type="text" id="PreOutStockTimeUpd" name="UPreOutStockTime" class="form-control input-sm" />

                        </td>

                        <td> 状态:</td>

                        <td><input type="text" id="StatusUpdate" name="UStatus" class="form-control input-sm" value="0" /></td>

                    </tr>

                      <tr>

                        <td> 发货人:</td>

                        <td><input type="text" id="ShipperCodeUpdate" name="UShipperCode" class="form-control input-sm" /></td>

                        <td colspan="2">

                            <input type="text" id="ShipperUpdate" name="UShipper" class="form-control input-sm" />

                        </td>

                        <td>社会信用代码:</td>

                        <td>

                            <input type="text" id="ShipperSCCDUpdate" name="UShipperSCCD" class="form-control input-sm" />

                        </td>

                    </tr>

                    <tr>

                        <td> 收货人:</td>

                        <td><input type="text" id="ConsigneeCodeUpdate" name="UConsigneeCode" class="form-control input-sm" /></td>

                        <td colspan="2">

                            <input type="text" id="ConsigneeUpdate" name="UConsignee" class="form-control input-sm" />

                        </td>

                        <td>社会信用代码:</td>

                        <td>

                            <input type="text" id="ConsigneeSccdUpdate" name="UConsigneeSccd" class="form-control input-sm" />

                        </td>

                    </tr>

                     <tr>

                        <td> 通知人:</td>

                        <td><input type="text" id="NotifyCodeUpdate" name="UNotifyCode" class="form-control input-sm" /></td>

                        <td colspan="2">

                            <input type="text" id="NotifyUpdate" name="UNotify" class="form-control input-sm" />

                        </td>

                        <td>社会信用代码:</td>

                        <td>

                            <input type="text" id="NotifySCCDUpdate" name="UNotifySCCD" class="form-control input-sm" />

                        </td>

                    </tr>

                    <tr>

                        <td>理货员:</td>

                        <td> <input type="text" id="TallyClerkUpdate" name="UTallyClerk" class="form-control input-sm" /></td>

                        <td>理货开始时间:</td>

                        <td>

                            <input type="text" id="TallyTimeUpdate" name="UTallyTime" class="form-control input-sm" />

                        </td>

                        <td>理货结束时间:</td>

                        <td>

                            <input type="text" id="ETallyTimeUpdate" name="UETallyTime" class="form-control input-sm" />

                        </td>

                    </tr>

                    <tr>

                        <td>净重:</td>

                        <td> <input type="text" id="NwtUpdate" name="UNwt" class="form-control input-sm" value="0" /></td>

                        <td>毛重:</td>

                        <td>

                            <input type="text" id="GwtUpdate" name="UGwt" class="form-control input-sm" value="0" />

                        </td>

                         <td>件数:</td>

                        <td>

                            <input type="text" id="PackageQtyUpdate" name="UPackageQty" class="form-control input-sm" value="0" />

                        </td>

                    </tr>

                    <tr>

                        <td>仓库号:</td>

                        <td>

                            <input type="text" id="WarehouseNoUpdate" name="UWarehouseNo" class="form-control input-sm" />

                        </td>

                         <td>车牌号:</td>

                        <td>

                            <input type="text" id="VehicleNoUpdate" name="UVehicleNo" class="form-control input-sm" />

                        </td>

                        <td>核查时间:</td>

                        <td>

                            <input type="text" id="CheckTimeUpdate" name="UCheckTime" class="form-control input-sm" />

                        </td>

                    </tr>

                    <tr>

                        <td> 核查员:</td>

                        <td>

                            <input type="text" id="CheckerUpdate" name="UChecker" class="form-control input-sm" />

                        </td>

                        <td>操作员:</td>

                        <td>

                            <input type="text" id="OperUpdate" name="UOper" class="form-control input-sm" />

                        </td>

                        <td>创建时间:</td>

                        <td>

                            <input type="text" id="CreationTimeUpdate" name="UCreationTime" class="form-control input-sm" />

                        </td>

                    </tr>

                    <tr>

                        <td> 备注:</td>

                        <td colspan="5"><input type="text" id="RemarkUpdate" name="URemark" class="form-control input-sm" /></td>

                    </tr>

                </table>

            </div>

            <div title="出库单明细">

                <!--panel-->

                <div data-options="region:'center',split:false" style="height:400px;">

                    <!--表格-->

                    <table id="dgOutOD"></table>

                </div>

            </div>

        </div>

    </div>

    <div id="dlg-buttons">

        <input type="submit" id="btnSave" value="保存" class="btn btn-primary" />

        <input type="submit" id="btnSubmit" value="提交" class="btn btn-primary" />

        <input type="submit" id="btnCancle" value="取消" class="btn btn-info" />

    </div>
4. 在Visual Studio 2017的“解决方案资源管理器”中,找到领域层“ABP.TPLMS.Web.Mvc”项目中的wwwroot目录下的view-resources目录。使用鼠标右键单击此目录,在弹出菜单中选择“添加” > “新建文件夹”。并重命名为“OutStock”。
5. 在Visual Studio 2017的“解决方案资源管理器”中,鼠标右键单击“OutStock”文件夹,然后选择“添加” > “新建项…”。 在“添加新项-ABP.TPLMS.Web.Mvc”对话框中,选择“javascript文件”,并将名称命名为Index.js。
6. 在Index.js文件中,我们写入如下代码。
//-----------------------系统管理-->出库单管理------------------------------//

//刷新数据

function initable() {

    $("#dgOutSO").datagrid({

        url: "/OutStock/List",

        title: "出库单管理",

        pagination: true,

        pageSize: 10,

        pageList: [10, 20, 30],

        fit: true,

        fitColumns: false,

        loadMsg: "正在加载出库单信息...",

        nowarp: false,

        border: false,

        idField: "Id",

        sortName: "Id",

        sortOrder: "asc",

        frozenColumns: [[//冻结列

            { field: "ck", checkbox: true, align: "left", width: 50 }

        ]],

        columns: [[

            { title: "编号", field: "Id", width: 50, sortable: true },

            { title: "出库单号", field: "No", width: 100, sortable: true },

            {title: "状态", field: "Status", width: 50            },

            { title: '到货日期', field: 'ReceiveTime',  width: 100, align: 'center' },

            { title: "货主", field: "OwnerCode", width: 150, sortable: true },

            { title: "预计到货时间", field: "PreDeliveryTime", width: 150, sortable: false },

            { title: '客户', field: 'CustomerName', width: 60, align: 'center' },

            { title: '收货人',field: 'Oper', width: 100, align: 'center' },

            { title: '审核人',field: 'Checker', width: 120, align: 'center' },

            { title: '件数', field: 'PackageNum', width: 120, align: 'center' },

            { title: '创建时间', field: 'CreationTime', width: 100, align: 'center' }

        ]]

    });

}

function reloaded() {   //reload

    $("#reload").click(function () {

        //

        $('#dgOutSO').datagrid('reload');

    });}
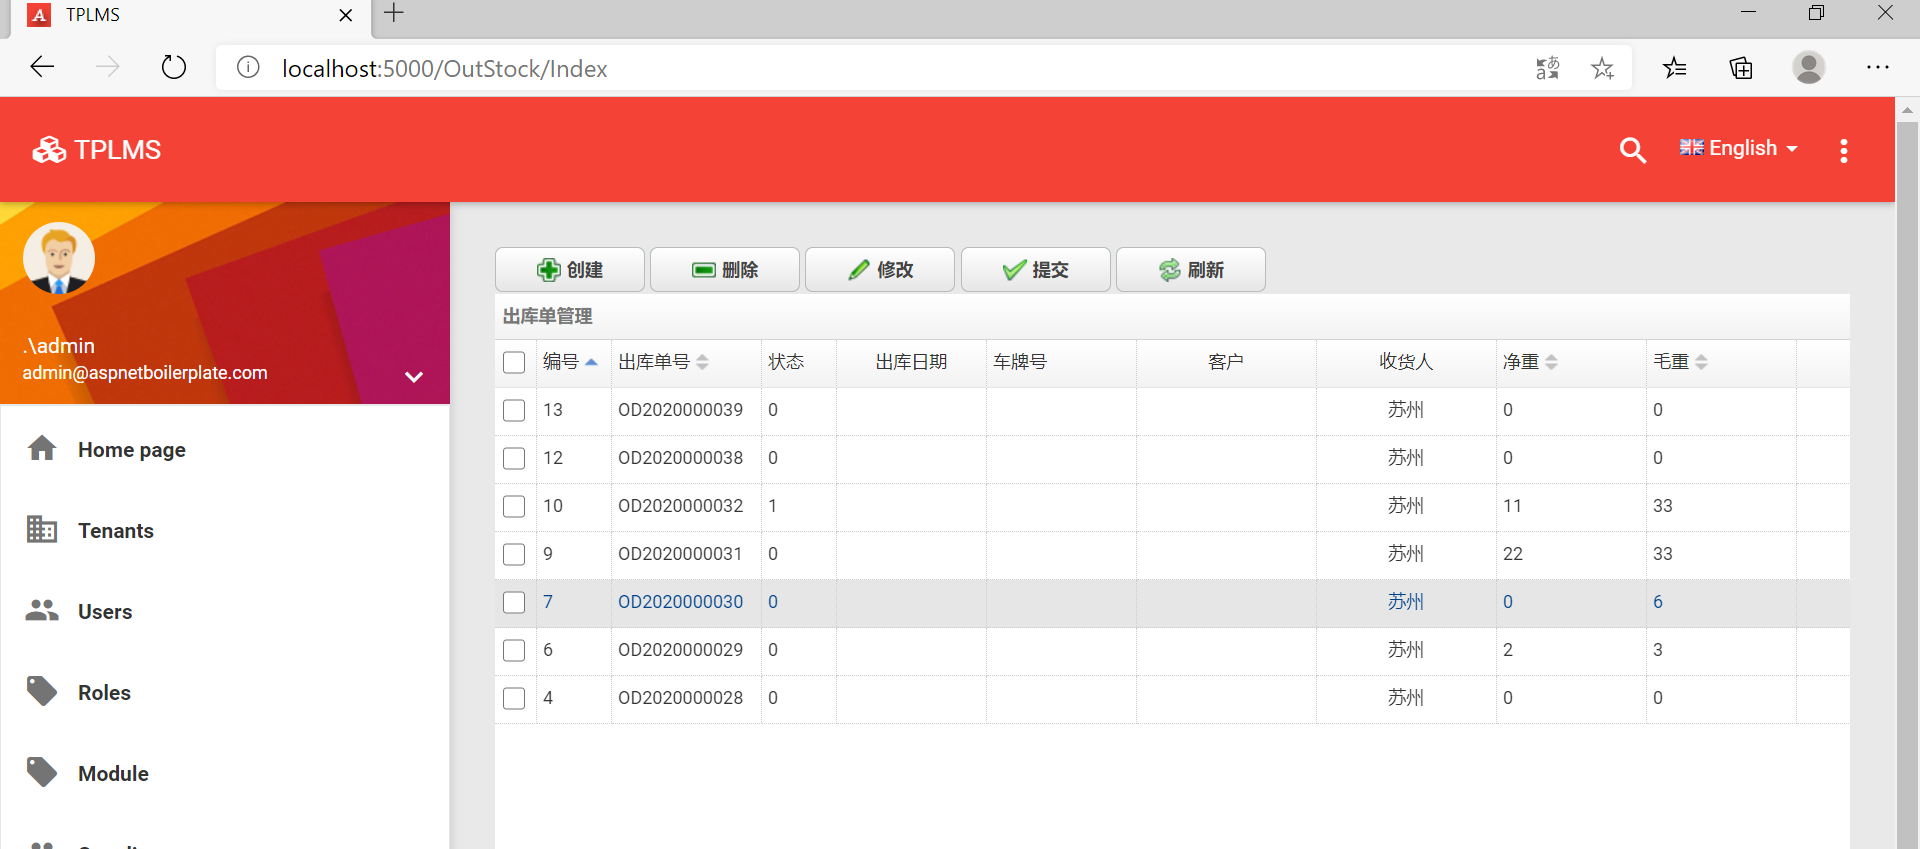
7. 在Visual Studio 2017中按F5运行应用程序。登录之后,点击“[出库管理]”菜单,我们可以看到出库单管理列表页面。如下图。
abp(net core)+easyui+efcore实现仓储管理系统——出库管理之五(五十四)的更多相关文章
- abp(net core)+easyui+efcore实现仓储管理系统——出库管理之六(五十五)
abp(net core)+easyui+efcore实现仓储管理系统目录 abp(net core)+easyui+efcore实现仓储管理系统--ABP总体介绍(一) abp(net core)+ ...
- Abp(net core)+easyui+efcore实现仓储管理系统——出库管理之七(五十六)
abp(net core)+easyui+efcore实现仓储管理系统目录 abp(net core)+easyui+efcore实现仓储管理系统--ABP总体介绍(一) abp(net core)+ ...
- abp(net core)+easyui+efcore实现仓储管理系统——出库管理之三(五十二)
abp(net core)+easyui+efcore实现仓储管理系统目录 abp(net core)+easyui+efcore实现仓储管理系统--ABP总体介绍(一) abp(net core)+ ...
- Abp(net core)+easyui+efcore实现仓储管理系统——出库管理之八(五十七)
abp(net core)+easyui+efcore实现仓储管理系统目录 abp(net core)+easyui+efcore实现仓储管理系统--ABP总体介绍(一) abp(net core)+ ...
- abp(net core)+easyui+efcore实现仓储管理系统——出库管理之四(五十三)
abp(net core)+easyui+efcore实现仓储管理系统目录 abp(net core)+easyui+efcore实现仓储管理系统--ABP总体介绍(一) abp(net core)+ ...
- abp(net core)+easyui+efcore实现仓储管理系统——出库管理之三(五十一)
abp(net core)+easyui+efcore实现仓储管理系统目录 abp(net core)+easyui+efcore实现仓储管理系统--ABP总体介绍(一) abp(net core)+ ...
- abp(net core)+easyui+efcore实现仓储管理系统——出库管理之二(五十)
abp(net core)+easyui+efcore实现仓储管理系统目录 abp(net core)+easyui+efcore实现仓储管理系统--ABP总体介绍(一) abp(net core)+ ...
- abp(net core)+easyui+efcore实现仓储管理系统——使用 WEBAPI实现CURD (十四)
abp(net core)+easyui+efcore实现仓储管理系统目录 abp(net core)+easyui+efcore实现仓储管理系统——ABP总体介绍(一) abp(net core)+ ...
- abp(net core)+easyui+efcore实现仓储管理系统——出库管理之一(四十九)
abp(net core)+easyui+efcore实现仓储管理系统目录 abp(net core)+easyui+efcore实现仓储管理系统——ABP总体介绍(一) abp(net core)+ ...
随机推荐
- Java知识系统回顾整理01基础03变量08表达式
一.以 ; 结尾的一段代码,即为一个表达式 表达式是由变量.操作符以及方法调用所构成的结构.如下所示: int i = 5; System.out.println(5); 都是表达式 public c ...
- 利用rtklib处理GPS以及北斗数据详解
利用rtklib开源代码处理GPS以及北斗数据详解 在GNSS领域最基础的工作是这些GNSS系统的定位工作,对于绝大多数研究者,自己着手完成这些工作是一个"鸡肋":完全独立设计的话 ...
- 插头 dp
插头dp 洛谷 黑题板子? P5056 给出n×m的方格,有些格子不能铺线,其它格子必须铺,形成一个闭合回路.问有多少种铺法? 1.轮廓线 简单地说,轮廓线就是已决策格子和未决策格子的分界线: 2,插 ...
- 【记】《.net之美》之读书笔记(二) C#中的泛型
前言 上一篇读书笔记,很多小伙伴说这本书很不错,所以趁着国庆假期,继续我的读书之旅,来跟随书中作者一起温习并掌握第二章的内容吧. 一.理解泛型 1.为什么要使用泛型?-----通过使用泛型,可以极大地 ...
- python之线程了解部分
一.死锁(了解) 死锁产生的4个必要条件: 互斥:一个资源同一时刻只允许一个线程进行访问 占有未释放:一个线程占有资源,且没有释放资源 不可抢占:一个已经占有资源的线程无法抢占到其他线程拥有的资源 循 ...
- WGS-84 to Web mercator
function mercator_encrypt (wgsLat, wgsLon) { var x = wgsLon * 20037508.34 / 180.; var y = Math.l ...
- Linux_centOS_5.7_64下如何安装jdk1.8&mysql
本文主要介绍的是如何是Linux环境下安装JDK的,因为Linux环境下,很多时候也离不开Java的,下面笔者就和大家一起分享如何jdk1.8的过程吧. JDK安装 环境 操作系统:Centos7_6 ...
- 多测师讲解selenium—自动化测试课堂面试题总结—高级讲师肖sir
1.你有做过自动化?你用什么语言? python2.自动化中如何使用语言打开一个网址?浏览器,浏览器对应驱动,导入库,类,get,url3.在一个浏览器中打开多个窗口?open_windows dri ...
- day11 Pyhton学习
一.昨日内容回顾 函数的进阶 动态传参 *args : 位置参数的动态传参 **kwargs: 关键字参数的动态传参 形参:聚合 实参:打散 顺序:位置参数>*args >默认值 > ...
- 界面酷炫,功能强大!这款 Linux 性能实时监控工具超好用!
对于维护.管理Linux系统来说,它的性能监控非常重要,特别是实时监控数据,这个数据有利于我们判断服务器的负载压力,及时调整资源调配,也有助于更好的服务于业务.所以,今天民工哥给大家安利一款 Linu ...