
【源码解析】Flink 是如何处理迟到数据
相信会看到这篇文章的都对Flink的时间类型(事件时间、处理时间、摄入时间)和Watermark有些了解,当然不了解可以先看下官网的介绍:https://ci.apache.org/projects/flink/flink-docs-master/dev/event_time.html
这里就会有这样一个问题:FLink 是怎么基于事件时间和Watermark处理迟到数据的呢?
在回答这个问题之前,建议大家可以看下下面的Google 的三篇论文,关于流处理的模型:
https://www.vldb.org/pvldb/vol8/p1792-Akidau.pdf 《The Dataflow Model: A Practical Approach to Balancing Correctness, Latency, and Cost in Massive-Scale, Unbounded, Out-of-Order Data Processing》
high-level的现代数据处理概念指引:
https://www.oreilly.com/ideas/the-world-beyond-batch-streaming-101
https://www.oreilly.com/ideas/the-world-beyond-batch-streaming-102
---------------------------进入正题--------------------------------
现在进入正题:FLink 是怎么基于事件时间和Watermark处理迟到数据的呢?
这个问题可以分成两个部分:
  1. 基于事件时间创建Timestamp 和Watermark(后面会详细介绍)

  2. 处理迟到数据
1. 基于事件时间创建Timestamp 和Watermark
为了方便查看,这里使用 assignTimestampsAndWatermarks(assigner: AssignerWithPeriodicWatermarks[T]): DataStream[T] 重载方法基于每个事件生成水印代码如下:
val input = env.addSource(source)

      .map(json => {

        // json : {"id" : 0, "createTime" : "2019-08-24 11:13:14.942", "amt" : "9.8"}

        val id = json.get("id").asText()

        val createTime = json.get("createTime").asText()

        val amt = json.get("amt").asText()

        LateDataEvent("key", id, createTime, amt)

      })

      // assign watermarks every event

      .assignTimestampsAndWatermarks(new AssignerWithPunctuatedWatermarks[LateDataEvent]() {

      // check extractTimestamp emitted watermark is non-null and large than previously

      override def checkAndGetNextWatermark(lastElement: LateDataEvent, extractedTimestamp: Long): Watermark = {

        new Watermark(extractedTimestamp)

      }

      // generate next watermark

      override def extractTimestamp(element: LateDataEvent, previousElementTimestamp: Long): Long = {

        val eventTime = sdf.parse(element.createTime).getTime

        eventTime

      }

    })
```
扩展:数据在算子中是以StreamRecord 对象作为流转抽象结构如下:
public final class StreamRecord<T> extends StreamElement {

    /** The actual value held by this record.  具体数据*/

    private T value;

    /** The timestamp of the record.  该数据对应的时间戳 */

    private long timestamp;

}
StreamElement 也是 Watermark 和 StreamStatus的父类,简单来说就是Flink 承载消息的基类(这里可以指定,Watermark 是和事件一个级别的抽象,而Timestamp 是Watermark和事件的成员变量,代表Watermark和事件的时间)
```
assignTimestampsAndWatermarks 是基于事件的数据(extractTimestamp 方法中返回的Timestamp),替换StreamRecord 对象中的Timestamp和发出新的Watermark(如果当前事件的Timestamp 生成的Watermark大于上一次的Watermark)
下面我们来debug这部分源码:
首先在extractTimestamp 方法中添加断点查看Timestamp 和Watermark的生成:
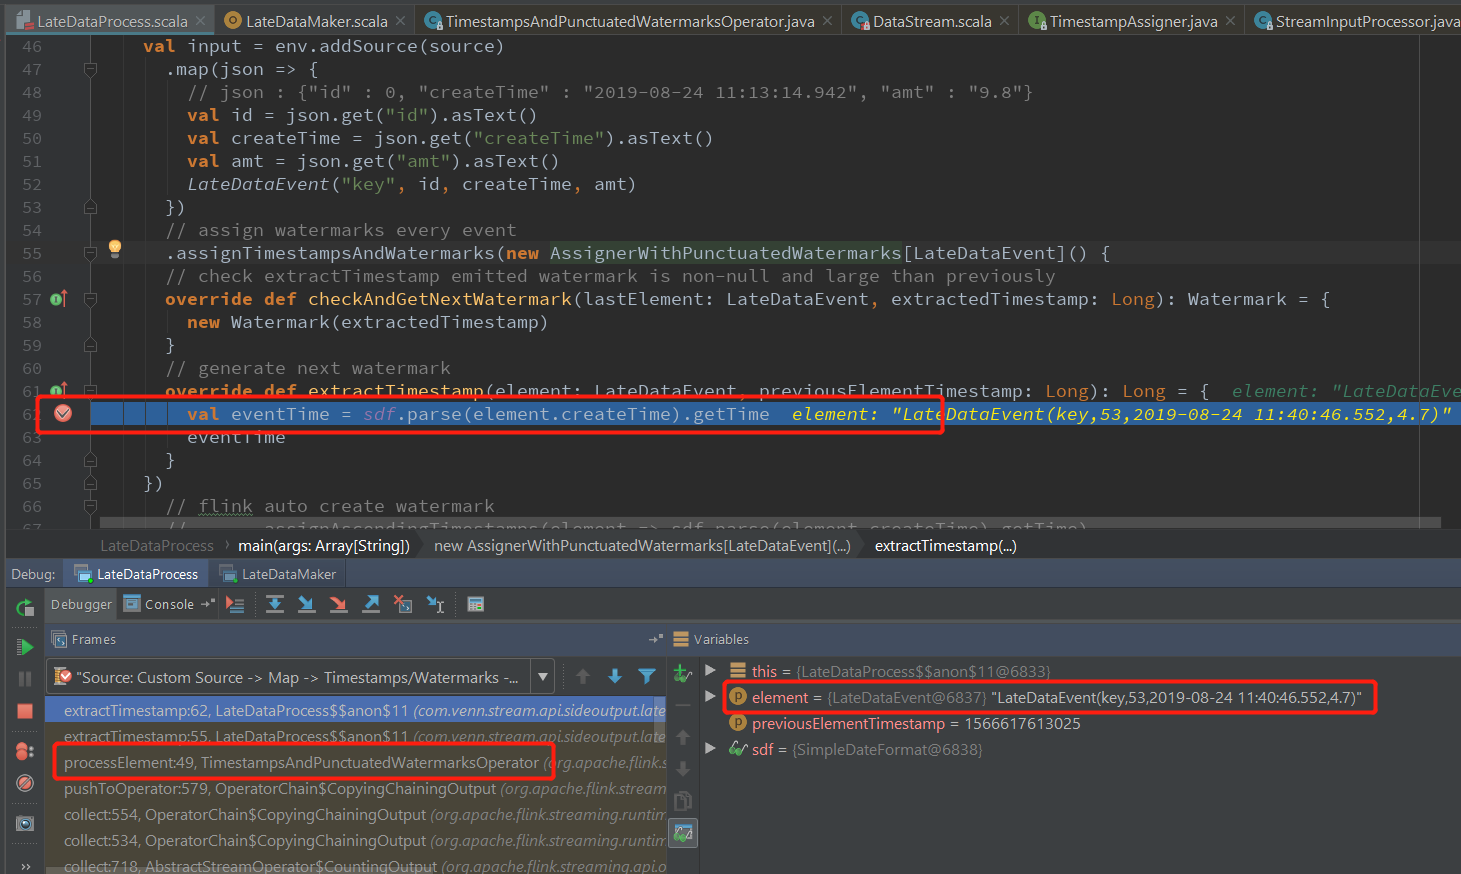
TimestampsAndPunctuatedWatermarksOperator.processElement(使用的类取决于assignTimestampsAndWatermarks 方法的参数) 中处理事件的Timestamp和对应的Watermark

StreamRecord对象的创建在 StreamSourceContexts.processAndCollectWithTimestamp 中,使用的Timestamp 是数据在kafka的时间,在KafkaFetcher.emitRecord方法中从consumerRecord中获取:
KafkaFetcher.emitRecord 发出从kafka中消费到的数据:
protected void emitRecord(

        T record,

        KafkaTopicPartitionState<TopicPartition> partition,

        long offset,

        ConsumerRecord<?, ?> consumerRecord) throws Exception {

        emitRecordWithTimestamp(record, partition, offset, consumerRecord.timestamp());

    }
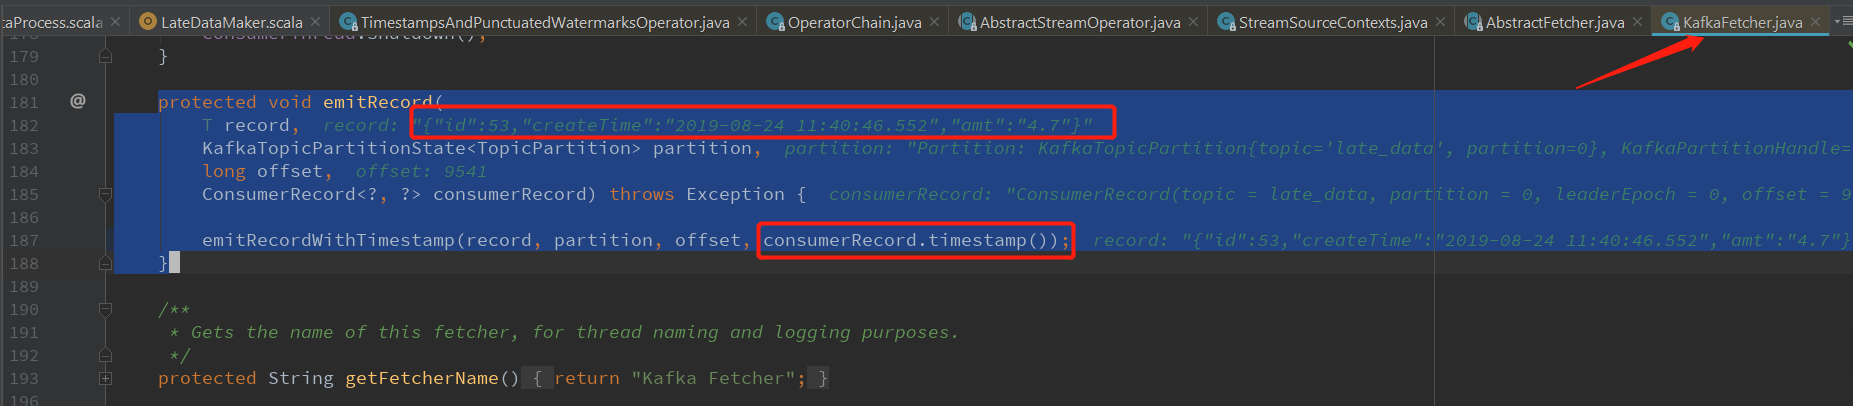
StreamSourceContexts.processAndCollectWithTimestamp 创建StreamRecord 对象
protected void processAndCollectWithTimestamp(T element, long timestamp) {

            output.collect(reuse.replace(element, timestamp)); // 放入真正的事件时间戳

        }

下面我们来看 TimestampsAndPunctuatedWatermarksOperator.processElement 的源码
@Override

    public void processElement(StreamRecord<T> element) throws Exception {

        // 获取这条数据

        final T value = element.getValue();

        // userFunction 就是代码里面创建的匿名类 AssignerWithPunctuatedWatermarks

        // 调用extractTimestamp,获取新的Timestamp

        // element.hasTimestamp 有的话就用,没有就给默认值long类型 的最小值

        final long newTimestamp = userFunction.extractTimestamp(value,

                element.hasTimestamp() ? element.getTimestamp() : Long.MIN_VALUE);

        // 使用新的Timestamp 替换StreamRecord 旧的Timestamp

        output.collect(element.replace(element.getValue(), newTimestamp));

        // 获取下一个Watermark,调用实现的 checkAndGetNextWatermark 方法

        final Watermark nextWatermark = userFunction.checkAndGetNextWatermark(value, newTimestamp);

        // 如果新的Watermark 大于上一个Watermark 就发出新的

        if (nextWatermark != null && nextWatermark.getTimestamp() > currentWatermark) {

            currentWatermark = nextWatermark.getTimestamp();

            output.emitWatermark(nextWatermark);

        }

    }
至此Timestamp和Watermark的创建(或者说生成)就好了
2. Flink 处理迟到数据
为了演示这个功能,在上面的程序中添加了window算子和迟到数据侧边输出的方法 sideOutputLateData,为了方便查看,这里再添加一次全部代码
val source = new FlinkKafkaConsumer[ObjectNode]("late_data", new JsonNodeDeserializationSchema(), Common.getProp)

    // 侧边输出的tag

    val late = new OutputTag[LateDataEvent]("late")

    val input = env.addSource(source)

      .map(json => {

        // json : {"id" : 0, "createTime" : "2019-08-24 11:13:14.942", "amt" : "9.8"}

        val id = json.get("id").asText()

        val createTime = json.get("createTime").asText()

        val amt = json.get("amt").asText()

        LateDataEvent("key", id, createTime, amt)

      })

      // assign watermarks every event

      .assignTimestampsAndWatermarks(new AssignerWithPunctuatedWatermarks[LateDataEvent]() {

      // check extractTimestamp emitted watermark is non-null and large than previously

      override def checkAndGetNextWatermark(lastElement: LateDataEvent, extractedTimestamp: Long): Watermark = {

        new Watermark(extractedTimestamp)

      }

      // generate next watermark

      override def extractTimestamp(element: LateDataEvent, previousElementTimestamp: Long): Long = {

        val eventTime = sdf.parse(element.createTime).getTime

        eventTime

      }

    })

      // after keyBy will have window number of different key

      .keyBy("key")

      .window(TumblingEventTimeWindows.of(Time.minutes(1)))

      // get lateData

      .sideOutputLateData(late)

      .process(new ProcessWindowFunction[LateDataEvent, LateDataEvent, Tuple, TimeWindow] {

        // just for debug window process late data

        override def process(key: Tuple, context: Context, elements: Iterable[LateDataEvent], out: Collector[LateDataEvent]): Unit = {

          // print window start timestamp & end timestamp & current watermark time

          println("window:" + context.window.getStart + "-" + context.window.getEnd + ", currentWatermark : " + context.currentWatermark)

          val it = elements.toIterator

          while (it.hasNext) {

            val current = it.next()

            out.collect(current)

          }

        }

      })

    // print late data

    input.getSideOutput(late).print("late:")

    input.print("apply:")

    env.execute("LateDataProcess")
代码逻辑很简单,主要是为了加入window算子,process算子是为了方便debug到window算子中
下面开始debug源码:
在process 方法中添加断点:

这次直接从window算子接收上游发过来的数据开始看起:
StreamInputProcessor.processInput方法负责将接收到的事件(数据、Watermark、StreamStatus、LatencyMarker),反序列化为 StreamElement(上文已经说得了,是事件抽象的基类),判断具体是那种消息,分别进行处理
public boolean processInput() throws Exception {

        while (true) {

            if (currentRecordDeserializer != null) {

                DeserializationResult result = currentRecordDeserializer.getNextRecord(deserializationDelegate);

                if (result.isBufferConsumed()) {

                    currentRecordDeserializer.getCurrentBuffer().recycleBuffer();

                    currentRecordDeserializer = null;

                }

                if (result.isFullRecord()) {

                    StreamElement recordOrMark = deserializationDelegate.getInstance();

                    if (recordOrMark.isWatermark()) {

                        // handle watermark

                        statusWatermarkValve.inputWatermark(recordOrMark.asWatermark(), currentChannel);

                        continue;

                    } else if (recordOrMark.isStreamStatus()) {

                        // handle stream status

                        statusWatermarkValve.inputStreamStatus(recordOrMark.asStreamStatus(), currentChannel);

                        continue;

                    } else if (recordOrMark.isLatencyMarker()) {

                        // handle latency marker

                        synchronized (lock) {

                            streamOperator.processLatencyMarker(recordOrMark.asLatencyMarker());

                        }

                        continue;

                    } else {

                        // now we can do the actual processing

                        StreamRecord<IN> record = recordOrMark.asRecord();

                        synchronized (lock) {

                            numRecordsIn.inc();

                            streamOperator.setKeyContextElement1(record);

                            streamOperator.processElement(record);

                        }

                        return true;

                    }

                }

            }

        }
注:代码比较长,挑选了跟这次主题相关的部分
Watermark:

数据:

这里我们主要看数据的处理逻辑:
// now we can do the actual processing

StreamRecord<IN> record = recordOrMark.asRecord();

synchronized (lock) {

    // metric 的Counter,统计有多少条数据进来

    numRecordsIn.inc();

    // 选择当前的key(类似与数据分区,每个key一个,里面存储自己的states)

    streamOperator.setKeyContextElement1(record);

    // 真正在进到WindowOperator 中处理数据了

    streamOperator.processElement(record);

}
就到了 WindowOperator.processElement 方法(主要判断逻辑都在这里)
// 判断windowAssigner 是不是MergingWindowAssigner

if (windowAssigner instanceof MergingWindowAssigner)
区分开会话窗口和滑动、跳动窗口的处理逻辑,会话窗口的各个key的窗口是不对齐的
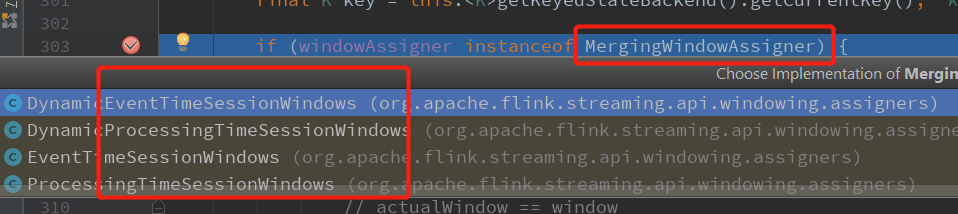
直接到 else部分:
} else {

    for (W window: elementWindows) {

        // drop if the window is already late 判断窗口数据是否迟到

        // 是,就直接跳过这条数据,重新处理下一条数据

        if (isWindowLate(window)) {

            continue;

        }
PS: 写了这么久,终于到迟到数据处理的地方了 -_-
下面看下 isWindowLate 部分的处理逻辑:
/**

 * Returns {@code true} if the watermark is after the end timestamp plus the allowed lateness

 * of the given window.

 */

protected boolean isWindowLate(W window) {

    // 只有事件时间下,并且 窗口元素的最大时间 + 允许迟到时间 <= 当前Watermark 的时候为true(即当前窗口元素迟到了)

    return (windowAssigner.isEventTime() && (cleanupTime(window) <= internalTimerService.currentWatermark()));

}

/**

 * Returns the cleanup time for a window, which is

 * {@code window.maxTimestamp + allowedLateness}. In

 * case this leads to a value greater than {@link Long#MAX_VALUE}

 * then a cleanup time of {@link Long#MAX_VALUE} is

 * returned.

 * 返回窗口的cleanup 时间, 窗口的最大时间 + 允许延迟的时间

 * @param window the window whose cleanup time we are computing.

 */

private long cleanupTime(W window) {

    if (windowAssigner.isEventTime()) {

        long cleanupTime = window.maxTimestamp() + allowedLateness;

        return cleanupTime >= window.maxTimestamp() ? cleanupTime : Long.MAX_VALUE;

    } else {

        return window.maxTimestamp();

    }

}
看一条正常到达的数据:
{"id" : 891, "createTime" : "2019-08-24 17:51:44.152", "amt" : "5.6"}


891 这条数据的事件时间是:2019-08-24 17:51:44.152 ,1 分钟的整分窗口,这条数据对应的窗口就是: [2019-08-24 17:51:00.000, 2019-08-24 17:52:000) ,对应的时间戳是 : [1566640260000, 1566640320000) ,当前的Watermark 是 : 1566640294102,窗口数据的最大时间戳大于 当前的Watermark, 不是迟到数据,不跳过。
现在在来看一条迟到的数据:
{"id" : 892, "createTime" : "2019-08-24 17:51:54.152", "amt" : "3.6"}
892 这条数据的事件时间是:2019-08-24 17:51:54.152 ,1 分钟的整分窗口,这条数据对应的窗口就是: [2019-08-24 17:51:00.000, 2019-08-24 17:52:000) ,对应的时间戳是 : [1566640260000, 1566640320000) ,当前的Watermark 是 : 1566652224102 ,窗口数据的最大时间戳小于 当前的Watermark, 数据是迟到数据,跳过。
上面就是窗口对迟到数据的处理源码dubug了,到这里就已经讲完Flink 处理迟到数据的两个部分:
  1. 基于事件时间创建Timestamp 和Watermark(后面会详细介绍)

  2. 窗口处理迟到数据
注: 这里加上“窗口”,明确是window 算子做的这些事情
下面在来看下窗口迟到输出的SideOutput ,源码在:WindowOperator.processElement 方法的最后一段:
// side output input event if 事件时间

// element not handled by any window 没有window处理过这条数据,上面isSkippedElement 默认值为true,如果上面判断为迟到数据,isSkippedElement就会为false

// late arriving tag has been set

// windowAssigner is event time and current timestamp + allowed lateness no less than element timestamp

if (isSkippedElement && isElementLate(element)) {

    // 设置了 lateDataOutputTag 即window 算子后面的  .sideOutputLateData(late)

    if (lateDataOutputTag != null){

        sideOutput(element);

    } else {

        this.numLateRecordsDropped.inc();

    }

}

/**

 * Decide if a record is currently late, based on current watermark and allowed lateness.

 * 事件时间,并且 元素的时间戳 + 允许延迟的时间 <= 当前watermark 是为true

 * @param element The element to check

 * @return The element for which should be considered when sideoutputs

 */

protected boolean isElementLate(StreamRecord<IN> element){

    return (windowAssigner.isEventTime()) &&

        (element.getTimestamp() + allowedLateness <= internalTimerService.currentWatermark());

}

/**

 * Write skipped late arriving element to SideOutput.

 *

 * @param element skipped late arriving element to side output

 */

protected void sideOutput(StreamRecord<IN> element){

    output.collect(lateDataOutputTag, element);

}
搞定
欢迎关注Flink菜鸟公众号,会不定期更新Flink(开发技术)相关的推文

【源码解析】Flink 是如何处理迟到数据的更多相关文章
- [源码解析] Flink UDAF 背后做了什么
[源码解析] Flink UDAF 背后做了什么 目录 [源码解析] Flink UDAF 背后做了什么 0x00 摘要 0x01 概念 1.1 概念 1.2 疑问 1.3 UDAF示例代码 0x02 ...
- Flink 源码解析 —— Flink JobManager 有什么作用?
JobManager 的作用 https://t.zsxq.com/2VRrbuf 博客 1.Flink 从0到1学习 -- Apache Flink 介绍 2.Flink 从0到1学习 -- Mac ...
- Flink 源码解析 —— Flink TaskManager 有什么作用?
TaskManager 有什么作用 https://t.zsxq.com/RZbu7yN 博客 1.Flink 从0到1学习 -- Apache Flink 介绍 2.Flink 从0到1学习 -- ...
- [源码解析] Flink的groupBy和reduce究竟做了什么
[源码解析] Flink的groupBy和reduce究竟做了什么 目录 [源码解析] Flink的groupBy和reduce究竟做了什么 0x00 摘要 0x01 问题和概括 1.1 问题 1.2 ...
- [源码解析] Flink的Slot究竟是什么?(1)
[源码解析] Flink的Slot究竟是什么?(1) 目录 [源码解析] Flink的Slot究竟是什么?(1) 0x00 摘要 0x01 概述 & 问题 1.1 Fllink工作原理 1.2 ...
- [源码解析] Flink的Slot究竟是什么?(2)
[源码解析] Flink 的slot究竟是什么?(2) 目录 [源码解析] Flink 的slot究竟是什么?(2) 0x00 摘要 0x01 前文回顾 0x02 注册/更新Slot 2.1 Task ...
- Hadoop源码解析之: TextInputFormat如何处理跨split的行
我们知道hadoop将数据给到map进行处理前会使用InputFormat对数据进行两方面的预处理: 对输入数据进行切分,生成一组split,一个split会分发给一个mapper进行处理. 针对每个 ...
- [源码解析] GroupReduce,GroupCombine 和 Flink SQL group by
[源码解析] GroupReduce,GroupCombine和Flink SQL group by 目录 [源码解析] GroupReduce,GroupCombine和Flink SQL grou ...
- Flink 源码解析 —— 源码编译运行
更新一篇知识星球里面的源码分析文章,去年写的,周末自己录了个视频,大家看下效果好吗?如果好的话,后面补录发在知识星球里面的其他源码解析文章. 前言 之前自己本地 clone 了 Flink 的源码,编 ...
随机推荐
- 软件测试过程中如何区分什么是功能bug,什么是需求bug,什么是设计bug?
问题描述: 测试过程中如何区分什么是功能bug,什么是需求bug,什么是设计bug? 精彩答案: 会员 土土的豆豆: 本期问题其实主要是针对不同方面或纬度上对于bug的一个归类和定位. 个人认为,从软 ...
- Tensorflow细节-P170-图像数据预处理
由于6.5中提出的TFRecord非常复杂,可扩展性差,所以本节换一种方式 import tensorflow as tf from tensorflow.examples.tutorials.mni ...
- Docker+GitLab+Jenkins+kubernetes实现DevOps 持续化集成和持续化部署概念图
Docker+GitLab+Jenkins+kubernetes实现DevOps 持续化集成和持续化部署概念图 转载自:原创 IT综合 作者:百联达 时间:2017-05-09 15:48:08 41 ...
- zabbix基本介绍
来源是 觅安教育 大家有兴趣可以去哔哩哔哩搜搜. Open-falcon是由小米公司开源 比如windows,linux,unix,openBSD,AIX,solaris,Mac等操作系统,都可以安装 ...
- npm 删除指定的某个包以及再次安装
npm uninstall xxxx --save-dev //删除包及删除配置项 npm install xxx@version //安装指定版本 npm install //覆盖
- 如何在Processing中调用Windows应用程序
Processing调用了exe就意味着失去了跨平台.调用的过程是,先得到当前的runtime,然后调用runtime的exec()方法,在exec()传入的是字符串参数,这个参数很重要,该有空格的地 ...
- 19、Executor原理剖析与源码分析
一.原理图解 二.源码分析 1.Executor注册机制 worker中为Application启动的executor,实际上是启动了这个CoarseGrainedExecutorBackend进程: ...
- AtCoder Grand Contest 019 题解
传送门 \(A\) 咕咕 int a,b,c,d,n,t; int main(){ scanf("%d%d%d%d%d",&a,&b,&c,&d,& ...
- ehcache.xml 配置文件备忘录(不建议出现中文注释,此处备忘)
<ehcache xmlns:xsi="http://www.w3.org/2001/XMLSchema-instance" xsi:noNamespaceSchemaLoc ...
- 【caffe Net】使用举例和代码中文注释
首先是Net使用的小例子: #include <vector> #include <iostream> #include <caffe/net.hpp> using ...