mac下安装nginx+php+mysql+xdebug
一,安装homebrew
就像linux下面有yum一样,mac也有个homebrew,管理软件非常便捷。
官网:http://brew.sh/index_zh-cn.html
上面有句命令,复制下来终端执行,如果命令返回404没找到,命令以官网最新为参考。
ruby -e "$(curl -fsSL https://raw.githubusercontent.com/Homebrew/install/master/install)"
任意键继续,可能需要输入你MAC的开机密码
漫长的等待。。。可以去洗个澡了再回来看

brew help可以看帮助
二,安装nginx
brew install nginx

#重新加载配置|重启|停止|退出 nginx

nginx -s reload|reopen|stop|quit

#测试配置是否有语法错误

nginx -t
又是漫长的等待
nginx -v 查看版本

打开 nginx 后,默认的访问端口 8080,如果要改为常用的 80 端口,则要修改 "/usr/local/etc/nginx/nginx.conf" 下监听(listen)端口值。
默认的文件访问目录(root)是 "/usr/local/Cellar/nginx/1.8.0/html"(这里的1..8.0是安装的nginx的版本,文件夹名以安装的nginx版本为准)。
把 nginx 设置为开机启动运行:
mkdir -p ~/Library/LaunchAgents

cp /usr/local/Cellar/nginx/1.8./homebrew.mxcl.nginx.plist ~/Library/LaunchAgents/

launchctl load -w ~/Library/LaunchAgents/homebrew.mxcl.nginx.plist
不过试了一下,不是超级用户登陆,而是普通用户登陆,并且监听的端口在1024以下的(例如把默认的8080端口改为了80端口),nginx 开机是启动不了。因此,要 nginx 开机启动的话,需要给予它管理员权限:
sudo chown  root:wheel /usr/local/Cellar/nginx/1.8.0/bin/nginx

sudo chmod  u+s /usr/local/Cellar/nginx/1.8.0/bin/nginx
二,安装mysql
brew install mysql
安装完之后登陆,报了个错,MySQL server through socket '/tmp/mysql.sock
启动一下mysql,在试一下
mysql.server restart
如果觉得很麻烦。直接到官网下个mac的dmg版mysql吧
记得卸载 brew remove mysql ,
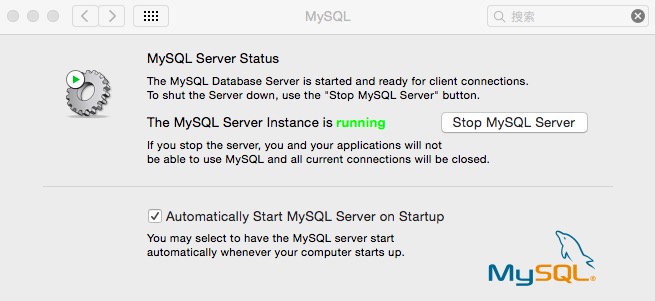
下载mysql官网的mac dmg版安装即可,安装完之后,在偏好设置里面会出现mysql的图标,和java,flash一样,打开看下,下面的勾选开机启动

cd ; nano .bash_profil
打开编辑这个文件
export PATH="/usr/local/mysql/bin:$PATH"

control+x 后回车退出
source ~/.bash_profile

mysql登陆,如果遇到
-bash: mysql: command not found
原因:这是由于系统默认会查找/usr/bin下的命令,如果这个命令不在这个目录下,当然会找不到命令,我们需要做的就是映射一个链接到/usr/bin目录下,相当于建立一个链接文件。
首先得知道mysql命令或mysqladmin命令的完整路径,比如mysql的路径是:/usr/local/mysql/bin/mysql,我们则可以这样执行命令:
# ln -s /usr/local/mysql/bin/mysql /usr/bin
设置你的密码
/usr/local/mysql/bin/mysqladmin -u root password 'yourpasswordhere'

mysql -uroot -pyourpasswordhere

登陆成功!
三、安装php-fpm
Mac是预装了php,不过很多扩展都没安装,目测最多只能在终端里执行下php指令,所以我选择重新安装php。由于 brew 默认是没有 php 安装,所以要使用 “brew tap” 来安装 brew 的第三方程序包,这里使用 josegonzalez 的php安装包,具体操作如下:
|
1
2
|
brew tap homebrew/dupesbrew tap josegonzalez/homebrew-php |
执行完后,就可以用 brew 安装php了。这里php有几个版本可以安装,具体可以执行 "brew search php" 查看一下有什么php版本可以安装,一般会有“php52、php53、php54”版本,我安装的是最新的php5.6版本。(php7.0尝试多次编译不过去放弃了。)
由于PHP5.4以上版本已经内嵌了 FPM,FastCGI Process Manager),在安装选项里标明就行,本人 php 的安装配置指令如下:
brew install php56 --with-debug --with-homebrew-curl --with-imap --with-homebrew-libressl --with-homebrew-libxslt --with-libmysql --without-apache --with-fpm
安装完后会出一段提示的。
The php.ini file can be found in:
/usr/local/etc/php/5.6/php.ini ✩✩✩✩ Extensions ✩✩✩✩ If you are having issues with custom extension compiling, ensure that
you are using the brew version, by placing /usr/local/bin before /usr/sbin in your PATH: PATH="/usr/local/bin:$PATH" //这个放在环境变量文件~/bash_profile的/usr/sbin/的前面,优先选择brew的php PHP56 Extensions will always be compiled against this PHP. Please install them
using --without-homebrew-php to enable compiling against system PHP. ✩✩✩✩ PHP CLI ✩✩✩✩ If you wish to swap the PHP you use on the command line, you should add the following to ~/.bashrc,
~/.zshrc, ~/.profile or your shell's equivalent configuration file: export PATH="$(brew --prefix homebrew/php/php56)/bin:$PATH" //命令行执行后才能php -v查看最新的php安装的版本 ✩✩✩✩ FPM ✩✩✩✩
To launch php-fpm on startup:
mkdir -p ~/Library/LaunchAgents //创建目录,有则忽略
cp /usr/local/opt/php56/homebrew.mxcl.php56.plist ~/Library/LaunchAgents/ //复制文件到系统目录
launchctl load -w ~/Library/LaunchAgents/homebrew.mxcl.php56.plist //执行后 开机启动php-fpm The control script is located at /usr/local/opt/php56/sbin/php56-fpm OS X 10.8 and newer come with php-fpm pre-installed, to ensure you are using the brew version you need to make sure /usr/local/sbin is before /usr/sbin in your PATH: PATH="/usr/local/sbin:$PATH" //更新安装,有则忽略,没有则加到~/.bash_profile You may also need to edit the plist to use the correct "UserName". Please note that the plist was called 'homebrew-php.josegonzalez.php56.plist' in old versions
of this formula. To have launchd start josegonzalez/php/php56 at login:
ln -sfv /usr/local/opt/php56/*.plist ~/Library/LaunchAgents //使用php
Then to load josegonzalez/php/php56 now:
launchctl load ~/Library/LaunchAgents/homebrew.mxcl.php56.plist //使用php
==> Summary
mac下安装nginx+php+mysql+xdebug的更多相关文章
- MAC下安装与配置MySQL
MAC下安装与配置MySQL MAC下安装与配置MySQL 一 下载MySQL 访问MySQL的官网http://www.mysql.com/downloads/ 然后在页面中会看到“MySQL ...
- Linux 环境下安装 Nginx+php+mysql 开发环境
一直以来都没有养成记录学习的好习惯,我想从这么一天开始,把自己学习和工作中的经验和坑都记录下来.等到以后老的时候还有可以回忆的地方. 最近在学习linux,虽然已经玩linux很久了,但是没有怎么用心 ...
- Mac 下 安装 Nginx
---恢复内容开始--- Mac 下 安装nginx 首先确定自己有安装homebrew 安装 nginx brew install nginx 启动nginx 1.15版本下 安装是 直接在ngin ...
- 《OD大数据实战》mac下安装nginx+php
一.mac安装nginx + php + php-fpm 或apache + php 1. Mac 下 Nginx.MySQL.PHP-FPM 的安装配置 2. Mac下安装LNMP(Nginx+P ...
- Windows下安装Nginx+php+mysql环境
系统:Windows 7 64位系统 安装之前,首先下载软件: Nginx: http://nginx.org/en/download.html PHP Stable PHP 5.6.26: http ...
- mac下安装nginx问题解决
需要在mac上安装nginx,按照下面的博客链接一步步安装,但是碰到了些问题.下面写一下我的解决方式. (http://stevendu.iteye.com/blog/1535466) 1. 安装PC ...
- mac 下安装nginx
1,mac下的依赖: pcre-8.38.tar.gz nginx-1.4.7.tar.gz 2,解压pcre:进入器解压目录. EddydeMacBook-Pro:~ eddy$ cd /Users ...
- windows与mac下安装nginx
window下 下载链接,自己选一个版本下载 nginx官网下载 本人放在D盘: 启动nginx 有很多种方法启动nginx (1)直接双击nginx.exe,双击后一个黑色的弹窗一闪而过 (2)打开 ...
- mac下安装nginx及相关配置
1. 安装 Homebrew 首先 homebrew是什么?它是Mac中的一款软件包管理工具,通过brew可以很方便的在Mac中安装软件或者是卸载软件.不了解的同学看以看官网(https://br ...
随机推荐
- X86 Booting Sequence
1.BIOS 0xFFFF0 電源正常啟動後,x86 CPU 會先執行 0xFFFF0,也就是 BIOS ROM 的進入點.由於 0xFFFF0 ~ 0xFFFFF 只有少的很可憐的 16 bytes ...
- java String 详解
1.java语言的字符串序列是通过字符串类实现的.java提供了3个字符串类:String类.StringBuilder类和StringBuffer类.String类是不变字符串,StringBuff ...
- sqlserver数据库 Schema
//读取数据库中所有的数据库 USE MASTER DECLARE @is_policy_automation_enabled bit SET @is_policy_automation_enable ...
- 使用MacBook Air的4项基本技巧
MacBook Air可以说是笔记本电脑中的翘楚:性能优异.拥有超长的电池使用时间的同时保持了轻盈的体态.纤薄的外形,这几乎满足了人们对笔记本的所有要求.如果你也是一个MacBook Air用户,不妨 ...
- Swift_UI_UILabel
Swift_UI_UILabel import UIKit class ViewController: UIViewController { override func viewDidLoad() { ...
- tomcat8 配置在线管理应用功能
在tomcat8下,更加注重安全性.如果要使用在管理控制台部署应用,需要修改更多的配置. 在$tomcat_base$/webapps/manager/META-INF/context.xml中 添加 ...
- Python—操作redis
Python操作redis 连接方式:点击 1.String 操作 redis中的String在在内存中按照一个name对应一个value来存储 set() #在Redis中设置值,默认不存在则创建, ...
- EF简单的添加修改删除基本语法
using ( androidhiveEntities db = new androidhiveEntities() ) { #re ...
- C# Winform中DataGridView绑定后DataGridViewCheckBoxColumn无法显示的问题
在控件DataGridView绑定数据源后,发现DataGridViewCheckBoxColumn不能显示当前的check值.经过一番努力,现将完整代码奉献出来,仅供参考. 错误代码: /*禁止自动 ...
- 移动端页面去掉click点击 背景色变化
a,input,em,h2{-webkit-tap-highlight-color:rgba(255,0,0,0);}给点击元素加上样式 :-webkit-tap-highlight-color:rg ...
