ansible非root用户批量修改root密码
前言:
由于线上服务器密码长久没有更新,现领导要求批量更换密码。线上的之前部署过salt,但由于各种因素没有正常使用。
使用自动化工具批量修改的计划搁浅了,后来领导给了个python多线程修改密码脚本。但实际测试效果并不理想,会出现卡住情况
#!/usr/bin/python
import paramiko#ssh连接模块
import time,sys,re,os
import socket
import threading,Queue#线程模块 root_cmd = r'''
这里输入你要执行的命令
'''
user_cmd = r''' echo '' '''
issu = 1
root_pwd='你要修改的root密码'
login_user = '普通用户名'
key_file = '/home/.ssh/id_rsa'#普通用户key
sshport = 22#端口
time_out = 60 #超时时间
Numer_Thread = 300#最大线程数(根据主机数量修改) q = Queue.Queue()#线程队列
socket.setdefaulttimeout(time_out)
lock = threading.RLock()#线程锁(同时只允许一个线程执行动作)
onlydir = dir() def sshgo(host,rootuser,rootpwd):
rtn = []
key = paramiko.RSAKey.from_private_key_file(key_file)
ssh = paramiko.SSHClient()
ssh.set_missing_host_key_policy(paramiko.AutoAddPolicy())
ssh.load_system_host_keys() rtn.append('________________________________%s'%host)
try:
ssh.connect(host,sshport,login_user,pkey=key)
except Exception,e:
rtn.append('%s__ERROR_________________________%s'%(e,host))
return rtn
if 'user_cmd' in onlydir:
stdin, stdout, stderr = ssh.exec_command('LANG=en_US.UTF-8;LANGUAGE=en_US.UTF-8; %s'%user_cmd)
rtn.append(stdout.read() + stdout.read())
#rtn.append(stdout.read() + stderr.read())
if not issu:
#return rtn
return "",(rtn)
shell = ssh.invoke_shell()
while not shell.recv(4096).endswith(']$ '):
time.sleep(0.1) buff =''
shell.send('LANG=en_US.UTF-8;LANGUAGE=en_US.UTF-8;su - %s'%rootuser)
shell.send('\n')
while not buff.endswith('Password: '):
time.sleep(0.1)
resp = shell.recv(4096)
buff += resp
if buff.endswith('exist') or buff.endswith(']$ '):
rtn.append('ERROR_SSH.RECV_____1________________%s'% resp)
return rtn
buff =''
shell.send(root_pwd)
shell.send('\n')
while not buff.endswith(']# '):
time.sleep(0.1)
resp = shell.recv(4096)
buff += resp
if buff.endswith('password') or buff.endswith(']$ '):
rtn.append('ERROR_SSH.RECV_____2________________%s'% resp)
return rtn
shell.send('LANG=en_US.UTF-8;LANGUAGE=en_US.UTF-8; %s '%root_cmd)
shell.send('\n')
buff = ''
while not buff.endswith(']# '):
time.sleep(0.1)
resp = shell.recv(4096)
buff += resp
if buff.endswith(']$ '):
rtn.append('ERROR_SSH.RECV_____3________________%s'% resp)
break
elif buff.endswith('? '):
rtn.append('ERROR_SSH.RECV_____4________________??')
break
#print buff
#rtn= (''.join(rtn)).strip()+" "+host
rtn.append('\n'.join(buff.split('\n')[1:-1]))
ssh.close()
return "",(rtn)
#return rtn def do_echo(host,rootuser,rootpwd):
result = sshgo(host,rootuser,rootpwd)
lock.acquire()
for pp in result:
print pp
sys.stdout.flush()
lock.release() def working():
while 1:
args = q.get()
do_echo(args[0],args[1],args[2])
q.task_done() for i in range (Numer_Thread):
t = threading.Thread(target=working)
t.setDaemon(1)
t.start()
print "Begin......"
fn = open("/var/tmp/169" ,"r")
#fn = open("/tmp/1.log" ,"r")
for i in fn:
if not re.match('#',i) and re.search('.',i):
c = i.split()
q_args = [c[0],'','']
#q_args = [c[0],c[1],c[2]]
q.put(q_args)
fn.close()
q.join()
python多线程修改root密码脚本
1.安装ansible
2.修改主机配置文件

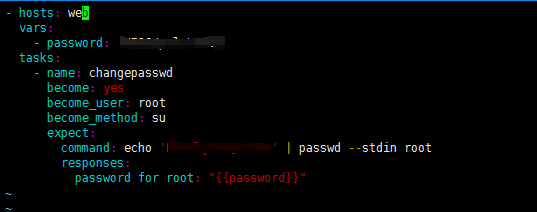
配置得了root密码,及普通用户和相应的key,这样做其实并不理想,1:不安全2:配置复杂点。后续可以使用ansible的playbook实现
2.切换普通用户执行命令

3.playbook版本
ansible非root用户批量修改root密码的更多相关文章
- Ansible playbook 批量修改服务器密码 先普通后root用户
fsckzy Ansible playbook 批量修改服务器密码 客户的需求:修改所有服务器密码,密码规则为Rfv5%+主机名后3位 背景:服务器有CentOS6.7,SuSE9.10.11,r ...
- centos 7 下进入单用户模式修改root密码
centos7进入单用户模式修改root用户密码 在工作中可能会遇到root密码忘记,那么这里就要进入单用户模式下了. 在重启电脑之后 时间:2015-05-13 10:42来源:blog.51cto ...
- 转Centos7.0进入单用户模式修改root密码
Centos7.0进入单用户模式修改root密码 启动Centos7 ,按空格让其停留在如下界面. 按e进行编辑 在UTF-8后面输入init=/bin/sh 根据提示按ctrl+x 得如下图 输 ...
- 忘记root密码怎么办-单用户模式修改root密码
忘记root密码怎么办-单用户模式修改root密码================================= 1,开机3秒内按下向下的方向键,目的是为了不让它进入系统,而是停留在开机界面. 2 ...
- 单用户模式修改root密码
单用户模式修改root密码 1.进入引导菜单界面2.按e进入grub,在linux或linux16那行结尾加上 rw init=/bin/bash,按Ctrl+x或F103.进入bash-4.3# , ...
- 进入单用户模式修改root密码
进入单用户模式修改root密码 1.进入引导菜单界面2.按e进入grub,在linux或linux16那行结尾加上 rw init=/bin/bash,按Ctrl+x或F103.进入bash-4.3# ...
- saltstack+python批量修改服务器密码
saltstack安装:略过 python脚本修改密码: # -*- coding utf-8 -*- import socket import re import os import sys imp ...
- ubuntu首次给root用户设置密码和root用户登录设置
1 ubuntu首次给root用户设置密码 给root用户设置密码输入命令sudo passwd,然后系统会让你输入密码,这时输入的密码就是root用户的密码了,设置完成之后就可以切换root用户登录 ...
- Ansible批量修改root密码
0x01:首先做好免密登录 http://www.cnblogs.com/evlon/p/8094306.html 0x02:批量修改密码 ansible all -m raw -a "ec ...
随机推荐
- DotNetBar grid筛选 按时间筛选
PatientDiaryPanel.Columns["RECORDDATE"].FilterExpr = string.Format("date(RECORDDATE) ...
- MySQL 插入数据 通过命令提示窗口插入数据
MySQL 表中使用 INSERT INTO SQL语句来插入数据. 你可以通过 mysql> 命令提示窗口中向数据表中插入数据,或者通过PHP脚本来插入数据. 语法 以下为向MySQL数据表插 ...
- 启用CentOS6.5 64位安装时自带的MySQL
#service mysqld start#cd /usr/bin#mysqladmin -u root password '123456'#./mysql -u root -pEnter passw ...
- 当利用pip安装模块出现错误时咋办
>在DOS窗口中到Python安装路径的scripts中执行 pip install pyperclip 出现错误 >>错误提示:Fatal error in launcher: ...
- Wampserver 2.5 多站点配置方法
写在开头:本文适用于wampserver2.5版本,和wamp的老版本配置有语法上的区别,笔者正是因为被老版本的配置办法给整迷糊了所以才总结了一篇针对2.5版本的配置方法,如果您还停留在1.x或着已经 ...
- MySQL查询出错提示 --secure-file-priv解决方法
原文 在某台DB上准备运行一个SQL语句,就是用SELECT INTO OUTFILE把查询结果写入到文件的时候提示以下信息: The MySQL server is running with the ...
- 遇到 Line 21: StartTag: invalid element name ios
打开这个的storyboard 文本编辑打开修改里面有冲突的部分
- Android 自定义View (五)——实践
前言: 前面已经介绍了<Android 自定义 view(四)-- onMeasure 方法理解>,那么这次我们就来小实践下吧 任务: 公司现有两个任务需要我完成 (1)监测液化天然气液压 ...
- Android tween 动画 XML 梳理
前言: Tween动画是展现出旋转.渐变.移动.缩放的这么一种转换过程,即补间动画.Tween动画有两种定义方式:XML形式,编码形式.这次主要来梳理XML的方式配置动画 (1)XML定义动画,按照动 ...
- 漫谈java重载与重写
重载(Overloading):为了让方法名相同而形参不同的构造方法同时存在,让类以统一的方式处理不同类型数据的一种手段 重写(Overriding):导出类对继承自基类的方法做出一定的修改,又称方法 ...