搭建QQ聊天通信的程序:(1)基于 networkcomms.net 创建一个WPF聊天客户端服务器应用程序 (1)
搭建QQ聊天通信的程序:(1)基于 networkcomms.net 创建一个WPF聊天客户端服务器应用程序
原文地址(英文):http://www.networkcomms.net/creating-a-wpf-chat-client-server-application/
注意:本教程是相当广泛的,如果你是在短请也看到我们的东西 开始和 如何在几分钟内创建一个客户端服务器应用程序教程。
注2:本例中包括,明显延长进一步证明功能,在包中包含的示例 包下载。
在我们开始之前确保您已经安装了Visual Studio 2010中表达或晚,这应该有 .net4.0 或更高版本。
1。 创建Visual Studio项目
- 创建一个新的包含visual c# visual studio解决方案的 WPF应用程序 “项目命名它” WPFChatExample ”
- 右键单击项目刚刚创建,选择“ 属性 ”。 确保的 目标框架 “是” .net4.0“而不是” 。 .net4.0客户端配置文件 ”。 你现在应该有这样的。
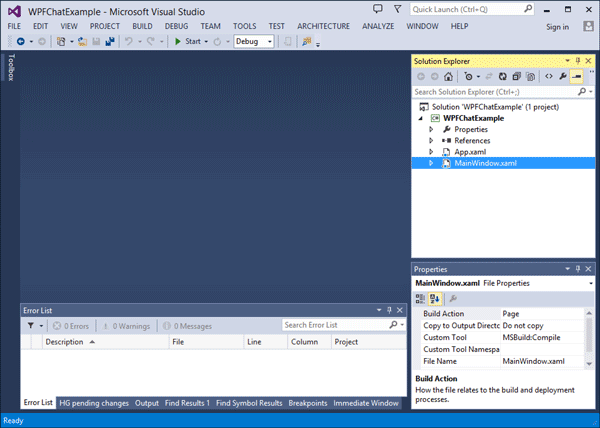
新鲜的visual studio创建应用程序命名为“WPFChatExample”
2。 添加NetworkComms.net DLL项目
- NetworkComms.Net 下载包包含DLL在所有支持的平台上,但我们感兴趣的只是.net4.0>>发布完整的DLL。 这个DLL复制到相同的位置,我们在步骤1中创建的解决方案。
- 我们现在需要添加一个项目引用NetworkComms。 净DLL我们只是补充道。 右键单击“ WPFChatExample “项目并选择” 添加引用… ”。 在打开的窗口中选择Browse选项卡并选择我们刚刚添加的DLL。
- 如果你扩大 引用 文件夹内的项目你现在应该看到NetworkComms。 净参考你就像这样:

“WPFChatExample”WPF应用程序包含一个引用NetworkComms完成.net DLL。
3所示。 添加WPF元素
- 我们需要添加文本框和按钮,我们打算与WPF布局。 双击“开始 MainWindow.xaml 的文件,主要查看器中打开:
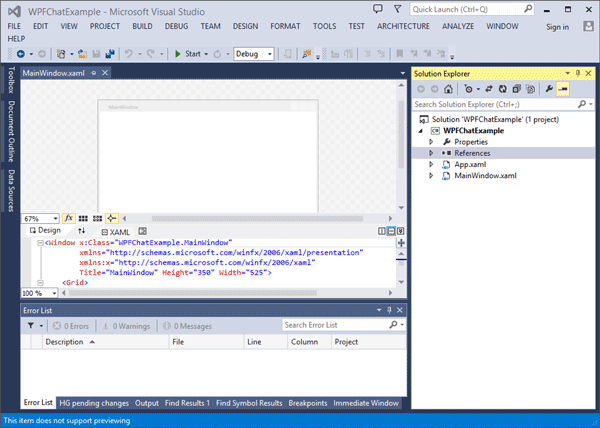
开放的主窗口。 xaml文件显示‘设计’和‘xaml”。
- 如果你想,你可以现在添加每个文本框和按钮。 为了节省时间但是我们提供了一个基础布局,您可以复制和粘贴。 复制并粘贴以下代码来替代所有现有的代码在XAML视图 MainWindow.xaml ”:
 <Window x:Class="WPFChatExample.MainWindow"

         xmlns="http://schemas.microsoft.com/winfx/2006/xaml/presentation"

         xmlns:x="http://schemas.microsoft.com/winfx/2006/xaml"

         Title="NetworkComms .Net WPF Chat Example" Height="" Width="" Background="#FF7CA0FF" ResizeMode="CanMinimize">

     <Grid>

         <TextBox Height="" HorizontalAlignment="Left" Margin="68,8,0,0" Name="serverIP" VerticalAlignment="Top" Width="" />

         <Label Content="Server IP:" Height="" HorizontalAlignment="Left" Margin="8,6,0,0" Name="label1" VerticalAlignment="Top" />

         <TextBox Height="" HorizontalAlignment="Left" Margin="199,8,0,0" Name="serverPort" VerticalAlignment="Top" Width="" />

         <Label Content="Port:" Height="" HorizontalAlignment="Left" Margin="166,6,0,0" Name="label2" VerticalAlignment="Top" />

         <TextBox Height="" HorizontalAlignment="Left" Margin="11,38,0,0" Name="chatBox" VerticalAlignment="Top" Width="" IsReadOnly="True" VerticalScrollBarVisibility="Visible" />

         <Label Content="Messages from:" Height="" HorizontalAlignment="Left" Margin="369,84,0,0" Name="label3" VerticalAlignment="Top" Width="" />

         <TextBox Height="" HorizontalAlignment="Left" Margin="373,108,0,0" Name="messagesFrom" VerticalAlignment="Top" Width="" IsReadOnly="True" VerticalScrollBarVisibility="Auto" />

         <Label Content="Local Name:" Height="" HorizontalAlignment="Left" Margin="293,7,0,0" Name="label4" VerticalAlignment="Top" />

         <TextBox Height="" HorizontalAlignment="Left" Margin="373,8,0,0" Name="localName" VerticalAlignment="Top" Width="" />

         <Label Content="Message:" Height="" HorizontalAlignment="Left" Margin="5,272,0,0" Name="label5" VerticalAlignment="Top" />

         <TextBox Height="" HorizontalAlignment="Left" Margin="62,274,0,0" Name="messageText" VerticalAlignment="Top" Width="" />

         <Button Content="Send" Height="" HorizontalAlignment="Left" Margin="373,274,0,0" Name="sendMessageButton" VerticalAlignment="Top" Width=""/>

         <CheckBox Content="Enable Server" Height="" HorizontalAlignment="Left" Margin="377,44,0,0" x:Name="enableServer" VerticalAlignment="Top"/>

         <CheckBox Content="Use Encryption" Height="" HorizontalAlignment="Left" Margin="377,65,0,0" Name="useEncryptionBox" VerticalAlignment="Top"/>

     </Grid>

 </Window>
- 设计窗口现在应该显示相当于你刚从上面贴的XAML。 这给了我们的基本布局聊天应用程序:
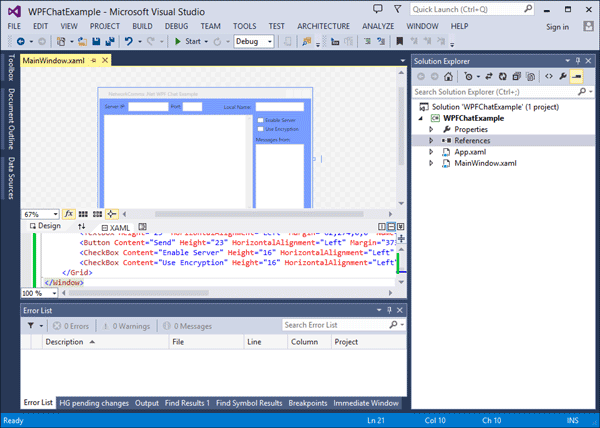
后复制粘贴的例子xaml代码设计窗口现在应该显示的基本布局。
- 媒体对你的键盘的F5′,确保项目成功构建(即错误列表窗口在Visual studio仍然是空的)。 如果项目不建立在这一点上请回去在本教程中,确保您已经完成了所有的必要步骤。 如果项目构建你现在应该看到WPF应用程序,当然,我们仍然需要添加的所有功能。
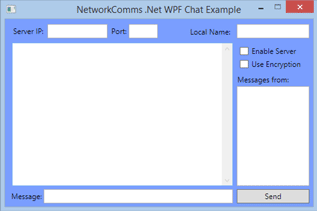
WPF聊天应用程序的例子。 所有的布局元素添加了但是没有任何功能。
4所示。 添加ChatMessage包装类
- 下一步是创建一个包装器类的消息我们将发送和接收,即一个对象我们发送和接收包含所有必要的信息。 右键单击该项目并选择“ 添加 “>” 新项目… ”。 这应该引出的 添加新项 窗口中,一个选项列表,你可以添加到项目中。 确保的 类 ”项被选中时,在窗口的底部输入名称” ChatMessage.cs ”。 现在点击“ 添加 ”。 新的类文件应该自动打开,你现在应该是这样的:
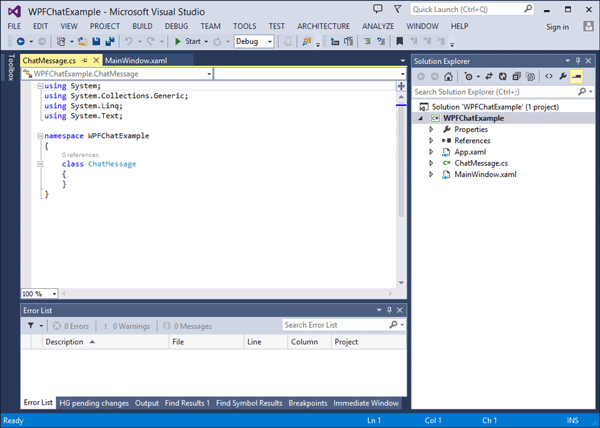
这个新类,名为“ChatMessage.cs”。 这将是用作聊天信息的包装器。
- 复制并粘贴以下代码,取代现有的所有代码在我们刚刚创建的类,“ ChatMessage.cs ”:
 using System;

 using System.Collections.Generic;

 using System.Linq;

 using System.Text;

 //我们需要包括以下三本类的命名空间
 using NetworkCommsDotNet;

 using NetworkCommsDotNet.Tools;

 using ProtoBuf;

 namespace WPFChatExample

 {

     /// <summary>

     /// A wrapper class for the messages that we intend to send and receive.

     /// The [ProtoContract] attribute informs NetworkComms .Net that we intend to

     /// serialise(连载) (turn into bytes) this object. At the base level the

     /// serialisation(连载) is performed by protobuf.net.

     /// </summary>

     [ProtoContract]

     class ChatMessage

     {

         /// <summary>

         /// chatmessage标识源.

         /// We use this variable as the constructor for the ShortGuid.

         /// The [ProtoMember(1)] attribute informs the serialiser that when

         /// an object of type ChatMessage is serialised we want to include this variable

         /// </summary>

         [ProtoMember()]

         string _sourceIdentifier;

         /// <summary>

         /// The source identifier is accessible as a ShortGuid

         /// </summary>

         public ShortGuid SourceIdentifier { get { return new ShortGuid(_sourceIdentifier); } }

         /// <summary>

         /// The name of the source of this ChatMessage.

         /// We use shorthand declaration, get and set.

         /// The [ProtoMember(2)] attribute informs the serialiser that when

         /// an object of type ChatMessage is serialised we want to include this variable

         /// </summary>

         [ProtoMember()]

         public string SourceName { get; private set; }

         /// <summary>

         /// The actual message.

         /// </summary>

         [ProtoMember()]

         public string Message { get; private set; }

         /// <summary>

         /// The index of this message. Every message sent by a particular source

         /// has an incrementing(增值) index.

         /// </summary>

         [ProtoMember()]

         public long MessageIndex { get; private set; }

         /// <summary>

         /// The number of times this message has been relayed.

         /// </summary>

         [ProtoMember()]

         public int RelayCount { get; private set; }

         /// <summary>

         /// We must include a private constructor to be used by the deserialisation step.

         /// </summary>

         private ChatMessage() { }

         /// <summary>

         /// Create a new ChatMessage

         /// </summary>

         /// <param name="sourceIdentifier">The source identifier</param>

         /// <param name="sourceName">The source name</param>

         /// <param name="message">The message to be sent</param>

         /// <param name="messageIndex">The index of this message</param>

         public ChatMessage(ShortGuid sourceIdentifier, string sourceName, string message, long messageIndex)

         {

             this._sourceIdentifier = sourceIdentifier;

             this.SourceName = sourceName;

             this.Message = message;

             this.MessageIndex = messageIndex;

             this.RelayCount = ;

         }

         /// <summary>

         /// Increment the relay count variable

         /// </summary>

         public void IncrementRelayCount()

         {

             RelayCount++;

         }

     }

 }
5。 将功能添加到代码元素MainWindow.xaml
- 现在我们将注意力转向的代码元素 MainWindow.xaml ”。 右键单击访问代码元素的 MainWindow.xaml ”,选择“ 视图代码 从上下文菜单中。 您应该看到一个代码文件,其中包含之前,所有的代码我们随后要添加将在 主窗口 类:
 using System;

 using System.Collections.Generic;

 using System.Linq;

 using System.Text;

 using System.Windows;

 using System.Windows.Controls;

 using System.Windows.Data;

 using System.Windows.Documents;

 using System.Windows.Input;

 using System.Windows.Media;

 using System.Windows.Media.Imaging;

 using System.Windows.Navigation;

 using System.Windows.Shapes;

 namespace WPFChatExample

 {

     /// <summary>

     /// Interaction logic for MainWindow.xaml

     /// </summary>

     public partial class MainWindow : Window

     {

         public MainWindow()

         {

             InitializeComponent();

         }

     }

 }
MainWindow.xaml
- 因为我们要执行网络任务在这门课中,我们首先需要添加相关的名称空间引用。 下面所有的 使用系统… “您想要添加名称空间引用:
 //We need to include the following namespaces

 using System.Net;

 using NetworkCommsDotNet;

 using NetworkCommsDotNet.DPSBase;

 using NetworkCommsDotNet.Tools;

 using NetworkCommsDotNet.Connections;

 using NetworkCommsDotNet.Connections.TCP;
- 接下来我们要添加一些类变量来帮助我们跟踪当前应用程序状态。 我们想跟踪:
- 我们已经收到最新消息。
- 最大数量的时候我们将传递一个信息。
- 一个可选的加密密钥。
- 本地索引时我们将使用发送新消息。
- 跟踪这些项目添加以下代码的类:
 #region Private Fields

 /// <summary>

 /// Dictionary to keep track of which peer messages have already been written to the chat window

 /// </summary>

 Dictionary<ShortGuid, ChatMessage> lastPeerMessageDict = new Dictionary<ShortGuid, ChatMessage>();

 /// <summary>

 /// The maximum number of times a chat message will be relayed

 /// </summary>

 int relayMaximum = ;

 /// <summary>

 /// An optional encryption key to use should one be required.

 /// This can be changed freely but must obviously be the same

 /// for both sender and receiver.

 /// </summary>

 string encryptionKey = "ljlhjf8uyfln23490jf;m21-=scm20--iflmk;";

 /// <summary>

 /// A local counter used to track the number of messages sent from

 /// this instance.

 /// </summary>

 long messageSendIndex = ;

 #endregion
- 接下来,我们将添加的方法使用WPF GUI。 前两个方法可用于从任何线程更新聊天和MessageFrom文本框:
 /// <summary>

 /// Append the provided message to the chatBox text box.

 /// </summary>

 /// <param name="message"></param>

 private void AppendLineToChatBox(string message)

 {

     //To ensure we can successfully append to the text box from any thread

     //we need to wrap the append within an invoke action.

     chatBox.Dispatcher.BeginInvoke(new Action<string>((messageToAdd) =>

     {

         chatBox.AppendText(messageToAdd + "\n");

         chatBox.ScrollToEnd();

     }), new object[] { message });

 }

 /// <summary>

 /// Refresh the messagesFrom text box using the recent message history.

 /// </summary>

 private void RefreshMessagesFromBox()

 {

     //We will perform a lock here to ensure the text box is only

     //updated one thread at  time

     lock (lastPeerMessageDict)

     {

         //Use a linq expression to extract an array of all current users from lastPeerMessageDict

         string[] currentUsers = (from current in lastPeerMessageDict.Values orderby current.SourceName select current.SourceName).ToArray();

         //To ensure we can successfully append to the text box from any thread

         //we need to wrap the append within an invoke action.

         this.messagesFrom.Dispatcher.BeginInvoke(new Action<string[]>((users) =>

         {

             //First clear the text box

             messagesFrom.Text = "";

             //Now write out each username

             foreach (var username in users)

                 messagesFrom.AppendText(username + "\n");

         }), new object[] { currentUsers });

     }

 }
- 接下来下有五个方法将被附加到WPF元素布局在步骤6。 他们将被用来发送消息,切换加密,本地服务器模式开关并正确地关闭一切当我们完成了对应用程序:
 /// <summary>

 /// Send any entered message when we click the send button.

 /// </summary>

 /// <param name="sender"></param>

 /// <param name="e"></param>

 private void SendMessageButton_Click(object sender, RoutedEventArgs e)

 {

     SendMessage();

 }

 /// <summary>

 /// Send any entered message when we press enter or return

 /// </summary>

 /// <param name="sender"></param>

 /// <param name="e"></param>

 private void MessageText_KeyUp(object sender, KeyEventArgs e)

 {

     if (e.Key == Key.Enter || e.Key == Key.Return)

         SendMessage();

 }

 /// <summary>

 /// Toggle encryption

 /// </summary>

 /// <param name="sender"></param>

 /// <param name="e"></param>

 private void UseEncryptionBox_CheckedToggle(object sender, RoutedEventArgs e)

 {

     if (useEncryptionBox.IsChecked != null && (bool)useEncryptionBox.IsChecked)

     {

         RijndaelPSKEncrypter.AddPasswordToOptions(NetworkComms.DefaultSendReceiveOptions.Options, encryptionKey);

         NetworkComms.DefaultSendReceiveOptions.DataProcessors.Add(DPSManager.GetDataProcessor<RijndaelPSKEncrypter>());

     }

     else

         NetworkComms.DefaultSendReceiveOptions.DataProcessors.Remove(DPSManager.GetDataProcessor<RijndaelPSKEncrypter>());

 }

 /// <summary>

 /// Correctly shutdown NetworkComms .Net when closing the WPF application

 /// </summary>

 /// <param name="sender"></param>

 /// <param name="e"></param>

 private void Window_Closing(object sender, System.ComponentModel.CancelEventArgs e)

 {

     //Ensure we shutdown comms when we are finished

     NetworkComms.Shutdown();

 }

 /// <summary>

 /// Toggle whether the local application is acting as a server

 /// </summary>

 /// <param name="sender"></param>

 /// <param name="e"></param>

 private void EnableServer_Toggle(object sender, RoutedEventArgs e)

 {

     //Enable or disable the local server mode depending on the checkbox IsChecked value

     if (enableServer.IsChecked != null && (bool)enableServer.IsChecked)

         ToggleServerMode(true);

     else

         ToggleServerMode(false);

 }
- 接下来我们添加的方法可以用来切换应用程序的本地服务器模式:
 /// <summary>

 /// Wrap the functionality required to enable/disable the local application server mode

 /// </summary>

 /// <param name="enableServer"></param>

 private void ToggleServerMode(bool enableServer)

 {

     if (enableServer)

     {

         //Start listening for new incoming TCP connections

         //Parameters ensure we listen across all adaptors using a random port

         Connection.StartListening(ConnectionType.TCP, new IPEndPoint(IPAddress.Any, ));

         //Write the IP addresses and ports that we are listening on to the chatBox

         chatBox.AppendText("Listening for incoming TCP connections on:\n");

         foreach (IPEndPoint listenEndPoint in Connection.ExistingLocalListenEndPoints(ConnectionType.TCP))

             chatBox.AppendText(listenEndPoint.Address + ":" + listenEndPoint.Port + "\n");

     }

     else

     {

         NetworkComms.Shutdown();

         chatBox.AppendText("Server disabled. No longer accepting connections and all existing connections have been closed.");

     }

 }
- 接下来,我们将创建一个方法,可以通过NetworkComms执行。 网络聊天消息时已经收到。 在此方法中,我们可以把任何我们想做的但是因为我们正在聊天应用程序可能希望的方法:
- 打印消息ChatBox文本框。
- 从文本框更新消息。
- 传递消息给其他同行。
- 可以执行这些功能的方法如下:
 /// <summary>

 /// Performs whatever functions we might so desire when we receive an incoming ChatMessage

 /// </summary>

 /// <param name="header">The PacketHeader corresponding with the received object</param>

 /// <param name="connection">The Connection from which this object was received</param>

 /// <param name="incomingMessage">The incoming ChatMessage we are after</param>

 private void HandleIncomingChatMessage(PacketHeader header, Connection connection, ChatMessage incomingMessage)

 {

     //We only want to write a message once to the chat window

     //Because we allow relaying and may receive the same message twice

     //we use our history and message indexes to ensure we have a new message

     lock (lastPeerMessageDict)

     {

         if (lastPeerMessageDict.ContainsKey(incomingMessage.SourceIdentifier))

         {

             if (lastPeerMessageDict[incomingMessage.SourceIdentifier].MessageIndex < incomingMessage.MessageIndex)

             {

                 //If this message index is greater than the last seen from this source we can safely

                 //write the message to the ChatBox

                 AppendLineToChatBox(incomingMessage.SourceName + " - " + incomingMessage.Message);

                 //We now replace the last received message with the current one

                 lastPeerMessageDict[incomingMessage.SourceIdentifier] = incomingMessage;

             }

         }

         else

         {

             //If we have never had a message from this source before then it has to be new

             //by definition

             lastPeerMessageDict.Add(incomingMessage.SourceIdentifier, incomingMessage);

             AppendLineToChatBox(incomingMessage.SourceName + " - " + incomingMessage.Message);

         }

     }

     //Once we have written to the ChatBox we refresh the MessagesFromWindow

     RefreshMessagesFromBox();

     //This last section of the method is the relay function

     //We start by checking to see if this message has already been relayed

     //the maximum number of times

     if (incomingMessage.RelayCount < relayMaximum)

     {

         //If we are going to relay this message we need an array of

         //all other known connections

         var allRelayConnections = (from current in NetworkComms.GetExistingConnection() where current != connection select current).ToArray();

         //We increment(增量) the relay count before we send

         incomingMessage.IncrementRelayCount();

         //We will now send the message to every other connection

         foreach (var relayConnection in allRelayConnections)

         {

             //We ensure we perform the send within a try catch

             //To ensure a single failed send will not prevent the

             //relay to all working connections.

             try { relayConnection.SendObject("ChatMessage", incomingMessage); }

             catch (CommsException) { /* Catch the comms exception, ignore and continue */ }

         }

     }

 }
- NetworkComms。 网有一个广泛的功能和使用情况。 其中一个允许您执行代码每次连接断开连接。 在这个例子中,我们将创建一个方法写ChatBox断开的消息。 方法如下:
 /// <summary>

 /// Performs whatever functions we might so desire when an existing connection is closed.

 /// </summary>

 /// <param name="connection">The closed connection</param>

 private void HandleConnectionClosed(Connection connection)

 {

     //We are going to write a message to the ChatBox when a user disconnects

     //We perform the following within a lock so that threads proceed one at a time

     lock (lastPeerMessageDict)

     {

         //Extract the remoteIdentifier from the closed connection

         ShortGuid remoteIdentifier = connection.ConnectionInfo.NetworkIdentifier;

         //If at some point we received a message with this identifier we can

         //include the source name in the disconnection message.

         if (lastPeerMessageDict.ContainsKey(remoteIdentifier))

             AppendLineToChatBox("Connection with '" + lastPeerMessageDict[remoteIdentifier].SourceName + "' has been closed.");

         else

             AppendLineToChatBox("Connection with '" + connection.ToString() + "' has been closed.");

         //Last thing is to remove this entry from our message history

         lastPeerMessageDict.Remove(connection.ConnectionInfo.NetworkIdentifier);

     }

     //Refresh the messages from box to reflect this disconnection

     RefreshMessagesFromBox();

 }
下一个方法将用于发送任何消息,我们创建:
 /// <summary>

 /// Send our message.

 /// </summary>

 private void SendMessage()

 {

     //If we have tried to send a zero length string we just return

     if (messageText.Text.Trim() == "") return;

     //We may or may not have entered some server connection information

     ConnectionInfo serverConnectionInfo = null;

     if (serverIP.Text != "")

     {

         try { serverConnectionInfo = new ConnectionInfo(serverIP.Text.Trim(), int.Parse(serverPort.Text)); }

         catch (Exception)

         {

             MessageBox.Show("Failed to parse the server IP and port. Please ensure it is correct and try again", "Server IP & Port Parse Error", MessageBoxButton.OK);

             return;

         }

     }

     //We wrap everything we want to send in the ChatMessage class we created

     ChatMessage messageToSend = new ChatMessage(NetworkComms.NetworkIdentifier, localName.Text, messageText.Text, messageSendIndex++);

     //We add our own message to the message history in-case it gets relayed back to us

     lock (lastPeerMessageDict) lastPeerMessageDict[NetworkComms.NetworkIdentifier] = messageToSend;

     //We write our own message to the chatBox

     AppendLineToChatBox(messageToSend.SourceName + " - " + messageToSend.Message);

     //We refresh the MessagesFrom box so that it includes our own name

     RefreshMessagesFromBox();

     //We clear the text within the messageText box.

     this.messageText.Text = "";

     //If we provided server information we send to the server first

     if (serverConnectionInfo != null)

     {

         //We perform the send within a try catch to ensure the application continues to run if there is a problem.

         try { TCPConnection.GetConnection(serverConnectionInfo).SendObject("ChatMessage", messageToSend); }

         catch (CommsException) { MessageBox.Show("A CommsException occurred while trying to send message to " + serverConnectionInfo, "CommsException", MessageBoxButton.OK); }

     }

     //If we have any other connections we now send the message to those as well

     //This ensures that if we are the server everyone who is connected to us gets our message

     var otherConnectionInfos = (from current in NetworkComms.AllConnectionInfo() where current != serverConnectionInfo select current).ToArray();

     foreach (ConnectionInfo info in otherConnectionInfos)

     {

         //We perform the send within a try catch to ensure the application continues to run if there is a problem.

         try { TCPConnection.GetConnection(info).SendObject("ChatMessage", messageToSend); }

         catch (CommsException) { MessageBox.Show("A CommsException occurred while trying to send message to " + info, "CommsException", MessageBoxButton.OK); }

     }

 }
- 最后我们需要添加的代码元素内的 MainWindow.xaml NetworkComms。net的是正确的初始化。 为了正确地初始化NetworkComms。 Net我们需要:
- 我们的机器的主机名设置默认本地名称。
- 触发的方法 HandleIncomingMessage “当我们收到一包类型” ChatMessage ”。
- 触发的方法 HandleConnectionClosed 当一个现有的连接关闭。
- 我们在主窗口类构造函数执行这些初始化任务,代之以下面的代码:
 public MainWindow()

 {

     InitializeComponent();

     //Write the IP addresses and ports that we are listening on to the chatBox

     chatBox.AppendText("Initialised WPF chat example.");

     //Add a blank line after the initialisation output

     chatBox.AppendText("\n");

     //Set the default Local Name box using to the local host name

     localName.Text = HostInfo.HostName;

     //Configure NetworkComms .Net to handle and incoming packet of type 'ChatMessage'

     //e.g. If we receive a packet of type 'ChatMessage' execute the method 'HandleIncomingChatMessage'

     NetworkComms.AppendGlobalIncomingPacketHandler<ChatMessage>("ChatMessage", HandleIncomingChatMessage);

     //Configure NetworkComms .Net to perform an action when a connection is closed

     //e.g. When a connection is closed execute the method 'HandleConnectionClosed'

     NetworkComms.AppendGlobalConnectionCloseHandler(HandleConnectionClosed);

 }
6。 将事件添加到WPF布局
- 应用程序的最后一步是添加必要的事件,这样按钮和文本框的布局可以用来发送消息。 这是通过编辑XAML的主窗口。 这是本教程的步骤3中相同的XAML编辑,但回顾一下,访问XAML通过双击 MainWindow.xaml 在解决方案资源管理器窗口中。
- 当应用程序关闭Window_Closing我们想运行方法。 取代XAML的顶部部分目前是这样的:
 <Window x:Class="WPFChatExample.MainWindow"

         xmlns="http://schemas.microsoft.com/winfx/2006/xaml/presentation"

         xmlns:x="http://schemas.microsoft.com/winfx/2006/xaml"

         Title="NetworkComms .Net WPF Chat Example" Height="" Width="" Background="#FF7CA0FF" ResizeMode="CanMinimize">
 <Window x:Class="WPFChatExample.MainWindow"

         xmlns="http://schemas.microsoft.com/winfx/2006/xaml/presentation"

         xmlns:x="http://schemas.microsoft.com/winfx/2006/xaml"

         Title="NetworkComms .Net WPF Chat Example" Height="" Width="" Background="#FF7CA0FF" ResizeMode="CanMinimize" Closing="Window_Closing">
- 我们想要一个当我们点击“发送消息 发送 ”按钮。 我们通过更换连接:
<Button Content="Send" Height="" HorizontalAlignment="Left" Margin="373,274,0,0" Name="sendMessageButton" VerticalAlignment="Top" Width="" />
这里以下排版不是很好,太晚了看花眼了,请参照原文(英文)
- 我们希望用户能够输入后按回车或返回发送消息的消息框。 我们通过更换连接:
<Button Content="Send" Height="" HorizontalAlignment="Left" Margin="373,274,0,0" Name="sendMessageButton" VerticalAlignment="Top" Width="" Click="SendMessageButton_Click"/>
- 接下来,我们需要添加事件检查,取消勾选“启用服务器”蜱虫盒。 我们通过更换连接:
这里以下排版不是很好,太晚了看花眼了,请参照原文(英文)
<Button Content="Send" Height="" HorizontalAlignment="Left" Margin="373,274,0,0" Name="sendMessageButton" VerticalAlignment="Top" Width="" Click="SendMessageButton_Click"/>
<TextBox Height="" HorizontalAlignment="Left" Margin="62,274,0,0" Name="messageText" VerticalAlignment="Top" Width="" />
<TextBox Height="" HorizontalAlignment="Left" Margin="62,274,0,0" Name="messageText" VerticalAlignment="Top" Width="" KeyUp="MessageText_KeyUp"/>
<CheckBox Content="Enable Server" Height="" HorizontalAlignment="Left" Margin="377,44,0,0" x:Name="enableServer" VerticalAlignment="Top" />
<CheckBox Content="Use Encryption" Height="" HorizontalAlignment="Left" Margin="377,65,0,0" Name="useEncryptionBox" VerticalAlignment="Top" />
- 最后,我们需要添加的事件检查和取消勾选“ 使用加密 “蜱虫盒。 我们通过更换线:
<CheckBox Content="Use Encryption" Height="" HorizontalAlignment="Left" Margin="377,65,0,0" Name="useEncryptionBox" VerticalAlignment="Top" Checked="UseEncryptionBox_CheckedToggle" Unchecked="UseEncryptionBox_CheckedToggle" />
- 就是这样。 现在,我们可以看到我们的努力。
7所示。 测试你的WPF聊天应用程序
- 我们终于抵达了测试阶段。 我们现在要开至少两个WPF聊天应用程序的实例。 要做到这一点,我们首先需要构建项目在调试模式下(确保Visual Studio显示的 调试 在顶部菜单),通过解决方案上单击右键并选择“ 构建解决方案 ”或紧迫的” F6 键盘上的。
- 现在浏览到构建应用程序的位置。 一种方法是右键单击项目在Visual Studio,选择“ 在Windows资源管理器打开文件夹 ”。 寻找一个文件夹名为“ 本 ”,在“ 调试 ”。
- 现在,您应该看到一个可执行文件名为“ WPFChatExample.exe ”,双击这两次打开两个实例的例子。 注意:当你打开应用程序从你的系统防火墙可能会得到一个通知。 重要的是要提供必要的权限(见防火墙文档)否则将无法交流的例子。
- 选择哪一个应用程序将作为一个服务器(指定的应用程序)。检查的 启用服务器 “tickbox。 该应用程序现在应该显示哪些ipaddress和港口可供连接:
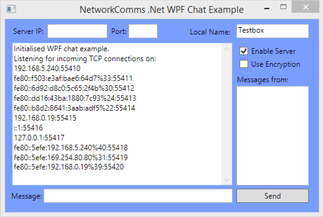
完成应用程序的示例输出本地服务器后启用。
- 选择一个合适的服务器IP地址和端口(通常127.0.0.1或192.168 . * . *)从应用程序A所示的输出和输入这些信息到其他应用程序(应用程序B)。
- 现在消息输入到应用程序B并点击发送或按enter。 现在的消息将出现在两个应用程序。 一旦连接建立了以这种方式信息现在可以进入两个应用程序中,它就会出现在另一个。
- 我们刚刚展示的是最基本的连接情况如下,以下应用程序B选择应用程序的服务器:

最基本的连接配置。 应用程序B已选定的应用程序服务器。
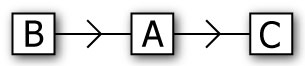
- 我们可以添加另一个应用程序,还贴上C和指定服务器应用程序如下:
另一个基本的连接配置。 应用程序B已选定的应用程序服务器。 应用C也选择的应用程序服务器。
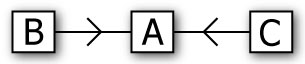
- 我们可以变得更时髦的因为我们添加了继电器的功能。 而不是应用程序C指定应用程序的服务器可以设置应用程序C应用程序A .一旦应用程序连接的服务器以这种方式进入一个消息客户端C将传送通过B:
一个更先进的连接配置。 应用程序B已选定的应用程序服务器。 C应用程序已经选择的应用程序服务器。
- 最后一个示例配置有三个应用程序设置他们的戒指。 C应用程序B使用应用服务器,应用程序C使用应用程序的服务器和应用程序使用应用程序B的服务器。 这个配置工作,因为我们有最大数量的继电器/消息和使用消息历史,以防止重复写入到聊天窗口:

最先进的连接配置使用三个客户。 选择应用程序B作为其服务器应用程序。 C应用程序B已经选定的应用程序服务器。 应用程序选择C应用程序的服务器。
如果一切工作 
- 如果你发现了这篇文章有用或有什么想法,我们可以如何改进,请给我们评论。
如果你有问题
- 确保您已经正确配置防火墙允许必要的交通。
- 如果你还有问题请上我们的 论坛我们将非常乐意帮助。
更多信息
- 看到我们的 开始或 基本的客户端服务器应用程序文章。
- 看到我们的网上 API参考这就解释了所有的方法做什么。
- 问我们的任何问题 论坛。
搭建QQ聊天通信的程序:(1)基于 networkcomms.net 创建一个WPF聊天客户端服务器应用程序 (1)的更多相关文章
- (4opencv)如何基于GOCW,创建一个实时视频程序
直接使用提供的代码框架进行修改,是最快得到效果的方法:但是这样的灵活性较差,而且真正的程序员从来都不会停滞在这一步:我们需要的是"将框架解析到最小化.理清楚每个构建之间的关系",只 ...
- 在 Visual Studio 中创建一个简单的 C# 控制台应用程序
转载:https://blog.csdn.net/qq_43994242/article/details/87260824 快速入门:使用 Visual Studio 创建第一个 C# 控制台应用 h ...
- 4.I/O复用以及基于I/O复用的回射客户端/服务器
I/O复用:当一个或多个I/O条件满足时,我们就被通知到,这种能力被称为I/O复用. 1.I/O复用的相关系统调用 posix的实现提供了select.poll.epoll两类系统调用以及相关的函数来 ...
- 创建一个简单的maven的web程序
最近学习Hadoop,发现学习要想用hadoop作为后台运行web程序,必须应用maven,所以学习了今天学习了一下maven,然后搭建了一个简单的web程序 首先我使用的是eclipse中自带的ma ...
- 简单创建一个完整的struts2框架小程序
要完成一个struts2框架的搭建, 1.首先应该从官网上下载最新的jar包,网络连接:http://struts.apache.org/download.cgi#struts2514.1,选择下载F ...
- 微信小程序开发(一)创建一个小程序Hello World!
开发微信小程序并不是很难,网上有很多小程序开发资料,尤其是微信官方的<小程序开发指南>最详细. 下面是我开发小程序的历程: 第一步,请前往https://mp.weixin.qq.com/ ...
- 如何用Unity创建一个的简单的HoloLens 3D程序
注:本文提到的代码示例下载地址>How to create a Hello World 3D holographic app with Unity 之前我们有讲过一次如何在HoloLens中创建 ...
- 用 JSQMessagesViewController 创建一个 iOS 聊天 App - 第 2 部分
原文链接 : Create an iOS Chat App using JSQMessagesViewController – Part 2 原文作者 : Mariusz Wisniewski 译者 ...
- 一步一步创建聊天程序2-利用epoll来创建简单的聊天室
如图,这个是看视频时,最后的作业,除了客户端未使用select实现外,其它的要求都有简单实现. 服务端代码如下: #include <stdio.h> #include <strin ...
随机推荐
- nodejs进阶(3)—路由处理
1. url.parse(url)解析 该方法将一个URL字符串转换成对象并返回. url.parse(urlStr, [parseQueryString], [slashesDenoteHost]) ...
- 为什么 NaN 不等于自身?
NaN 即Not a Number , 不是一个数字, 那么NaN到底是什么呢? 话说在JavaScript中,有6大数据类型,分别包括string,number,boolean,undefined, ...
- 关于这段时间学习 EntityFramework的 一点感悟
Ado.Net,用了N多年,Entity Framework也关注了很多年. 每当项目转型的时候,就花费大巴的时间,学习一番,潮流的东西. 这个Orm很多,这个EF很火,这么多年了,我还是不敢用,虽然 ...
- MVC5+EF6+MYSQl,使用codeFirst的数据迁移
之前本人在用MVC4+EF5+MYSQL搭建自己的博客.地址:www.seesharply.com;遇到一个问题,就是采用ef的codefirst模式来编写程序,我们一般会在程序开发初期直接在glob ...
- Mysql事务探索及其在Django中的实践(二)
继上一篇<Mysql事务探索及其在Django中的实践(一)>交代完问题的背景和Mysql事务基础后,这一篇主要想介绍一下事务在Django中的使用以及实际应用给我们带来的效率提升. 首先 ...
- SuperMap iClient for JavaScript 新手入门
地理信息系统(英语:Geographic Information System,缩写:GIS)是一门综合性学科,结合地理学与地图学,已经广泛的应用在不同的领域,是用于输入.存储.查询.分析和显示地理数 ...
- EventBus实现activity跟fragment交互数据
最近老是听到技术群里面有人提出需求,activity跟fragment交互数据,或者从一个activity跳转到另外一个activity的fragment,所以我给大家介绍一个开源项目,EventBu ...
- jquery.Callbacks的实现
前言 本人是一个热爱前端的菜鸟,一直喜欢学习js原生,对于jq这种js库,比较喜欢理解他的实现,虽然自己能力有限,水平很低,但是勉勉强强也算是能够懂一点吧,对于jq源码解读系列,博客园里有很多,推荐大 ...
- 修改eclipse皮肤
习惯了vim黑色背景的程序猿们想必用eclipse时会倍感的不适应吧,不过没关系,因为eclipse的皮肤是可以自己定制的! 下面是我电脑上的eclipse界面,看到这个是不是找回了vim的感觉呢? ...
- pt-pmp
pt-pmp有两方面的作用:一是获取进程的堆栈信息,二是对这些堆栈信息进行汇总. 进程的堆栈信息是利用gdb获取的,所以在获取的过程中,会对mysql服务端的性能有一定的影响. 用官方的话说: Thi ...