Android实现图片一边的三角形边框
在每一个图片的某一侧都可以展示出一个三角形的边框视图,就是咱们的三角形标签视图。这个视图在电商类APP当中比较常用,使用过ebay的同学应该都还记得有些商品的左上角或者右上角都会显示一个三角形的边框,用于给人一个直观的商品正在促销,或者刚刚上线的直观感受。我们可以看看实现后的效果如下:
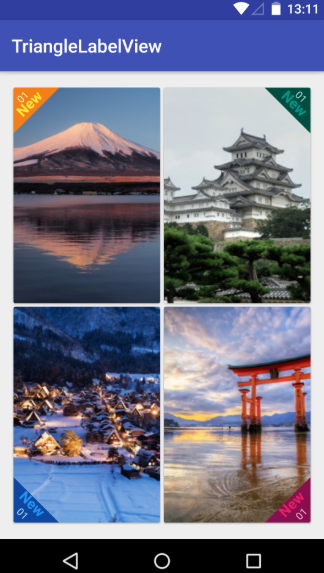
在真实的APP当中,我们还会加上一个SrcollView控件,这样子才可以进行不断地上下浏览。我们这里主要是为了让大家明白这个视图是该如何实现的,就不演示SrcollView控件下的做法了,直接在线性布局下做一个简单的说明。由于在线性布局上面一共具有四张图,因此咱们可以先单独编写每一个imageview的自定义view,然后<include>的语法将他们组合起来,这样可以提高UI开发的效率,进行协同工作与开发。首先咱们先实现左上角和右上角的triangle view.
在build.gradle文件当中相应地方添加如下代码,导入相应的maven库:
allprojects {

        repositories {

            ...

            maven { url "https://jitpack.io" }

        }

}
之后在另一个build.gradle文件当中添加库:
dependencies {

            implementation 'com.github.shts:TriangleLabelView:1.1.2'

    }
咱们的前期工作就这样做好啦,现在就开始正式编写咱们的每一个三角形边框视图啦,首先是第一个位于左上角的视图
一.card_left_top.xml:
<?xml version="1.0" encoding="utf-8"?>

<android.support.v7.widget.CardView xmlns:android="http://schemas.android.com/apk/res/android"

    xmlns:app="http://schemas.android.com/apk/res-auto"

    android:layout_width="match_parent"

    android:layout_height="match_parent">

    <RelativeLayout

        android:layout_width="match_parent"

        android:layout_height="match_parent">

        <ImageView

            android:id="@+id/image"

            android:scaleType="centerCrop"

            android:src="@drawable/s_image_2"

            android:layout_width="match_parent"

            android:layout_height="match_parent" />

        <jp.shts.android.library.TriangleLabelView

            android:layout_width="match_parent"

            android:layout_height="match_parent"

            android:layout_alignParentLeft="true"

            android:layout_alignParentTop="true"

            app:backgroundColor="@color/yellow_900"

            app:corner="leftTop"

            app:labelBottomPadding="5dp"

            app:labelCenterPadding="0dp"

            app:labelTopPadding="10dp"

            app:primaryText="New"

            app:primaryTextColor="@color/yellow_500"

            app:primaryTextSize="16sp"

            app:secondaryText="01"

            app:secondaryTextColor="@color/yellow_100"

            app:secondaryTextSize="11sp" />

    </RelativeLayout>

</android.support.v7.widget.CardView>
编写好后在preview当中显示如下:

下面是位于右上角的视图
二.card_right_top.xml:
<?xml version="1.0" encoding="utf-8"?>

<android.support.v7.widget.CardView xmlns:android="http://schemas.android.com/apk/res/android"

    xmlns:app="http://schemas.android.com/apk/res-auto"

    android:layout_width="match_parent"

    android:layout_height="match_parent">

    <RelativeLayout

        android:layout_width="match_parent"

        android:layout_height="match_parent">

        <ImageView

            android:id="@+id/image"

            android:scaleType="centerCrop"

            android:src="@drawable/s_image_4"

            android:layout_width="match_parent"

            android:layout_height="match_parent" />

        <jp.shts.android.library.TriangleLabelView

            android:layout_width="match_parent"

            android:layout_height="match_parent"

            android:layout_alignParentRight="true"

            android:layout_alignParentTop="true"

            app:backgroundColor="@color/teal_900"

            app:corner="rightTop"

            app:labelBottomPadding="5dp"

            app:labelCenterPadding="0dp"

            app:labelTopPadding="10dp"

            app:primaryText="New"

            app:primaryTextColor="@color/teal_500"

            app:primaryTextSize="16sp"

            app:secondaryText="01"

            app:secondaryTextColor="@color/teal_100"

            app:secondaryTextSize="11sp" />

    </RelativeLayout>

</android.support.v7.widget.CardView>
三.card_right_buttom.xml:
<?xml version="1.0" encoding="utf-8"?>

<android.support.v7.widget.CardView xmlns:android="http://schemas.android.com/apk/res/android"

    xmlns:app="http://schemas.android.com/apk/res-auto"

    android:layout_width="match_parent"

    android:layout_height="match_parent">

    <RelativeLayout

        android:layout_width="match_parent"

        android:layout_height="match_parent">

        <ImageView

            android:id="@+id/image"

            android:scaleType="centerCrop"

            android:src="@drawable/s_image_3"

            android:layout_width="match_parent"

            android:layout_height="match_parent" />

        <jp.shts.android.library.TriangleLabelView

            android:layout_width="match_parent"

            android:layout_height="match_parent"

            android:layout_alignParentRight="true"

            android:layout_alignParentBottom="true"

            app:backgroundColor="@color/pink_900"

            app:corner="rightBottom"

            app:labelTopPadding="10dp"

            app:labelCenterPadding="5dp"

            app:labelBottomPadding="0dp"

            app:primaryText="New"

            app:primaryTextColor="@color/pink_500"

            app:primaryTextSize="16sp"

            app:secondaryText="01"

            app:secondaryTextColor="@color/pink_100"

            app:secondaryTextSize="11sp" />

    </RelativeLayout>

</android.support.v7.widget.CardView>
四.card_left_buttom.xml:
<?xml version="1.0" encoding="utf-8"?>

<android.support.v7.widget.CardView xmlns:android="http://schemas.android.com/apk/res/android"

    xmlns:app="http://schemas.android.com/apk/res-auto"

    android:layout_width="match_parent"

    android:layout_height="match_parent">

    <RelativeLayout

        android:layout_width="match_parent"

        android:layout_height="match_parent">

        <ImageView

            android:id="@+id/image"

            android:src="@drawable/s_image_1"

            android:scaleType="centerCrop"

            android:layout_width="match_parent"

            android:layout_height="match_parent" />

        <jp.shts.android.library.TriangleLabelView

            android:layout_width="match_parent"

            android:layout_height="match_parent"

            android:layout_alignParentLeft="true"

            android:layout_alignParentBottom="true"

            app:backgroundColor="@color/blue_900"

            app:corner="leftBottom"

            app:labelTopPadding="10dp"

            app:labelCenterPadding="5dp"

            app:labelBottomPadding="0dp"

            app:primaryText="New"

            app:primaryTextColor="@color/blue_500"

            app:primaryTextSize="16sp"

            app:secondaryText="01"

            app:secondaryTextColor="@color/blue_100"

            app:secondaryTextSize="11sp" />

    </RelativeLayout>
最后咱们整合一下就OK啦!整合后的主活动的代码为:
五.activity_main.xml:
<?xml version="1.0" encoding="utf-8"?>

<LinearLayout xmlns:android="http://schemas.android.com/apk/res/android"

    xmlns:tools="http://schemas.android.com/tools"

    xmlns:app="http://schemas.android.com/apk/res-auto"

    android:layout_width="match_parent"

    android:layout_height="match_parent"

    android:orientation="vertical"

    tools:context=".Fragment2">

 <LinearLayout

        android:layout_width="match_parent"

        android:layout_height="0dp"

        android:layout_weight="1"

        android:orientation="horizontal">

        <include android:layout_width="0dp"

            android:layout_height="match_parent"

            android:layout_weight="1"

            android:layout_margin="2dp"

            android:id="@+id/left_top" layout="@layout/card_left_top" />

        <include android:layout_width="0dp"

            android:layout_height="match_parent"

            android:layout_weight="1"

            android:layout_margin="2dp"

            android:id="@+id/right_top" layout="@layout/card_right_top" />

    </LinearLayout>

    <LinearLayout

        android:layout_width="match_parent"

        android:layout_height="0dp"

        android:layout_weight="1"

        android:orientation="horizontal">

        <include android:layout_width="0dp"

            android:layout_height="match_parent"

            android:layout_weight="1"

            android:layout_margin="2dp"

            android:id="@+id/left_bottom" layout="@layout/card_left_bottom" />

        <include android:layout_width="0dp"

            android:layout_height="match_parent"

            android:layout_weight="1"

            android:layout_margin="2dp"

            android:id="@+id/right_bottom" layout="@layout/card_right_bottom" />

    </LinearLayout>

</LinearLayout>
完事儿!github源码可以在https://github.com/shts/TriangleLabelView处进行阅读!!!
帅照:
Android实现图片一边的三角形边框的更多相关文章
- Android 给图片 加边框
图片处理时,有时需要为图片加一些边框,下面介绍一种为图片添加简单边框的方法. 基本思路是:将边框图片裁剪成八张小图片(图片大小最好一致,不然后面处理会很麻烦),分别对应左上角,左边,左下角,下边,右下 ...
- Android 给图片加边框
图片处理时,有时需要为图片加一些边框,下面介绍一种为图片添加简单边框的方法. 基本思路是:将边框图片裁剪成八张小图片(图片大小最好一致,不然后面处理会很麻烦),分别对应左上角,左边,左下角,下边,右下 ...
- Android ImageView图片自适应 (转)
网络上下载下来的图片自适应:android:adjustViewBounds="true"(其详细解释在下面)<ImageView android:id=" ...
- Android ImageView图片自适应
网络上下载下来的图片自适应:android:adjustViewBounds="true"(其详细解释在下面) <ImageView android:id=" ...
- Android圆形图片自定义控件
Android圆形图片控件效果图如下: 代码如下: RoundImageView.java package com.dxd.roundimageview; import android.content ...
- Android Imageview 图片居左居右,自定义圆角
android:scaleType="fitStart" 图片靠左不变形显示, android:scaleType=”fitEnd” 图片靠右显示,不变形. 半透明andr ...
- Android圆形图片--自己定义控件
Android圆形图片控件效果图例如以下: 代码例如以下: RoundImageView.java package com.dxd.roundimageview; import android.con ...
- Android压缩图片到100K以下并保持不失真的高效方法
前言:目前一般手机的相机都能达到800万像素,像我的Galaxy Nexus才500万像素,拍摄的照片也有1.5M左右.这么大的照片上传到服务器,不仅浪费流量,同时还浪费时间. 在开发Android企 ...
- 仿优酷Android客户端图片左右滑动(自动滑动)
最终效果: 页面布局main.xml: <?xml version="1.0" encoding="utf-8"?> <LinearLayou ...
随机推荐
- [ASP.NET Core 3框架揭秘] 依赖注入[5]: 利用容器提供服务
毫不夸张地说,整个ASP.NET Core框架是建立在依赖注入框架之上的.ASP.NET Core应用在启动时构建管道以及利用该管道处理每个请求过程中使用到的服务对象均来源于依赖注入容器.该依赖注入容 ...
- 爬虫学习--Day4(网页采集器的实现)
#UA: User-Agent {请求载体的身份标识}#(反爬机制)UA检测:门户网站的服务器回检测对应请求的载体身份标识,如果检测到请求的载体身份为某一款浏览器就说明该请求时一个正常的请求.但是,如 ...
- 去除word文档页眉处的横杠
如何去除上图word文档页眉处的横杠 wps软件使用者 第一步双击页眉,到页眉页脚: 第一步点击上图页眉横线,点击无线型或者删除横线即可: Microsoft Office 专业增 ...
- mysql数据库基本操作语句
1 更改字段名:change alter table student change column gradenews grade int(11); 2 增加字段和删除字段 alter table s ...
- 4、Vim编辑器与正则表达式-面试题
题目 自己写答案
- 深入理解计算机系统 第二章 信息的表示和处理 Part2 第二遍
<深入理解计算机系统> 第三版 第二遍读这本书,每周花两到三小时时间,能读多少读多少(这次看了 29 ~ 34 页) 第一遍对应笔记链接 https://www.cnblogs.com/s ...
- Redis实战--Jedis实现分布式锁
echo编辑整理,欢迎转载,转载请声明文章来源.欢迎添加echo微信(微信号:t2421499075)交流学习. 百战不败,依不自称常胜,百败不颓,依能奋力前行.--这才是真正的堪称强大!!! 分布式 ...
- Python 命令行之旅:深入 click 之选项篇
作者:HelloGitHub-Prodesire HelloGitHub 的<讲解开源项目>系列,项目地址:https://github.com/HelloGitHub-Team/Arti ...
- springboot配置springMVC
/** * @ClassName MvcConfigure * @Description SpringMVC配置 * @Author JAGNG * @Date 2019/10/28 10:23 ** ...
- go中的关键字-defer
1. defer的使用 defer 延迟调用.我们先来看一下,有defer关键字的代码执行顺序: func main() { defer func() { fmt.Println("1号输出 ...