qt实现串口通讯
摘要:上位机软件程序通过QT实现,采集输入信息,根据实际需要做出合适的串口通讯协议,实现效果如下图所示:
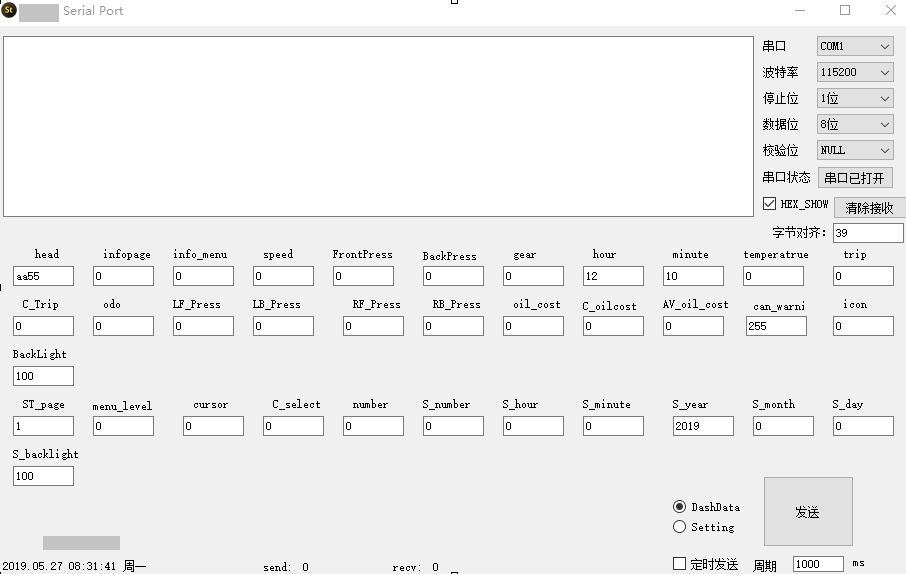
主要实现的功能:
1.串口基本参数可选,可调
2.显示区域可选择十六进制/asicii码显示,可根据自己的需求调整多少字节对齐,显示的比较工整,有利于解析协议
3.可自己制定协议头,其他子项内容都是以十进制输入,内置checksum自动计算
4.实时显示发送/接收字节数
5.可自己定制时间周期定时发送
6.实时显示时间
代码实现:
实现过程较为简单,主要是协议处理:
串口设备:新建串口对象 -> 寻找可用串口设置 -> 设置串口基本参数 -> 打开串口 ->监听串口
串口协议:LineEdit的内容是大端格式,所以使用的时候要将变量转换成大端,默认是小端
注意:
 QString("%1").arg(ui>lineEdit_S_num>text().toInt(),,,QChar(''))

 第一个参数 : 将Qstring转换为int型 第二个参数 : 需要将几个字符串转换成十六进制的,

 如char型   :需要两个字符

    short型  : 需要四个字符

    int/long : 需要八个字符

 第三个参数:  转换为多少进制

 第四个参数:  不足位数的用0补齐
 //QByteArray里面的数据按照对应的通讯协议进行调整

 void Widget::int_adjust(QByteArray  &str,qint8 startcount)

 {

     qint8 temp1;

     qint8 temp2;

     temp1 = str[startcount];

     temp2 = str[startcount+];

     str[startcount] = str[startcount+];

     str[startcount+] = str[startcount+];

     str[startcount+] =temp2;

     str[startcount+] =temp1;

 }

 void Widget::short_adjust(QByteArray  &str,qint8 startcount)

 {

     qint8 temp1;

     temp1 = str[startcount];

     str[startcount] = str[startcount+];

     str[startcount+] = temp1;

 }
 //字符串转成十六进制实现

 void Widget::StringToHex(QString str, QByteArray &senddata)

 {

     int hexdata,lowhexdata;

     int hexdatalen = ;

     int len = str.length();

     senddata.resize(len/);

     char lstr,hstr;

     for(int i=; i<len; )

     {

         //char lstr,

         hstr=str[i].toLatin1();

         if(hstr == ' ')

         {

             i++;

             continue;

         }

         i++;

         if(i >= len)

            break;

         lstr = str[i].toLatin1();

         hexdata = ConvertHexChar(hstr);

         lowhexdata = ConvertHexChar(lstr);

         if((hexdata == ) || (lowhexdata == ))

             break;

         else

             hexdata = hexdata*+lowhexdata;

         i++;

         senddata[hexdatalen] = (char)hexdata;

         hexdatalen++;

     }

     senddata.resize(hexdatalen);

 }

 char Widget::ConvertHexChar(char ch)

 {

    if((ch >= '') && (ch <= ''))

             return ch-0x30;

         else if((ch >= 'A') && (ch <= 'F'))

            return ch-'A'+;

         else if((ch >= 'a') && (ch <= 'f'))

             return ch-'a'+;

         else return (-);

 }
要点,易错点基本已经指出,其他的比较简单,这里不再赘叙
 #include "widget.h"

 #include "ui_widget.h"

 #include <QTimer>

 #include <QDateTime>

 #include <QMessageBox>

 static int CountBase = ;

 static int SENDNUMSIZE = ;

 static int recvCount = ;

 Widget::Widget(QWidget *parent) :

     QWidget(parent),

     ui(new Ui::Widget)

 {

     ui->setupUi(this);

     serial = new QSerialPort;

     /* regester software timer*/

     atimer = new QTimer();

     atimer->setInterval();

     atimer->start();

     cycletime = new QTimer();

     cycletime->setInterval(ui->lineEdit_cycletime->text().toInt());

     QObject::connect(atimer,&QTimer::timeout,this,&Widget::timer_handle);

         //查找可用的串口

            foreach (const QSerialPortInfo &info,QSerialPortInfo::availablePorts())

            {

                QSerialPort serial;

                serial.setPort(info);

                if(serial.open(QIODevice::ReadWrite))

                {

                    ui->comBox->addItem(serial.portName());

                    serial.close();

                }

            }

            //设置波特率下拉菜单默认显示第0项

            ui->baudBox->setCurrentIndex();

            ui->baudBox->setEnabled(false);

            ui->stopbitBox->setEnabled(false);

            ui->databitBox->setEnabled(false);

            ui->checkBox->setEnabled(false);

            ui->comBox->setEnabled(false);

 }

 Widget::~Widget()

 {

     delete ui;

 }

 void Widget::timer_handle(void)

 {

     QDateTime current_date_time =QDateTime::currentDateTime();

     QString current_date =current_date_time.toString("yyyy.MM.dd hh:mm:ss ddd");

    // ui->textBrowser_date

     ui->label_date->setText(current_date);

 }

 void Widget::on_pushButton_oprea_clicked()

 {

     if(ui->pushButton_oprea->text() == tr("串口已关闭"))

         {

             serial = new QSerialPort;

             //设置串口名

             serial->setPortName(ui->comBox->currentText());

             //打开串口

             serial->open(QIODevice::ReadWrite);

             //设置波特率

             serial->setBaudRate(QSerialPort::Baud115200);//设置波特率为115200

             //设置数据位数

             switch (ui->databitBox->currentIndex())

             {

             case :

                 serial->setDataBits(QSerialPort::Data8);//设置数据位8

                 break;

             default:

                 break;

             }

             //设置校验位

             switch (ui->checkBox->currentIndex())

             {

             case :

                 serial->setParity(QSerialPort::NoParity);

                 break;

             default:

                 break;

             }

             //设置停止位

             switch (ui->stopbitBox->currentIndex())

             {

             case :

                 serial->setStopBits(QSerialPort::OneStop);//停止位设置为1

                 break;

             case :

                 serial->setStopBits(QSerialPort::TwoStop);

             default:

                 break;

             }

             //设置流控制

             serial->setFlowControl(QSerialPort::NoFlowControl);//设置为无流控制

             //关闭设置菜单使能

             ui->baudBox->setEnabled(true);

             ui->stopbitBox->setEnabled(true);

             ui->databitBox->setEnabled(true);

             ui->checkBox->setEnabled(true);

             ui->comBox->setEnabled(true);

             ui->pushButton_oprea->setText(tr("串口已打开"));

             //连接信号槽

             QObject::connect(serial,&QSerialPort::readyRead,this,&Widget::ReadData);

         }

         else

         {

             cycletime->stop();

             //关闭串口

             serial->clear();

             serial->close();

             serial->deleteLater();

             //恢复设置使能

             ui->baudBox->setEnabled(false);

             ui->stopbitBox->setEnabled(false);

             ui->databitBox->setEnabled(false);

             ui->checkBox->setEnabled(false);

             ui->comBox->setEnabled(false);

             ui->pushButton_oprea->setText(tr("串口已关闭"));

         }

 }

 //读取接收到的信息

 void Widget::ReadData()

 {

      QByteArray temp;

     if(ui->HEX_SHOW->isChecked())

     {

        SENDNUMSIZE = ui->lineEdit_duiqi->text().toInt();

        temp = serial->readAll();

         QDataStream out(&temp,QIODevice::ReadWrite);    //将字节数组读入

             while(!out.atEnd())

             {

                 qint8 outChar = ;

                 static qint8 datacount = ;

                 recvCount++;

                 out>>outChar;   //每字节填充一次,直到结束

                 datacount++;

                 //十六进制的转换

                 QString str = QString(" %1").arg(outChar&0xFF,,,QLatin1Char(''));

                 ui->textBrowser->insertPlainText(str);

                 ui->label_recvvalue->setNum(recvCount);

                 if(SENDNUMSIZE+ == datacount)

                 {

                     datacount = ;

                     ui->textBrowser->insertPlainText("\n");

                      ui->textBrowser->moveCursor(QTextCursor::End);

                 }

             }

     }

     else

     {

         temp += serial->readAll();

         if(!temp.isEmpty())

         {

             ui->textBrowser->append(temp);

             ui->textBrowser->moveCursor(QTextCursor::End);

         }

         temp.clear();

     }

 }

  short Widget::checksum(QByteArray ba)

 {

     short i = ,sumValue = ;

     for(i=;i<(ba.length());i++)

     {

         sumValue+=ba.at(i);

     }

     return sumValue;

 }

 void Widget::on_send_clicked()

 {

     short checkValue = ;

     QString str;

     QByteArray senddata;

     if(ui->pushButton_oprea->text() == tr("串口已关闭"))

     {

         QMessageBox::information(this, "warning", "串口没打开", QMessageBox::Yes);

     }

     if(ui->radio_dash->isChecked())

     {

          str =  ui->lineEdit_head->text()

                 + QString("%1").arg(ui->lineEdit_infopage->text().toShort(),,,QChar(''))

                 + QString("%1").arg(ui->lineEdit_menu->text().toShort(),,,QChar(''))

                 + QString("%1").arg(ui->lineEdit_speed->text().toShort(),,,QChar(''))

                 + QString("%1").arg(ui->lineEdit_FP->text().toShort(),,,QChar(''))

                 + QString("%1").arg(ui->lineEdit_BP->text().toShort(),,,QChar(''))

                 + QString("%1").arg(ui->lineEdit_gear->text().toShort(),,,QChar(''))

                 + QString("%1").arg(ui->lineEdit_hour->text().toShort(),,,QChar(''))

                 + QString("%1").arg(ui->lineEdit_minute->text().toShort(),,,QChar(''))

                 + QString("%1").arg(ui->lineEdit_TemP->text().toShort(),,,QChar(''))//

                 + QString("%1").arg(ui->lineEdit_trip->text().toShort(),,,QChar(''))//

                 + QString("%1").arg(ui->lineEdit_C_Trip->text().toShort(),,,QChar(''))//

                 + QString("%1").arg(ui->lineEdit_odo->text().toInt(),,,QChar(''))//

                 + QString("%1").arg(ui->lineEdit_LF_Press->text().toShort(),,,QChar(''))//

                 + QString("%1").arg(ui->lineEdit_LB_Press->text().toShort(),,,QChar(''))//

                 + QString("%1").arg(ui->lineEdit_RF_Press->text().toShort(),,,QChar(''))//

                 + QString("%1").arg(ui->lineEdit_RB_Press->text().toShort(),,,QChar(''))//

                 + QString("%1").arg(ui->lineEdit_oil_cost->text().toInt(),,,QChar(''))//

                 + QString("%1").arg(ui->lineEdit_C_oilcost->text().toShort(),,,QChar(''))

                 + QString("%1").arg(ui->lineEdit_AV_oil_cost->text().toShort(),,,QChar(''))

                 + QString("%1").arg(ui->lineEdit_can_warning->text().toShort(),,,QChar(''))

                 + QString("%1").arg(ui->lineEdit_icon->text().toShort(),,,QChar(''))//

                 + QString("%1").arg(ui->lineEdit_backlight->text().toShort(),,,QChar(''));

                  /*************** 调整short 和 init 数据类型字节发送顺序 ****************/

                  StringToHex(str,senddata);//将str字符串转换为16进制的形式

                  short_adjust(senddata,);

                  short_adjust(senddata,);

                  short_adjust(senddata,);

                  int_adjust(senddata,);

                  short_adjust(senddata,);

                  short_adjust(senddata,);

                  short_adjust(senddata,);

                  short_adjust(senddata,);

                  int_adjust(senddata,);

                  short_adjust(senddata,);

          }

     else{

          str =  ui->lineEdit_head->text()

                 + QString("%1").arg(ui->lineEdit_ST_Page->text().toShort(),,,QChar(''))

                 + QString("%1").arg(ui->lineEdit_menu_level->text().toShort(),,,QChar(''))

                 + QString("%1").arg(ui->lineEdit_cursor->text().toShort(),,,QChar(''))

                 + QString("%1").arg(ui->lineEdit_C_selcet->text().toShort(),,,QChar(''))

                 + QString("%1").arg(ui->lineEdit_num->text().toShort(),,,QChar(''))

                 + QString("%1").arg(ui->lineEdit_S_num->text().toInt(),,,QChar(''))

                 + QString("%1").arg(ui->lineEdit_S_hour->text().toShort(),,,QChar(''))

                 + QString("%1").arg(ui->lineEdit_S_minute->text().toShort(),,,QChar(''))

                 + QString("%1").arg(ui->lineEdit_S_year->text().toShort(),,,QChar(''))

                 + QString("%1").arg(ui->lineEdit_S_month->text().toShort(),,,QChar(''))

                 + QString("%1").arg(ui->lineEdit_S_day->text().toShort(),,,QChar(''))

                 + QString("%1").arg(ui->lineEdit_S_backlight->text().toShort(),,,QChar(''));

                  /*************** 调整short 和 init 数据类型字节发送顺序 ****************/

                  StringToHex(str,senddata);//将str字符串转换为16进制的形式

                  int_adjust(senddata,);

                  short_adjust(senddata,);

     }

     checkValue = checksum(senddata);

     senddata.append((char)(checkValue));

     serial->write(senddata);//发送到串口

     CountBase+=senddata.length();

     ui->label_sendvalue->setNum(CountBase);

  }

 void Widget::int_adjust(QByteArray  &str,qint8 startcount)

 {

     qint8 temp1;

     qint8 temp2;

     temp1 = str[startcount];

     temp2 = str[startcount+];

     str[startcount] = str[startcount+];

     str[startcount+] = str[startcount+];

     str[startcount+] =temp2;

     str[startcount+] =temp1;

 }

 void Widget::short_adjust(QByteArray  &str,qint8 startcount)

 {

     qint8 temp1;

     temp1 = str[startcount];

     str[startcount] = str[startcount+];

     str[startcount+] = temp1;

 }

 void Widget::StringToHex(QString str, QByteArray &senddata)

 {

     int hexdata,lowhexdata;

     int hexdatalen = ;

     int len = str.length();

     senddata.resize(len/);

     char lstr,hstr;

     for(int i=; i<len; )

     {

         //char lstr,

         hstr=str[i].toLatin1();

         if(hstr == ' ')

         {

             i++;

             continue;

         }

         i++;

         if(i >= len)

            break;

         lstr = str[i].toLatin1();

         hexdata = ConvertHexChar(hstr);

         lowhexdata = ConvertHexChar(lstr);

         if((hexdata == ) || (lowhexdata == ))

             break;

         else

             hexdata = hexdata*+lowhexdata;

         i++;

         senddata[hexdatalen] = (char)hexdata;

         hexdatalen++;

     }

     senddata.resize(hexdatalen);

 }

 char Widget::ConvertHexChar(char ch)

 {

    if((ch >= '') && (ch <= ''))

             return ch-0x30;

         else if((ch >= 'A') && (ch <= 'F'))

            return ch-'A'+;

         else if((ch >= 'a') && (ch <= 'f'))

             return ch-'a'+;

         else return (-);

 }

 void Widget::on_pushButton_clicked()

 {

     ui->textBrowser->clear();

     CountBase = ;

     ui->label_sendvalue->setNum();

     recvCount = ;

      ui->label_recvvalue->setNum();

 }

 void  Widget::cycletime_handle(void)

 {

     on_send_clicked();

 }

 void Widget::on_lineEdit_duiqi_editingFinished()

 {

     SENDNUMSIZE = ui->lineEdit_duiqi->text().toInt();

 }

 void Widget::on_checkBox_TIMER_stateChanged(int arg1)

 {

     if(ui->checkBox_TIMER->isChecked())

     {

         cycletime->start();

         QObject::connect(cycletime,&QTimer::timeout,this,&Widget::cycletime_handle);

     }

     else

     {

         cycletime->stop();

     }

 }
all code
qt实现串口通讯的更多相关文章
- 树莓派中QT实现串口通讯
树莓派中QT实现串口通讯 开发平台为QT 此博客QT使用的为WiringPi驱动 我使用的串口调试助手为 cutecom 先简单说一些开发过程中需要注意的问题 Linux 下设备为 tty ,对应在 ...
- QSerialPort-Qt串口通讯
版权声明:若无来源注明,Techie亮博客文章均为原创. 转载请以链接形式标明本文标题和地址: 本文标题:QSerialPort-Qt串口通讯 本文地址:http://techieliang. ...
- 嵌入式Linux学习笔记(六) 上位机QT界面实现和串口通讯实现
目录 (1).参考资料 (2).QT界面布局实现 (3).数据和操作逻辑 在上一章我们实现了下位机的协议制定,并通过串口通讯工具完成了对设备内外设(LED)的状态修改,下面就要进行上位机软件的实现了( ...
- Qt之先用了再说系列-串口通讯(单串口单线程)
QT 串口通讯(单串口单线程) 串口通讯在我们写程序的时候或多或少会用到,借此在这记录一下QT是如何使用串口来通讯的.本次先侃侃在单线程下使用1个串口来通讯过程.好了,废话不多说,直接看步骤,我们的宗 ...
- Qt实现串口通信总结
Qt实现串口通信总结 注意: Qt5发布之前,Qt实现串口通信一般是采用第三方类库qextserialport.Qt5发布后自带了QtSerialPort 能够支持串口通信. 1.Qextserial ...
- Qt 编写串口调试助手
一.成品图展示 成品图如下所示: 二.串口通讯步骤 1.在工程文件(.pro)中添加串口通信相关运行库:QT += serialport 2.在头文件中添加: #include <QSerial ...
- C#串口通讯实例
本文参考<C#网络通信程序设计>(张晓明 编著) 程序界面如下图: 参数设置界面代码如下: using System; using System.Collections.Generic; ...
- delphi之动态库调用和串口通讯
串口通讯: Spcomm 控件属性: CommName :表示COM1,COM2等串口的名字: BaudRate:设定波特率9600,4800等 StartComm StopComm 函数Write ...
- 用SPCOMM 在 Delphi中实现串口通讯 转
用Delphi 实现串口通讯,常用的几种方法为:使用控件如MSCOMM和SPCOMM,使用API函数或者在Delphi 中调用其它串口通讯程序.利用API编写串口通信程序较为复杂,需要掌握大量通信 ...
随机推荐
- Visual Studio Code安装Python环境
如何在全宇宙最强编辑器安装Python运行环境 (雾 首先安装Python2和Python3,如果只需要用到一个的话,直接安装即可运行,不存在转换问题. 安装Python扩展,直接搜索安装即可. 更改 ...
- SpringCloud微服务笔记-Nginx实现网关反向代理
背景 当前在SpringCloud微服务架构下,网关作为服务的入口尤为重要,一旦网关发生单点故障会导致整个服务集群瘫痪,为了保证网关的高可用可以通过Nginx的反向代理功能实现网关的高可用. 项目源码 ...
- JS替换字符串多余的空格符
var str = 'sdfsdfds '; str.replace(/(^\s*)|(\s*$)/g, "");
- class命名归类
常见class关键词: 布局类:header, footer, container, main, content, aside, page, section 包裹类:wrap, inner 区块类:r ...
- Android 正 N 边形圆角头像的实现
卖一下广告,欢迎大家关注我的微信公众号,扫一扫下方二维码或搜索微信号 stormjun94(徐公码字),即可关注. 目前专注于 Android 开发,主要分享 Android开发相关知识和一些相关的优 ...
- java自学小测试 九九乘法表
public class Ninenine { public static void main(String[] args) { for(int i=1;i<=9;i++){ for(int j ...
- Hadoop点滴-Hadoop分布式文件系统
Hadoop自带HDFS,即 Hadoop Distributed FileSystem(不是HaDoop FileSystem 的简称) 适用范围 超大文件:最新的容量达到PB级 流式数据访问:H ...
- redis常用操作-键的生存时间
System.out.println("设置 key001的过期时间为5秒:"+jedis.expire("key001", 5)); System.out.p ...
- c# 9.0 特性提案 简化空参数验证代码
简而言之就是将已存在的特性null参数验证,使用一个简单的语义标注进一步简化. 对于如下这段代码 // Before void Insert(string s) { if (s is null) { ...
- springboot 获取Resource目录下的文件
如图,获取user.png: 代码实现: //文件路径,此处static前不能加/,否则解析不到try { //此处的static前不能加/!!! file = ResourceUtils.getFi ...