API gateway 之 kong 基本操作 (三)
一、演示环境准备
1、nginx配置
[root@nginx conf.d]# pwd

/etc/nginx/conf.d

[root@nginx conf.d]# ls

conf_bak  kong_test.conf

[root@nginx conf.d]# cat kong_test.conf

server {

    listen       ;

    server_name  192.168.1.128;

    access_log  /root/access.log  main;

    location / {

        root   /usr/share/nginx/html;

        index  index.html index.htm;

    }

}

[root@nginx conf.d]# cd /usr/share/nginx/html/

[root@nginx html]# ls

.html  50x.html  index.html

[root@nginx html]# mkdir test

[root@nginx html]# cd test

[root@nginx test]# echo "`hostname` , hello" > first.html

[root@nginx test]# cat first.html

nginx , hello
二、基本操作
1、添加 API
官网教程:https://getkong.org/docs/0.10.x/getting-started/adding-your-api/
提示:在查看官网文档时默认会定向到最新的说明文档,要留意下当前kong版本选择对应的文档。
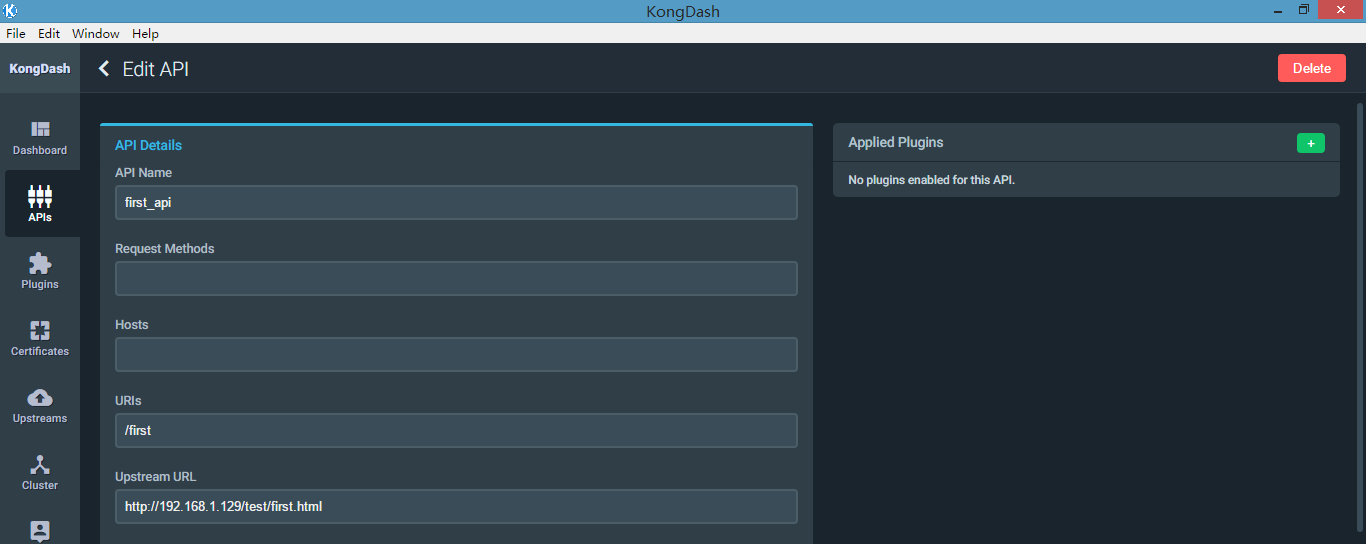
[root@kong_server ~]# curl -i -X POST http://localhost:8001/apis/ -d "name=first_api" -d "uris=/first" -d "upstream_url=http://192.168.1.129/test/first.html"

HTTP/1.1  Created

Date: Thu,  Apr  :: GMT

Content-Type: application/json; charset=utf-

Transfer-Encoding: chunked

Connection: keep-alive

Access-Control-Allow-Origin: *

Server: kong/0.10.

{"http_if_terminated":true,"id":"683c6d99-5766-4cdf-bd3f-5b6b1e3afe67","retries":,"preserve_host":false,"created_at":,"upstream_connect_timeout":,"upstream_url":"http:\/\/192.168.1.129\/test\/first.html","upstream_read_timeout":,"https_only":false,"upstream_send_timeout":,"strip_uri":true,"name":"first_api","uris":["\/first"]}
当然,此步骤也可以通过kong的桌面管理工具进行操作 或者 UI工具操作,安装步骤见 API gateway 之 kong 安装(二)
a、验证是否已生效
[root@kong_server ~]# curl -i -X GET http://192.168.1.128:8000/first

HTTP/1.1  OK

Date: Thu,  Apr  :: GMT

Content-Type: text/html; charset=UTF-

Content-Length:

Connection: keep-alive

Server: nginx/1.10.

Last-Modified: Sat,  Jan  :: GMT

ETag: "5a5976a5-e"

Accept-Ranges: bytes

X-Kong-Upstream-Latency:

X-Kong-Proxy-Latency:

Via: kong/0.10.

nginx , hello
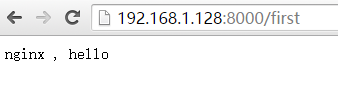
这样,就添加了一个API,并通过kong代理请求到后端的nginx服务器上了,此时kong就是一个反向代理服务器,由于kong是api gateway,它支持很多安全、验证、日志等插件功能,所以就可以在API上添加想要实现的功能对应的插件
2、启用插件(basic auth)
basic auth插件作用就是当访问某个API时,需要经过认证用户名密码通过后才能访问。
官网教程:https://getkong.org/plugins/basic-authentication/?_ga=2.77732445.853990414.1523077059-1213803929.1523077059
a、关联插件到需要认证的API上面
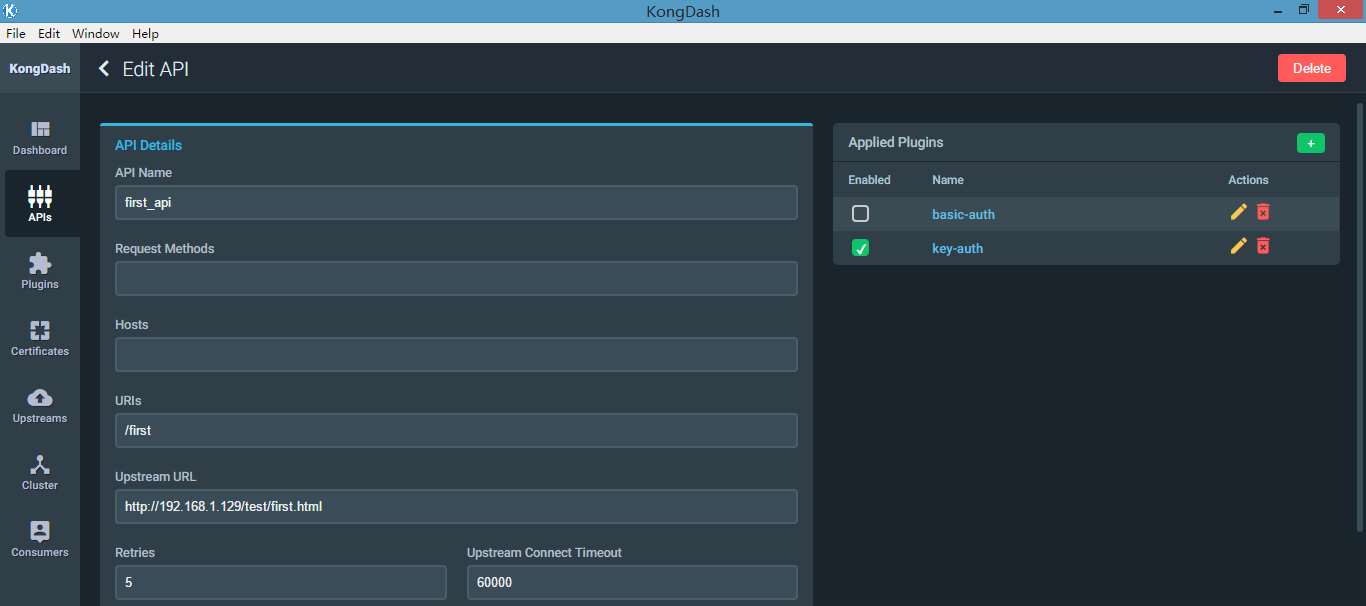
[root@kong_server ~]# curl -X POST http://localhost:8001/apis/first_api/plugins -d "name=basic-auth" -d "config.hide_credentials=true"

{"api_id":"683c6d99-5766-4cdf-bd3f-5b6b1e3afe67","id":"61a6ebe0-677c-406e-b93f-a1da9b617db4","created_at":,"enabled":true,"name":"basic-auth","config":{"hide_credentials":true,"anonymous":""}}
b、创建一个消费者(consumer)
注意:这里的consumer主要是指代表一种角色,它也可以是多个不同名字的consumer,假如这个API我允许通过哪些角色的consumer访问,其他一律不允许,比如,jason, tom, jack等消费者角色,kong通常设置某些认证且只允许某个消费者来认证访问,后面演示中还会用到。
[root@kong_server ~]# curl -i -X POST http://localhost:8001/consumers/ -d "username=Jason"

HTTP/1.1  Created

Date: Fri,  Apr  :: GMT

Content-Type: application/json; charset=utf-

Transfer-Encoding: chunked

Connection: keep-alive

Access-Control-Allow-Origin: *

Server: kong/0.10.

{"username":"Jason","created_at":,"id":"63d186fd-aa5c-449c-99d7-1f0cb7437e47"}
c、创建一个用户信息,即basic auth认证需要用到的用户名/密码
[root@kong_server ~]# curl -X POST http://localhost:8001/consumers/Jason/basic-auth \

>     --data "username=user1" \

>     --data "password=password1"

{"password":"0efeedcbcf5fbca03dc602dcd57fb77ea5c0d237","consumer_id":"63d186fd-aa5c-449c-99d7-1f0cb7437e47","id":"d38e51e0-7aef-4383-b9cb-cd5ff0b8eda2","username":"user1","created_at":}
d、再次访问加入basic auth认证后的 API
[root@kong_server ~]# curl -i -X GET http://localhost:8000/first --header "Authorization: Basic dXNlcjE6cGFzc3dvcmQx"

HTTP/1.1  OK

Date: Fri,  Apr  :: GMT

Content-Type: text/html; charset=UTF-

Content-Length:

Connection: keep-alive

Server: nginx/1.10.

Last-Modified: Sat,  Jan  :: GMT

ETag: "5a5976a5-e"

Accept-Ranges: bytes

X-Kong-Upstream-Latency:

X-Kong-Proxy-Latency:

Via: kong/0.10.

nginx , hello
这里要注意的是,dXNlcjE6cGFzc3dvcmQx 这个是对字符串 "user1:password1" 做base64编码后的结果,即 echo -n "user1:password1" | base64,如果输入错误编码后的值,kong会返回403 Forbidden
[root@kong_server ~]# curl -i -X GET http://localhost:8000/first --header "Authorization: Basic hahaha"

HTTP/1.1  Forbidden

Date: Fri,  Apr  :: GMT

Content-Type: application/json; charset=utf-

Transfer-Encoding: chunked

Connection: keep-alive

Server: kong/0.10.

{"message":"Invalid authentication credentials"}
浏览器访问效果

创建了这个basic auth用户名、密码后,可以把这个插件应用到其他的API上面,可以通过这个用户名密码登录验证。
3、key-auth 插件认证
官网教程:https://getkong.org/plugins/key-authentication/?_ga=2.44833389.853990414.1523077059-1213803929.1523077059
a、关联插件至指定API
[root@kong_server ~]# curl -i -X POST \

>   --url http://localhost:8001/apis/first_api/plugins/ \

>   --data 'name=key-auth'

HTTP/1.1  Created

Date: Fri,  Apr  :: GMT

Content-Type: application/json; charset=utf-

Transfer-Encoding: chunked

Connection: keep-alive

Access-Control-Allow-Origin: *

Server: kong/0.10.

{"api_id":"683c6d99-5766-4cdf-bd3f-5b6b1e3afe67","id":"51c396d9-6ae1-45fe-a760-bbb1735f77b6","created_at":,"enabled":true,"name":"key-auth","config":{"hide_credentials":false,"anonymous":"","key_names":["apikey"],"key_in_body":false}}
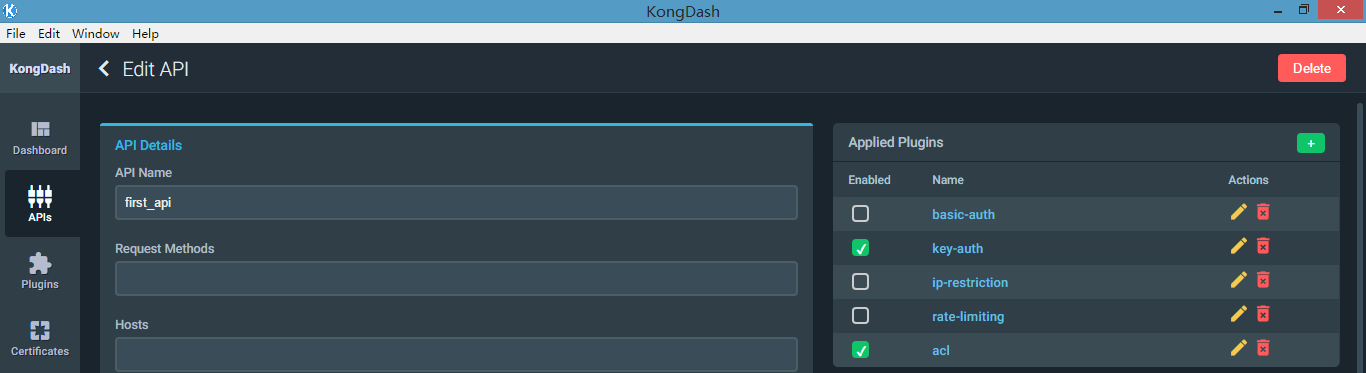
此时已经向first_api这个API应用了2个插件,为了不影响,把basic-auth插件取消掉
b、验证是否生效
[root@nginx html]# curl -i -X GET --url http://192.168.1.128:8000/first

HTTP/1.1  Unauthorized

Date: Fri,  Apr  :: GMT

Content-Type: application/json; charset=utf-

Transfer-Encoding: chunked

Connection: keep-alive

WWW-Authenticate: Key realm="kong"

Server: kong/0.10.

{"message":"No API key found in request"}
c、自定义API key给consumer
[root@kong_server ~]# curl -i -X POST \

>   --url http://localhost:8001/consumers/Jason/key-auth/ \

>   --data 'key=test_api_key_jason'

HTTP/1.1  Created

Date: Fri,  Apr  :: GMT

Content-Type: application/json; charset=utf-

Transfer-Encoding: chunked

Connection: keep-alive

Access-Control-Allow-Origin: *

Server: kong/0.10.

{"created_at":,"consumer_id":"63d186fd-aa5c-449c-99d7-1f0cb7437e47","key":"test_api_key_jason","id":"fae89fb9-9e9b-4c98-bf7d-b393a81c297b"}
d、通过刚刚创建的API key访问API
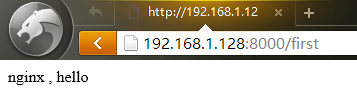
[root@nginx html]# curl -i -X GET --url http://192.168.1.128:8000/first --header "apikey: test_api_key_jason"

HTTP/1.1  OK

Date: Fri,  Apr  :: GMT

Content-Type: text/html; charset=UTF-

Content-Length:

Connection: keep-alive

Server: nginx/1.10.

Last-Modified: Sat,  Jan  :: GMT

ETag: "5a5976a5-e"

Accept-Ranges: bytes

X-Kong-Upstream-Latency:

X-Kong-Proxy-Latency:

Via: kong/0.10.

nginx , hello
浏览器访问:

e、通过kong自定义生成apikey(推荐这种方式)
[root@kong_server ~]# curl -i -X POST --url http://localhost:8001/consumers/ --data "username=Tom"

HTTP/1.1  Created

Date: Fri,  Apr  :: GMT

Content-Type: application/json; charset=utf-

Transfer-Encoding: chunked

Connection: keep-alive

Access-Control-Allow-Origin: *

Server: kong/0.10.

{"username":"Tom","created_at":,"id":"665658e9-f88b-48a0-81c1-594df3bdf456"}

[root@kong_server ~]# curl -i -X POST --url http://localhost:8001/consumers/Tom/key-auth/ -d ""

HTTP/1.1  Created

Date: Fri,  Apr  :: GMT

Content-Type: application/json; charset=utf-

Transfer-Encoding: chunked

Connection: keep-alive

Access-Control-Allow-Origin: *

Server: kong/0.10.

{"created_at":,"consumer_id":"665658e9-f88b-48a0-81c1-594df3bdf456","key":"d4661517c9a0463ebabcba7187d2ee0b","id":"16755308-0f55-427e-9cc6-c0d8de0897d4"}
也可以查询某个consumer的API key
[root@kong_server ~]# curl -i -X GET --url http://localhost:8001/consumers/Tom/key-auth/

HTTP/1.1  OK

Date: Fri,  Apr  :: GMT

Content-Type: application/json; charset=utf-

Transfer-Encoding: chunked

Connection: keep-alive

Access-Control-Allow-Origin: *

Server: kong/0.10.

{"data":[{"created_at":,"consumer_id":"665658e9-f88b-48a0-81c1-594df3bdf456","key":"d4661517c9a0463ebabcba7187d2ee0b","id":"16755308-0f55-427e-9cc6-c0d8de0897d4"}],"total":}

[root@kong_server ~]#

[root@kong_server ~]#

[root@kong_server ~]# curl -i -X GET --url http://localhost:8001/consumers/Jason/key-auth/

HTTP/1.1  OK

Date: Fri,  Apr  :: GMT

Content-Type: application/json; charset=utf-

Transfer-Encoding: chunked

Connection: keep-alive

Access-Control-Allow-Origin: *

Server: kong/0.10.

{"data":[{"created_at":,"consumer_id":"63d186fd-aa5c-449c-99d7-1f0cb7437e47","key":"test_api_key_jason","id":"fae89fb9-9e9b-4c98-bf7d-b393a81c297b"}],"total":}
f、访问测试
[root@nginx html]# curl -i -X GET --url http://192.168.1.128:8000/first --header 'apikey: d4661517c9a0463ebabcba7187d2ee0b'

HTTP/1.1  OK

Date: Fri,  Apr  :: GMT

Content-Type: text/html; charset=UTF-

Content-Length:

Connection: keep-alive

Server: nginx/1.10.

Last-Modified: Sat,  Jan  :: GMT

ETag: "5a5976a5-e"

Accept-Ranges: bytes

X-Kong-Upstream-Latency:

X-Kong-Proxy-Latency:

Via: kong/0.10.

nginx , hello
浏览器访问:
4、IP Restriction 插件
官网教程:https://getkong.org/plugins/ip-restriction/?_ga=2.44833389.853990414.1523077059-1213803929.1523077059
Linux nginx服务器IP:192.168.1.129
这里把192.168.1.129的IP加入黑名单进行测试
a、管理插件至指定API
[root@kong_server ~]# curl -i -X POST http://localhost:8001/apis/first_api/plugins \

>     --data "name=ip-restriction"  \

>     --data "config.blacklist=192.168.1.129, 143.1.0.0/24"

HTTP/1.1  Created

Date: Fri,  Apr  :: GMT

Content-Type: application/json; charset=utf-

Transfer-Encoding: chunked

Connection: keep-alive

Access-Control-Allow-Origin: *

Server: kong/0.10.

{"api_id":"683c6d99-5766-4cdf-bd3f-5b6b1e3afe67","id":"3bdc6ea8-0fca-41f3-b330-36b2ce71c9e2","created_at":,"enabled":true,"name":"ip-restriction","config":{"blacklist":["192.168.1.129","143.1.0.0\/24"]}}
b、验证是否生效
只启用ip restriction插件
[root@nginx html]# curl -i -X GET --url http://192.168.1.128:8000/first

HTTP/1.1  Forbidden

Date: Fri,  Apr  :: GMT

Content-Type: application/json; charset=utf-

Transfer-Encoding: chunked

Connection: keep-alive

Server: kong/0.10.

{"message":"Your IP address is not allowed"}
5、Rate limiting 访问速率限制
官网教程:https://getkong.org/plugins/rate-limiting/?_ga=2.85736144.853990414.1523077059-1213803929.1523077059
a、关联至API
[root@kong_server ~]# curl -X POST http://localhost:8001/apis/first_api/plugins \

>     --data "name=rate-limiting"  \

>     --data "config.second=2" \

>     --data "config.hour=100"

{"api_id":"683c6d99-5766-4cdf-bd3f-5b6b1e3afe67","id":"4135a8bf-13b6-4f6f-b006-f5afe65ae6cc","created_at":,"enabled":true,"name":"rate-limiting","config":{"fault_tolerant":true,"limit_by":"consumer","policy":"cluster","redis_database":,"second":,"hour":,"redis_timeout":,"redis_port":}}
config.second=2 表示每秒超过2次请求first_api接口时,将会被限制,提示限制信息
config.hour=100 表示一个小时内超过100次后就会被限制访问,提示限制信息
提示:这里是可以指定只限制某个consumer,加上参数就可了 consumer_id=CONSUMER
b、效果测试
[root@nginx html]# for i in {..}; do curl -X GET --url http://192.168.1.128:8000/first ; done

nginx , hello

nginx , hello

{"message":"API rate limit exceeded"}
浏览器快速刷新效果:

6、acl 访问控制
In order to use this plugin, you need to properly have configured your Service or Route (or API) with anauthentication plugin so that the plugin can identify who is the client Consumer making the request.
要使用这个插件的话,我们必须先配置好认证插件,可以是basic-auth, key-auth, OAth 2.0,其实这个acl插件需要知道是那个consumer发起的请求,由于前面几个认证插件都需要关联consumer,acl需要借助认证插件。
a、应用插件至API
[root@kong_server ~]# curl -X POST http://localhost:8001/apis/first_api/plugins/ \

>     --data "name=acl"  \

>     --data "config.blacklist=group1"

{"api_id":"683c6d99-5766-4cdf-bd3f-5b6b1e3afe67","id":"3cfc5701-78f5-48d6-a475-28ac09b2fb9a","created_at":,"enabled":true,"name":"acl","config":{"blacklist":["group1"]}}
b、关联consumer
前面我们已经添加了 Jason, Tom 两个consumer, 我们再添加Jerry, Bob两个,以便分为2个组,然后让acl控制一个组做黑名单或白名单
[root@kong_server ~]# curl -X POST http://localhost:8001/consumers/ -d "username=Jerry"

{"username":"Jerry","created_at":,"id":"98c8d417-1572-48fe-99ee-feab95cb788e"}

[root@kong_server ~]# curl -X POST http://localhost:8001/consumers/ -d "username=Bob"

{"username":"Bob","created_at":,"id":"40fb4329-482c-432c-8a1c-101a3ddae328"}

[root@kong_server ~]# curl -X POST http://localhost:8001/consumers/Jerry/key-auth/ -d ""

{"created_at":,"consumer_id":"98c8d417-1572-48fe-99ee-feab95cb788e","key":"d0baf3a09b074a65a14b66057ddd2f07","id":"417fd160-0282-483a-bdbf-6e7e183d0ff9"}

[root@kong_server ~]# curl -X POST http://localhost:8001/consumers/Bob/key-auth/ -d ""

{"created_at":,"consumer_id":"40fb4329-482c-432c-8a1c-101a3ddae328","key":"4cea214e55024c4aba0aeb3e79472ebe","id":"940d1166-bb78-424e-bb2f-5b50b2751c63"}

[root@kong_server ~]# curl -X POST http://localhost:8001/consumers/Jerry/acls/ -d "group=group1"

{"group":"group1","consumer_id":"98c8d417-1572-48fe-99ee-feab95cb788e","created_at":,"id":"5259a6c1-4ddc-402d-8572-2651d46555f4"}

[root@kong_server ~]# curl -X POST http://localhost:8001/consumers/Bob/acls/ -d "group=group1"

{"group":"group1","consumer_id":"40fb4329-482c-432c-8a1c-101a3ddae328","created_at":,"id":"be2191d4-ecae-4638-ab5a-dd26c16d6002"}
c、验证是否生效
注意:这个是需要开启一个认证插件的,不然会报错
[root@nginx html]# curl -X GET --url http://192.168.1.128:8000/first

{"message":"Cannot identify the consumer, add an authentication plugin to use the ACL plugin"}

[root@nginx html]# curl -X GET --url http://192.168.1.128:8000/first -H "apikey: test_api_key_jason"

{"message":"Cannot identify the consumer, add an authentication plugin to use the ACL plugin"}
以key-auth插件作为认证插件,开启key-auth插件,再测试
[root@nginx html]# curl -X GET --url http://192.168.1.128:8000/first -H "apikey: d0baf3a09b074a65a14b66057ddd2f07"   # Jerry apikey

{"message":"You cannot consume this service"}

[root@nginx html]# curl -X GET --url http://192.168.1.128:8000/first -H "apikey: 4cea214e55024c4aba0aeb3e79472ebe"   # Bob apikey

{"message":"You cannot consume this service"}

[root@nginx html]# curl -X GET --url http://192.168.1.128:8000/first -H "apikey: test_api_key_jason"   # Jason 自定义apikey(不在黑名单组)

nginx , hello


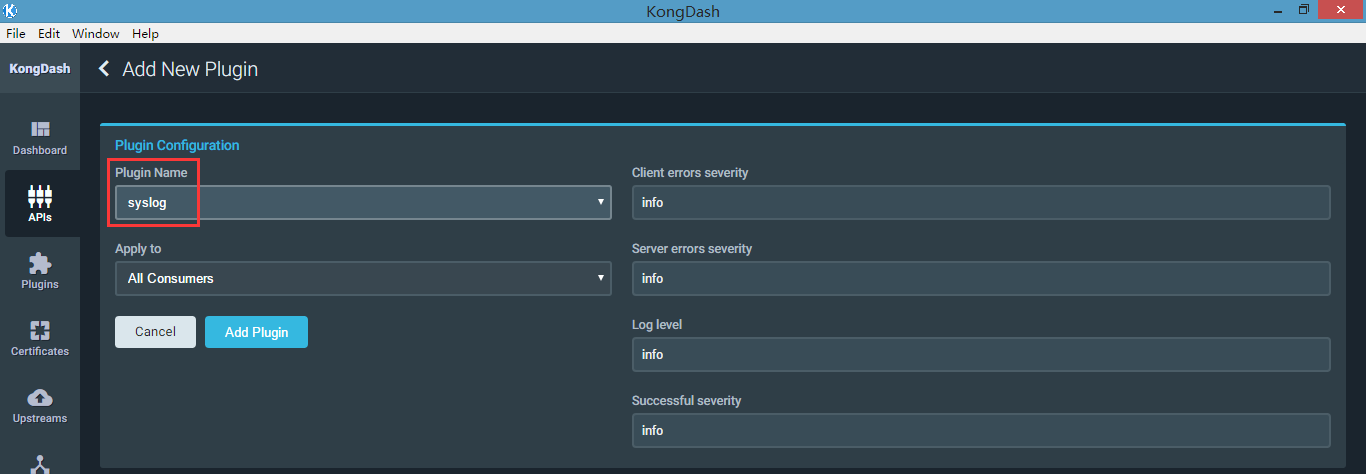
7、syslog 插件
把指定api的请求日志记录到syslog日志
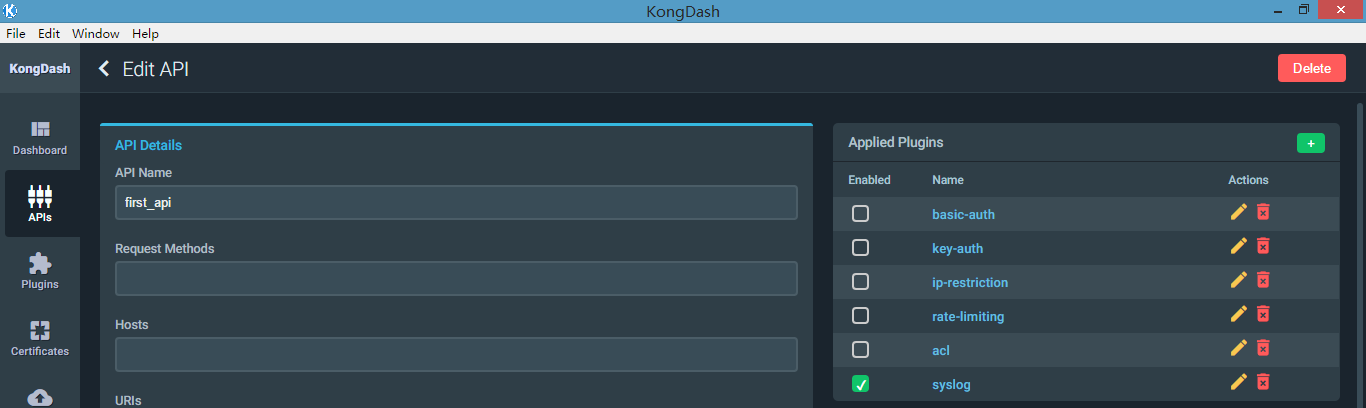
a、关联syslog插件
我们直接通过桌面管理工具添加

b、验证,访问API时,tailf /var/log/message(kong服务器)
[root@nginx html]# curl -i -X GET --url http://192.168.1.128:8000/first

HTTP/1.1  OK

Date: Fri,  Apr  :: GMT

Content-Type: text/html; charset=UTF-

Content-Length:

Connection: keep-alive

Server: nginx/1.10.

Last-Modified: Sat,  Jan  :: GMT

ETag: "5a5976a5-e"

Accept-Ranges: bytes

X-Kong-Upstream-Latency:

X-Kong-Proxy-Latency:

Via: kong/0.10.

nginx , hello
系统日志
Apr :: base kong[]: {"client_ip":"192.168.1.129","request":{"method":"GET","uri":"\/first","size":"","request_uri":"http:\/\/192.168.1.128:8000\/first","querystring":{},"headers":{"host":"192.168.1.128:8000","accept":"*\/*","user-agent":"curl\/7.19.7 (x86_64-redhat-linux-gnu) libcurl\/7.19.7 NSS\/3.27.1 zlib\/1.2.3 libidn\/1.18 libssh2\/1.4.2"}},"response":{"status":,"size":"","headers":{"server":"nginx\/1.10.2","content-type":"text\/html; charset=UTF-8","connection":"close","content-length":"","x-kong-proxy-latency":"","last-modified":"Sat, 13 Jan 2018 03:01:57 GMT","x-kong-upstream-latency":"","accept-ranges":"bytes","via":"kong\/0.10.4","etag":"\"5a5976a5-e\""}},"latencies":{"request":,"kong":,"proxy":},"started_at":,"tries":[{"ip":"192.168.1.129","port":}],"api":{"uris":["\/first"],"id":"683c6d99-5766-4cdf-bd3f-5b6b1e3afe67","upstream_read_timeout":,"preserve_host":false,"created_at":,"upstream_connect_timeout":,"upstream_url":"http:\/\/192.168.1.129\/test\/first.html","strip_uri":true,"https_only":false,"name":"first_api","http_if_terminated":true,"upstream_send_timeout":,"retries":}}
更多插件应用:https://konghq.com/plugins/
API gateway 之 kong 基本操作 (三)的更多相关文章
- API gateway 之 kong 基本介绍 (一)
一.API网关概念介绍 API 网关,即API Gateway,是大型分布式系统中,为了保护内部服务而设计的一道屏障,可以提供高性能.高可用的 API托管服务,从而帮助服务的开发者便捷地对外提供服务, ...
- API gateway 之 kong 安装 (二)
一.系统环境 [root@kong ~]# service iptables status iptables: Firewall is not running. [root@kong ~]# gete ...
- API gateway 之 kong 安装
kong安装: https://getkong.org/install/centos/ 下载指定版本rpm: wget https://bintray.com/kong/kong-community- ...
- 【设计模式 7】从公司的目前框架和API Gateway,谈谈对外观模式的理解
我,第一次用到外观模式,应该是3年多以前.那时候是做一个收费系统,在当时的U层和B层之间,加了一层Facade.当时,在一些复杂的业务逻辑处理时,感受到了加入外观层的好处,但对于一些简单的(我指的是, ...
- kong API gateway
参考:https://www.cnblogs.com/chenjinxi/p/8724564.html 一.简介 Kong,是由Mashape公司开源的,基于Nginx的API gateway. 二. ...
- API Gateway - KONG 安装与配置
简介 Kong,是由Mashape公司开源的,基于Nginx的API gateway 特点 可扩展,支持分布式 模块化 功能:授权.日志.ip限制.限流.api 统计分析(存在商业插件Galileo等 ...
- API Gateway : Kong
what problems 多个服务要写自己的log,auth,对于比较耗时的,有时还要高流量限制. solution intro 单点部署的情况: why not just haproxy log ...
- 关于kong | API Gateway
目录 为什么需要 API 网关(more) kong的概念 为什么使用Kong Kong 的管理方式 高可扩展性的背后-插件机制 [前言]: Kong是一个云原生,高效,可扩展的分布式 API 网关. ...
- Docker安装Kong API Gateway并使用
我最新最全的文章都在南瓜慢说 www.pkslow.com,文章更新也只在官网,欢迎大家来喝茶~~ 1 简介 Kong不是一个简单的产品,本文讲的Kong主要指的是Kong API Gateway,即 ...
随机推荐
- Python爬虫(三):BeautifulSoup库
BeautifulSoup 是一个可以从 HTML 或 XML 文件中提取数据的 Python 库,它能够将 HTML 或 XML 转化为可定位的树形结构,并提供了导航.查找.修改功能,它会自动将输入 ...
- wordpress安装主题、插件需要FTP用户名密码
修改主目录wordpress下的wp-config.php文件,在最结尾加上 define("FS_METHOD", "direct"); define(&qu ...
- [Machine learning] Logistic regression
1. Variable definitions m : training examples' count \(X\) : design matrix. each row of \(X\) is a t ...
- ELK 学习笔记之 elasticsearch启动时Warning解决办法
elasticsearch启动时Warning解决办法: 转载:http://www.dajiangtai.com/community/18136.do?origin=csdn-geek&dt ...
- 手把手带你利用Ribbon实现客户端的负载均衡
之前的文章<SpringCloud搭建注册中心与服务注册>介绍了注册中心的搭建和服务的注册,本文将介绍下服务消费者通过Ribbon调用服务实现负载均衡的过程. 本文目录 一.Ribbon服 ...
- 如何决定使用 HashMap 还是 TreeMap?
问:如何决定使用 HashMap 还是 TreeMap? 介绍 TreeMap<K,V>的Key值是要求实现java.lang.Comparable,所以迭代的时候TreeMap默认是按照 ...
- spring5 源码深度解析----- @Transactional注解的声明式事物介绍(100%理解事务)
面的几个章节已经分析了spring基于@AspectJ的源码,那么接下来我们分析一下Aop的另一个重要功能,事物管理. 事务的介绍 1.数据库事物特性 原子性多个数据库操作是不可分割的,只有所有的操作 ...
- 关于MySQL退出命令,还有你不知道的一种操作
前两天再进MySQL窗口的时候,手快点了一个 ' ,并且按下了enter键,于是就出现了这种情况, 然后就退不出来了,为此我还特意上网查了一下,最后的结果基本上都是只能关闭MySQL 重新进入. 因为 ...
- RMAN详细教程(二):备份、检查、维护、恢复
RMAN详细教程(一):基本命令代码 一.创建增量备份 增量备份级别为0-4,但为方便备份管理,oracle建议只限于0级和1级. 1.差异增量备份(differential incremental ...
- BZOJ 1345: [Baltic2007]序列问题Sequence
1345: [Baltic2007]序列问题Sequence Time Limit: 5 Sec Memory Limit: 162 MBSubmit: 1180 Solved: 633[Subm ...