
Android View 的添加绘制流程 (二)
View 的绘制系列文章:
Android View 绘制流程之 DecorView 与 ViewRootImpl
Android View 的绘制流程之 Measure 过程详解 (一)
Android View 的绘制流程之 Layout 和 Draw 过程详解 (二)
Android View 的事件分发原理解析
概述
上一篇 Android View 绘制流程之 DecorView 与 ViewRootImpl 分析了在调用 setContentView 之后,DecorView 是如何与 activity 关联在一起的,最后讲到了 ViewRootImpl 开始绘制的逻辑。本文接着上篇,继续往下讲,开始分析 view 的绘制流程。
上文说到了调用 performTraversals 进行绘制,由于 performTraversals 方法比较长,看一个简化版:
// ViewRootImpl 类

private void performTraversals() {

    // 这个方法代码非常多,但是重点就是执行这三个方法

    // 执行测量

    performMeasure(childWidthMeasureSpec, childHeightMeasureSpec);

    // 执行布局(ViewGroup)中才会有

    performLayout(lp, mWidth, mHeight);

    // 执行绘制

    performDraw();

}
其流程具体如下:
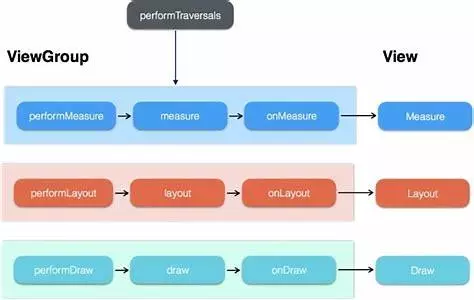
View的整个绘制流程可以分为以下三个阶段:
measure: 判断是否需要重新计算 View 的大小,需要的话则计算;
layout: 判断是否需要重新计算 View 的位置,需要的话则计算;
draw: 判断是否需要重新绘制 View,需要的话则重绘制。
MeasureSpec
在介绍绘制前,先了解下 MeasureSpec。MeasureSpec 封装了父布局传递给子布局的布局要求,它通过一个 32 位 int 类型的值来表示,该值包含了两种信息,高两位表示的是 SpecMode(测量模式),低 30 位表示的是 SpecSize(测量的具体大小)。下面通过注释的方式来分析来类:
/**
* 三种SpecMode:
* 1.UNSPECIFIED
* 父 ViewGroup 没有对子View施加任何约束,子 view 可以是任意大小。这种情况比较少见,主要用于系统内部多次measure的情形,
* 用到的一般都是可以滚动的容器中的子view,比如ListView、GridView、RecyclerView中某些情况下的子view就是这种模式。
* 一般来说,我们不需要关注此模式。
* 2.EXACTLY
* 该 view 必须使用父 ViewGroup 给其指定的尺寸。对应 match_parent 或者具体数值(比如30dp)
* 3.AT_MOST
* 该 View 最大可以取父ViewGroup给其指定的尺寸。对应wrap_content
*
* MeasureSpec使用了二进制去减少对象的分配。
*/
public class MeasureSpec {
// 进位大小为2的30次方(int的大小为32位,所以进位30位就是要使用int的最高位和第二高位也就是32和31位做标志位)
private static final int MODE_SHIFT = 30; // 运算遮罩,0x3为16进制,10进制为3,二进制为11。3向左进位30,就是11 00000000000(11后跟30个0)
// (遮罩的作用是用1标注需要的值,0标注不要的值。因为1与任何数做与运算都得任何数,0与任何数做与运算都得0)
private static final int MODE_MASK = 0x3 << MODE_SHIFT; // 0向左进位30,就是00 00000000000(00后跟30个0)
public static final int UNSPECIFIED = 0 << MODE_SHIFT;
// 1向左进位30,就是01 00000000000(01后跟30个0)
public static final int EXACTLY = 1 << MODE_SHIFT;
// 2向左进位30,就是10 00000000000(10后跟30个0)
public static final int AT_MOST = 2 << MODE_SHIFT; /**
* 根据提供的size和mode得到一个详细的测量结果
*/
// 第一个return:
// measureSpec = size + mode; (注意:二进制的加法,不是十进制的加法!)
// 这里设计的目的就是使用一个32位的二进制数,32和31位代表了mode的值,后30位代表size的值
// 例如size=100(4),mode=AT_MOST,则measureSpec=100+10000...00=10000..00100
//
// 第二个return:
// size &; ~MODE_MASK就是取size 的后30位,mode & MODE_MASK就是取mode的前两位,最后执行或运算,得出来的数字,前面2位包含代表mode,后面30位代表size
public static int makeMeasureSpec(int size, int mode) {
if (sUseBrokenMakeMeasureSpec) {
return size + mode;
} else {
return (size & ~MODE_MASK) | (mode & MODE_MASK);
}
} /**
* 获得SpecMode
*/
// mode = measureSpec & MODE_MASK;
// MODE_MASK = 11 00000000000(11后跟30个0),原理是用MODE_MASK后30位的0替换掉measureSpec后30位中的1,再保留32和31位的mode值。
// 例如10 00..00100 & 11 00..00(11后跟30个0) = 10 00..00(AT_MOST),这样就得到了mode的值
public static int getMode(int measureSpec) {
return (measureSpec & MODE_MASK);
} /**
* 获得SpecSize
*/
// size = measureSpec & ~MODE_MASK;
// 原理同上,不过这次是将MODE_MASK取反,也就是变成了00 111111(00后跟30个1),将32,31替换成0也就是去掉mode,保留后30位的size
public static int getSize(int measureSpec) {
return (measureSpec & ~MODE_MASK);
}
}
顺便提下 MATCH_PARENT 和 WRAP_CONTENT 这两个代表的值,分别是 -1 和 -2。
       /**

         * Special value for the height or width requested by a View.

         * MATCH_PARENT means that the view wants to be as big as its parent,

         * minus the parent's padding, if any. Introduced in API Level 8.

         */

        public static final int MATCH_PARENT = -1;

        /**

         * Special value for the height or width requested by a View.

         * WRAP_CONTENT means that the view wants to be just large enough to fit

         * its own internal content, taking its own padding into account.

         */

        public static final int WRAP_CONTENT = -2;
Decorview 尺寸的确定
在 performTraversals 中,首先是要确定 DecorView 的尺寸。只有当 DecorView 尺寸确定了,其子 View 才可以知道自己能有多大。具体是如何去确定的,可以看下面的代码:
//Activity窗口的宽度和高度

int desiredWindowWidth;

int desiredWindowHeight;

...

//用来保存窗口宽度和高度,来自于全局变量mWinFrame,这个mWinFrame保存了窗口最新尺寸

Rect frame = mWinFrame;

//构造方法里mFirst赋值为true,意思是第一次执行遍历吗

if (mFirst) {

    //是否需要重绘

    mFullRedrawNeeded = true;

    //是否需要重新确定Layout

    mLayoutRequested = true;

    // 这里又包含两种情况:是否包括状态栏

    //判断要绘制的窗口是否包含状态栏,有就去掉,然后确定要绘制的Decorview的高度和宽度

    if (shouldUseDisplaySize(lp)) {

        // NOTE -- system code, won't try to do compat mode.

        Point size = new Point();

        mDisplay.getRealSize(size);

        desiredWindowWidth = size.x;

        desiredWindowHeight = size.y;

    } else {

        //宽度和高度为整个屏幕的值

        Configuration config = mContext.getResources().getConfiguration();

        desiredWindowWidth = dipToPx(config.screenWidthDp);

        desiredWindowHeight = dipToPx(config.screenHeightDp);

    }

    ...

 else{

        // 这是window的长和宽改变了的情况,需要对改变的进行数据记录

        //如果不是第一次进来这个方法,它的当前宽度和高度就从之前的mWinFrame获取

        desiredWindowWidth = frame.width();

        desiredWindowHeight = frame.height();

        /**

         * mWidth和mHeight是由WindowManagerService服务计算出的窗口大小,

         * 如果这次测量的窗口大小与这两个值不同,说明WMS单方面改变了窗口的尺寸

         */

        if (desiredWindowWidth != mWidth || desiredWindowHeight != mHeight) {

            if (DEBUG_ORIENTATION) Log.v(mTag, "View " + host + " resized to: " + frame);

            //需要进行完整的重绘以适应新的窗口尺寸

            mFullRedrawNeeded = true;

            //需要对控件树进行重新布局

            mLayoutRequested = true;

            //window窗口大小改变

            windowSizeMayChange = true;

        }

 }

    ...

    // 进行预测量

    if (layoutRequested){

        ...

        if (mFirst) {

            // 视图窗口当前是否处于触摸模式。

            mAttachInfo.mInTouchMode = !mAddedTouchMode;

            //确保这个Window的触摸模式已经被设置

            ensureTouchModeLocally(mAddedTouchMode);

        } else {

            //六个if语句,判断insects值和上一次比有什么变化,不同的话就改变insetsChanged

            //insects值包括了一些屏幕需要预留的区域、记录一些被遮挡的区域等信息

            if (!mPendingOverscanInsets.equals(mAttachInfo.mOverscanInsets)) {

                    insetsChanged = true;

            }

            ...

          //  这里有一种情况,我们在写dialog时,会手动添加布局,当设定宽高为Wrap_content时,会把屏幕的宽高进行赋值,给出尽量长的宽度

            /**

             * 如果当前窗口的根布局的width或height被指定为 WRAP_CONTENT 时,

             * 比如Dialog,那我们还是给它尽量大的长宽,这里是将屏幕长宽赋值给它

             */

            if (lp.width == ViewGroup.LayoutParams.WRAP_CONTENT

                    || lp.height == ViewGroup.LayoutParams.WRAP_CONTENT) {

                windowSizeMayChange = true;

                //判断要绘制的窗口是否包含状态栏,有就去掉,然后确定要绘制的Decorview的高度和宽度

                if (shouldUseDisplaySize(lp)) {

                    // NOTE -- system code, won't try to do compat mode.

                    Point size = new Point();

                    mDisplay.getRealSize(size);

                    desiredWindowWidth = size.x;

                    desiredWindowHeight = size.y;

                } else {

                    Configuration config = res.getConfiguration();

                    desiredWindowWidth = dipToPx(config.screenWidthDp);

                    desiredWindowHeight = dipToPx(config.screenHeightDp);

                }

            }

        }

    }

}
这里主要是分两步走:
如果是第一次测量,那么根据是否有状态栏,来确定是直接使用屏幕的高度,还是真正的显示区高度。
如果不是第一次,那么从 mWinFrame 获取,并和之前保存的长宽高进行比较,不相等的话就需要重新测量确定高度。
当确定了 DecorView 的具体尺寸之后,然后就会调用 measureHierarchy 来确定其 MeasureSpec :
 // Ask host how big it wants to be

  windowSizeMayChange |= measureHierarchy(host, lp, res,

        desiredWindowWidth, desiredWindowHeight);
其中 host 就是 DecorView,lp 是 wm 在添加时候传给 DecorView 的,最后两个就是刚刚确定显示宽高 ,看下方法的具体逻辑 :
    private boolean measureHierarchy(final View host, final WindowManager.LayoutParams lp,

            final Resources res, final int desiredWindowWidth, final int desiredWindowHeight) {

        int childWidthMeasureSpec;

        int childHeightMeasureSpec;

        boolean windowSizeMayChange = false;boolean goodMeasure = false;
     // 说明是 dialog

        if (lp.width == ViewGroup.LayoutParams.WRAP_CONTENT) {

            // On large screens, we don't want to allow dialogs to just

            // stretch to fill the entire width of the screen to display

            // one line of text.  First try doing the layout at a smaller

            // size to see if it will fit.

            final DisplayMetrics packageMetrics = res.getDisplayMetrics();

            res.getValue(com.android.internal.R.dimen.config_prefDialogWidth, mTmpValue, true);

            int baseSize = 0;
       // 获取一个基本的尺寸

            if (mTmpValue.type == TypedValue.TYPE_DIMENSION) {

                baseSize = (int)mTmpValue.getDimension(packageMetrics);

            }

            if (DEBUG_DIALOG) Log.v(mTag, "Window " + mView + ": baseSize=" + baseSize

                    + ", desiredWindowWidth=" + desiredWindowWidth);
       // 如果大于基本尺寸

            if (baseSize != 0 && desiredWindowWidth > baseSize) {

                childWidthMeasureSpec = getRootMeasureSpec(baseSize, lp.width);

                childHeightMeasureSpec = getRootMeasureSpec(desiredWindowHeight, lp.height);

                performMeasure(childWidthMeasureSpec, childHeightMeasureSpec);

                if (DEBUG_DIALOG) Log.v(mTag, "Window " + mView + ": measured ("

                        + host.getMeasuredWidth() + "," + host.getMeasuredHeight()

                        + ") from width spec: " + MeasureSpec.toString(childWidthMeasureSpec)

                        + " and height spec: " + MeasureSpec.toString(childHeightMeasureSpec));
          // 判断测量是否准确

                if ((host.getMeasuredWidthAndState()&View.MEASURED_STATE_TOO_SMALL) == 0) {

                    goodMeasure = true;

                } else {

                    // Didn't fit in that size... try expanding a bit.

                    baseSize = (baseSize+desiredWindowWidth)/2;

                    if (DEBUG_DIALOG) Log.v(mTag, "Window " + mView + ": next baseSize="

                            + baseSize);

                    childWidthMeasureSpec = getRootMeasureSpec(baseSize, lp.width);

                    performMeasure(childWidthMeasureSpec, childHeightMeasureSpec);

                    if (DEBUG_DIALOG) Log.v(mTag, "Window " + mView + ": measured ("

                            + host.getMeasuredWidth() + "," + host.getMeasuredHeight() + ")");

                    if ((host.getMeasuredWidthAndState()&View.MEASURED_STATE_TOO_SMALL) == 0) {

                        if (DEBUG_DIALOG) Log.v(mTag, "Good!");

                        goodMeasure = true;

                    }

                }

            }

        }

     // 这里就是一般 DecorView 会走的逻辑

        if (!goodMeasure) {

            childWidthMeasureSpec = getRootMeasureSpec(desiredWindowWidth, lp.width);

            childHeightMeasureSpec = getRootMeasureSpec(desiredWindowHeight, lp.height);

            performMeasure(childWidthMeasureSpec, childHeightMeasureSpec);
       // 与之前的尺寸进行对比,看看是否相等,不想等,说明尺寸可能发生了变化

            if (mWidth != host.getMeasuredWidth() || mHeight != host.getMeasuredHeight()) {

                windowSizeMayChange = true;

            }

        }

      return windowSizeMayChange;

    }
上面主要主要做的就是来确定父 View 的 MeasureSpec。但是分了两种不同类型:
如果宽是 WRAP_CONTENT 类型,说明这是 dialog,会有一些针对 dialog 的处理,最终会调用 performMeasure 进行测量;
对于一般 Activity 的尺寸,会调用 getRootMeasureSpec MeasureSpec 。
下面看下 DecorView MeasureSpec 的计算方法:
    private static int getRootMeasureSpec(int windowSize, int rootDimension) {

        int measureSpec;

        switch (rootDimension) {

        case ViewGroup.LayoutParams.MATCH_PARENT:

            // Window can't resize. Force root view to be windowSize.

            measureSpec = MeasureSpec.makeMeasureSpec(windowSize, MeasureSpec.EXACTLY);

            break;

        case ViewGroup.LayoutParams.WRAP_CONTENT:

            // Window can resize. Set max size for root view.

            measureSpec = MeasureSpec.makeMeasureSpec(windowSize, MeasureSpec.AT_MOST);

            break;

        default:

            // Window wants to be an exact size. Force root view to be that size.

            measureSpec = MeasureSpec.makeMeasureSpec(rootDimension, MeasureSpec.EXACTLY);

            break;

        }

        return measureSpec;

    }
该方法主要是根据 View 的 MeasureSpec 是根据宽高的参数来划分的。
MATCH_PARENT :精确模式,大小就是窗口的大小;
WRAP_CONTENT :最大模式,大小不定,但是不能超过窗口的大小;
固定大小:精确模式,大小就是指定的具体宽高,比如100dp。
对于 DecorView 来说就是走第一个 case,到这里 DecorView 的 MeasureSpec 就确定了,从 MeasureSpec 可以得出 DecorView 的宽高的约束信息。
获取子 view 的 MeasureSpec
当父 ViewGroup 对子 View 进行测量时,会调用 View 类的 measure 方法,这是一个 final 方法,无法被重写。ViewGroup 会传入自己的 widthMeasureSpec 和 heightMeasureSpec,分别表示父 View 对子 View 的宽度和高度的一些限制条件。尤其是当 ViewGroup 是 WRAP_CONTENT 的时候,需要优先测量子 View,只有子 View 宽高确定,ViewGroup 才能确定自己到底需要多大的宽高。
当 DecorView 的 MeasureSpec 确定以后,ViewRootImpl 内部会调用 performMeasure 方法:
  private void performMeasure(int childWidthMeasureSpec, int childHeightMeasureSpec) {

        if (mView == null) {

            return;

        }

        Trace.traceBegin(Trace.TRACE_TAG_VIEW, "measure");

        try {

            mView.measure(childWidthMeasureSpec, childHeightMeasureSpec);

        } finally {

            Trace.traceEnd(Trace.TRACE_TAG_VIEW);

        }

    }
该方法传入的是对 DecorView 的 MeasureSpec,其中 mView 就是 DecorView 的实例,接下来看 measure() 的具体逻辑:
/**

 * 调用这个方法来算出一个View应该为多大。参数为父View对其宽高的约束信息。

 * 实际的测量工作在onMeasure()方法中进行

 */

public final void measure(int widthMeasureSpec, int heightMeasureSpec) {

  ......
  // Suppress sign extension for the low bytes

   long key = (long) widthMeasureSpec << 32 | (long) heightMeasureSpec & 0xffffffffL;

   if (mMeasureCache == null) mMeasureCache = new LongSparseLongArray(2);
// 若mPrivateFlags中包含PFLAG_FORCE_LAYOUT标记,则强制重新布局

  // 比如调用View.requestLayout()会在mPrivateFlags中加入此标记

  final boolean forceLayout = (mPrivateFlags & PFLAG_FORCE_LAYOUT) == PFLAG_FORCE_LAYOUT;

  final boolean specChanged = widthMeasureSpec != mOldWidthMeasureSpec

      || heightMeasureSpec != mOldHeightMeasureSpec;

  final boolean isSpecExactly = MeasureSpec.getMode(widthMeasureSpec) == MeasureSpec.EXACTLY

      && MeasureSpec.getMode(heightMeasureSpec) == MeasureSpec.EXACTLY;

  final boolean matchesSpecSize = getMeasuredWidth() == MeasureSpec.getSize(widthMeasureSpec)

      && getMeasuredHeight() == MeasureSpec.getSize(heightMeasureSpec);

  final boolean needsLayout = specChanged

      && (sAlwaysRemeasureExactly || !isSpecExactly || !matchesSpecSize);

  // 需要重新布局

  if (forceLayout || needsLayout) {
    // first clears the measured dimension flag 标记为未测量状态
    mPrivateFlags &= ~PFLAG_MEASURED_DIMENSION_SET;
    // 对阿拉伯语、希伯来语等从右到左书写、布局的语言进行特殊处理
    resolveRtlPropertiesIfNeeded();
// 先尝试从缓从中获取,若forceLayout为true或是缓存中不存在或是

    // 忽略缓存,则调用onMeasure()重新进行测量工作

    int cacheIndex = forceLayout ? -1 : mMeasureCache.indexOfKey(key);

    if (cacheIndex < 0 || sIgnoreMeasureCache) {

      // measure ourselves, this should set the measured dimension flag back

      onMeasure(widthMeasureSpec, heightMeasureSpec);

      . . .

    } else {

      // 缓存命中,直接从缓存中取值即可,不必再测量

      long value = mMeasureCache.valueAt(cacheIndex);

      // Casting a long to int drops the high 32 bits, no mask needed

      setMeasuredDimensionRaw((int) (value >> 32), (int) value);
      mPrivateFlags3 |= PFLAG3_MEASURE_NEEDED_BEFORE_LAYOUT;
}
// 如果自定义的View重写了onMeasure方法,但是没有调用setMeasuredDimension()方法就会在这里抛出错误;
   // flag not set, setMeasuredDimension() was not invoked, we raise
   // an exception to warn the developer
   if ((mPrivateFlags & PFLAG_MEASURED_DIMENSION_SET) != PFLAG_MEASURED_DIMENSION_SET) {
       throw new IllegalStateException("View with id " + getId() + ": "
              + getClass().getName() + "#onMeasure() did not set the"
              + " measured dimension by calling"
              + " setMeasuredDimension()");
   }
mPrivateFlags |= PFLAG_LAYOUT_REQUIRED;
  }

  mOldWidthMeasureSpec = widthMeasureSpec;

  mOldHeightMeasureSpec = heightMeasureSpec;
 // 保存到缓存中

  mMeasureCache.put(key, ((long) mMeasuredWidth) << 32 |

      (long) mMeasuredHeight & 0xffffffffL); // suppress sign extension

}
这里要注意的是,这是一个 final 方法,不能被继承。这个方法只在 View 类里面。总结一下 measure() 都干了什么事:
调用
View.measure()方法时 View 并不是立即就去测量,而是先判断一下要不要进行测量操作,如果没必要,那么 View 就不需要重新测量了,避免浪费时间资源如果需要测量,在测量之前,会先判断是否存在缓存,存在直接从缓存中获取就可以了,再调用一下
setMeasuredDimensionRaw方法,将从缓存中读到的测量结果保存到成员变量mMeasuredWidth和mMeasuredHeight中。如果不能从
mMeasureCache中读到缓存过的测量结果,调用onMeasure()方法去完成实际的测量工作,并且将尺寸限制条件widthMeasureSpec和heightMeasureSpec传递给onMeasure()方法。关于onMeasure()方法,会在下面详细介绍。将结果保存到
mMeasuredWidth和mMeasuredHeight这两个成员变量中,同时缓存到成员变量mMeasureCache中,以便下次执行measure()方法时能够从其中读取缓存值。需要说明的是,View 有一个成员变量
mPrivateFlags,用以保存 View 的各种状态位,在测量开始前,会将其设置为未测量状态,在测量完成后会将其设置为已测量状态。
DecorView 是 FrameLayout 子类,这时候应该去看 FrameLayout 中的 onMeasure() 方法,代码具体如下:
 protected void onMeasure(int widthMeasureSpec, int heightMeasureSpec) {
      // 获取子view的个数

        int count = getChildCount();

        final boolean measureMatchParentChildren =

                MeasureSpec.getMode(widthMeasureSpec) != MeasureSpec.EXACTLY ||

                MeasureSpec.getMode(heightMeasureSpec) != MeasureSpec.EXACTLY;

        mMatchParentChildren.clear();

        int maxHeight = 0;

        int maxWidth = 0;

        int childState = 0;

        for (int i = 0; i < count; i++) {

            final View child = getChildAt(i);
       // mMeasureAllChildren 默认为FALSE,表示是否全部子 view 都要测量,子view不为GONE就要测量

            if (mMeasureAllChildren || child.getVisibility() != GONE) {
                // 测量子view

                measureChildWithMargins(child, widthMeasureSpec, 0, heightMeasureSpec, 0);
                // 获取子view的布局参数

                final LayoutParams lp = (LayoutParams) child.getLayoutParams();
                // 记录子view的最大宽度和高度

                maxWidth = Math.max(maxWidth,

                        child.getMeasuredWidth() + lp.leftMargin + lp.rightMargin);

                maxHeight = Math.max(maxHeight,

                        child.getMeasuredHeight() + lp.topMargin + lp.bottomMargin);

                childState = combineMeasuredStates(childState, child.getMeasuredState());
                // 记录所有跟父布局有着相同宽或高的子view

                if (measureMatchParentChildren) {

                    if (lp.width == LayoutParams.MATCH_PARENT ||

                            lp.height == LayoutParams.MATCH_PARENT) {

                        mMatchParentChildren.add(child);

                    }

                }

            }

        }

        // Account for padding too  子view的最大宽高计算出来后,还要加上父View自身的padding

        maxWidth += getPaddingLeftWithForeground() + getPaddingRightWithForeground();

        maxHeight += getPaddingTopWithForeground() + getPaddingBottomWithForeground();

        // Check against our minimum height and width

        maxHeight = Math.max(maxHeight, getSuggestedMinimumHeight());

        maxWidth = Math.max(maxWidth, getSuggestedMinimumWidth());

        // Check against our foreground's minimum height and width

        final Drawable drawable = getForeground();

        if (drawable != null) {

            maxHeight = Math.max(maxHeight, drawable.getMinimumHeight());

            maxWidth = Math.max(maxWidth, drawable.getMinimumWidth());

        }

     // 确定父 view 的宽高

        setMeasuredDimension(resolveSizeAndState(maxWidth, widthMeasureSpec, childState),

                resolveSizeAndState(maxHeight, heightMeasureSpec,

                        childState << MEASURED_HEIGHT_STATE_SHIFT));

        count = mMatchParentChildren.size();

        if (count > 1) {

            for (int i = 0; i < count; i++) {

                final View child = mMatchParentChildren.get(i);

                final MarginLayoutParams lp = (MarginLayoutParams) child.getLayoutParams();

                final int childWidthMeasureSpec;
          // 如果子view的宽是MATCH_PARENT,那么宽度 = 父view的宽 - 父Padding - 子Margin

                if (lp.width == LayoutParams.MATCH_PARENT) {

                    final int width = Math.max(0, getMeasuredWidth()

                            - getPaddingLeftWithForeground() - getPaddingRightWithForeground()

                            - lp.leftMargin - lp.rightMargin);

                    childWidthMeasureSpec = MeasureSpec.makeMeasureSpec(

                            width, MeasureSpec.EXACTLY);

                } else {

                    childWidthMeasureSpec = getChildMeasureSpec(widthMeasureSpec,

                            getPaddingLeftWithForeground() + getPaddingRightWithForeground() +

                            lp.leftMargin + lp.rightMargin,

                            lp.width);

                }

                final int childHeightMeasureSpec;
          // 同理

                if (lp.height == LayoutParams.MATCH_PARENT) {

                    final int height = Math.max(0, getMeasuredHeight()

                            - getPaddingTopWithForeground() - getPaddingBottomWithForeground()

                            - lp.topMargin - lp.bottomMargin);

                    childHeightMeasureSpec = MeasureSpec.makeMeasureSpec(

                            height, MeasureSpec.EXACTLY);

                } else {

                    childHeightMeasureSpec = getChildMeasureSpec(heightMeasureSpec,

                            getPaddingTopWithForeground() + getPaddingBottomWithForeground() +

                            lp.topMargin + lp.bottomMargin,

                            lp.height);

                }

                child.measure(childWidthMeasureSpec, childHeightMeasureSpec);

            }

        }

    }
FrameLayout 是 ViewGroup 的子类,后者有一个 View[] 类型的成员变量 mChildren,代表了其子 View 集合。通过 getChildAt(i) 能获取指定索引处的子 View,通过 getChildCount() 可以获得子 View 的总数。
在上面的源码中,首先调用 measureChildWithMargins() 方法对所有子 View 进行了一遍测量,并计算出所有子 View 的最大宽度和最大高度。而后将得到的最大高度和宽度加上padding,这里的 padding 包括了父 View 的 padding 和前景区域的 padding。然后会检查是否设置了最小宽高,并与其比较,将两者中较大的设为最终的最大宽高。最后,若设置了前景图像,我们还要检查前景图像的最小宽高。
经过了以上一系列步骤后,我们就得到了 maxHeight 和 maxWidth 的最终值,表示当前容器 View 用这个尺寸就能够正常显示其所有子 View(同时考虑了 padding 和 margin )。而后我们需要调用 resolveSizeAndState() 方法来结合传来的 MeasureSpec 来获取最终的测量宽高,并保存到 mMeasuredWidth 与 mMeasuredHeight 成员变量中。
如果存在一些子 View 的宽或高是 MATCH_PARENT,那么需要等父 View 的尺寸计算出来后,重新计算这些子 View 的 MeasureSpec,再来测量这些子 view 的宽高。
这里提醒我们在自定义 View 的时候需要考虑你的子 View 是不是和你自定义的 View 的大小是一样,如果一样,就需要等自定义 View 的大小确定了,再重新测量一遍。
下面看看 measureChildWithMargins() 方法具体逻辑:
/**

     * Ask one of the children of this view to measure itself, taking into

     * account both the MeasureSpec requirements for this view and its padding

     * and margins. The child must have MarginLayoutParams The heavy lifting is

     * done in getChildMeasureSpec.

     *

     * @param child The child to measure

     * @param parentWidthMeasureSpec The width requirements for this view

     * @param widthUsed Extra space that has been used up by the parent

     *        horizontally (possibly by other children of the parent)

     * @param parentHeightMeasureSpec The height requirements for this view

     * @param heightUsed Extra space that has been used up by the parent

     *        vertically (possibly by other children of the parent)

     */

    protected void measureChildWithMargins(View child,

            int parentWidthMeasureSpec, int widthUsed,

            int parentHeightMeasureSpec, int heightUsed) {

        final MarginLayoutParams lp = (MarginLayoutParams) child.getLayoutParams();

        final int childWidthMeasureSpec = getChildMeasureSpec(parentWidthMeasureSpec,

                mPaddingLeft + mPaddingRight + lp.leftMargin + lp.rightMargin

                        + widthUsed, lp.width);

        final int childHeightMeasureSpec = getChildMeasureSpec(parentHeightMeasureSpec,

                mPaddingTop + mPaddingBottom + lp.topMargin + lp.bottomMargin

                        + heightUsed, lp.height);

        child.measure(childWidthMeasureSpec, childHeightMeasureSpec);

    }
该方法主要是获取子 View 的 MeasureSpec,然后调用 child.measure() 来完成子 View 的测量。下面看看子 View 获取 MeasureSpec 的具体逻辑:
 public static int getChildMeasureSpec(int spec, int padding, int childDimension) {
        // 父 view 的 mode 和 size

        int specMode = MeasureSpec.getMode(spec);

        int specSize = MeasureSpec.getSize(spec);

     // 去掉 padding

        int size = Math.max(0, specSize - padding);

        int resultSize = 0;

        int resultMode = 0;

        switch (specMode) {

        // Parent has imposed an exact size on us

        case MeasureSpec.EXACTLY:

            if (childDimension >= 0) {

                resultSize = childDimension;

                resultMode = MeasureSpec.EXACTLY;

            } else if (childDimension == LayoutParams.MATCH_PARENT) {

                // Child wants to be our size. So be it.

                resultSize = size;

                resultMode = MeasureSpec.EXACTLY;

            } else if (childDimension == LayoutParams.WRAP_CONTENT) {

                // Child wants to determine its own size. It can't be

                // bigger than us.

                resultSize = size;

                resultMode = MeasureSpec.AT_MOST;

            }

            break;

        // Parent has imposed a maximum size on us

        case MeasureSpec.AT_MOST:

            if (childDimension >= 0) {

                // Child wants a specific size... so be it

                resultSize = childDimension;

                resultMode = MeasureSpec.EXACTLY;

            } else if (childDimension == LayoutParams.MATCH_PARENT) {

                // Child wants to be our size, but our size is not fixed.

                // Constrain child to not be bigger than us.

                resultSize = size;

                resultMode = MeasureSpec.AT_MOST;

            } else if (childDimension == LayoutParams.WRAP_CONTENT) {

                // Child wants to determine its own size. It can't be

                // bigger than us.

                resultSize = size;

                resultMode = MeasureSpec.AT_MOST;

            }

            break;

        // Parent asked to see how big we want to be

        case MeasureSpec.UNSPECIFIED:

            if (childDimension >= 0) {

                // Child wants a specific size... let him have it

                resultSize = childDimension;

                resultMode = MeasureSpec.EXACTLY;

            } else if (childDimension == LayoutParams.MATCH_PARENT) {

                // Child wants to be our size... find out how big it should

                // be

                resultSize = View.sUseZeroUnspecifiedMeasureSpec ? 0 : size;

                resultMode = MeasureSpec.UNSPECIFIED;

            } else if (childDimension == LayoutParams.WRAP_CONTENT) {

                // Child wants to determine its own size.... find out how

                // big it should be

                resultSize = View.sUseZeroUnspecifiedMeasureSpec ? 0 : size;

                resultMode = MeasureSpec.UNSPECIFIED;

            }

            break;

        }

        //noinspection ResourceType

        return MeasureSpec.makeMeasureSpec(resultSize, resultMode);

    }
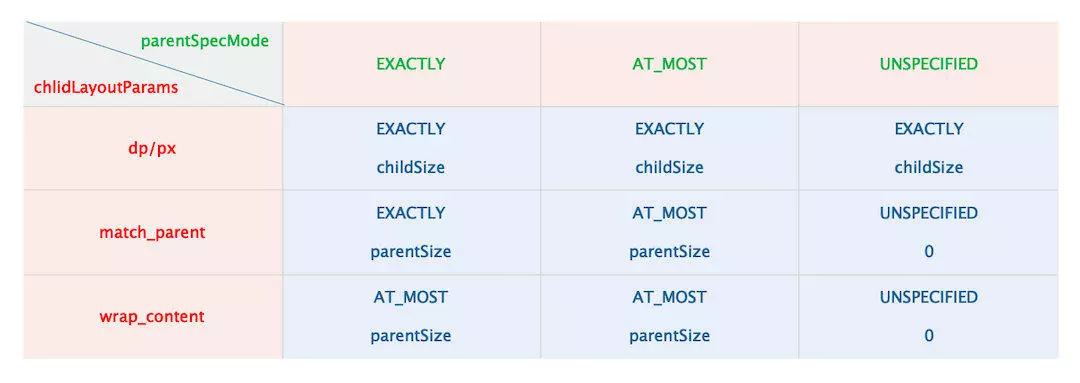
该方法清楚展示了普通 View 的 MeasureSpec 的创建规则,每个 View 的 MeasureSpec 状态量由其直接父 View 的 MeasureSpec 和 View 自身的属性 LayoutParams (LayoutParams 有宽高尺寸值等信息)共同决定。
子 View 为
具体的宽/高,那么 View 的 MeasureSpec 都为 LayoutParams 中大小。子 View 为
match_parent,父元素为精度模式(EXACTLY),那么 View 的 MeasureSpec 也是精准模式他的大小不会超过父容器的剩余空间。子 View 为
wrap_content,不管父元素是精准模式还是最大化模式(AT_MOST),View 的 MeasureSpec 总是为最大化模式并且大小不超过父容器的剩余空间。父容器为 UNSPECIFIED 模式主要用于系统多次 Measure 的情形,一般我们不需要关心。
总结为下表:
View.measure() 代码逻辑前面已经分析过了,最终会调用 onMeasuere 方法,下面看下 View.onMeasuere() 的代码:
 protected void onMeasure(int widthMeasureSpec, int heightMeasureSpec) {

        setMeasuredDimension(getDefaultSize(getSuggestedMinimumWidth(), widthMeasureSpec),

                getDefaultSize(getSuggestedMinimumHeight(), heightMeasureSpec));

    }
上面方法中调用了 方法中调用了 setMeasuredDimension()方法,setMeasuredDimension()又调用了 getDefaultSize() 方法。getDefaultSize() 又调用了getSuggestedMinimumWidth()和 getSuggestedMinimumHeight(),那反向研究一下,先看下 getSuggestedMinimumWidth() 方法 (getSuggestedMinimumHeight() 原理 getSuggestedMinimumWidth() 跟一样)。
 protected int getSuggestedMinimumWidth() {

        return (mBackground == null) ? mMinWidth : max(mMinWidth, mBackground.getMinimumWidth());

    }
源码很简单,如果 View 没有背景,就直接返回 View 本身的最小宽度 mMinWidth;如果给 View 设置了背景,就取 View 本身的最小宽度 mMinWidth 和背景的最小宽度的最大值.
那么 mMinWidth 是哪里来的?搜索下源码就可以知道,View 的最小宽度 mMinWidth 可以有两种方式进行设置:
- 第一种是在 View 的构造方法中进行赋值的,View 通过读取 XML 文件中View设置的
minWidth属性来为mMinWidth赋值:
case R.styleable.View_minWidth:

     mMinWidth = a.getDimensionPixelSize(attr, 0);

     break;
- 第二种是在调用 View 的
setMinimumWidth方法为mMinWidth赋值
public void setMinimumWidth(int minWidth) {

    mMinWidth = minWidth;

    requestLayout();

}
下面看下 getDefaultSize() 的代码逻辑:
    public static int getDefaultSize(int size, int measureSpec) {

        int result = size;

        int specMode = MeasureSpec.getMode(measureSpec);

        int specSize = MeasureSpec.getSize(measureSpec);

        switch (specMode) {

        case MeasureSpec.UNSPECIFIED:

            result = size;

            break;

        case MeasureSpec.AT_MOST:

        case MeasureSpec.EXACTLY:

            result = specSize;

            break;

        }

        return result;

    }
从注释可以看出,getDefaultSize()这个测量方法并没有适配 wrap_content 这一种布局模式,只是简单地将 wrap_content 跟 match_parent 等同起来。
到了这里,我们要注意一个问题:
getDefaultSize()方法中 wrap_content 和 match_parent 属性的效果是一样的,而该方法是 View 的 onMeasure()中默认调用的,也就是说,对于一个直接继承自 View 的自定义 View 来说,它的 wrap_content 和 match_parent 属性是一样的效果,因此如果要实现自定义 View 的 wrap_content,则要重写 onMeasure() 方法,对 wrap_content 属性进行处理。
如何处理呢?也很简单,代码如下所示:
protected void onMeasure(int widthMeasureSpec, int heightMeasureSpec){

  super.onMeasure(widthMeasureSpec, heightMeasureSpec);

  //取得父ViewGroup指定的宽高测量模式和尺寸

  int widthSpecMode = MeasureSpec.getMode(widthMeasureSpec);

  int widthSpecSize = MeasureSpec.getSize(widthMeasureSpec);

  int heightSpecMode = MeasureSpec.getMode(heightMeasureSpec);

  int heightSpecSize = MeasureSpec.getSize(heightMeasureSpec);

  if (widthSpecMode == MeasureSpec.AT_MOST && heightSpecMode == MeasureSpec.AT_MOST) {

    //如果宽高都是AT_MOST的话,即都是wrap_content布局模式,就用View自己想要的宽高值

        setMeasuredDimension(mWidth, mHeight);

  }else if (widthSpecMode == MeasureSpec.AT_MOST) {

    //如果只有宽度都是AT_MOST的话,即只有宽度是wrap_content布局模式,宽度就用View自己想要的宽度值,高度就用父ViewGroup指定的高度值

        setMeasuredDimension(mWidth, heightSpecSize);

  }else if (heightSpecMode == MeasureSpec.AT_MOST) {

    //如果只有高度都是AT_MOST的话,即只有高度是wrap_content布局模式,高度就用View自己想要的宽度值,宽度就用父ViewGroup指定的高度值

        setMeasuredDimension(widthSpecSize, mHeight);

  }

}
在上面的代码中,我们要给 View 指定一个默认的内部宽/高(mWidth 和 mHeight),并在 wrap_content 时设置此宽/高即可。最后将在将宽高设置到 View 上:
    // View

    protected final void setMeasuredDimension(int measuredWidth, int measuredHeight) {

        boolean optical = isLayoutModeOptical(this);

        if (optical != isLayoutModeOptical(mParent)) {

            Insets insets = getOpticalInsets();

            int opticalWidth  = insets.left + insets.right;

            int opticalHeight = insets.top  + insets.bottom;

            measuredWidth  += optical ? opticalWidth  : -opticalWidth;

            measuredHeight += optical ? opticalHeight : -opticalHeight;

        }

        setMeasuredDimensionRaw(measuredWidth, measuredHeight);

    }

    private void setMeasuredDimensionRaw(int measuredWidth, int measuredHeight) {

        mMeasuredWidth = measuredWidth;

        mMeasuredHeight = measuredHeight;

        mPrivateFlags |= PFLAG_MEASURED_DIMENSION_SET;

    }
这里就是把测量完的宽高值赋值给 mMeasuredWidth、mMeasuredHeight 这两个 View 的属性,然后将标志位置为已测量状态。
子 View 测量完成以后,会计算 childState,看下 combineMeasuredStates 方法 :
public static int combineMeasuredStates(int curState, int newState) {

        return curState | newState;

    }
当前 curState 为 0, newState 是调用 child.getMeasuredState() 方法得到的,来看下这个方法的具体逻辑:
 /**

     * Return only the state bits of {@link #getMeasuredWidthAndState()}

     * and {@link #getMeasuredHeightAndState()}, combined into one integer.

     * The width component is in the regular bits {@link #MEASURED_STATE_MASK}

     * and the height component is at the shifted bits

     * {@link #MEASURED_HEIGHT_STATE_SHIFT}>>{@link #MEASURED_STATE_MASK}.

     */

    public final int getMeasuredState() {

        return (mMeasuredWidth&MEASURED_STATE_MASK)

                | ((mMeasuredHeight>>MEASURED_HEIGHT_STATE_SHIFT)

                        & (MEASURED_STATE_MASK>>MEASURED_HEIGHT_STATE_SHIFT));

    }
该方法返回一个 int 值,该值同时包含宽度的 state 以及高度的 state 信息,不包含任何的尺寸信息。
MEASURED_STATE_MASK 的值为 0xff000000,其高字节的 8 位全部为 1,低字节的 24 位全部为 0。
MEASURED_HEIGHT_STATE_SHIFT 值为 16。
将 MEASURED_STATE_MASK 与
mMeasuredWidth做与操作之后就取出了存储在宽度首字节中的 state 信息,过滤掉低位三个字节的尺寸信息。由于 int 有四个字节,首字节已经存了宽度的 state 信息,那么高度的 state 信息就不能存在首位字节。MEASURED_STATE_MASK 向右移 16 位,变成了 0x0000ff00,这个值与高度值
mMeasuredHeight做与操作就取出了mMeasuredHeight第三个字节中的信息。而mMeasuredHeight的 state 信息是存在首字节中,所以也得对mMeasuredHeight向右移相同的位置,这样就把 state 信息移到了第三个字节中。最后,将得到的宽度 state 与高度 state 按位或操作,这样就拼接成一个 int 值,该值首个字节存储宽度的 state 信息,第三个字节存储高度的 state 信息。
这些都得到之后,就可以开始去计算父 View 的尺寸了:
        // 确定父 View 的宽高

        setMeasuredDimension(resolveSizeAndState(maxWidth, widthMeasureSpec, childState),

                resolveSizeAndState(maxHeight, heightMeasureSpec,

                        childState << MEASURED_HEIGHT_STATE_SHIFT));
下面开始看 resolveSizeAndState 具体逻辑:
// View 的静态方法

public static int resolveSizeAndState(int size, int measureSpec, int childMeasuredState) {

        final int specMode = MeasureSpec.getMode(measureSpec);

        final int specSize = MeasureSpec.getSize(measureSpec);

        final int result;

        switch (specMode) {

            case MeasureSpec.AT_MOST:

                if (specSize < size) {

                    result = specSize | MEASURED_STATE_TOO_SMALL;

                } else {

                    result = size;

                }

                break;

            case MeasureSpec.EXACTLY:

                result = specSize;

                break;

            case MeasureSpec.UNSPECIFIED:

            default:

                result = size;

        }

        return result | (childMeasuredState & MEASURED_STATE_MASK);

    }
这个方法的代码结构跟前文提到的 getDefaultSize()方法很相似,主要的区别在于 specMode 为 AT_MOST 的情况。我们当时说 getDefaultSize() 方法是没有适配wrap_content 这种情况,而这个 resolveSizeAndState() 方法是已经适配了 wrap_content 的布局方式,那具体怎么实现 AT_MOST 测量逻辑的呢?有两种情况:
当父 ViewGroup 指定的最大尺寸比 View 想要的尺寸还要小时,会给这个父 ViewGroup 的指定的最大值
specSize加入一个尺寸太小的标志 MEASURED_STATE_TOO_SMALL,然后将这个带有标志的尺寸返回,父 ViewGroup 通过该标志就可以知道分配给 View 的空间太小了,在窗口协商测量的时候会根据这个标志位来做窗口大小的决策。当父 ViewGroup 指定的最大尺寸比没有比 View 想要的尺寸小时(相等或者 View 想要的尺寸更小),直接取 View 想要的尺寸,然后返回该尺寸。
getDefaultSize() 方法只是 onMeasure() 方法中获取最终尺寸的默认实现,其返回的信息比 resolveSizeAndState() 要少,那么什么时候才会调用 resolveSizeAndState() 方法呢? 主要有两种情况:
Android 中的大部分 ViewGroup 类都调用了
resolveSizeAndState()方法,比如 LinearLayout 在测量过程中会调用resolveSizeAndState()方法而非getDefaultSize()方法。我们自己在实现自定义的 View 或 ViewGroup 时,我们可以重写
onMeasure()方法,并在该方法内调用resolveSizeAndState()方法。
到此,终于把 View 测量过程讲完了。
下一篇开始讲 View 的 layout 和 draw 过程。
参考文章
Android源码完全解析——View的Measure过程
Android View 的添加绘制流程 (二)的更多相关文章
- android View层的绘制流程
还记得前面<Android应用setContentView与LayoutInflater加载解析机制源码分析>这篇文章吗?我们有分析到Activity中界面加载显示的基本流程原理,记不记得 ...
- Android View的加载流程
什么是Activity? Activity是 用户操作的可视化界面:它为用户提供了一个放置视图和交互操作的窗口.采用setContentView的方法提供.因此,可以理解Activity.Window ...
- Android之TextView文字绘制流程
一:TextView的onDraw()方法: 1.第一句restartMarqueeIfNeeded()绘制字幕滚动. protected void onDraw(Canvas canvas) { r ...
- Android视图绘制流程完全解析,带你一步步深入了解View(二)
转载请注明出处:http://blog.csdn.net/guolin_blog/article/details/16330267 在上一篇文章中,我带着大家一起剖析了一下LayoutInflater ...
- Android中View绘制流程以及invalidate()等相关方法分析
[原文]http://blog.csdn.net/qinjuning 整个View树的绘图流程是在ViewRoot.java类的performTraversals()函数展开的,该函数做的执行过程可简 ...
- Android中View绘制流程以及invalidate()等相关方法分析(转载的文章,出处在正文已表明)
转载请注明出处:http://blog.csdn.net/qinjuning 前言: 本文是我读<Android内核剖析>第13章----View工作原理总结而成的,在此膜拜下作者 .同时 ...
- Android中View绘制流程以及invalidate()等相关方法分析(转)
转自:http://blog.csdn.net/qinjuning 前言: 本文是我读<Android内核剖析>第13章----View工作原理总结而成的,在此膜拜下作者 .同时真挚地向渴 ...
- 【朝花夕拾】Android自定义View篇之(一)View绘制流程
前言 转载请申明转自[https://www.cnblogs.com/andy-songwei/p/10955062.html]谢谢! 自定义View.多线程.网络,被认为是Android开发者必须牢 ...
- 深入理解 Android 之 View 的绘制流程
概述 本篇文章会从源码(基于Android 6.0)角度分析Android中View的绘制流程,侧重于对整体流程的分析,对一些难以理解的点加以重点阐述,目的是把View绘制的整个流程把握好,而对于特定 ...
随机推荐
- 计算机网络(1)- TCP
TCP的全称是传输控制协议(Transmission Control Protocol)[RFC 793] TCP提供面向连接的服务.在传送数据之前必须先建立连接,数据传送结束后要释放连接.TCP不提 ...
- Ajax自我总结
一念起.万水千山皆有情. 一念灭.沧海桑田已无心. ------ 随记 本文主要针对ajax原理介绍,很少涉及实例,主要用于对知识的梳理总结,方便以后学习和查询... Ajax 一.Ajax是 ...
- continue和break在while中用法
continue用法:结束本次循环,不执行continue下面的语句,返回执行下一次循环.注意:当执行完while的循环后,执行else 后的语句 break:结束循环,else下面语句也不执行
- 论文阅读 Prefetch-aware fingerprint cache management for data deduplication systems
论文链接 https://link.springer.com/article/10.1007/s11704-017-7119-0 这篇论文试图解决的问题是在cache 环节之前,prefetch-ca ...
- My Eclipse 配置
设置编码格式 点击Windows → preference → WorkSpace 设置编码格式 点击Windows → preference → General →Appearence → Colo ...
- [考试反思]1010csp-s模拟测试67:摸索
嗯...所谓RP守恒? 仍然延续着好一场烂一场的规律. 虽说我也想打破这个规律,但是并不想在考烂之后打破这个规律.(因为下一场要考好???) 我也不知道我现在是什么状态,相较于前一阶段有所提升(第一鸡 ...
- CSPS模拟 69
$C_n^0=1$ $C_n^0=1$ $C_n^0=1$ 我怎么又双叒叕犯这种错误了啊 (咳檀) T1 WA0,大神题,不会做! T2 就是要找一个最长区间,满足左端点是区间最小值,右端点是区间最大 ...
- 史上最全的excel读写技术分享
目录 简介 导出excel常用的几种方法 POI CSV jxl jxls easyexcel 快速入门 代码解读 总结 常用API 单元格样式 合并单元格 数据样式 多sheet设置 单元格添加超链 ...
- 原生JS实现双向链表
1.前言 双向链表和单向链表的区别在于,在链表中,一个节点只有链向下一个节点的链接,而在双向链表中,链接是双向的:一个链向下一个元素,另一个链向前一个元素,如下图所示: 从图中可以看到,双向链表中,在 ...
- 【洛谷】P2371 [国家集训队]墨墨的等式(屠版题)
先讲讲曲折的思路吧...... 首先,应该是CRT之类的东西,乱搞 不行......打了打草稿,发现有解的情况是gcd(a1,a2.....an)|B,于是可以求gcd然后O(n)查询?但是B的范围直 ...