Nginx安装、默认虚拟主机、Nginx用户认证和域名重定向
6月7日任务
12.6 Nginx安装
12.7 默认虚拟主机
12.8 Nginx用户认证
12.9 Nginx域名重定向
扩展
nginx.conf 配置详解 http://www.ha97.com/5194.htmlhttp://my.oschina.net/duxuefeng/blog/34880
nginx rewrite四种flag http://www.netingcn.com/nginx-rewrite-flag.htmlhttp://unixman.blog.51cto.com/10163040/1711943
12.6 Nginx安装
安装步骤如下:
1、进入SRC目录并使用wget下载Nginx源码包
[root@jimmylinux- ~]# cd /usr/local/src

[root@jimmylinux- src]# wget http://nginx.org/download/nginx-1.12.1.tar.gz

[root@jimmylinux- src]# ls

mysql-5.6.-linux-glibc2.-x86_64.tar.gz  nginx-1.12..tar.gz  php-5.6.  php-5.6..tar.gz
2、解压源码包
[root@jimmylinux- src]# tar zxf nginx-1.12..tar.gz 解压源码包
3、进入到Nginx目录,然后配置文件。
[root@jimmylinux- src]# cd nginx-1.12.

[root@jimmylinux-001 nginx-1.12.1]# ./configure --prefix=/usr/local/nginx
4、编译及编译安装
[root@jimmylinux- nginx-1.12.]# make && make install
[root@jimmylinux- nginx-1.12.]# ls /usr/local/nginx

conf  html  logs  sbin

[root@jimmylinux- nginx-1.12.]# ls /usr/local/nginx/conf  配置文件目录

fastcgi.conf            koi-utf             nginx.conf           uwsgi_params

fastcgi.conf.default    koi-win             nginx.conf.default   uwsgi_params.default

fastcgi_params          mime.types          scgi_params          win-utf

fastcgi_params.default  mime.types.default  scgi_params.default

[root@jimmylinux- nginx-1.12.]# ls /usr/local/nginx/html  样例文件

50x.html  index.html

[root@jimmylinux- nginx-1.12.]# ls /usr/local/nginx/logs  日志目录

[root@jimmylinux- nginx-1.12.]# ls /usr/local/nginx/sbin/  核心进程文件

nginx
[root@jimmylinux-001 nginx-1.12.1]# /usr/local/nginx/sbin/nginx -t -t查看配置文件是否有错
nginx: the configuration file /usr/local/nginx/conf/nginx.conf syntax is ok
nginx: configuration file /usr/local/nginx/conf/nginx.conf test is successful
5、创建配置文件做一个启动脚本
[root@jimmylinux- nginx-1.12.]# vim /etc/init.d/nginx

添加以下内容

#!/bin/bash

# chkconfig: -

# description: http service.

# Source Function Library

. /etc/init.d/functions

# Nginx Settings

NGINX_SBIN="/usr/local/nginx/sbin/nginx"

NGINX_CONF="/usr/local/nginx/conf/nginx.conf"

NGINX_PID="/usr/local/nginx/logs/nginx.pid"

RETVAL=

prog="Nginx"

start()

{

    echo -n $"Starting $prog: "

    mkdir -p /dev/shm/nginx_temp

    daemon $NGINX_SBIN -c $NGINX_CONF

    RETVAL=$?

    echo

    return $RETVAL

}

stop()

{

    echo -n $"Stopping $prog: "

    killproc -p $NGINX_PID $NGINX_SBIN -TERM

    rm -rf /dev/shm/nginx_temp

    RETVAL=$?

    echo

    return $RETVAL

}

reload()

{

    echo -n $"Reloading $prog: "

    killproc -p $NGINX_PID $NGINX_SBIN -HUP

    RETVAL=$?

    echo

    return $RETVAL

}

restart()

{

    stop

    start

}

configtest()

{

    $NGINX_SBIN -c $NGINX_CONF -t

    return

}

case "$1" in

  start)

        start

        ;;

  stop)

        stop

        ;;

  reload)

        reload

        ;;

  restart)

        restart

        ;;

  configtest)

        configtest

        ;;

  *)

        echo $"Usage: $0 {start|stop|reload|restart|configtest}"

        RETVAL=

esac

exit $RETVAL
6、修改权限、把Nginx添加到服务列表、设置开机自启动。
[root@jimmylinux- nginx-1.12.]# chmod  /etc/init.d/nginx  修改权限

[root@jimmylinux- nginx-1.12.]# chkconfig --add nginx  添加到服务列表

[root@jimmylinux- nginx-1.12.]# chkconfig nginx on  设置开机自启动
7、配置(编辑)配置文件
[root@jimmylinux- nginx-1.12.]# cd /usr/local/nginx/conf/

[root@jimmylinux- conf]# ls

fastcgi.conf            koi-utf             nginx.conf           uwsgi_params

fastcgi.conf.default    koi-win             nginx.conf.default   uwsgi_params.default

fastcgi_params          mime.types          scgi_params          win-utf

fastcgi_params.default  mime.types.default  scgi_params.default

[root@jimmylinux- conf]# mv nginx.conf nginx.cof.bak  备份自带的Nginx.conf文件

[root@jimmylinux- conf]# vim nginx.conf  新建并编辑配置文件

添加以下内容

user nobody nobody;   指定运行用户

worker_processes ;    指定子进程数量

error_log /usr/local/nginx/logs/nginx_error.log crit;

pid /usr/local/nginx/logs/nginx.pid;

worker_rlimit_nofile ;

events

{

    use epoll;

    worker_connections ;  指定进程最大连接数

}

http

{

    include mime.types;

    default_type application/octet-stream;

    server_names_hash_bucket_size ;

    server_names_hash_max_size ;

    log_format combined_realip '$remote_addr $http_x_forwarded_for [$time_local]'

    ' $host "$request_uri" $status'

    ' "$http_referer" "$http_user_agent"';

    sendfile on;

    tcp_nopush on;

    keepalive_timeout ;

    client_header_timeout 3m;

    client_body_timeout 3m;

    send_timeout 3m;

    connection_pool_size ;

    client_header_buffer_size 1k;

    large_client_header_buffers  4k;

    request_pool_size 4k;

    output_buffers  32k;

    postpone_output ;

    client_max_body_size 10m;

    client_body_buffer_size 256k;

    client_body_temp_path /usr/local/nginx/client_body_temp;

    proxy_temp_path /usr/local/nginx/proxy_temp;

    fastcgi_temp_path /usr/local/nginx/fastcgi_temp;

    fastcgi_intercept_errors on;

    tcp_nodelay on;

    gzip on;

    gzip_min_length 1k;

    gzip_buffers  8k;

    gzip_comp_level ;

    gzip_http_version 1.1;

    gzip_types text/plain application/x-javascript text/css text/htm

    application/xml;

    server                      定义每一个Server对应一个虚拟主机

    {

        listen ;  监听80端口

        server_name localhost;  主机域名

        index index.html index.htm index.php;  主页路径

        root /usr/local/nginx/html;

        location ~ \.php$

        {

            include fastcgi_params;

            fastcgi_pass unix:/tmp/php-fcgi.sock;

            fastcgi_index index.php;

            fastcgi_param SCRIPT_FILENAME /usr/local/nginx/html$fastcgi_script_name;

        }

    }

}
8、启动Nginx服务
[root@jimmylinux- conf]# /usr/local/nginx/sbin/nginx -t  检查语法是否有错

nginx: the configuration file /usr/local/nginx/conf/nginx.conf syntax is ok

nginx: configuration file /usr/local/nginx/conf/nginx.conf test is successful

[root@jimmylinux- conf]# /etc/init.d/nginx start  启动Nginx

Starting nginx (via systemctl):                            [  确定  ]

[root@jimmylinux- conf]# ps aux |grep nginx  查看Nginx服务进程,有小写字母s表示有父进程。

root         0.0  0.0      ?        Ss   :   : nginx: master process /usr/local/nginx/sbin/nginx -c /usr/local/nginx/conf/nginx.conf

nobody       0.0  0.0     ?        S    :   : nginx: worker process

nobody       0.0  0.0     ?        S    :   : nginx: worker process

root         0.0  0.0     pts/    S+   :   : grep --color=auto nginx
Nginx配置完成后localhost测试一下
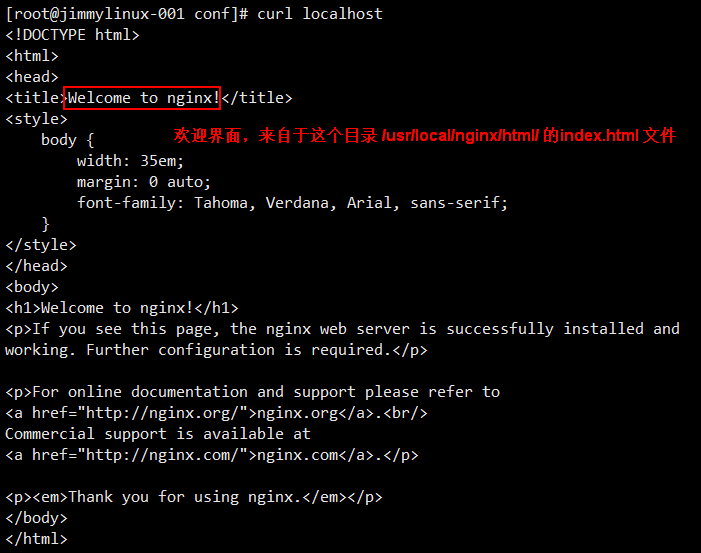
访问IP地址也同样可以显示欢迎界面

Nginx同样也支持PHP解析
[root@jimmylinux- conf]# vim /usr/local/nginx/html/.php  新建1.php文件

加入以下内容
<?php
echo "This is Nginx test php parsing page.";
?>

12.7 默认虚拟主机
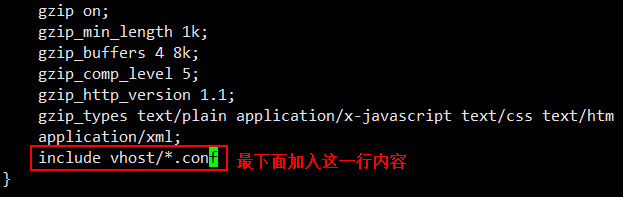
1、编辑Nginx配置文件nginx.conf
[root@jimmylinux- conf]# vim nginx.conf

在http最下面的地方加入以下内容

include vhost/*.conf
2、创建子目录并新建配置文件
[root@jimmylinux- conf]# mkdir vhost  创建子目录

[root@jimmylinux- conf]# cd vhost/

[root@jimmylinux- vhost]# vim aaa.com.conf  新建配置文件

加入以下内容

server

{

    listen  default_server;

    server_name aaa.com;

    index index.html index.htm index.php;

    root /data/wwwroot/default;

}
3、创建目录并新建一个index.html文件
[root@jimmylinux- vhost]# mkdir -p /data/wwwroot/default/

[root@jimmylinux- vhost]# cd /data/wwwroot/default/

[root@jimmylinux- default]# vim index.html

加入以下内容

This is the default site.
[root@jimmylinux- default]# /usr/local/nginx/sbin/nginx -t  检查语法是否有错

nginx: the configuration file /usr/local/nginx/conf/nginx.conf syntax is ok

nginx: configuration file /usr/local/nginx/conf/nginx.conf test is successful
4、重启Nginx服务
[root@jimmylinux- default]# /etc/init.d/nginx restart  重启Nginx服务或重新加载都行

[root@jimmylinux- default]# /usr/local/nginx/sbin/nginx -s reload  重新加载配置文件
5、curl命令访问测试
[root@jimmylinux- default]# curl localhost

This is the default site.

[root@jimmylinux- default]# curl 127.0.0.1

This is the default site.

[root@jimmylinux- default]# curl -x127.0.0.: aaa.com

This is the default site.
12.8 Nginx用户认证
1、创建一个虚拟主机
[root@jimmylinux- conf]# cd vhost/

[root@jimmylinux- vhost]# vim test.com.conf  新建配置文件

增加以下内容

server

{

    listen ;

    server_name test.com;

    index index.html index.htm index.php;

    root /data/wwwroot/test.com;

    location  /

    {

        auth_basic              "Auth";  定义用户名

        auth_basic_user_file   /usr/local/nginx/conf/htpasswd;  用户名密码文件

    }

}
2、生成密码文件,可以使用Apache自带的htpasswd工具,如果没有就yum安装后再生成。
[root@jimmylinux- vhost]# yum install -y httpd

[root@jimmylinux- vhost]# htpasswd -c /usr/local/nginx/conf/htpasswd jimmy  -c表示创建用户名为jimmy

New password:  输入密码

Re-type new password: 再次输入相同的密码

Adding password for user jimmy  生成用户jimmy对应的密码

[root@jimmylinux- vhost]# cat /usr/local/nginx/conf/htpasswd  查看密码

jimmy:$apr1$VGQQYHsB$8hpeYxjew5BwrzuGJ5APc/

[root@jimmylinux- vhost]# htpasswd /usr/local/nginx/conf/htpasswd user1  如果创建第二个用户,这个时候不需要加-c

New password:

Re-type new password:

Adding password for user user1

[root@jimmylinux- vhost]# !cat

cat /usr/local/nginx/conf/htpasswd

jimmy:$apr1$VGQQYHsB$8hpeYxjew5BwrzuGJ5APc/

user1:$apr1$yN8V9Tv/$M9H.YcEMHMUR4pD6vl//d/
3、测试配置并重新加载
[root@jimmylinux- vhost]# /usr/local/nginx/sbin/nginx -t

nginx: the configuration file /usr/local/nginx/conf/nginx.conf syntax is ok

nginx: configuration file /usr/local/nginx/conf/nginx.conf test is successful

[root@jimmylinux- vhost]# /usr/local/nginx/sbin/nginx -s reload
重新加载的好处,当你配置文件有问题时,重新加载是不会生效的,不会破坏原来Nginx的服务,万一配置文件有问题,一重启服务停了,那问题就大了,所以还是使用-s加载比较好。

[root@jimmylinux- vhost]# curl -x127.0.0.: test.com

<html>

<head><title> Authorization Required</title></head>  401报错说明没有指定用户,需要指定用户验证。

<body bgcolor="white">

<center><h1> Authorization Required</h1></center>

<hr><center>nginx/1.12.</center>

</body>

</html>

[root@jimmylinux- vhost]# curl -x127.0.0.: test.com -I

HTTP/1.1  Unauthorized

Server: nginx/1.12.

Date: Thu,  Jun  :: GMT

Content-Type: text/html

Content-Length:

Connection: keep-alive

WWW-Authenticate: Basic realm="Auth"
[root@jimmylinux- vhost]# curl -ujimmy:abcd1234 -x127.0.0.: test.com

<html>

<head><title> Not Found</title></head>  404报错,因为访问的index还没有创建,所以会提示404。

<body bgcolor="white">

<center><h1> Not Found</h1></center>

<hr><center>nginx/1.12.</center>

</body>

</html>
[root@jimmylinux-001 vhost]# mkdir /data/wwwroot/test.com/ 创建目录
[root@jimmylinux-001 vhost]# echo "test.com" > /data/wwwroot/test.com/index.html 指定index.html文件
[root@jimmylinux-001 vhost]# curl -ujimmy:abcd1234 -x127.0.0.1:80 test.com 重新测试就可以访问了
test.com
这种认证是针对整个站点进行认证
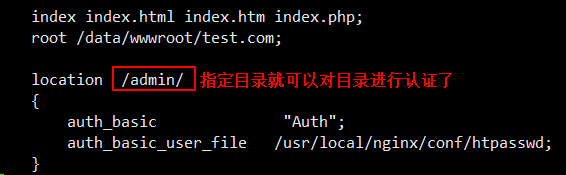
如果需要对目录进行认证,编辑配置文件指定目录即可。
[root@jimmylinux-001 vhost]# vim test.com.conf
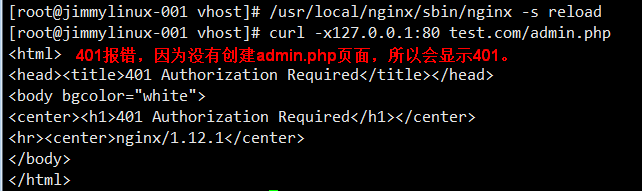
[root@jimmylinux- vhost]# /usr/local/nginx/sbin/nginx -s reload


[root@jimmylinux- vhost]# curl -x127.0.0.: test.com

test.com


[root@jimmylinux- vhost]# curl -x127.0.0.: test.com/admin/

<html>

<head><title> Authorization Required</title></head>

<body bgcolor="white">

<center><h1> Authorization Required</h1></center>

<hr><center>nginx/1.12.</center>

</body>

</html>


[root@jimmylinux- vhost]# mkdir /data/wwwroot/test.com/admin  创建目录


[root@jimmylinux- vhost]# echo "test.com admin dir" > /data/wwwroot/test.com/admin/index.html  创建测试页面

[root@jimmylinux- vhost]# curl -x127.0.0.: test.com/admin/

<html>

<head><title> Authorization Required</title></head>

<body bgcolor="white">

<center><h1> Authorization Required</h1></center>

<hr><center>nginx/1.12.</center>

</body>

</html>


[root@jimmylinux- vhost]# curl -ujimmy:abcd1234 -x127.0.0.: test.com/admin/  指定用户名和密码,访问成功。

test.com admin dir
还可以针对URL匹配指定的访问路径,同样是编辑配置文件。
[root@jimmylinux- vhost]# vim test.com.conf

server

{

    listen ;

    server_name test.com;

    index index.html index.htm index.php;

    root /data/wwwroot/test.com;

    location  ~ admin.php  匹配php的访问路径

    {

        auth_basic              "Auth";

        auth_basic_user_file   /usr/local/nginx/conf/htpasswd;

    }

}
12.9 Nginx域名重定向
1、更改配置文件test.com.conf
[root@jimmylinux- vhost]# vim test.com.conf

server

{

    listen ;

    server_name test.com test2.com test3.com;

    index index.html index.htm index.php;

    root /data/wwwroot/test.com;

    if ($host != 'test.com' ) {

        rewrite  ^/(.*)$  http://test.com/$1  permanent;

    }

}
2、curl测试
[root@jimmylinux- vhost]# /usr/local/nginx/sbin/nginx -t

nginx: the configuration file /usr/local/nginx/conf/nginx.conf syntax is ok

nginx: configuration file /usr/local/nginx/conf/nginx.conf test is successful

[root@jimmylinux- vhost]# /usr/local/nginx/sbin/nginx -s reload

[root@jimmylinux- vhost]# curl -x127.0.0.: test2.com/index.html -I

HTTP/1.1  Moved Permanently

Server: nginx/1.12.

Date: Thu,  Jun  :: GMT

Content-Type: text/html

Content-Length:

Connection: keep-alive

Location: http://test.com/index.html

[root@jimmylinux- vhost]# curl -x127.0.0.: test2.com/admin/index.html -I

HTTP/1.1  Moved Permanently

Server: nginx/1.12.

Date: Thu,  Jun  :: GMT

Content-Type: text/html

Content-Length:

Connection: keep-alive

Location: http://test.com/admin/index.html

[root@jimmylinux- vhost]# curl -x127.0.0.: test3.com/admin/index.html/adjlfj -I

HTTP/1.1  Moved Permanently

Server: nginx/1.12.

Date: Thu,  Jun  :: GMT

Content-Type: text/html

Content-Length:

Connection: keep-alive

Location: http://test.com/admin/index.html/adjlfj

[root@jimmylinux- vhost]# curl -x127.0.0.: test4.com/admin/index.html/adjlfj -I

HTTP/1.1  Not Found

Server: nginx/1.12.

Date: Thu,  Jun  :: GMT

Content-Type: text/html

Content-Length:

Connection: keep-alive
Nginx安装、默认虚拟主机、Nginx用户认证和域名重定向的更多相关文章
- Nginx安装 默认虚拟主机 Nginx用户认证 Nginx域名重定向
Nginx安装 cd /usr/local/src (http://nginx.org/en/download.html) wget http://nginx.org/download/nginx-1 ...
- nginx创建默认虚拟主机
创建默认虚拟主机配置文件作用:禁止任何人通过ip或未允许的域名访问web服务. 如:vim vhosts/default.conf server { listen 80 default; server ...
- LNMP配置——Nginx配置 —— 默认虚拟主机
一.配置 首先修改配置文件 #vi /usr/local/nginx/conf/nginx.conf 在最后一个结束符号}前加一行配置: include vhost/*.conf; 意思就是/usr/ ...
- LAMP 1.8默认虚拟主机
默认虚拟主机是为了解决别人域名恶心绑定自己的服务器ip,可导致服务器上的网站排名靠后,即干扰seo优化 我们访问指定的两个网站可以直接访问,ip也可以访问 打开配置文件 vim /usr/local/ ...
- apache禁止默认虚拟主机
禁止默认虚拟主机:作用使除特定域名外,其它的域名/ip无法访问此站点. 在虚拟主机配置文件中 即:/usr/local/apache2/conf/extra/httpd-vhosts.conf 将其中 ...
- nginx的安装 、Nginx默认虚拟主机、nginx用户认证、nginx 域名重定向
1.nginx:官网:www.nginx.org 下载:wget -c http://nginx.org/download/nginx-1.14.0.tar.gz解压:tar -zxvf nginx ...
- Linux centosVMware Nginx安装、 默认虚拟主机、Nginx用户认证、Nginx域名重定向
一. Nginx安装 cd /usr/local/src wget http://nginx.org/download/nginx-1.12.1.tar.gz 版本在http://nginx.org/ ...
- [转] linux学习第四十四篇:Nginx安装,Nginx默认虚拟主机,Nginx域名重定向
Nginx安装 进入存放源码包的目录: cd /usr/local/src 下载源码包: wget http://nginx.org/download/nginx-1.12.1.tar.gz 解压: ...
- centos LAMP第二部分apache配置 下载discuz!配置第一个虚拟主机 安装Discuz! 用户认证 配置域名跳转 配置apache的访问日志 配置静态文件缓存 配置防盗链 访问控制 apache rewrite 配置开机启动apache tcpdump 第二十节课
centos LAMP第二部分apache配置 下载discuz!配置第一个虚拟主机 安装Discuz! 用户认证 配置域名跳转 配置apache的访问日志 配置静态文件缓存 配置防盗链 ...
随机推荐
- 这次一定要教会你搭建Redis集群和MySQL主从同步(非Docker)
前言 一直都想自己动手搭建一个Redis集群和MySQL的主从同步,当然不是依靠Docker的一键部署(虽然现在企业开发用的最多的是这种方式),所以本文就算是一个教程类文章吧,但在动手搭建之前,会先聊 ...
- MIT线性代数:19.行列式和代数余子式
- Flex简记
display的flex属性的使用对象分为1.容器即包含有元素的元素,2.项目,即某一个元素.就容器而言,flex可以实现换行(flex-wrap),改变容器内元素的排列方向(flex-directi ...
- Js对象继承小结
1.继承 对象的定义好用一些的一般是把实例对象的属性定义在类里面,通过this指针指向具体实例属性.定义对象的public方法时将其绑定到prototype中.子类在继承父类时可以通过对象冒充来继承父 ...
- windsServer2008设置定时重启
点击“开始”——“管理工具”——“任务计划程序”. 右键“任务计划程序库”——“创建任务”. 输入计划名称.描述和安全选项(如下图). 点击触发器,点击“新建…”,输入计划周期和时间(如下图):无误后 ...
- python模块——socket
实例一. server: #socket套接字(IP + 端口号)(qq,wechat 发送接收消息依靠socket模块),cs架构import socketserver = socket.socke ...
- 小白学 Python(24):Excel 基础操作(下)
人生苦短,我选Python 前文传送门 小白学 Python(1):开篇 小白学 Python(2):基础数据类型(上) 小白学 Python(3):基础数据类型(下) 小白学 Python(4):变 ...
- [LC]141题 Linked List Cycle (环形链表)(链表)
①中文题目 给定一个链表,判断链表中是否有环. 为了表示给定链表中的环,我们使用整数 pos 来表示链表尾连接到链表中的位置(索引从 0 开始). 如果 pos 是 -1,则在该链表中没有环. 示例 ...
- Java基础:数组的声明,循环,赋值,拷贝。
数组的声明 一般有两种形式的声明: int[] a; int a[]; 这两种声明都没错,但是大多数都使用第一种声明,因为变量名是独立的,不带任何符号. 声明一个数组,并没有将a真正的初始化为一个数组 ...
- Chocolatey初体验
新电脑安装Nodejs时发现安装包提示是否自动安装Chocolatey,之前没看到过这个名词,于是搜索了下,发现Chocolatey是Windows平台的包管理工具,类似于Linux的yum/apt- ...