C++第四十三篇 -- VS2017创建控制台程序勾选MFC类库
用VS2017创建EXE带MFC类库方法
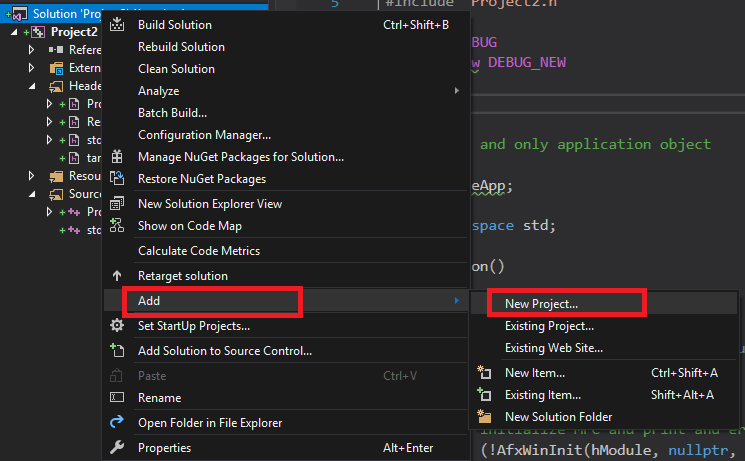
1. File --> New --> Project

2. Windows桌面向导
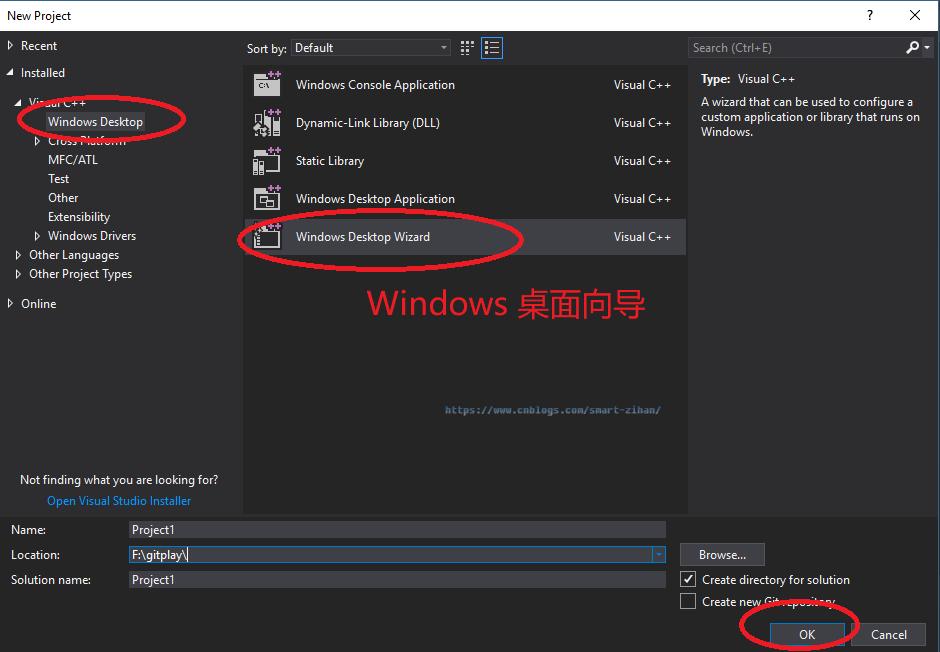
3. 勾选MFC类库

4. 创建成功
如果项目编译出错
1. 项目创建成功后编译报错界面

原因分析:缺少#include <afxwin.h>头文件。
解决方案:在#include "Project1.h"后面添加#include <afxwin.h>,编译通过。
如果上述方法不行,可参考下面解决方法,否则跳过以下内容。
原因分析:对比别人创建成功的项目,发现多了一个#include "framework.h"
解决方案:copy成功项目的framework.h头文件,并#include "framework.h",另外framework.h头文件中引用了targetver.h头文件,因此,将targetver.h头文件也copy过来
2. 编译成功后的界面
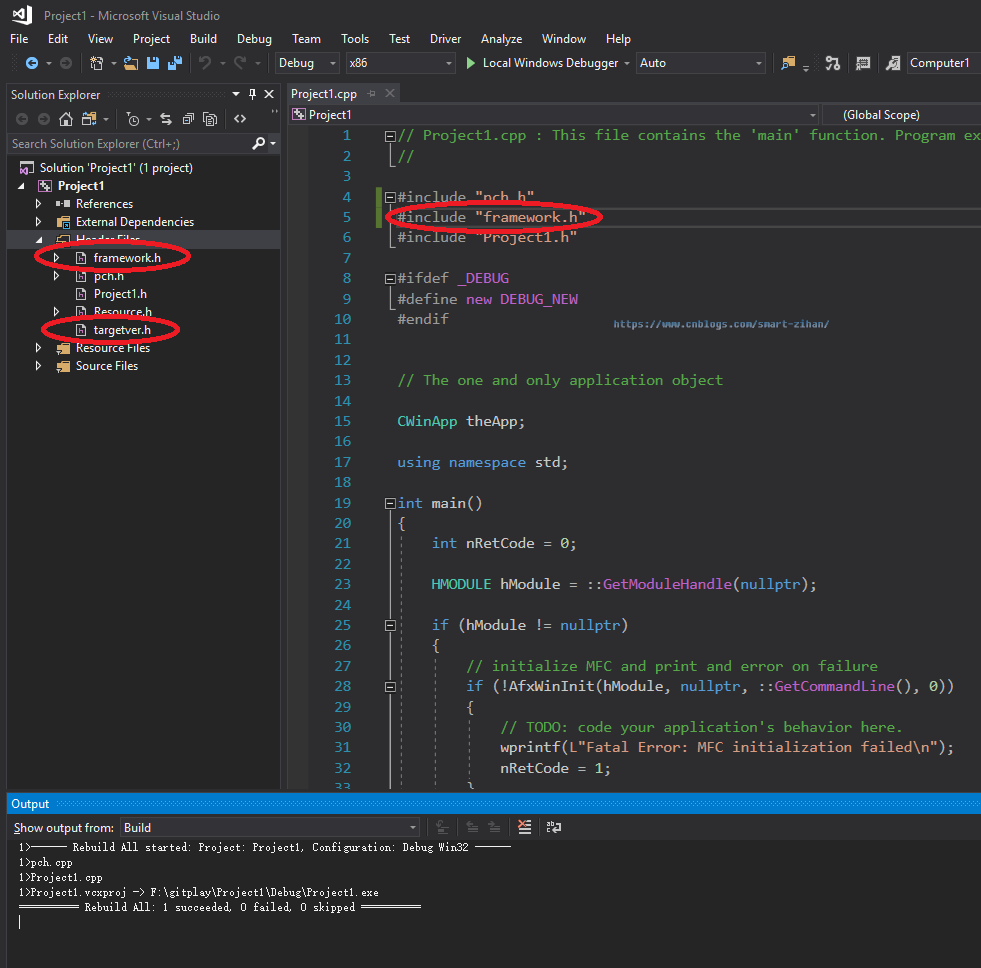
3. framework.h


#pragma once

#include "targetver.h"

#include <stdio.h>

#include <tchar.h>

#define _ATL_CSTRING_EXPLICIT_CONSTRUCTORS      // 部分 CString 构造函数将是显式的

#define _AFX_NO_MFC_CONTROLS_IN_DIALOGS         // 移除对话框中的 MFC 控件支持

#ifndef VC_EXTRALEAN

#define VC_EXTRALEAN            // 从 Windows 头文件中排除极少使用的内容

#endif

#include <afx.h>

#include <afxwin.h>         // MFC 核心组件和标准组件

#include <afxext.h>         // MFC 扩展

#ifndef _AFX_NO_OLE_SUPPORT

#include <afxdtctl.h>           // MFC 对 Internet Explorer 4 公共控件的支持

#endif

#ifndef _AFX_NO_AFXCMN_SUPPORT

#include <afxcmn.h>                     // MFC 对 Windows 公共控件的支持

#endif // _AFX_NO_AFXCMN_SUPPORT

#include <iostream>
4. targetver.h
#pragma once

// // 包含 SDKDDKVer.h 可定义可用的最高版本的 Windows 平台。

// 如果希望为之前的 Windows 平台构建应用程序,在包含 SDKDDKVer.h 之前请先包含 WinSDKVer.h 并

// 将 _WIN32_WINNT 宏设置为想要支持的平台。

#include <SDKDDKVer.h>
这样就不会编译出错了。
EXE调用MFC窗口
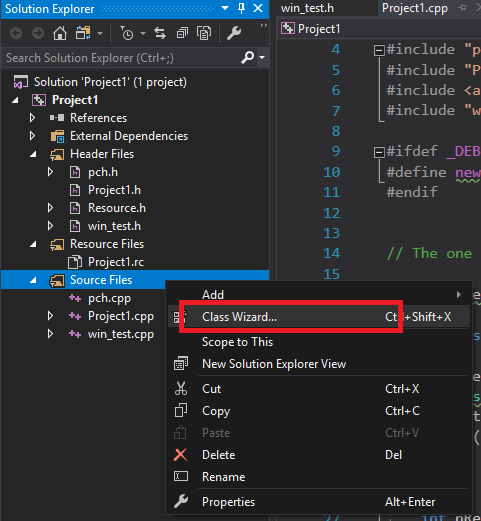
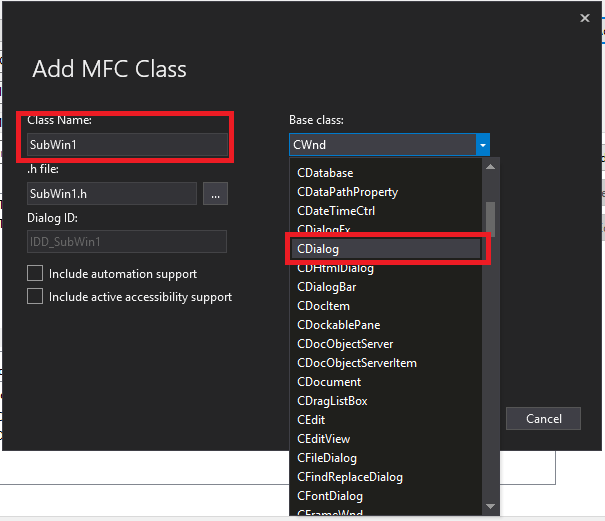
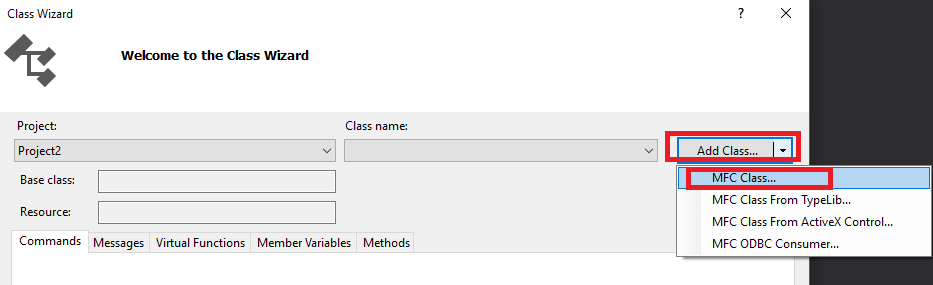
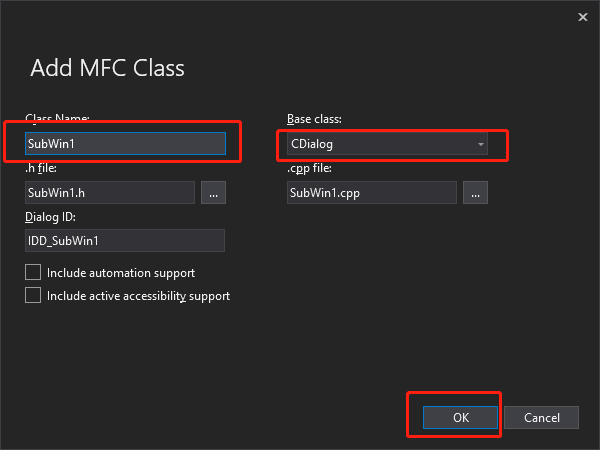
1. 新建一个子窗口


2. 修改SubWin1.cpp中#include "stdafx.h"为#include "pch.h"并且注释掉#include "Project1.h",然后添加#include "resource.h"如下
3. 在Project1.cpp中添加#include "SubWin1.h",然后用以下语句调用SubWin窗口
    SubWin1 *chartdialog = new SubWin1;

    int ReturnValue = chartdialog->DoModal(); // Show the dialog

    printf("%d\n", ReturnValue);
Project1.cpp
// Project1.cpp : This file contains the 'main' function. Program execution begins and ends there.

//

#include "pch.h"

#include "Project1.h"

#include <afxwin.h>

#include "win_test.h"

#include "SubWin1.h"

#ifdef _DEBUG

#define new DEBUG_NEW

#endif

// The one and only application object

CWinApp theApp;

using namespace std;

void win_test_show() {

    //win_test *chartdialog = new win_test;

    //int ReturnValue = chartdialog->DoModal(); // Show the dialog

    //printf("%d\n", ReturnValue);

    SubWin1 *chartdialog = new SubWin1;

    int ReturnValue = chartdialog->DoModal(); // Show the dialog

    printf("%d\n", ReturnValue);

}

int call() {

    int nRetCode = 0;

    HMODULE hModule = ::GetModuleHandle(nullptr);

    if (hModule != nullptr)

    {

        // initialize MFC and print and error on failure

        if (!AfxWinInit(hModule, nullptr, ::GetCommandLine(), 0))

        {

            // TODO: code your application's behavior here.

            wprintf(L"Fatal Error: MFC initialization failed\n");

            nRetCode = 1;

        }

        else

        {

            // TODO: code your application's behavior here.

            win_test_show();

        }

    }

    else

    {

        // TODO: change error code to suit your needs

        wprintf(L"Fatal Error: GetModuleHandle failed\n");

        nRetCode = 1;

    }

    return nRetCode;

}

int main()

{

    int nRetCode = 0;

    call();

    return nRetCode;

}
可以看到窗口已经成功调用了
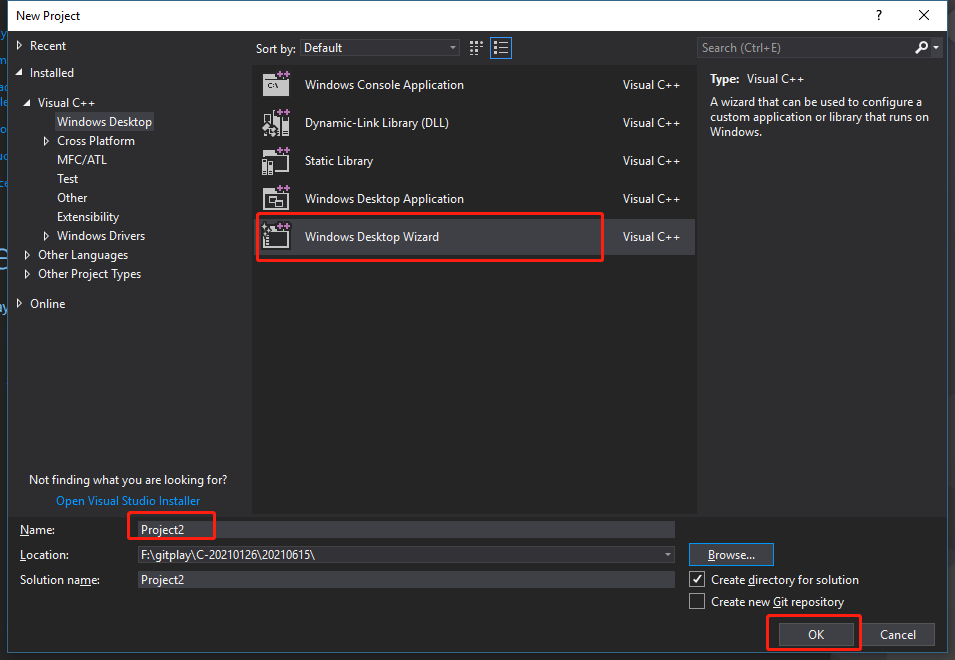
创建DLL带MFC类库方法
1. 新建一个Windows Desktop Wizard项目
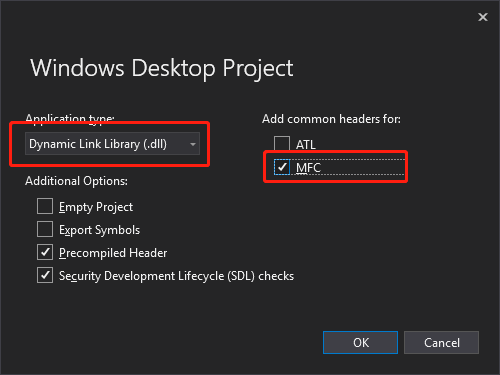
2. 勾选MFC,新建DLL
3. 编译程序,编译成功。
4. 新建一个Win32程序用来测试Dll

5. 在Dll中新建一个MFC的窗口

6. Project2.cpp中调用它,修改Project.cpp如下
// Project2.cpp : Defines the exported functions for the DLL application.

//

#include "stdafx.h"

#include "Project2.h"

#include "SubWin1.h"

#ifdef _DEBUG

#define new DEBUG_NEW

#endif

// The one and only application object

CWinApp theApp;

using namespace std;

int Function()

{

    int nRetCode = 0;

    HMODULE hModule = ::GetModuleHandle(nullptr);

    if (hModule != nullptr)

    {

        // initialize MFC and print and error on failure

        if (!AfxWinInit(hModule, nullptr, ::GetCommandLine(), 0))

        {

            // TODO: code your application's behavior here.

            wprintf(L"Fatal Error: MFC initialization failed\n");

            nRetCode = 1;

        }

        else

        {

            // TODO: code your application's behavior here.

            SubWin1 *chartdialog = new SubWin1;

            int ReturnValue = chartdialog->DoModal(); // Show the dialog

            printf("%d\n", ReturnValue);

        }

    }

    else

    {

        // TODO: change error code to suit your needs

        wprintf(L"Fatal Error: GetModuleHandle failed\n");

        nRetCode = 1;

    }

    return nRetCode;

}
7. 修改Project.h如下
// The following ifdef block is the standard way of creating macros which make exporting

// from a DLL simpler. All files within this DLL are compiled with the {0}_EXPORTS

// symbol defined on the command line. This symbol should not be defined on any project

// that uses this DLL. This way any other project whose source files include this file see

// {0}_API functions as being imported from a DLL, whereas this DLL sees symbols

// defined with this macro as being exported.

#ifdef __cplusplus

extern "C" {

#endif

#ifdef PROJECT2_EXPORTS

#define PROJECT2_API __declspec(dllexport)

#else

#define PROJECT2_API __declspec(dllimport)

#endif

// This class is exported from the dllxiu

    PROJECT2_API int Function();

#ifdef __cplusplus

}

#endif
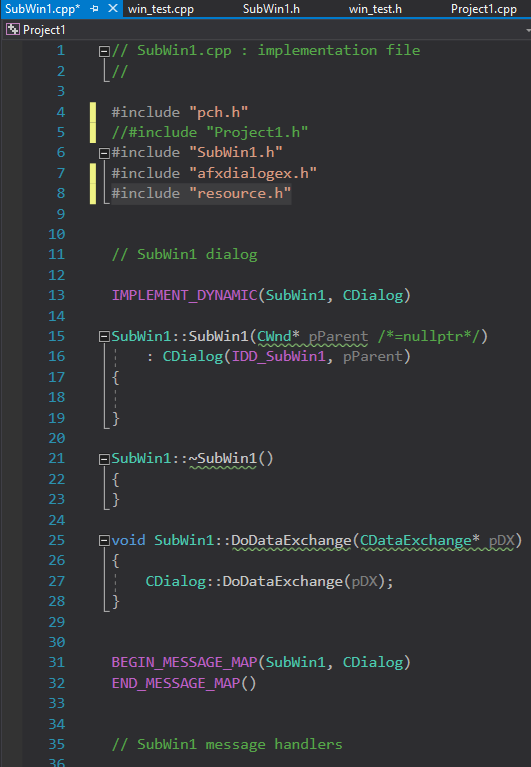
8. 将SubWin1.cpp中添加头文件#include "resource.h"
// SubWin1.cpp : implementation file

//

#include "stdafx.h"

#include "Project2.h"

#include "SubWin1.h"

#include "afxdialogex.h"

#include "resource.h"

// SubWin1 dialog

IMPLEMENT_DYNAMIC(SubWin1, CDialog)

SubWin1::SubWin1(CWnd* pParent /*=nullptr*/)

    : CDialog(IDD_SubWin1, pParent)

{

}

SubWin1::~SubWin1()

{

}

void SubWin1::DoDataExchange(CDataExchange* pDX)

{

    CDialog::DoDataExchange(pDX);

}

BEGIN_MESSAGE_MAP(SubWin1, CDialog)

END_MESSAGE_MAP()

// SubWin1 message handlers
9. 编辑Test.cpp调用dll,本次采用的是静态加载DLL的方法,具体操作方法可以看前文。
// Test.cpp : This file contains the 'main' function. Program execution begins and ends there.

//

#include "pch.h"

#include <iostream>

#include "../Project2/Project2.h"

int main()

{

    std::cout << "Hello World!\n";

    Function();

}

// Run program: Ctrl + F5 or Debug > Start Without Debugging menu

// Debug program: F5 or Debug > Start Debugging menu

// Tips for Getting Started:

//   1. Use the Solution Explorer window to add/manage files

//   2. Use the Team Explorer window to connect to source control

//   3. Use the Output window to see build output and other messages

//   4. Use the Error List window to view errors

//   5. Go to Project > Add New Item to create new code files, or Project > Add Existing Item to add existing code files to the project

//   6. In the future, to open this project again, go to File > Open > Project and select the .sln file
10. 执行结果如下

chartdialog->DoModal()的返回结果居然是-1,这里就是DLL调用MFC类和EXE调用MFC类的区别所在了。解决这个问题的关键就是要在调用窗口语句之前加上AFX_MANAGE_STATE(AfxGetStaticModuleState());这句话。
Project2.cpp
// Project2.cpp : Defines the exported functions for the DLL application.

//

#include "stdafx.h"

#include "Project2.h"

#include "SubWin1.h"

#ifdef _DEBUG

#define new DEBUG_NEW

#endif

// The one and only application object

CWinApp theApp;

using namespace std;

int Function()

{

    int nRetCode = 0;

    HMODULE hModule = ::GetModuleHandle(nullptr);

    if (hModule != nullptr)

    {

        // initialize MFC and print and error on failure

        if (!AfxWinInit(hModule, nullptr, ::GetCommandLine(), 0))

        {

            // TODO: code your application's behavior here.

            wprintf(L"Fatal Error: MFC initialization failed\n");

            nRetCode = 1;

        }

        else

        {

            // TODO: code your application's behavior here.

            AFX_MANAGE_STATE(AfxGetStaticModuleState());

            SubWin1 *chartdialog = new SubWin1;

            int ReturnValue = chartdialog->DoModal(); // Show the dialog

            printf("%d\n", ReturnValue);

        }

    }

    else

    {

        // TODO: change error code to suit your needs

        wprintf(L"Fatal Error: GetModuleHandle failed\n");

        nRetCode = 1;

    }

    return nRetCode;

}
这样就可以成功的在DLL中调出窗口。
C++第四十三篇 -- VS2017创建控制台程序勾选MFC类库的更多相关文章
- 四十三、在SAP中初始化勾选值
一.上代码 二.运行时,勾选框会被自动勾选中 三.表单如下
- Visual 中控制台程序如何使用MFC类库
unresolved external symbol __beginthreadex错误的解决Win32 Consle Application使用MFC的一些类如CString时编译时相信会很经常遇到 ...
- 控制台程序的参数解析类库 CommandLine
C#控制台程序的参数解析类库 CommandLine简单使用说明 前言 C#开发的控制台程序,默认接收string[] args参数.如果有多个参数需要输入时,可以按照顺序依次输入:但如果有些参数不是 ...
- C#控制台程序的参数解析类库 CommandLine简单使用说明
前言 C#开发的控制台程序,默认接收string[] args参数.如果有多个参数需要输入时,可以按照顺序依次输入:但如果有些参数不是必选的,或者有些参数中间需要有空格比如时间“2016-05-18 ...
- Android UI开发第四十三篇——使用Property Animation实现墨迹天气3.0引导界面及动画实现
前面写过<墨迹天气3.0引导界面及动画实现>,里面完美实现了动画效果,那一篇文章使用的View Animation,这一篇文章使用的Property Animation实现.Propert ...
- 第四十三篇、利用NSProxy解决NSTimer内存泄漏问题
问题描述: 用NSTimer来实现每隔一定时间执行制定的任务,例如最常见的广告轮播图.如果我们在 timerWithTimeInterval:1 target:self 中指定target为当前控制器 ...
- Python学习笔记(四十三)virtualenv (创建一套“隔离”的Python运行环境)
摘抄自:https://www.liaoxuefeng.com/wiki/0014316089557264a6b348958f449949df42a6d3a2e542c000/001432712108 ...
- Python之路(第四十三篇)线程的生命周期、全局解释器锁
一.线程的生命周期(新建.就绪.运行.阻塞和死亡) 当线程被创建并启动以后,它既不是一启动就进入执行状态的,也不是一直处于执行状态的,在线程的生命周期中,它要经过新建(new).就绪(Ready).运 ...
- VS2017创建控制台应用后,编写完代码调试正常,使用exe文件直接执行出现闪退情况解决方法。
这是因为代码中包含的相对路径的原因. 解决办法:把项目中包含的所有相对路径修改为绝对路径. (个人觉得因为直接执行exe文件,默认打开在C盘的用户目录下.) 例如: std::string DATA_ ...
随机推荐
- 手写Spring,定义标记类型Aware接口,实现感知容器对象
作者:小傅哥 博客:https://bugstack.cn 沉淀.分享.成长,让自己和他人都能有所收获! 一.前言 同事写的代码,我竟丝毫看不懂! 大佬的代码,就像 "赖蛤蟆泡青蛙,张的丑玩 ...
- Docker(39)- docker 实战二之安装 Tomcat
背景 参考了狂神老师的 Docker 教程,非常棒! https://www.bilibili.com/video/BV1og4y1q7M4?p=15 直接运行容器 本地找不到镜像会自动下载 --rm ...
- 『心善渊』Selenium3.0基础 — 11、Selenium对元素常用操作
目录 1.Selenium对元素常用操作 2.Selenium对元素的其他操作 1.Selenium对元素常用操作 操作 说明 click() 单击元素 send_keys() 模拟输入 clear( ...
- 如何在国产龙芯架构平台上运行c/c++、java、nodejs等编程语言
高能预警:本文内容过于硬核,涉及编译器原理.cpu指令集.机器码.编程语言原理.跨平台原理等计算机专业基础知识,建议具有c.c++.java.nodejs等多种编程语言开发能力,且实战经验丰富的资深开 ...
- SSH远程登录相关教程
命令概述 命令 英文 ssh 用户名@ip secure shell scp 用户名@ip:文件名或路径 用户名@ip:文件名或路径 secure copy 在 Linux 中 SSH 是 非常常用 ...
- SpringBoot Validation优雅的全局参数校验
前言 我们都知道在平时写controller时候,都需要对请求参数进行后端校验,一般我们可能会这样写 public String add(UserVO userVO) { if(userVO.getA ...
- netcore3.1 + vue (前后端分离) IIS 部署
1.安装 aspnetcore-runtime-3.1.1-win-x64.exe 2.安装dotnet-hosting-3.1.1-win.exe 3.安装urlrewrite和applicatio ...
- 一文看懂HTTPS、证书机构(CA)、证书、数字签名、私钥、公钥(转)
说到https,我们就不得不说tls/ssl,那说到tls/ssl,我们就不得不说证书机构(CA).证书.数字签名.私钥.公钥.对称加密.非对称加密.这些到底有什么用呢,正所谓存在即合理,这篇文章我就 ...
- Quzrtz.net 示例
//框架.Net Core 2.0//先用Nuget 安装最新quartz.net using System; using Quartz; using Quartz.Impl; using Syste ...
- AspNetCore&MassTransit Courier实现分布式事务
在之前的一篇博文中,CAP框架可以方便我们实现非实时.异步场景下的最终一致性,而有些用例总是无法避免的需要在实时.同步场景下进行,可以借助Saga事务来解决这一困扰.在一些博文和仓库中也搜寻到了.Ne ...