Flume(二)【入门】
一.安装部署
下载安装包,解压,分发多节点
1.安装地址
(1) Flume官网:http://flume.apache.org/
(2)文档查看:http://flume.apache.org/FlumeUserGuide.html
(3)下载:http://archive.apache.org/dist/flume/
2.安装步骤
(1)将apache-flume-1.9.0-bin.tar.gz上传到linux的/opt/software目录下
(2)解压apache-flume-1.9.0-bin.tar.gz到/opt/module/目录下
tar -zxf /opt/software/apache-flume-1.9.0-bin.tar.gz -C /opt/module/
(3)修改apache-flume-1.9.0-bin的名称为flume
mv /opt/module/apache-flume-1.9.0-bin /opt/module/flume
(4)将lib文件夹下的guava-11.0.2.jar删除以兼容Hadoop 3.1.3,否则报错
rm /opt/module/flume/lib/guava-11.0.2.jar
二.入门案例
1.官方案例(nestat->logger)
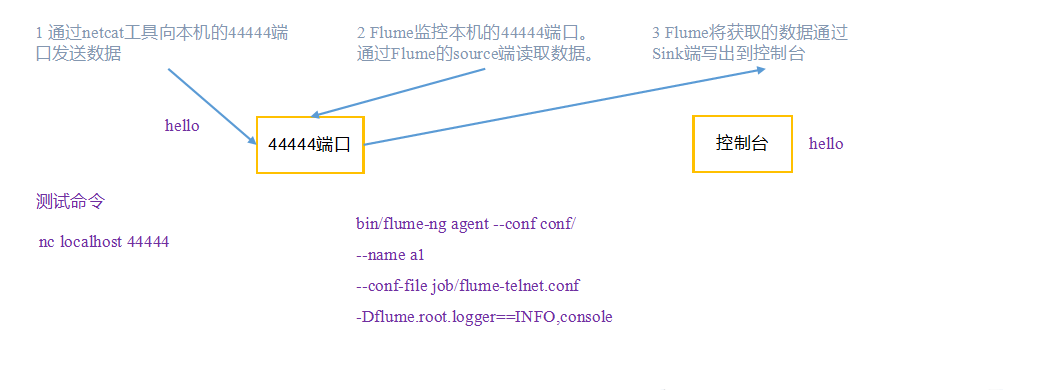
需求:使用Flume监听一个端口,收集该端口数据,并打印到控制台。
需求分析
步骤
1)安装netcat工具
[atguigu@hadoop102 software]$ sudo yum install -y nc
2)判断44444端口是否被占用
[atguigu@hadoop102 flume-telnet]$ sudo netstat -tunlp | grep 44444
3)创建Flume Agent配置文件flume-netcat-logger.conf
在opt/modult/flume目录下创建job目录用来存放flume agent的配置文件,在job文件夹下创建flume-netcat-logger.conf。
[atguigu@hadoop102 flume]$ mkdir job

[atguigu@hadoop102 flume]$ cd job/

[atguigu@hadoop102 job]$ vim flume-netcat-logger.conf
在flume-netcat-logger.conf添加如下内容
添加内容如下:
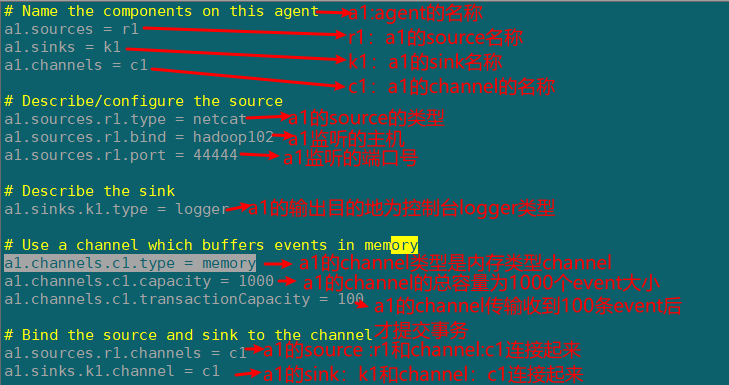
# Name the components on this agent
a1.sources = r1
a1.sinks = k1
a1.channels = c1
# Describe/configure the source
a1.sources.r1.type = netcat
a1.sources.r1.bind = localhost
a1.sources.r1.port = 44444
# Describe the sink
a1.sinks.k1.type = logger
# Use a channel which buffers events in memory
a1.channels.c1.type = memory
a1.channels.c1.capacity = 1000
a1.channels.c1.transactionCapacity = 100
# Bind the source and sink to the channel
a1.sources.r1.channels = c1
a1.sinks.k1.channel = c1
注:配置文件来源于官方手册http://flume.apache.org/FlumeUserGuide.html
配置文件解析
4)先开启flume监听端口
[atguigu@hadoop102 flume]$ bin/flume-ng agent --conf conf/ --name a1 --conf-file job/flume-netcat-logger.conf -Dflume.root.logger=INFO,console
缩写形式
[atguigu@hadoop102 flume]$ bin/flume-ng agent -c conf/ -n a1 -f job/flume-netcat-logger.conf -Dflume.root.logger=INFO,console
参数说明
--conf/-c:表示配置文件存储在conf/目录
--name/-n:表示给agent起名为a1
--conf-file/-f:flume本次启动读取的配置文件是在job文件夹下的flume-telnet.conf文件。
-Dflume.root.logger=INFO,console :-D表示flume运行时动态修改flume.root.logger参数属性值,并将控制台日志打印级别设置为INFO级别。日志级别包括:log、info、warn、error。
5)使用netcat工具向本机的44444端口发送内容
[atguigu@hadoop102 ~]$ nc localhost 44444

hello

flume
6)在Flume监听页面观察数据接收情况

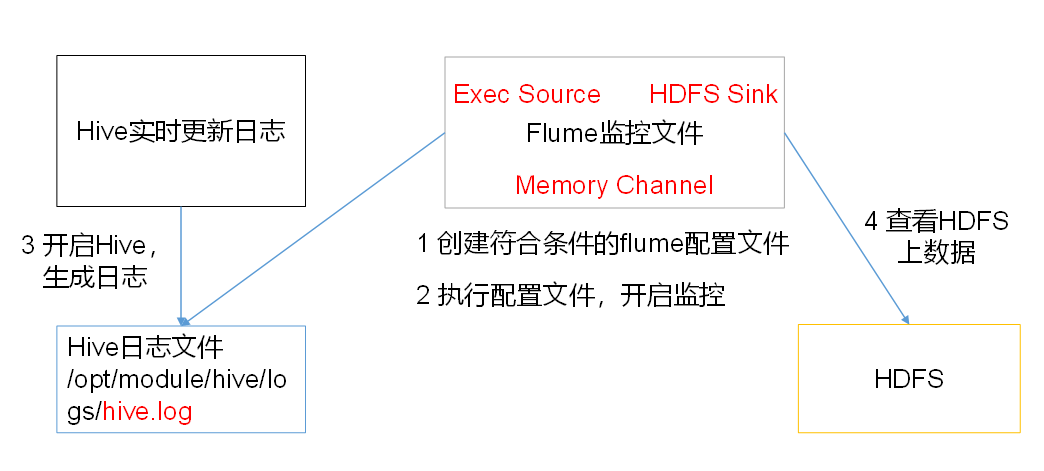
2.实时监控单个追加文件(exec->hdfs)
需求:实时监控Hive日志,并上传到HDFS中
需求分析
步骤
1)创建flume-file-hdfs.conf文件
注:要想读取Linux系统中的文件,就得按照Linux命令的规则执行命令。由于Hive日志在Linux系统中所以读取文件的类型选择:exec即execute执行的意思。表示执行Linux命令来读取文件。
添加一下内容:
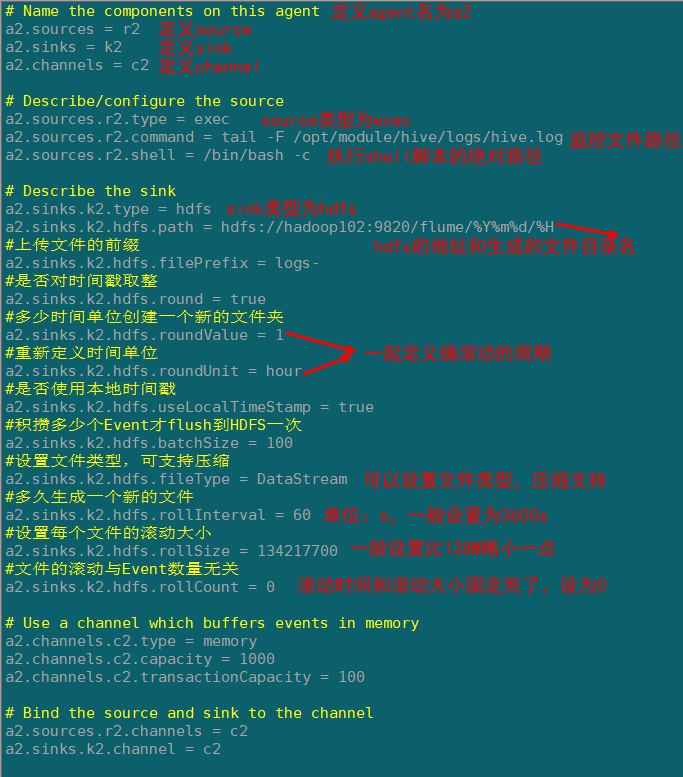
# Name the components on this agent

a2.sources = r2

a2.sinks = k2

a2.channels = c2

# Describe/configure the source

a2.sources.r2.type = exec

a2.sources.r2.command = tail -F /opt/module/hive/logs/hive.log

a2.sources.r2.shell = /bin/bash -c

# Describe the sink

a2.sinks.k2.type = hdfs

a2.sinks.k2.hdfs.path = hdfs://hadoop102:9820/flume/%Y%m%d/%H

#上传文件的前缀

a2.sinks.k2.hdfs.filePrefix = logs-

#是否对时间戳取整

a2.sinks.k2.hdfs.round = true

#多少时间单位创建一个新的文件夹

a2.sinks.k2.hdfs.roundValue = 1

#重新定义时间单位

a2.sinks.k2.hdfs.roundUnit = hour

#是否使用本地时间戳

a2.sinks.k2.hdfs.useLocalTimeStamp = true

#积攒多少个Event才flush到HDFS一次

a2.sinks.k2.hdfs.batchSize = 100

#设置文件类型,可支持压缩

a2.sinks.k2.hdfs.fileType = DataStream

#多久生成一个新的文件

a2.sinks.k2.hdfs.rollInterval = 60

#设置每个文件的滚动大小

a2.sinks.k2.hdfs.rollSize = 134217700

#文件的滚动与Event数量无关

a2.sinks.k2.hdfs.rollCount = 0

# Use a channel which buffers events in memory

a2.channels.c2.type = memory

a2.channels.c2.capacity = 1000

a2.channels.c2.transactionCapacity = 100

# Bind the source and sink to the channel

a2.sources.r2.channels = c2

a2.sinks.k2.channel = c2
配置文件解析
2)运行Flume agent
[atguigu@hadoop102 flume]$ bin/flume-ng agent -c conf/ --n a2 -f job/flume-file-hdfs.conf
3)启动hdfs集群和hive
[atguigu@hadoop102 hadoop-2.7.2]$ sbin/start-dfs.sh

[atguigu@hadoop103 hadoop-2.7.2]$ sbin/start-yarn.sh

[atguigu@hadoop102 hive]$ bin/hive

hive (default)>
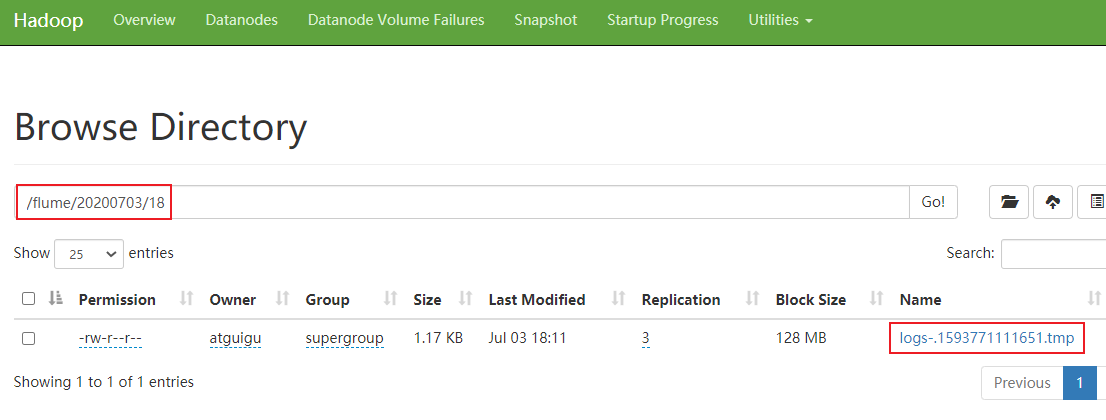
4)查看hdfs的上文件
3.实时监控目录下多个新文件(spooldir->hdfs)
案例需求:使用Flume监听整个目录的文件,并上传至HDFS
需求分析
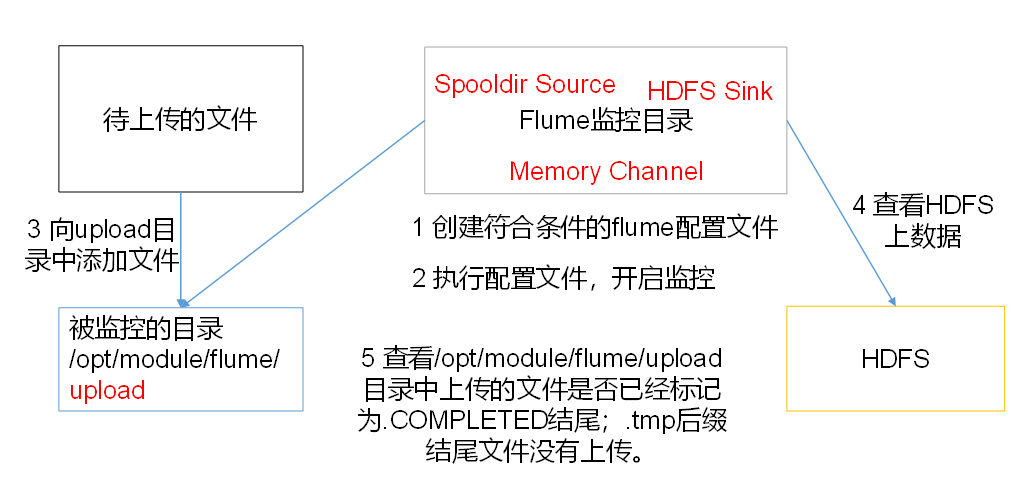
步骤
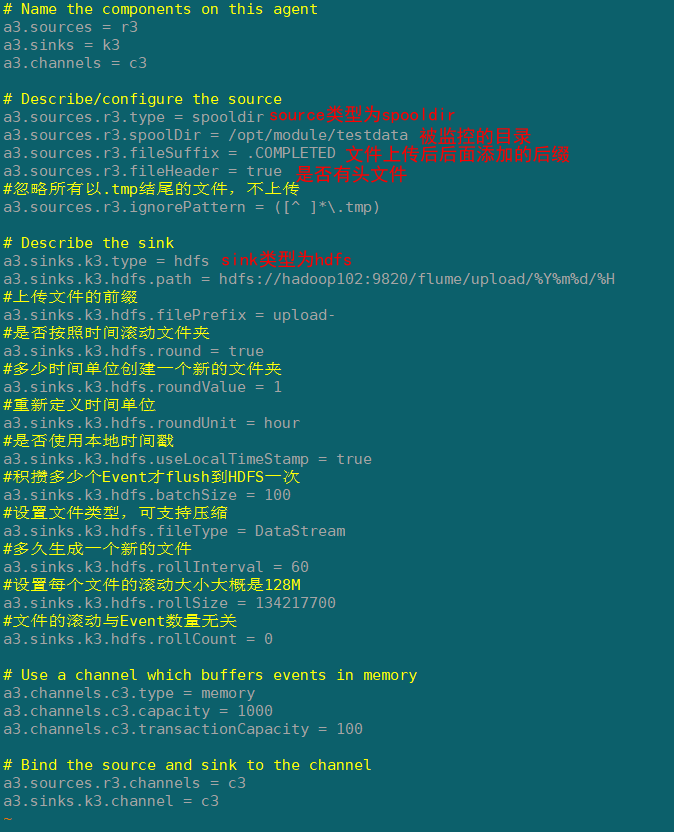
1)创建配置文件flume-dir-hdfs.conf
添加一下内容
a3.sources = r3

a3.sinks = k3

a3.channels = c3

# Describe/configure the source

a3.sources.r3.type = spooldir

a3.sources.r3.spoolDir = /opt/module/testdata

a3.sources.r3.fileSuffix = .COMPLETED

a3.sources.r3.fileHeader = true

#忽略所有以.tmp结尾的文件,不上传

a3.sources.r3.ignorePattern = ([^ ]*\.tmp)

# Describe the sink

a3.sinks.k3.type = hdfs

a3.sinks.k3.hdfs.path = hdfs://hadoop102:9820/flume/upload/%Y%m%d/%H

#上传文件的前缀

a3.sinks.k3.hdfs.filePrefix = upload-

#是否按照时间滚动文件夹

a3.sinks.k3.hdfs.round = true

#多少时间单位创建一个新的文件夹

a3.sinks.k3.hdfs.roundValue = 1

#重新定义时间单位

a3.sinks.k3.hdfs.roundUnit = hour

#是否使用本地时间戳

a3.sinks.k3.hdfs.useLocalTimeStamp = true

#积攒多少个Event才flush到HDFS一次

a3.sinks.k3.hdfs.batchSize = 100

#设置文件类型,可支持压缩

a3.sinks.k3.hdfs.fileType = DataStream

#多久生成一个新的文件

a3.sinks.k3.hdfs.rollInterval = 60

#设置每个文件的滚动大小大概是128M

a3.sinks.k3.hdfs.rollSize = 134217700

#文件的滚动与Event数量无关

a3.sinks.k3.hdfs.rollCount = 0

# Use a channel which buffers events in memory

a3.channels.c3.type = memory

a3.channels.c3.capacity = 1000

a3.channels.c3.transactionCapacity = 100

# Bind the source and sink to the channel

a3.sources.r3.channels = c3

a3.sinks.k3.channel = c3
配置文件解析
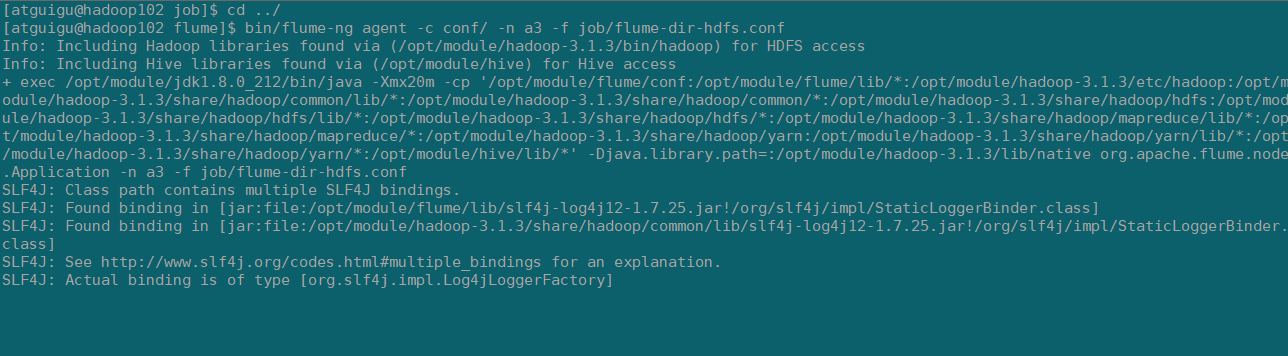
2)启动监控文件夹命令
[atguigu@hadoop102 flume]$ bin/flume-ng agent -c conf/ -n a3 -f job/flume-dir-hdfs.conf
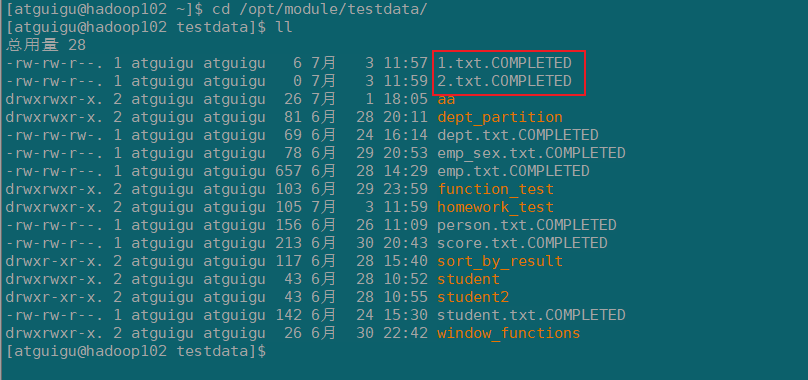
3)向testdata文件夹中添加文件
观察文件名
4)查看hdfs上数据
注意
- 在监控目录下的文件修改文件名的会,会再次上传,所以不要持续改动
2)上传成功后文件会以.complted结尾,
3)同名文件上传两次会导致任务挂掉,第二次的文件不会上传,需要删除第二次的同名文件
4.实时监控目录下的多个追加文件(Taildir->hdfs)
Exec source适用于监控一个实时追加的文件,不能实现断点续传;Spooldir Source适合用于同步新文件,但不适合对实时追加日志的文件进行监听并同步;而Taildir Source适合用于监听多个实时追加的文件,并且能够实现断点续传。
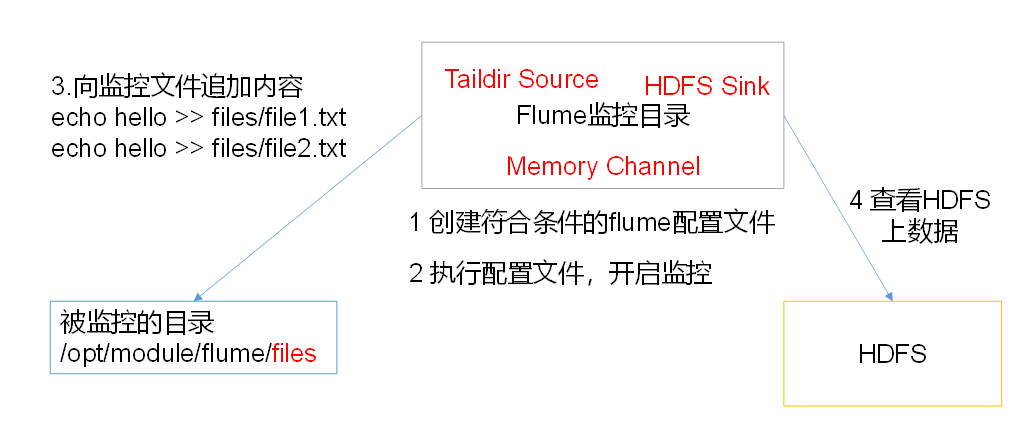
案例需求:使用Flume监听整个目录的实时追加文件,并上传至HDFS
需求分析
步骤
1)创建配置文件flume-taildir-hdfs.conf
添加一下内容:
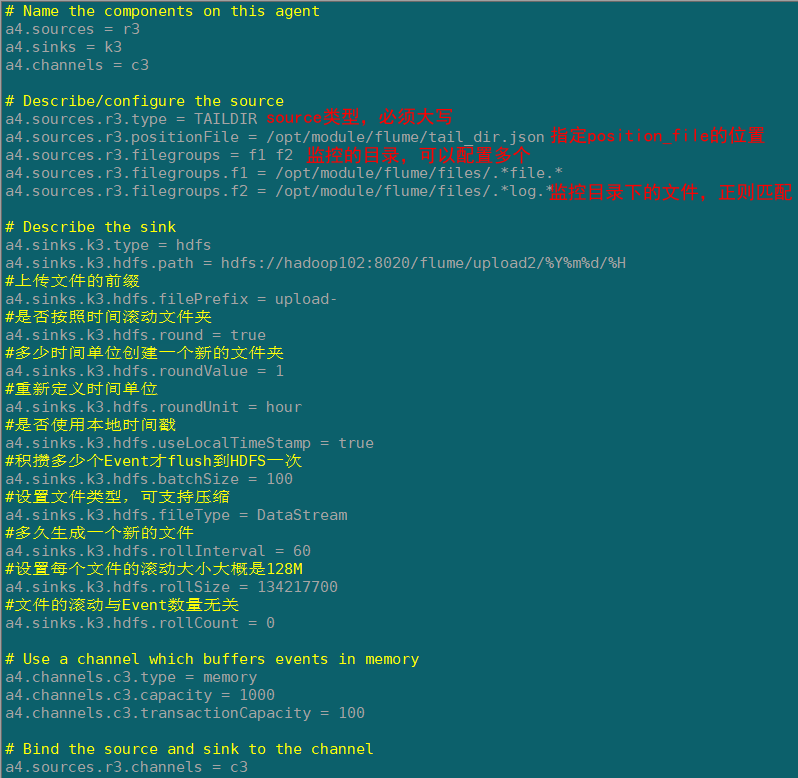
# Name the components on this agent

a4.sources = r3

a4.sinks = k3

a4.channels = c3

# Describe/configure the source

a4.sources.r3.type = TAILDIR

a4.sources.r3.positionFile = /opt/module/flume/tail_dir.json

a4.sources.r3.filegroups = f1 f2

a4.sources.r3.filegroups.f1 = /opt/module/flume/files/.*file.*

a4.sources.r3.filegroups.f2 = /opt/module/flume/files/.*log.*

# Describe the sink

a4.sinks.k3.type = hdfs

a4.sinks.k3.hdfs.path = hdfs://hadoop102:9820/flume/upload2/%Y%m%d/%H

#上传文件的前缀

a4.sinks.k3.hdfs.filePrefix = upload-

#是否按照时间滚动文件夹

a4.sinks.k3.hdfs.round = true

#多少时间单位创建一个新的文件夹

a4.sinks.k3.hdfs.roundValue = 1

#重新定义时间单位

a4.sinks.k3.hdfs.roundUnit = hour

#是否使用本地时间戳

a4.sinks.k3.hdfs.useLocalTimeStamp = true

#积攒多少个Event才flush到HDFS一次

a4.sinks.k3.hdfs.batchSize = 100

#设置文件类型,可支持压缩

a4.sinks.k3.hdfs.fileType = DataStream

#多久生成一个新的文件

a4.sinks.k3.hdfs.rollInterval = 60

#设置每个文件的滚动大小大概是128M

a4.sinks.k3.hdfs.rollSize = 134217700

#文件的滚动与Event数量无关

a4.sinks.k3.hdfs.rollCount = 0

# Use a channel which buffers events in memory

a4.channels.c3.type = memory

a4.channels.c3.capacity = 1000

a4.channels.c3.transactionCapacity = 100

# Bind the source and sink to the channel

a4.sources.r3.channels = c3

a4.sinks.k3.channel = c3
配置文件解析
2)启动监控文件夹命令
[atguigu@hadoop102 flume]$ bin/flume-ng agent --conf conf/ --name a3 --conf-file job/flume-taildir-hdfs.conf
3)向files文件夹追加内容
在opt/module/flume创建files文件夹,添加文件
[atguigu@hadoop102 flume]$ mkdir files

[atguigu@hadoop102 files]$ echo hello >> file1.txt

[atguigu@hadoop102 files]$ echo atguigu >> file2.txt
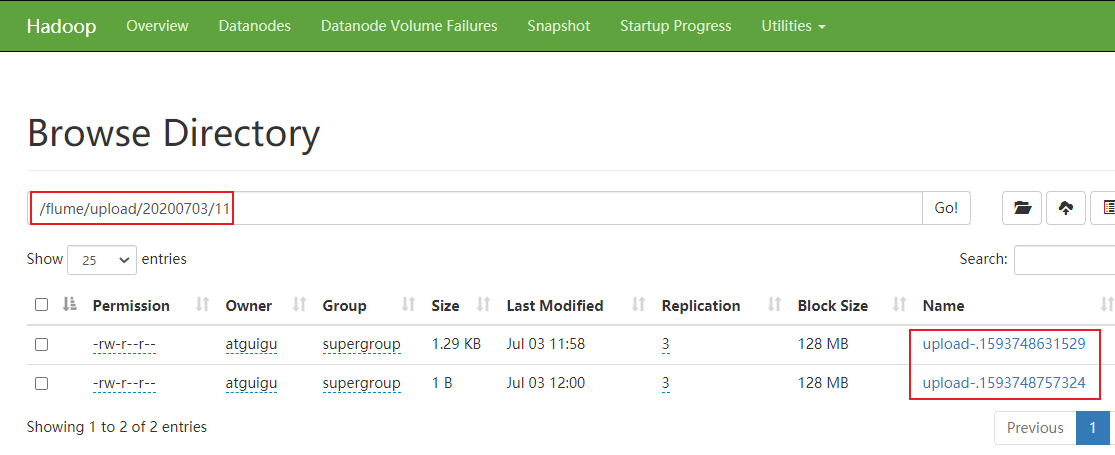
4)查看hdfs

Taildir
Taildir Source维护了一个json格式的position File,其会定期的往position File中更新每个文件读取到的最新的位置,因此能够实现断点续传。Position File的格式如下:
{"inode":2496272,"pos":12,"file":"/opt/module/flume/files/file1.txt"}
{"inode":2496275,"pos":12,"file":"/opt/module/flume/files/file2.txt"}
注:Linux中储存文件元数据的区域就叫做inode,每个inode都有一个号码,操作系统用inode号码来识别不同的文件,Unix/Linux系统内部不使用文件名,而使用inode号码来识别文件。

三.FAQ
1.注意hdfs的端口,ip别配置错误否则导致连接异常
2.注意flume1.9的lib包的guava包可能和hadoop中的冲突,以高版本的为准
Flume(二)【入门】的更多相关文章
- Android(Lollipop/5.0) Material Design(二) 入门指南
Material Design系列 Android(Lollipop/5.0)Material Design(一) 简介 Android(Lollipop/5.0)Material Design(二) ...
- 大数据技术之_09_Flume学习_Flume概述+Flume快速入门+Flume企业开发案例+Flume监控之Ganglia+Flume高级之自定义MySQLSource+Flume企业真实面试题(重点)
第1章 Flume概述1.1 Flume定义1.2 Flume组成架构1.2.1 Agent1.2.2 Source1.2.3 Channel1.2.4 Sink1.2.5 Event1.3 Flum ...
- Flume初入门简单配置与使用
1.Flume在集群中扮演的角色 Flume.Kafka用来实时进行数据收集,Spark.Storm用来实时处理数据,impala用来实时查询. 2.Flume框架简介 1.1 Flume提供一个分布 ...
- Flume 中文入门手冊
原文:https://cwiki.apache.org/confluence/display/FLUME/Getting+Started 什么是 Flume NG? Flume NG 旨在比起 Flu ...
- 《Java从入门到放弃》JavaSE入门篇:面向对象语法二(入门版)
想了半天,发现单独的封装和多态没什么好讲的,我们就简单说说Java里面对应的语法吧. 相关内容如下: 一.访问修饰符 二.getter/setter方法 三.构造方法 四.super和this 五.s ...
- Mybatis(二)入门程序-通过id查找用户、模糊查找用户、添加用户、删除用户
根据下图myBatis的架构,创建一个使用MyBatis的工程. 一.配置MyBatis 环境(如图) 1.sqlMapConfig.xml 首先,导入jar包(上图右边)并加载路径,然后 ...
- go微服务框架go-micro深度学习(二) 入门例子
上一篇帖子简单介绍了go-micro的整体框架结构,这一篇主要写go-micro使用方式的例子,中间会穿插一些go-micro的源码,和调用流程图,帮大家更好的理解go-micro的底层.更详细更具体 ...
- Flume - 快速入门
关于Flume,官方定义如下: Apache Flume is a distributed, reliable, and available system for efficiently collec ...
- 第1节 flume:6、flume的入门测试案例
案例:使用网络telent命令向一台机器发送一些网络数据,然后通过flume采集网络端口数据. 1.2.1 Flume的安装部署 第一步:下载解压修改配置文件 Flume的安装非常简单,只需要解压即可 ...
随机推荐
- Ubuntu 16.04 菜单栏 换位置 挪到左边 挪到下边
Ubuntu菜单栏的位置可以调 到左侧 或者底部 调整到底部 $ gsettings set com.canonical.Unity.Launcher launcher-position Bottom ...
- Spark记录(一):Spark全景概述
一.Spark是什么 Spark是一个开源的大数据处理引擎. 二.Spark的主要组件如下图所示: 三.Spark运行时架构 Spark共有三种运行模式:本地模式.集群模式.客户端模式. 生产环境基 ...
- fork()和vfork()的区别,signal函数用法,exec()系列函数的用法小结
一:fork()和vfork()的区别: fork()函数可以创建子进程,有两个返回值,即调用一次返回两个值,一个是父进程调用fork()后的返回值,该返回值是刚刚创建的子进程的ID;另一个是子 ...
- Linux&C 线程控制 课后习题
Q1:多线程与多进程相比有什么优势? 多进程程序耗费的资源大,因为fork()的时候子进程需要继承父进程的几乎所有东西,但是多线程程序线程只继承一部分,即自己的私有数据,例如自己的线程ID,一组寄存器 ...
- Mysql—— 内连接、左连接、右连接以及全连接查询
CREATE TABLE `a_table` ( `a_id` int(11) DEFAULT NULL, `a_name` varchar(10) DEFAULT NULL, `a_part` va ...
- PTA 7-1 还原二叉树 (25分)
PTA 7-1 还原二叉树 (25分) 给定一棵二叉树的先序遍历序列和中序遍历序列,要求计算该二叉树的高度. 输入格式: 输入首先给出正整数N(≤50),为树中结点总数.下面两行先后给出先序和中序遍历 ...
- Java 中的关键字
Java 中有多少个关键字,有大小写之分吗? Java 中有 48 个关键字在使用 + 两个保留关键字未使用,共 50 个关键字. Java 关键字全部都由是小写组成. Java 中保留关键字分别是哪 ...
- 大爽Python入门教程 0-3 安装Atom与配置Python环境
大爽Python入门公开课教案 点击查看教程总目录 安装轻量级IDE--Atom 一 下载 下面步骤1,2中网络卡顿的朋友, 请直接查看步骤3来操作 1. 搜索官网 使用搜索引擎搜索Atom, 打开搜 ...
- 菜鸡的Java笔记 - java 线程的同步与死锁 (同步 synchronization,死锁 deadlock)
线程的同步与死锁 (同步 synchronization,死锁 deadlock) 多线程的操作方法 1.线程同步的产生与解决 2.死锁的问题 ...
- Django 项目配置拆分独立
目录 一.创建配置目录 二.创建基础配置文件 三.创建各个环境的配置 四.调整settings.py 五.程序使用 六.目录结构 Django 项目中,我们默认的配置是都在 settings.py 文 ...