aspnetcore 应用 接入Keycloak快速上手指南
登录及身份认证是现代web应用最基本的功能之一,对于企业内部的系统,多个系统往往希望有一套SSO服务对企业用户的登录及身份认证进行统一的管理,提升用户同时使用多个系统的体验,Keycloak正是为此种场景而生。本文将简明的介绍Keycloak的安装、使用,并给出aspnetcore 应用如何快速接入Keycloak的示例。
Keycloak是什么
Keycloak是一种面向现代应用和服务的开源IAM(身份识别与访问管理)解决方案
Keycloak提供了单点登录(SSO)功能,支持OpenID Connect、OAuth 2.0、SAML 2.0标准协议,拥有简单易用的管理控制台,并提供对LDAP、Active Directory以及Github、Google等社交账号登录的支持,做到了非常简单的开箱即用。
Keycloak常用核心概念介绍
首先通过官方的一张图来了解下整体的核心概念
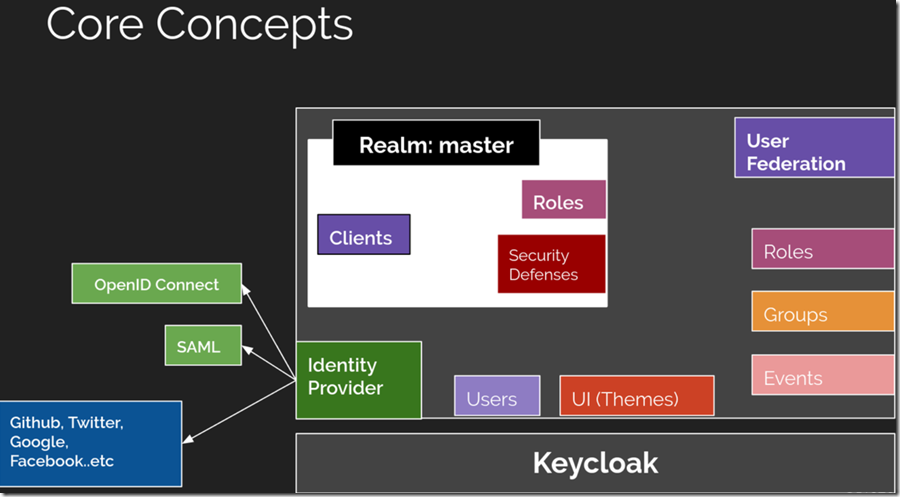
这里先只介绍4个最常用的核心概念:
Users: 用户,使用并需要登录系统的对象Roles: 角色,用来对用户的权限进行管理Clients: 客户端,需要接入Keycloak并被Keycloak保护的应用和服务Realms: 领域,领域管理着一批用户、证书、角色、组等,一个用户只能属于并且能登陆到一个域,域之间是互相独立隔离的, 一个域只能管理它下面所属的用户
Keycloak服务安装及配置
安装Keycloak
Keycloak安装有多种方式,这里使用Docker进行快速安装
登录后复制
docker run -d --name keycloak \

    -p 8080:8080 \

    -e KEYCLOAK_USER=admin \

    -e KEYCLOAK_PASSWORD=admin \
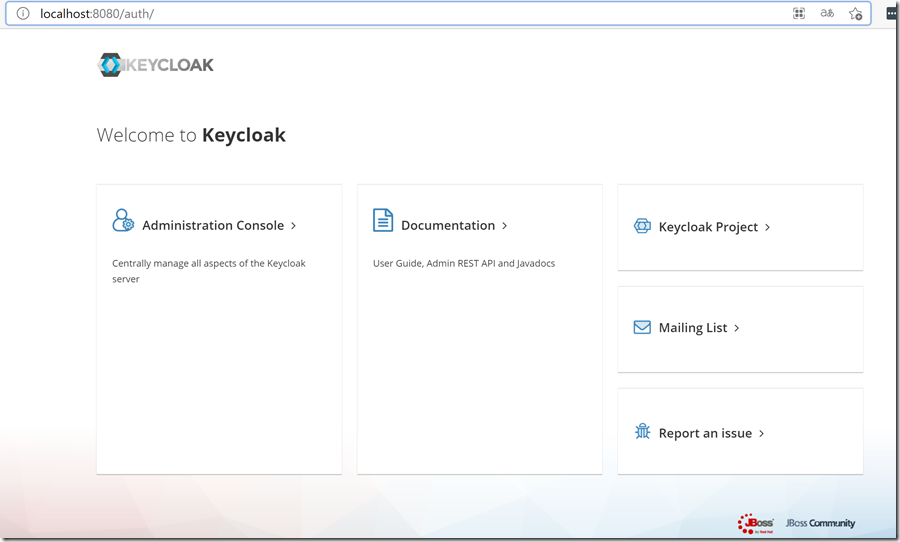
jboss/keycloak:13.0.0访问http://localhost:8080并点击Administration Console进行登录
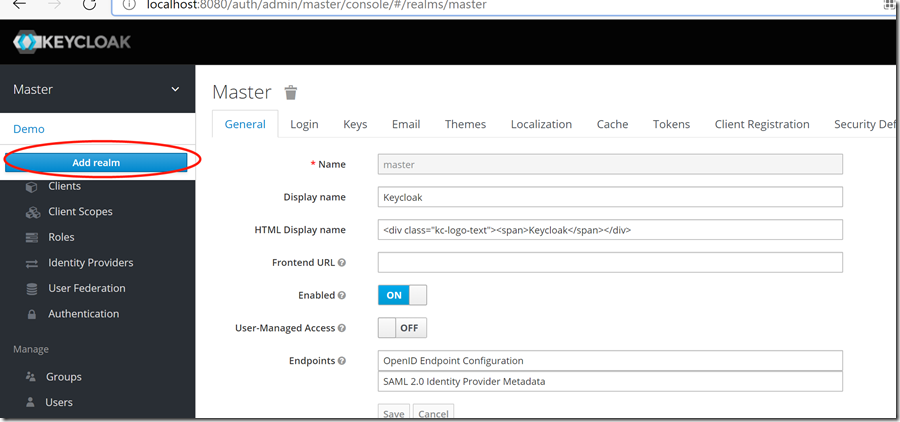
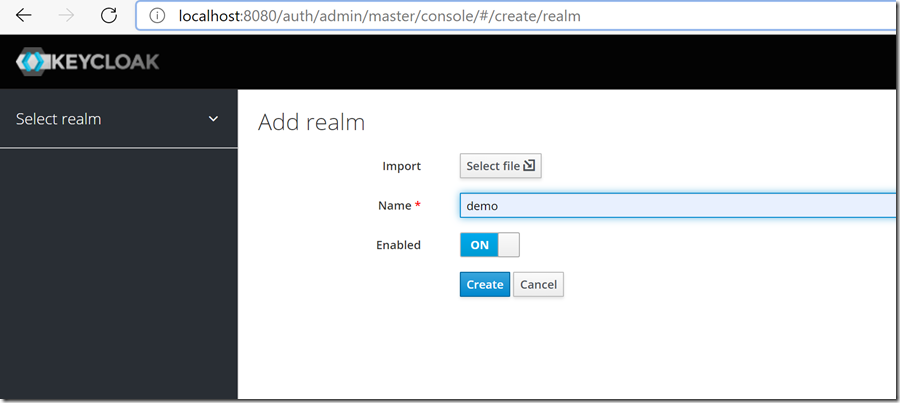
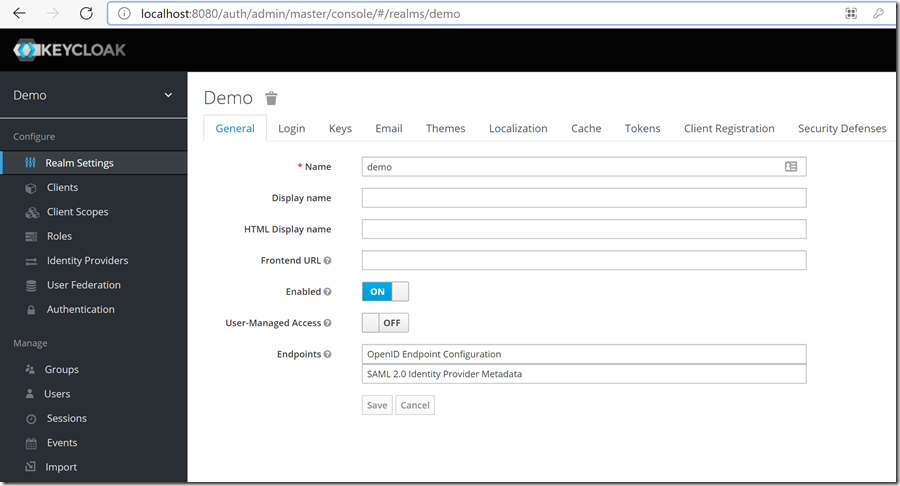
创建Realm
创建一个新的realm: demo,后续所有的客户端、用户、角色等都在此realm中创建
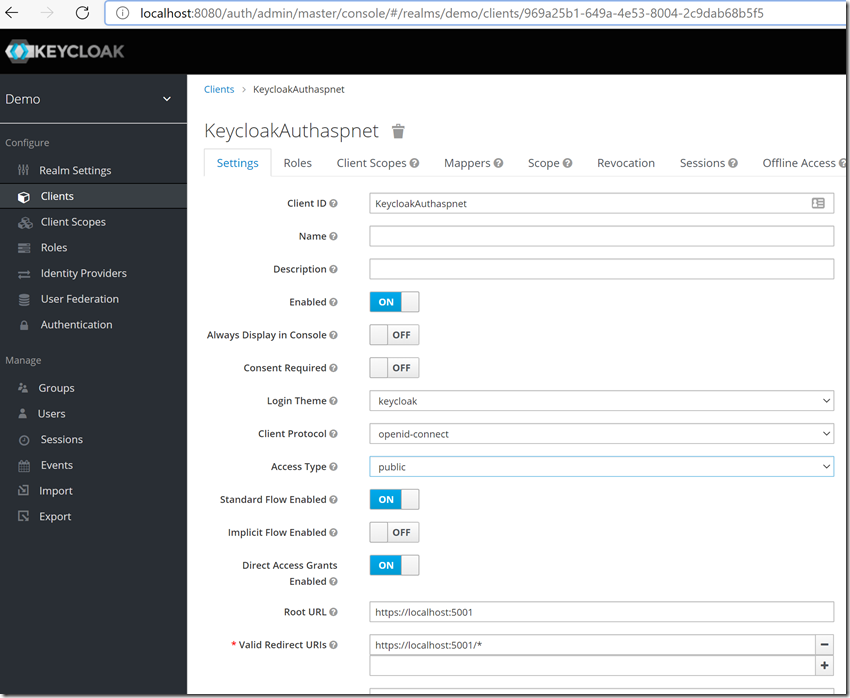
创建客户端
创建前端应用客户端
创建一个新的客户端:KeycloakAuthaspnet,Access Type选择public
关于客户端的访问类型(Access Type)
上面创建的2个客户端的访问类型分别是public、bearer-only,那么为什么分别选择这种类型,实际不同的访问类型有什么区别呢?
事实上,Keycloak目前的访问类型共有3种:
confidential:适用于服务端应用,且需要浏览器登录以及需要通过密钥获取access token的场景。典型的使用场景就是服务端渲染的web系统。public:适用于客户端应用,且需要浏览器登录的场景。典型的使用场景就是前端web系统,包括采用vue、react实现的前端项目等。bearer-only:适用于服务端应用,不需要浏览器登录,只允许使用bearer token请求的场景。典型的使用场景就是restful api。
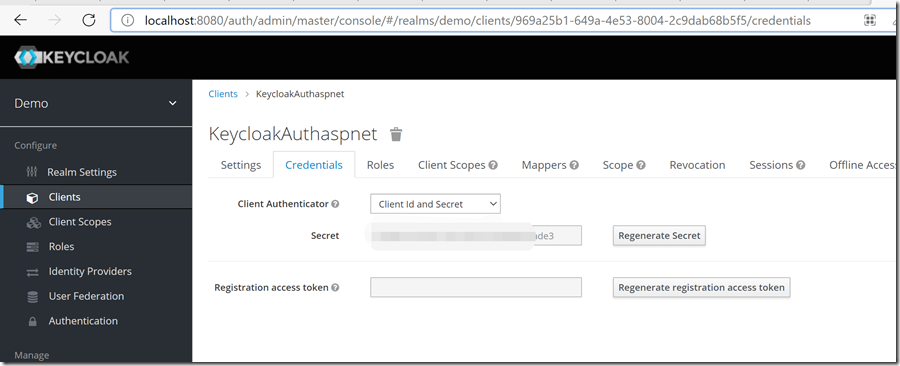
Access Type 里面选 Confidential,然后才有 Client Secret ,保存之后,会出现Credentials的Tab,记录下这里的secret,后面要用到
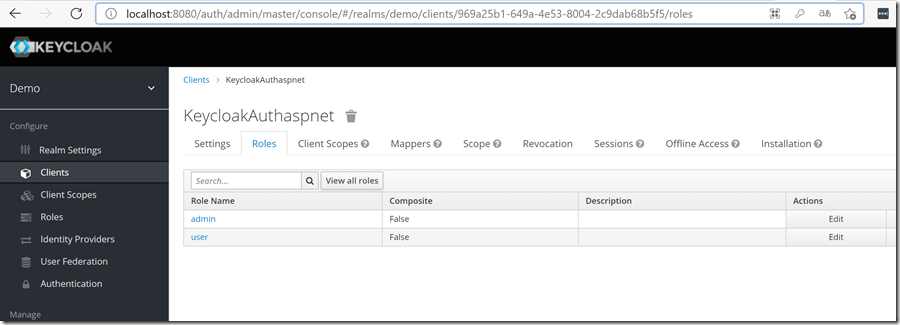
创建用户和角色
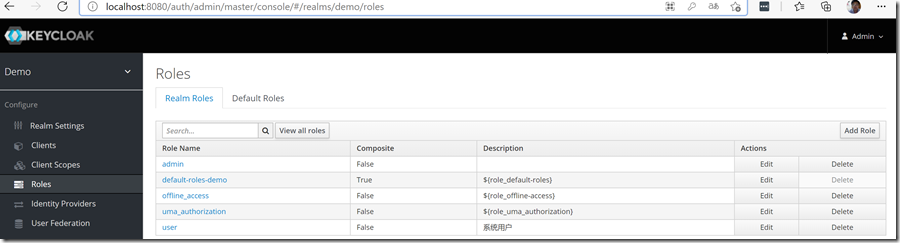
创建角色
创建2个角色:admin、user
还可以创建全局的角色
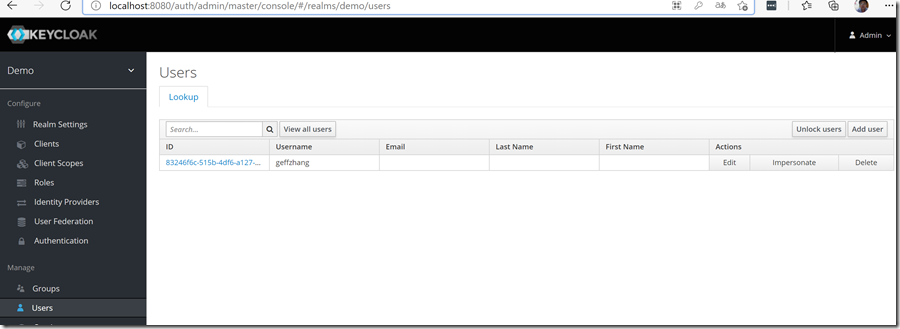
创建用户
创建1个用户:geffzhang
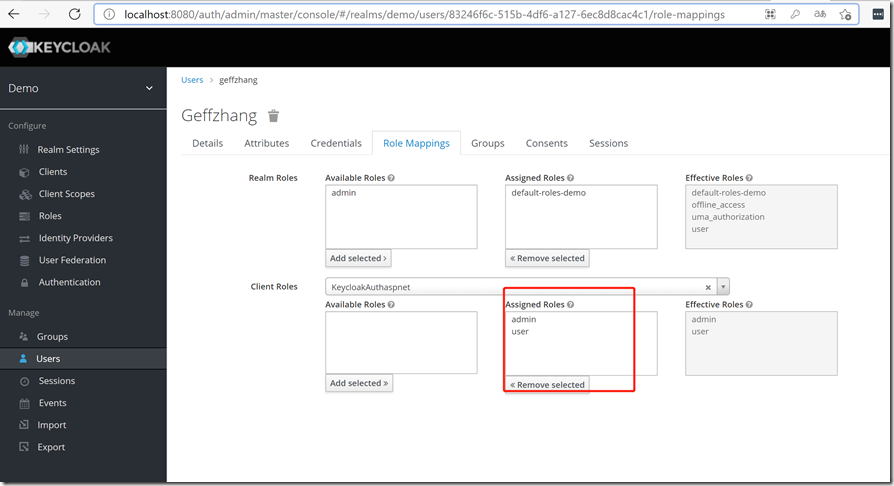
绑定用户和角色
给geffzhang 用户分配角色admin和user
aspnetcore 应用集成Keycloak简明指南
添加 Microsoft.AspNetCore.Authentication.OpenIdConnect 和 Microsoft.AspNetCore.Identity 包
<Project Sdk="Microsoft.NET.Sdk.Web">
<PropertyGroup>
<TargetFramework>net5.0</TargetFramework>
<UserSecretsId>afab524d-850e-499a-bc13-98f61ca0eb3b</UserSecretsId>
<DockerDefaultTargetOS>Linux</DockerDefaultTargetOS>
</PropertyGroup>
<ItemGroup>
<PackageReference Include="Microsoft.AspNetCore.Authentication.OpenIdConnect" Version="5.0.5" />
<PackageReference Include="Microsoft.AspNetCore.Identity" Version="2.2.0" />
<PackageReference Include="Microsoft.VisualStudio.Azure.Containers.Tools.Targets" Version="1.10.8" />
<PackageReference Include="Microsoft.VisualStudio.Web.CodeGeneration.Design" Version="5.0.2" />
</ItemGroup>
</Project>
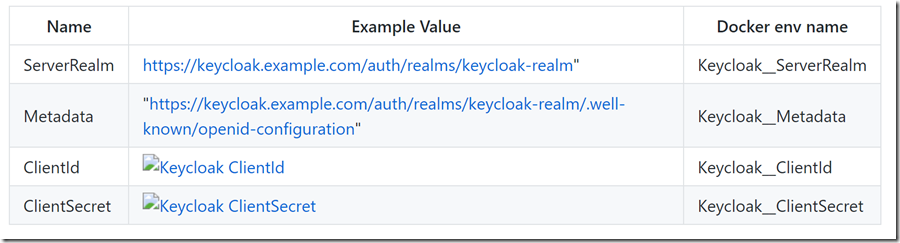
Appsettings.json

// This method gets called by the runtime. Use this method to add services to the container.
public void ConfigureServices(IServiceCollection services)
{
services.AddControllersWithViews();
services.AddAuthentication(options =>
{
//Sets cookie authentication scheme
options.DefaultAuthenticateScheme = CookieAuthenticationDefaults.AuthenticationScheme;
options.DefaultSignInScheme = CookieAuthenticationDefaults.AuthenticationScheme;
options.DefaultChallengeScheme = OpenIdConnectDefaults.AuthenticationScheme;
})
.AddCookie(cookie =>
{
//Sets the cookie name and maxage, so the cookie is invalidated.
cookie.Cookie.Name = "keycloak.cookie";
cookie.Cookie.MaxAge = TimeSpan.FromMinutes(60);
cookie.Cookie.SecurePolicy = CookieSecurePolicy.SameAsRequest;
cookie.SlidingExpiration = true;
})
.AddOpenIdConnect(options =>
{
/*
* ASP.NET core uses the http://*:5000 and https://*:5001 ports for default communication with the OIDC middleware
* The app requires load balancing services to work with :80 or :443
* These needs to be added to the keycloak client, in order for the redirect to work.
* If you however intend to use the app by itself then,
* Change the ports in launchsettings.json, but beware to also change the options.CallbackPath and options.SignedOutCallbackPath!
* Use LB services whenever possible, to reduce the config hazzle :)
*/
//Use default signin scheme
options.SignInScheme = CookieAuthenticationDefaults.AuthenticationScheme;
//Keycloak server
options.Authority = Configuration.GetSection("Keycloak")["ServerRealm"];
//Keycloak client ID
options.ClientId = Configuration.GetSection("Keycloak")["ClientId"];
//Keycloak client secret
options.ClientSecret = Configuration.GetSection("Keycloak")["ClientSecret"];
//Keycloak .wellknown config origin to fetch config
options.MetadataAddress = Configuration.GetSection("Keycloak")["Metadata"];
//Require keycloak to use SSL
options.RequireHttpsMetadata = false;
options.GetClaimsFromUserInfoEndpoint = true;
options.Scope.Add("openid");
options.Scope.Add("profile");
//Save the token
options.SaveTokens = true;
//Token response type, will sometimes need to be changed to IdToken, depending on config.
options.ResponseType = OpenIdConnectResponseType.Code;
//SameSite is needed for Chrome/Firefox, as they will give http error 500 back, if not set to unspecified.
options.NonceCookie.SameSite = SameSiteMode.Unspecified;
options.CorrelationCookie.SameSite = SameSiteMode.Unspecified;
options.TokenValidationParameters = new TokenValidationParameters
{
NameClaimType = "name",
RoleClaimType = ClaimTypes.Role,
ValidateIssuer = true
};
});
/*
* For roles, that are defined in the keycloak, you need to use ClaimTypes.Role
* You also need to configure keycloak, to set the correct name on each token.
* Keycloak Admin Console -> Client Scopes -> roles -> mappers -> create
* Name: "role client mapper" or whatever you prefer
* Mapper Type: "User Client Role"
* Multivalued: True
* Token Claim Name: role
* Add to access token: True
*/
/*
* Policy based authentication
*/
services.AddAuthorization(options =>
{
//Create policy with more than one claim
options.AddPolicy("users", policy =>
policy.RequireAssertion(context =>
context.User.HasClaim(c =>
(c.Value == "user") || (c.Value == "admin"))));
//Create policy with only one claim
options.AddPolicy("admins", policy =>
policy.RequireClaim(ClaimTypes.Role, "admin"));
//Create a policy with a claim that doesn't exist or you are unauthorized to
options.AddPolicy("noaccess", policy =>
policy.RequireClaim(ClaimTypes.Role, "noaccess"));
});
/*
* Non policy based authentication
* Uncomment below and comment the policy section
*/
//services.AddAuthorization();
}
经过上述的配置,通过oidc 很容易就接入到了Keycloak。具体代码请参见:https://github.com/NanoFabricFX/AspNetCore-keycloak/tree/dotnet5。
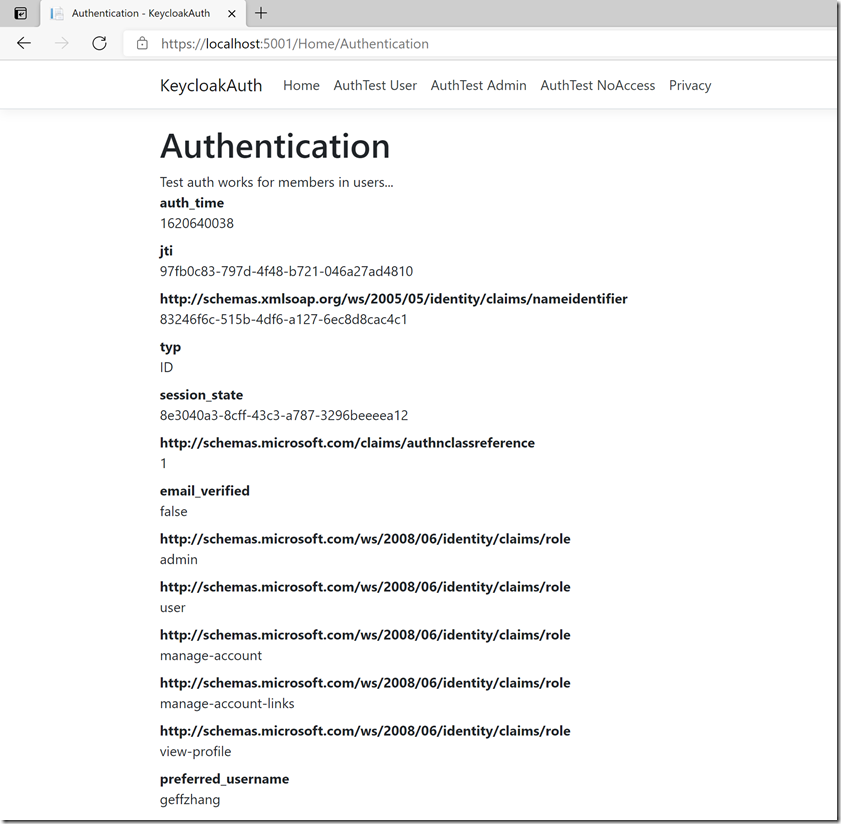
运行效果,第一次访问项目会跳转Keycloak登录页

用户登陆geffzhang
总结
Keycloak部署及接入简单,轻量的同时功能又不失强大,非常适合企业内部的SSO方案。在Identity Server4 收费的背景之下,微软计划在.NET 6里面继续集成,已经被社区骂的狗血喷头https://devblogs.microsoft.com/aspnet/asp-net-core-6-and-authentication-servers/
相关文章:
aspnetcore 应用 接入Keycloak快速上手指南的更多相关文章
- Keycloak快速上手指南,只需10分钟即可接入Spring Boot/Vue前后端分离应用实现SSO单点登录
登录及身份认证是现代web应用最基本的功能之一,对于企业内部的系统,多个系统往往希望有一套SSO服务对企业用户的登录及身份认证进行统一的管理,提升用户同时使用多个系统的体验,Keycloak正是为此种 ...
- Rancher 快速上手指南操作(1)
Rancher 快速上手指南操作(1)该指南知道用户如何快速的部署Rancher Server 管理容器.前提是假设你的机器已经安装好docker了.1 确认 docker 的版本,下面是 ubunt ...
- UnityShader快速上手指南(三)
简介 这一篇还是一些基本的shader操作:裁剪.透明和法向量的应用 (纠结了很久写不写这些,因为代码很简单,主要是些概念上的东西) 先来看下大概的效果图:(从左到右依次是裁剪,透明,加了法向量的透明 ...
- [转]Rancher 快速上手指南操作(1)
本文转自:http://www.cppblog.com/zhiyewang/archive/2016/03/17/213053.aspx Rancher 快速上手指南操作(1)该指南知道用户如何快速的 ...
- Markdown快速上手指南
Markdown快速上手指南 1.Markdown介绍 markdown可以实现快速html文档编辑,格式优没,并且不需要使用html元素. markdown采用普通文本的形式,例如读书笔记等易于使用 ...
- Github Action 快速上手指南
前言 各位读者,新年快乐,我是过了年匆忙赶回上海努力搬砖的蛮三刀. Github之前更新了一个Action功能(应该是很久以前了),可以实现很多自动化操作.用来替代用户自己设置的自动化脚本(比如:钩子 ...
- UnityShader快速上手指南(二)
简介 前一篇介绍了如果编写最基本的shader,接下来本文将会简单的深入一下,我们先来看下效果吧 呃,gif效果不好,实际效果是很平滑的动态过渡 实现思路 1.首先我们要实现一个彩色方块 2.让色彩动 ...
- UnityShader快速上手指南(一)
简介 引言 其实网上有很多shader教程,但是大概看了下,也不知是网上各位大神已经脱离了代码层面的高度还是啥原因.貌似没有找到从代码方面作为入门讲解的,导致了shader对于苦逼程序员入门有一定要求 ...
- Mac快速上手指南
上周刚入手了2017版MacBookPro,预装macOS High Sierra.第一次接触Mac系统,经过一周的使用,简单总结下与Windows相比最常用的功能,快速上手. 1.Mac键盘实现Ho ...
随机推荐
- 谈谈C++中的数据对齐
对于C/C++程序员来说,掌握数据对齐是很有必要的,因为只有了解了这个概念,才能知道编译器在什么时候会偷偷的塞入一些字节(padding)到我们的结构体(struct/class),也唯有这样我们才能 ...
- CSS轮廓和圆角
1 2 <!DOCTYPE html> 3 <html lang="en"> 4 <head> 5 <meta charset=" ...
- 内存模型与c++中的memory order
概 c++的atomic使用总会配合各种各样的memory order进行使用,memory order控制了执行结果在多核中的可见顺序,,这个可见顺序与代码序不一定一致(第一句代码执行完成的结果不一 ...
- CodeForces - 1360C
C. Similar Pairs time limit per test 2 seconds memory limit per test 256 megabytes input standard in ...
- 一种3位sar adc仿真验证
3位sar adc采用下图的电容阵列,电路如下图:所有电容的正端(也称为上极板)与比较器的同相端连接,比较器反相端接gnd,其工作过程进行大致分析见之前的文章<一种3位sar adc工作过程推导 ...
- QT项目-Chart Themes Example学习(一)
1.main.cpp #include "themewidget.h" #include <QtWidgets/QApplication> #include <Q ...
- 图文详解Java对象内存布局
作为一名Java程序员,我们在日常工作中使用这款面向对象的编程语言时,做的最频繁的操作大概就是去创建一个个的对象了.对象的创建方式虽然有很多,可以通过new.反射.clone.反序列化等不同方式来创建 ...
- 如何使用Excel发送邮件?
假设你有一个Excel,其中列出了所有收件人的信息,如下所示: 如果需要向列表中的每个用户发送一封邮件,最好使用当前记录生成一个附件,并且格式如下: 姓名, 发送消息 你应该怎么办?一个一个拷贝发送? ...
- 【Java】7.0 进制转换
[二进制转十进制] public static void main(String args[]) { Scanner sc = new Scanner(System.in); System.out.p ...
- 1. Mybatis 参数传递
方法1:顺序传参法 public User selectUser(String name, int deptId); <select id="selectUser" resu ...