Pytest_定制allure报告(12)
定制报告需要先导入allure模块,再使用以下装饰器方法:
- feature: 标注主要功能模块。
- story: 标注feature功能模块下的分支功能。
- description:在报告中显示用例描述。
- step: 标注测试用例步骤。
- issue && testcase:标注用例关联的链接。
- attach: 添加一些附加内容到测试报告中。
- severity: 标注测试用例的重要级别,包含blocker, critical, normal, minor, trivial 几个不同的等级。
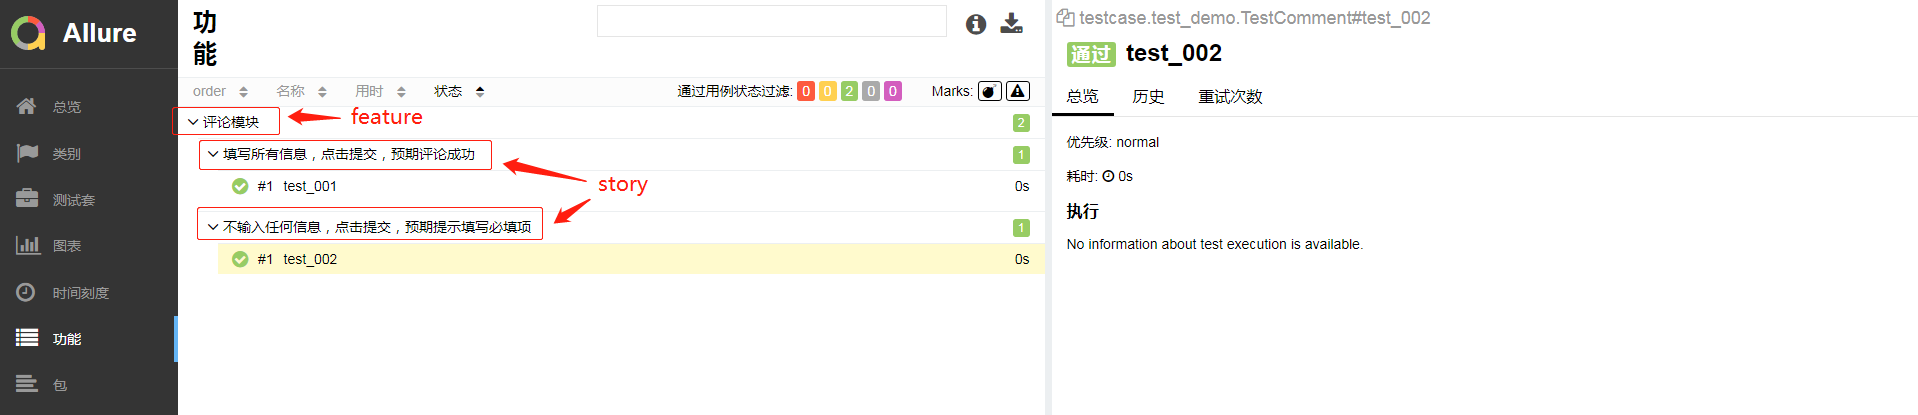
feature && story
主要用于为用例分层级
import allure

@allure.feature("评论模块")

class TestComment:

    @allure.story("填写所有信息,点击提交,预期评论成功")

    def test_001(self):

        print("\n填写信息")

        print("\n点击提交")

    @allure.story("不输入任何信息,点击提交,预期提示填写必填项")

    def test_002(self):

        print("\n点击提交")
报告样式如下:
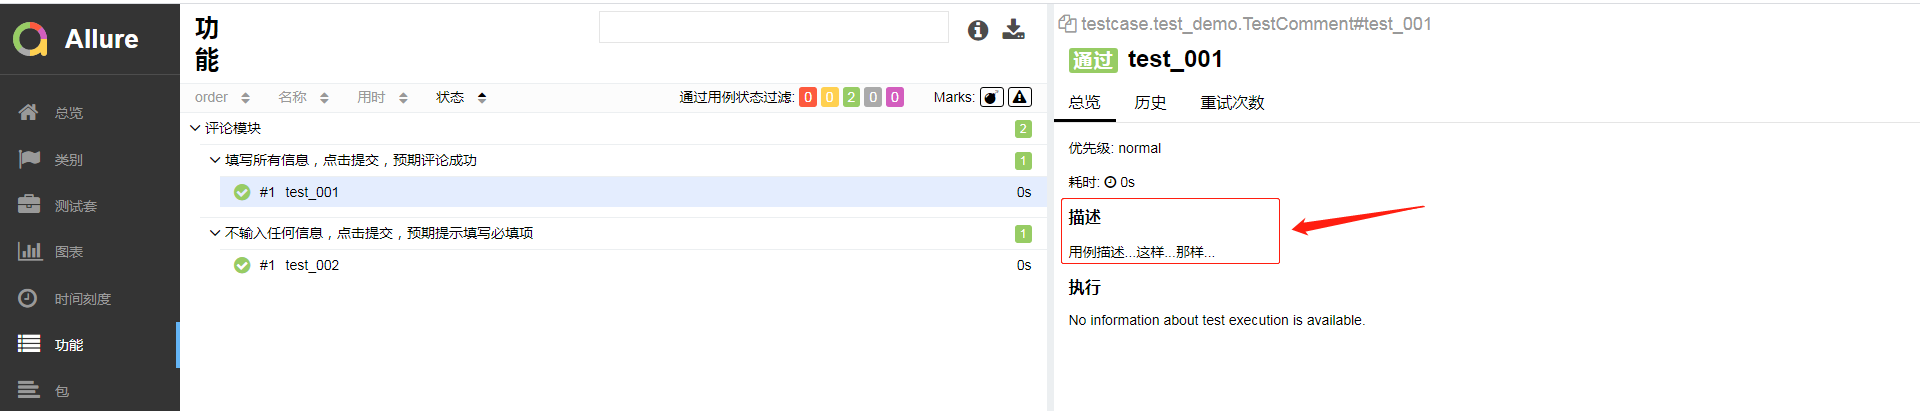
description
用于在报告中增加用例描述信息,除了这个方法外,还可以在方法下使用3个引号的方式增加用例描述信息。
import allure

@allure.feature("评论模块")

class TestComment:

    @allure.story("填写所有信息,点击提交,预期评论成功")

    @allure.description("用例描述...这样...那样...")

    def test_001(self):

        print("\n填写信息")

        print("\n点击提交")

    @allure.story("不输入任何信息,点击提交,预期提示填写必填项")

    def test_002(self):

        """用例描述...也可以...这样...那样"""

        print("\n点击提交")
报告样式如下:
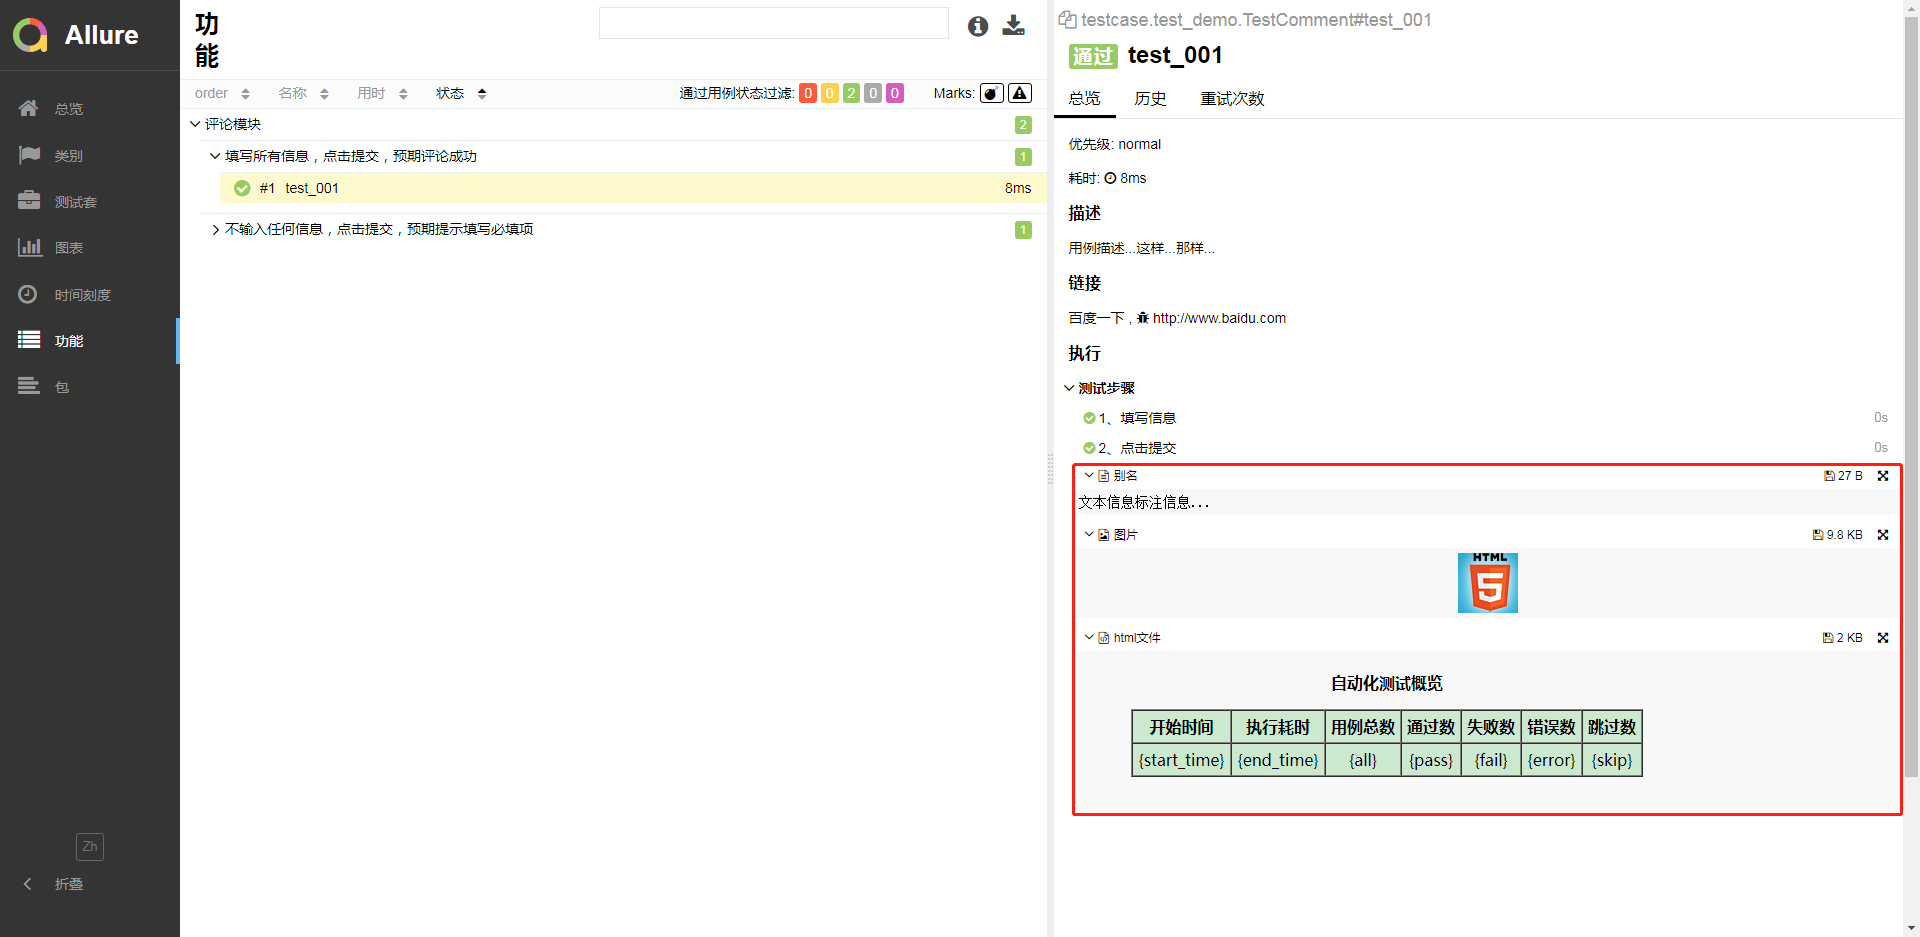
step
在报告中增加测试步骤的显示。
import allure

@allure.feature("评论模块")

class TestComment:

    @allure.story("填写所有信息,点击提交,预期评论成功")

    @allure.description("用例描述...这样...那样...")

    def test_001(self):

        with allure.step("1、填写信息"):

            print("\n填写信息")

            assert 1 == 1

        with allure.step("2、点击提交"):

            print("\n点击提交")

            assert 2 == 1

    @allure.story("不输入任何信息,点击提交,预期提示填写必填项")

    def test_002(self):

        """用例描述...也可以...这样...那样"""

        print("\n点击提交")
报告样式如下:

issue && testcase
issue与testcase用于在报告中增加关联链接,用法基本一样,第1个参数为关联的url地址,第2个为缺省参数,作用是为地址的别名。
import allure

@allure.feature("评论模块")

class TestComment:

    @allure.story("填写所有信息,点击提交,预期评论成功")

    @allure.description("用例描述...这样...那样...")

    @allure.issue("http://www.baidu.com")

    @allure.testcase("http://www.baidu.com", "百度一下")

    def test_001(self):

        with allure.step("1、填写信息"):

            print("\n填写信息")

            assert 1 == 1

        with allure.step("2、点击提交"):

            print("\n点击提交")

            assert 2 == 1

    @allure.story("不输入任何信息,点击提交,预期提示填写必填项")

    def test_002(self):

        """用例描述...也可以...这样...那样"""

        print("\n点击提交")
报告样式如下:

attach
在报告中添加一些附加内容,内容可以为文本信息、图片、文件等。
import allure

@allure.feature("评论模块")

class TestComment:

    @allure.story("填写所有信息,点击提交,预期评论成功")

    @allure.description("用例描述...这样...那样...")

    @allure.issue("http://www.baidu.com")

    @allure.testcase("http://www.baidu.com", "百度一下")

    def test_001(self):

        with allure.step("1、填写信息"):

            print("\n填写信息")

            assert 1 == 1

        with allure.step("2、点击提交"):

            print("\n点击提交")

        # attach 添加文本信息

        allure.attach("文本信息标注信息...", "别名")

        # attach 可以添加图片

        allure.attach.file(r"D:\Users\User\Desktop\图片管理\60-60.jpg", "图片", attachment_type=allure.attachment_type.JPG)

        # attach 可以添加html文件

        allure.attach.file(r"D:\Users\User\Desktop\图片管理\test.html", "html文件", attachment_type=allure.attachment_type.HTML)

    @allure.story("不输入任何信息,点击提交,预期提示填写必填项")

    def test_002(self):

        """用例描述...也可以...这样...那样"""

        print("\n点击提交")
报告样式如下:
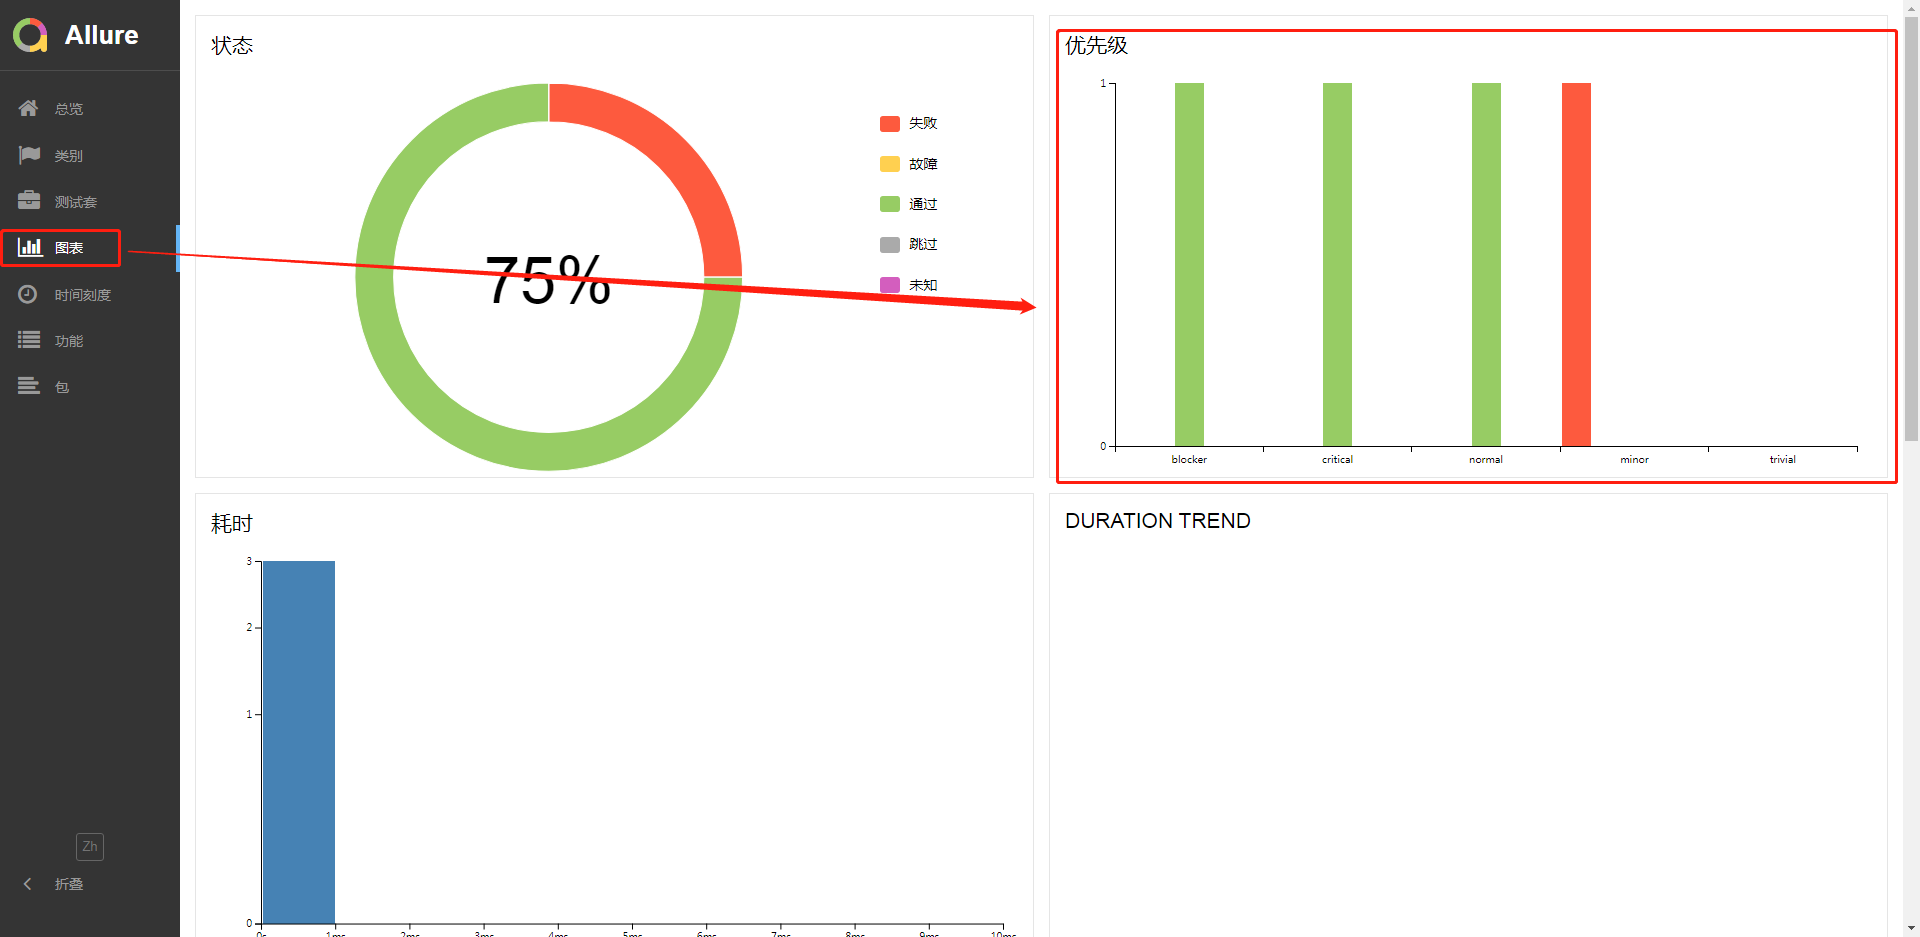
severity
为测试用例的划分重要级别,包含blocker, critical, normal, minor, trivial 5个不同的等级。默认是normal级别。
import allure

@allure.feature("评论模块")

class TestComment:

    @allure.story("填写所有信息,点击提交,预期评论成功")

    @allure.description("用例描述...这样...那样...")

    @allure.issue("http://www.baidu.com")

    @allure.testcase("http://www.baidu.com", "百度一下")

    def test_001(self):

        with allure.step("1、填写信息"):

            print("\n填写信息")

            assert 1 == 1

        with allure.step("2、点击提交"):

            print("\n点击提交")

        # attach 添加文本信息

        allure.attach("文本信息标注信息...", "别名")

        # attach 可以添加图片

        allure.attach.file(r"D:\Users\User\Desktop\图片管理\60-60.jpg", "图片", attachment_type=allure.attachment_type.JPG)

        # attach 可以添加html文件

        allure.attach.file(r"D:\Users\User\Desktop\图片管理\test.html", "html文件", attachment_type=allure.attachment_type.HTML)

    @allure.severity("blocker")

    def test_002(self):

        pass

    @allure.severity("critical")

    def test_003(self):

        pass

    @allure.severity("minor")

    def test_004(self):

        assert 1 == 2
报告样式如下:
环境配置信息
在概览中查看环境配置默认是没有的。
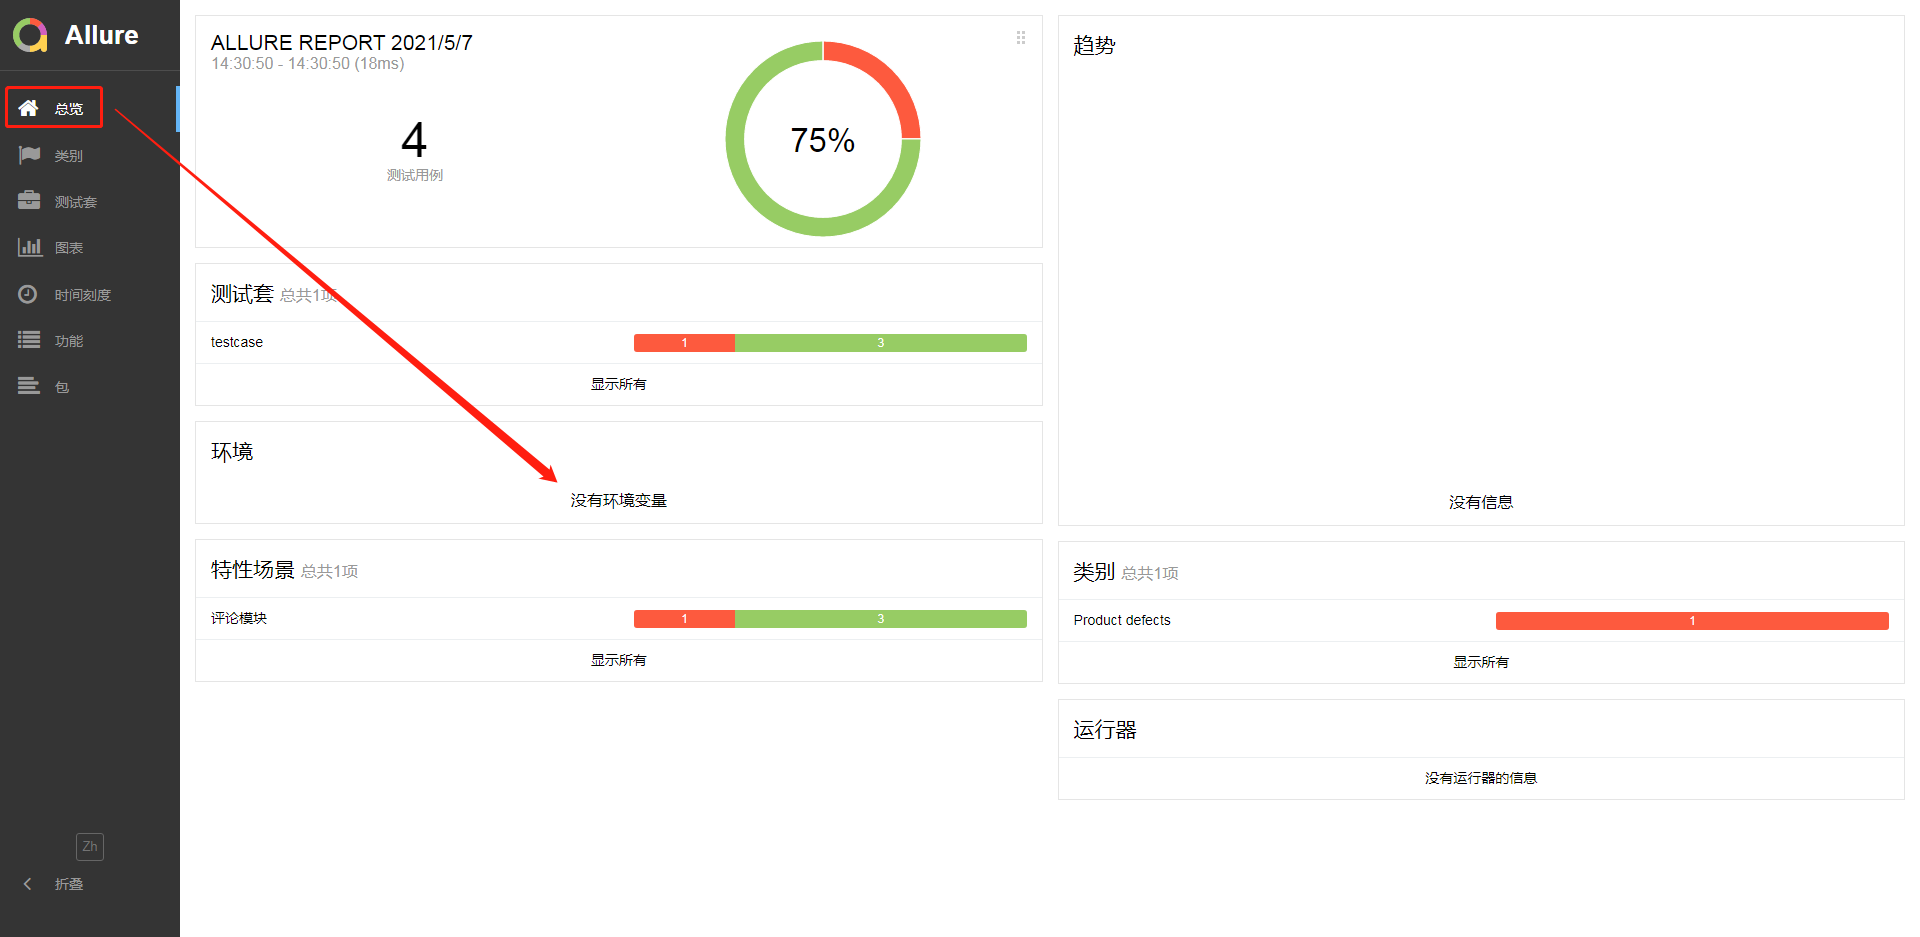
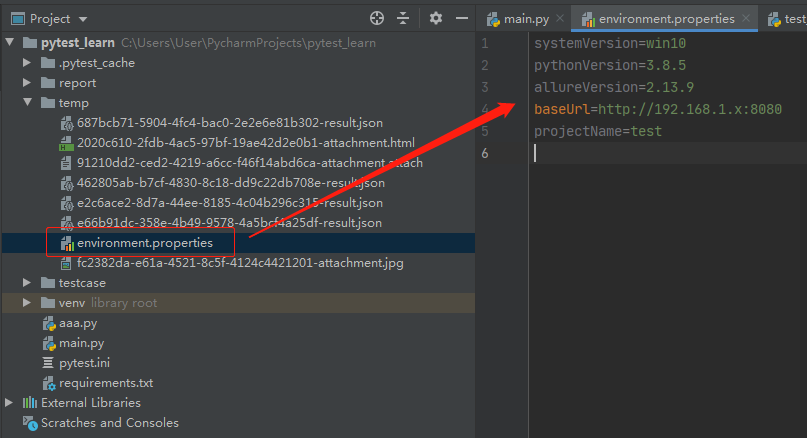
若要在报告中增加环境信息需要在第一步生成的json文件中,增加一个environment.properties文件,文件内容如下样式:
systemVersion=win10

pythonVersion=3.8.5

allureVersion=2.13.9

baseUrl=http://192.168.1.x:8080

projectName=test
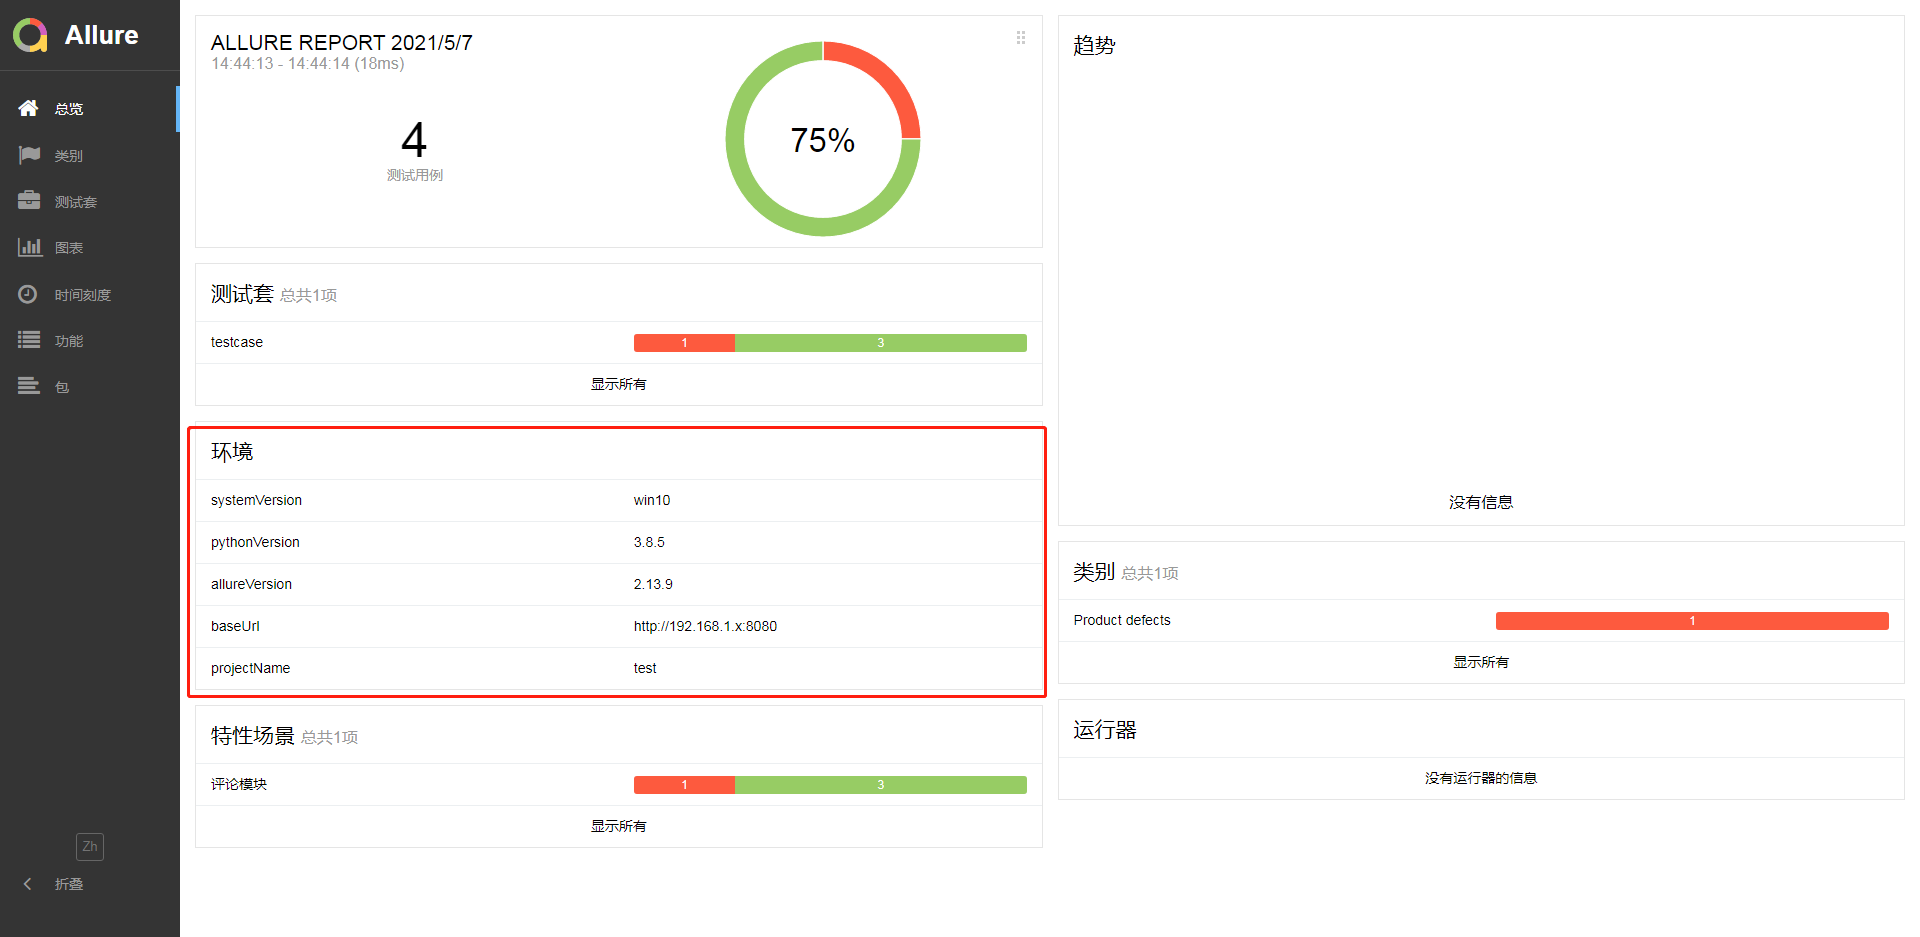
然后再执行并生成报告,报告样式如下:
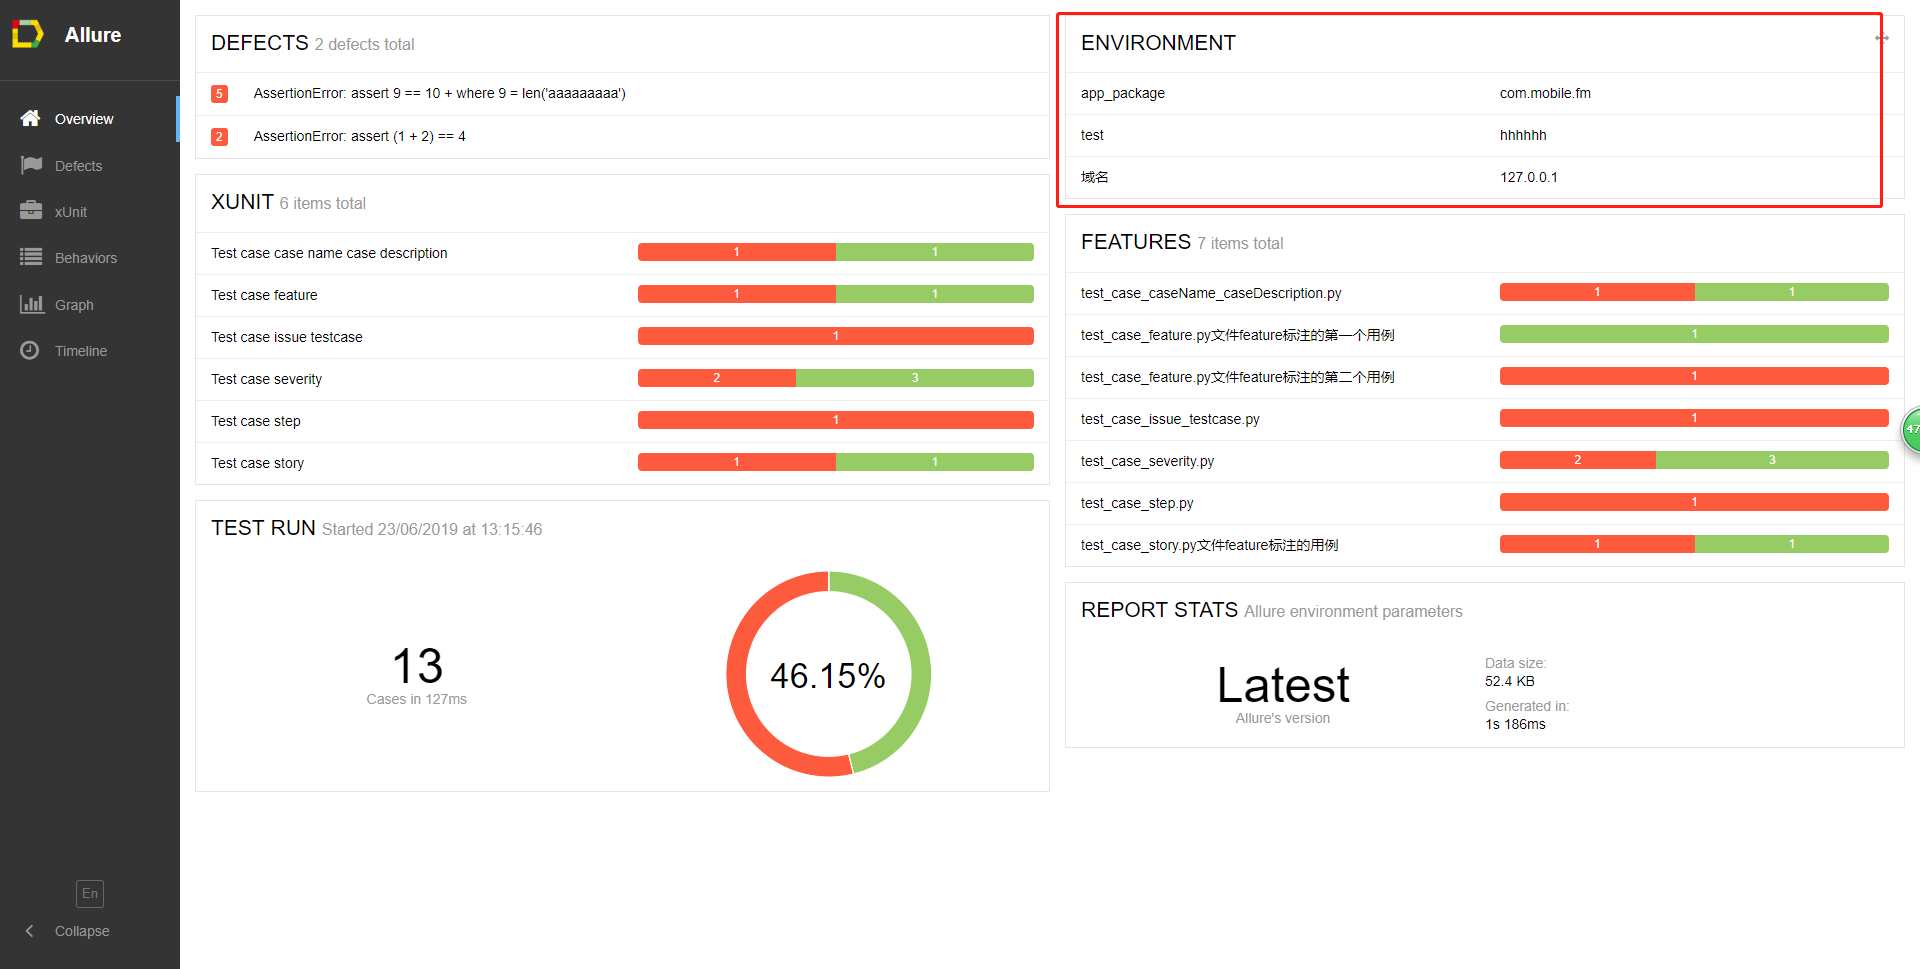
在allure 1.X的中,可以通过一个以test开头的py文件来配置,该方法在 2.X已弃用,仅供了解:

报告样式如下:
Pytest_定制allure报告(12)的更多相关文章
- allure报告定制(pytest+jenkins)
环境及安装可查看 pytest+jenkins安装+allure导出报告 要让allure报告更漂亮,更直观,需要在脚本中写入allure特性 一开始allure调用step().story().fe ...
- pytest+allure(allure-pytest基于这个插件)设计定制化报告
一:环境准备 1.python3.6 2.windows环境 3.pycharm 4.allure-pytest 5.allure2.8.0 6.java1.8 allure-pytest快速安装 在 ...
- pytest+allure(pytest-allure-adaptor基于这个插件)设计定制化报告
一:环境准备 1.python3.6 2.windows环境 3.pycharm 4.pytest-allure-adaptor 5.allure2.8.0 6.java1.8 pytest-allu ...
- 如何利用jenkins插件查看allure报告-----完整篇(解决404和无数据问题)
背景: python3+appium+pytest+allure写了安卓的自动化脚本,在windows本机pycharm上跑通过后生成了allure报告. 公司jenkins搭建在linux服务器上 ...
- pytest系列(四)- pytest+allure+jenkins - 持续集成平台生成allure报告
pytest是什么 pytest是python的一款测试框架,拥有unittest的功能并比它更丰富. allure是什么 有非常多的优秀的测试框架,但却是有非常少优秀的报告工具可以展示非常清楚的用例 ...
- pytest框架优化——将异常截屏图片加入到allure报告中
痛点分析: 在做allure定制化的时候,关于附件添加这一块,我们在代码里可以添加我们准备好的附件,这里用图片,通过下面的方法就能实现 allure.attach(file, '图片描述', allu ...
- pytest框架之allure报告生成
一.关于安装 allure是跟pytest一起集成使用的,所以需要同时安装pytest以及allure-pytest插件: pip install pytest pip install allure- ...
- pytest生成allure报告
在pytest框架中可以用很多插件来生成测试报告,本文总结下怎么生成allure报告 allure allure是一款开源的,专门用来展示测试结果的一个工具,allure可以与很多的测试框架做集成,比 ...
- 移动自动化appium(2)- Allure报告使用详解
6 Allure报告 6.1 Allure介绍 Allure是一个独立的报告插件,生成美观易读的报告,比之前的html好看,目前支持的语言:Java.PHP.Ruby.Python.C#等 6.2 A ...
随机推荐
- C语言实现鼠标绘图
使用C语言+EGE图形库(Easy Graphics Engine).思路是通过不断绘制直线来实现鼠标绘图的功能,前一个时刻鼠标的坐标作为直线的起点,现在时刻的坐标作为终点(严格意义是线段而不是直线) ...
- HDD深圳站:全生命周期赋能开发者,华为引领应用生态升级
12月14日,由华为开发者联盟主办的HDD(HUAWEI Developer Day)于深圳举行.此次HDD主论坛,围绕打造应用全生命周期服务,介绍了华为在创新孵化.开发测试.应用分发和运营增长阶段的 ...
- [V&N2020 公开赛]babybabypwn
写在开头,感谢"影二つ"师傅的指点. 题目的做法思路网上一搜一大把,这篇博客主要记录一下这道题用pwntools写srop的时候,为什么需要省略前面8个字节. 在看题目之前,先来学 ...
- MySQL管理之道,性能调优,高可用与监控(第二版)pdf下载
MySQL管理之道,性能调优,高可用与监控(第二版) 书中内容以实战为导向,所有内容均来自于笔者多年实践经验的总结和新知识的拓展,同时也针对运维人员.DBA等相关工作者会遇到的有代表性的疑难问题给出了 ...
- Sentinel-Go 源码系列(三)滑动时间窗口算法的工程实现
要说现在工程师最重要的能力,我觉得工程能力要排第一. 就算现在大厂面试经常要手撕算法,也是更偏向考查代码工程实现的能力,之前在群里看到这样的图片,就觉得很离谱. 算法与工程实现 在 Sentinel- ...
- CF1443A Kids Seating 题解
Content 有 \(t\) 组询问,每组询问给定一个数 \(n\),试构造出一个长度为 \(n\) 的数列 \(\{a_i\}_{i=1}^n\),使得: \(\forall i\in[1,n], ...
- MLNX网卡驱动安装
安装/升级MLNX驱动 1. 安装准备 驱动下载地址:https://www.mellanox.com/products/ethernet-drivers/linux/mlnx_en 选择和系统版本匹 ...
- Shell 丢弃错误和输出信息
shell中使用>/dev/null 2>&1 丢弃信息 在一些Shell脚本中,特别是Crontab的脚本中,经常会看到 >/dev/null 2>&1这 ...
- my.ini配置文件内容
# For advice on how to change settings please see# http://dev.mysql.com/doc/refman/5.6/en/server-con ...
- Boost Asio要点概述(一)
[注]本文不是boost asio的完整应用讲述,而是仅对其中要点的讲解,主要参考了Boost Asio 1.68的官方文档(https://www.boost.org/doc/libs/1_68_0 ...