
移动自动化appium(2)- Allure报告使用详解
6 Allure报告
6.1 Allure介绍
Allure是一个独立的报告插件,生成美观易读的报告,比之前的html好看,目前支持的语言:Java、PHP、Ruby、Python、C#等
6.2 Allure安装
pip3 install allure-pytest
(注意:这里不要使用pytest-allure-adaptor)
有一个帮助文档可以参考:
https://docs.qameta.io/allure/#_about
生成Allure报告的命令:
pytest --alluredir report
执行完这条命令,case运行完毕后,会在当前目录下生成一个report文件夹,里面有一个json文件,就是生成的报告
在pytest.ini中,之前的报告是这样生成的:
addopts = -s --html=report/report.html --reruns 1
如果想用allure,那么改成:
addopts = -s --alluredir report --reruns 1
直接在终端执行pytest就可以了
6.3 json报告转为html报告
上面的命令执行后,生成的是json文件,json文件不那么好看,需要将json转成html,这里要先安装一个插件,步骤:
1、下载allure压缩包,地址:
https://dl.bintray.com/qameta/generic/io/qameta/allure/allure/2.7.0/allure-2.7.0.zip
2、解压后,将bin目录配置到环境变量
3、进入report的上一级目录,执行命令:allure generate report/ -o report/html --clean
执行上面的操作步骤后,在report文件夹下就多了一个html文件夹,里面的index.html文件就是html报告。
生成html的时候遇到这样的报错:
Exception in thread "main" java.lang.UnsupportedClassVersionError: io/qameta/all
ure/CommandLine : Unsupported major.minor version 52.0
那么可能是你的jdk版本太低了,可以打开cmd,输入java -version,以及javac -version,看一下版本,如果低于1.8,换成1.8版本就好了。
jdk1.8版本下载地址:
https://www.oracle.com/technetwork/java/javase/downloads/jdk8-downloads-2133151.html
6.4 allure+pytest实战操作
6.4.1 step用法
@allure.step(“”):
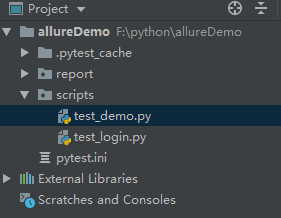
用来描述用例步骤的,简单一点的用法,比如新建一个项目,框架如图:
第一种用法:
在”F:\python\allureDemo\scripts\test_demo.py”文件中,写入下列代码:
import allure

class TestLogin:

    @allure.step("测试登录成功的步骤")

    def test_login_success(self):

        print("login success")

        assert 1
在终端输入pytest运行测试用例,然后从cmd进入到F:\python\allureDemo这个路径,输入allure generate report/ -o report/html --clean,生成测试报告
观察报告结果:
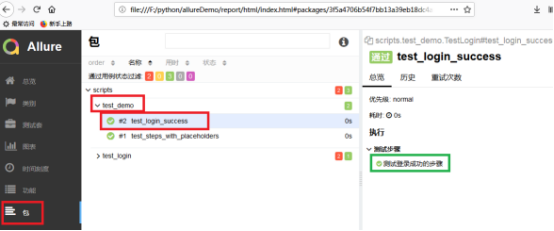
打开生成的报告,点击左侧的“包”或者“功能”,可以看到这样的页面,右侧test_login_success是我们的测试用例,圈绿色的部分是step的内容。
第二种用法:
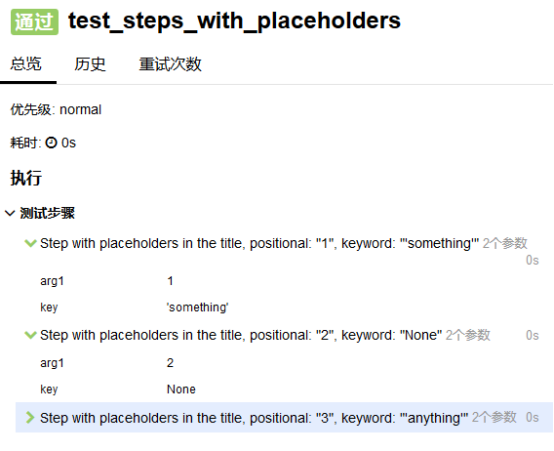
allure的帮助文档中,给出的step的示例,test_steps_with_placeholders()这个测试用例:
import allure

@allure.step('Step with placeholders in the title, positional: "{0}", keyword: "{key}"')

def step_with_title_placeholders(arg1, key=None):

    pass

def test_steps_with_placeholders():

    step_with_title_placeholders(1, key='something')

    step_with_title_placeholders(2)

    step_with_title_placeholders(3, 'anything')
运行结果:
第三种用法:
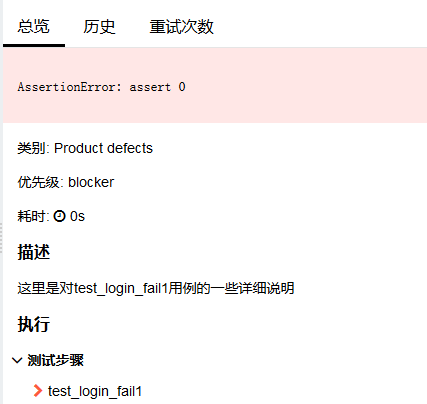
第三种用法是只写一个@allure.step,没有参数,这种情况会直接把方法名放到步骤显示的位置,例如:
  @allure.step

    def test_login_fail1(self):

        print("login fail1")

        assert 0
运行结果:
还有比如:
@allure.step
def passing_step():

    pass

def test_with_step_in_fixture_from_conftest(fixture_with_conftest_step):

  passing_step()
等等方式
6.4.2 attach()添加case描述和截图
allure.attach()不是一个装饰器,需要写到test用例里面,比如下面这样:
    def test_login_fail(self):

        allure.attach("输入正确的用户名:xxxx")

        print("input username")

        allure.attach("", "输入错误的密码:xxx")

        print("input password")

        allure.attach("", "点击登录")

        print("click login button")

        assert 0
第二个attach方法有两个参数,第一个有一个,这样写虽然都不会报错,但是结果会不一样,如图:
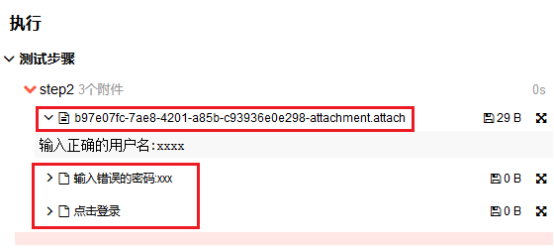
第一个,只写了一个参数的,会像图第一个圈红的位置那样,必须点开这个才会看到操作步骤,第二个和第三个,直接就可以看到操作步骤,更直观。
attach还可以增加截图:
    def test_login_success(self):

        allure.attach.file(r'D:\xx\xxx.jpg', '我是附件截图的名字',

                           attachment_type=allure.attachment_type.JPG)

        print("login success")

        assert 1
结果:
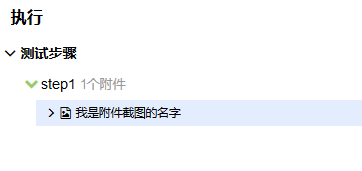
点击截图的名字,就可以看到截图。
attach.file()第三个参数,还可以是allure.attachment_type.PNG、allure.attachment_type.HTML、allure.attachment_type.TEXT等。
6.4.3 Descriptions
description是显示在描述位置的内容,可以描述一下你这个测试用例想做什么。
第一种用法,长字符串:
@allure.description("""

Multiline test description.

That comes from the allure.description decorator.

Nothing special about it.

""")

def test_description_from_decorator():

  assert 42 == int(6 * 7)
结果:

第二种用法,html格式:
可以使用html格式
import allure

@allure.description_html("""

<h1>Test with some complicated html description</h1>

<table style="width:100%">

  <tr>

    <th>Firstname</th>

    <th>Lastname</th>

    <th>Age</th>

  </tr>

  <tr align="center">

    <td>William</td>

    <td>Smith</td>

    <td>50</td>

  </tr>

  <tr align="center">

    <td>Vasya</td>

    <td>Jackson</td>

    <td>94</td>

  </tr>

</table>

""")

def test_html_description():

  assert True
结果:
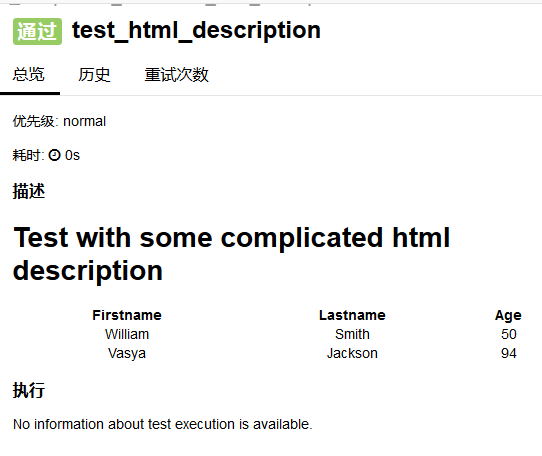
这里如果我们只是想要用一两句话概括这个测试用例的话,直接用一个字符串就足够了。
第三种用法,文档注释:
def test_unicode_in_docstring_description():

    """Unicode in description.

    Этот тест проверяет юникод.

    你好伙计.

    """

    assert 42 == int(6 * 7)
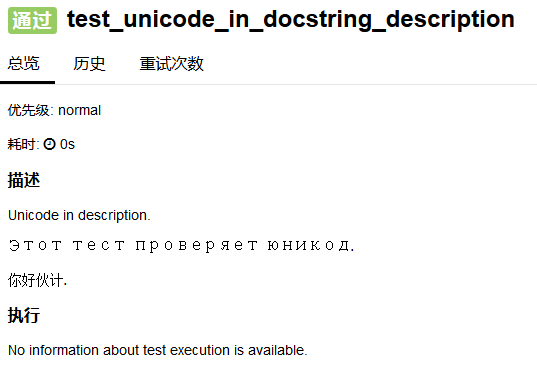
像这样的文档注释,会直接放到报告的描述中去,如图:
6.4.4 title用法
title就是显示的case标题
比如这样:
    @allure.title("case1:登录成功的用例")

    def test_login_success(self):

        allure.attach.file(r'D:\一寸照\报名照片.jpg', '我是附件截图的名字',

                           attachment_type=allure.attachment_type.JPG)

        print("login success")

        assert 1
结果如图:
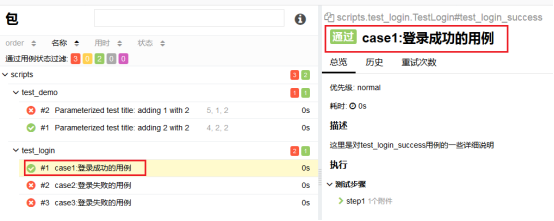
会在圈红部分两个地方显示。
如果有参数的话,还可以这样用:
import allure

import pytest

@allure.title("Parameterized test title: adding {param1} with {param2}")

@pytest.mark.parametrize('param1,param2,expected', [

    (2, 2, 4),

    (1, 2, 5)

])

def test_with_parameterized_title(param1, param2, expected):

    assert param1 + param2 == expected
结果就是这样:
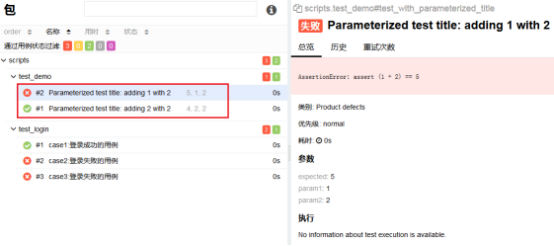
6.4.5 link超链接
直接把官网的例子拿过来:
import allure

TEST_CASE_LINK = 'https://github.com/qameta/allure-integrations/issues/8#issuecomment-268313637'

@allure.link('https://www.youtube.com/watch?v=4YYzUTYZRMU')

def test_with_link():

    pass

@allure.link('https://www.youtube.com/watch?v=Su5p2TqZxKU', name='Click me')

def test_with_named_link():

    pass

@allure.issue('', 'Pytest-flaky test retries shows like test steps')

def test_with_issue_link():

    pass

@allure.testcase(TEST_CASE_LINK, 'Test case title')

def test_with_testcase_link():

    pass
运行后,会出来一个链接,可以点击。
6.4.6 用例级别
下面这段代码示例里有两个点,一个是feature方法,一个是severity
import allure

@allure.feature('这里是一级标签')

class TestLogin:

    @allure.title("case1:登录成功的用例")

    @allure.description("这里是对test_login_success用例的一些详细说明")

    @allure.story("这里是第一个二级标签")

    def test_login_success(self):

        allure.attach.file(r'D:\一寸照\报名照片.jpg', '我是附件截图的名字',

                           attachment_type=allure.attachment_type.JPG)

        print("login success")

        assert 1

    @allure.title("case2:登录失败的用例")

    @allure.description("这里是对test_login_fail用例的一些详细说明")

    @allure.severity(allure.severity_level.CRITICAL)

    @allure.story("这里是第一个二级标签")

    def test_login_fail(self):

        allure.attach("步骤1", "输入正确的用户名")

        print("input username")

        allure.attach("步骤2", "输入错误的密码")

        print("input password")

        allure.attach("步骤3", "点击登录")

        print("click login button")

        assert 0

    @allure.title("case3:登录失败的用例")

    @allure.description("这里是对test_login_fail1用例的一些详细说明")

    @allure.severity(allure.severity_level.BLOCKER)

    @allure.story("这里是第一个二级标签")

    def test_login_fail1(self):

        print("login fail1")

        assert 0
点击allure报告中的“图表”,可以看到有优先级:
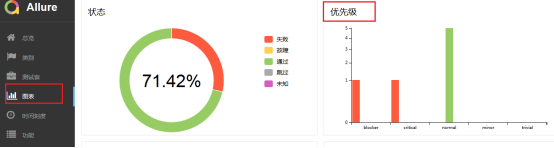
这个优先级,如果不写,默认就是normal。用法就像标黄色底色那样,级别总共有五个:
- BLOCKER = 'blocker' 中断缺陷(客服端程序无响应,无法执行下一步骤)
- CRITICAL = 'critical' 临界缺陷(功能点缺失)
- NORMAL = 'normal' 普通缺陷(数据计算错误)
- MINOR = 'minor' 次要缺陷(界面错误与ui需求不符)
- TRIVIAL = 'trivial' 轻微缺陷(必须项无提示,或者提示不规范)
用例分级的方法:
@allure.feature('这里是一级标签')
@allure.story("这里是第一个二级标签")
对应的结果为:
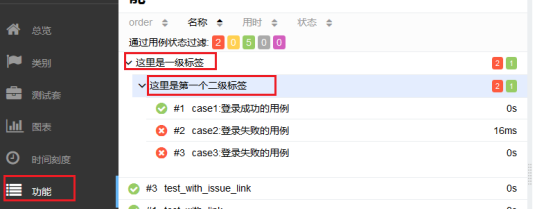
6.4.7 添加截图
3.7.6讲到过截图的方法get_screenshot_as_file(路径),6.4.2讲了attach上传图片的方法,两个方法结合起来就可以在测试过程中截图并且传到报告上
    def test_login(self):

        # 输入手机号

        self.login_page.input_tel("")

        # 输入密码

        self.login_page.input_pwd("sy123")

        time.sleep(3)

        # 点击登录

        self.login_page.click_login()

        # 截图的方法

        self.login_page.screenshot("login_success")

        # 上传到报告

        allure.attach.file(r'.\screen\login_success.png', 'login_success',\

                           attachment_type=allure.attachment_type.PNG)

    def screenshot(self, file_name):

        self.driver.get_screenshot_as_file("./screen/" + file_name + ".png")
移动自动化appium(2)- Allure报告使用详解的更多相关文章
- 自动化集成:Pipeline流水语法详解
前言:该系列文章,围绕持续集成:Jenkins+Docker+K8S相关组件,实现自动化管理源码编译.打包.镜像构建.部署等操作:本篇文章主要描述Pipeline流水线用法. 一.Webhook原理 ...
- 自动化集成:Kubernetes容器引擎详解
前言:该系列文章,围绕持续集成:Jenkins+Docker+K8S相关组件,实现自动化管理源码编译.打包.镜像构建.部署等操作:本篇文章主要描述Kubernetes引擎用法. 一.基础简介 Kube ...
- python接口自动化(七)--状态码详解对照表(详解)
简介 我们为啥要了解状态码,从它的作用,就不言而喻了.如果不了解,我们就会像个无头苍蝇,横冲直撞.遇到问题也不知道从何处入手,就是想找别人帮忙,也不知道是找前端还是后端的工程师. 状态码的作用是:we ...
- SpringBoot自动化配置之四:@Conditional注解详解
前言 之前在分析spring boot 源码时导出可见@ConditionalOnBean 之类的注解,那么它到底是如何使用的以及其工作流程如何,我们这里就围绕以下几点来分析: @Conditiona ...
- Python自动化必备发送邮件报告脚本详解
#!/usr/bin/python3# -*- coding:UTF-8 -*-import smtplib#smtplib库主要用来连接第三方smtp库,用来发邮件from email.mime.t ...
- UI自动化学习笔记- UnitTest单元测试框架详解
一.UnitTest基本使用 1. UnitTest框架 1.1 什么是框架 说明: 框架英文单词frame 为解决一类事情的功能集合 1.2什么是UnitTest框架 概念:UnitTest是pyt ...
- autoIT 自动化上传/下载文件图文详解【python selenium】
情景: 在用selenium进行web页面自动化时,时不时会遇到上传附件的情况,常见的情况就是一个上传按钮,点击后弹出windows窗口,选择文件后上传,如下图1所示 图1 这种情况超出了seleni ...
- postman接口自动化,环境变量的用法详解(附postman常用的方法)
在实现接口自动测试的时候,会经常遇到接口参数依赖的问题,例如调取登录接口的时候,需要先获取登录的key值,而每次请求返回的key值又是不一样的,那么这种情况下,要实现接口的自动化,就要用到postma ...
- Python3自动化运维之Fabric模版详解
一.概要 Fabric是基于Python(2.7,3.4+以上版本)实现的SSH命令行工具,简化了SSH的应用程序部署及系统管理任务,它提供了系统基础的操作组件,可以实现本地或远程shell命令,包括 ...
随机推荐
- Java基础IO流 ,文件读取,由易至难
最基础的读取文件 import java.io.File;import java.io.FileInputStream;import java.io.FileNotFoundException;imp ...
- MVC07
1. 讲解ASP.net MVC的I/O操作 新建一个控制台程序,输入代码如下 using System; using System.IO; namespace IO { class Program ...
- python从一个目录中复制全部文件图片至另一个目录中,及删除指定目录中的图片
import shutil import os #目录自己改一下即可,复制 path = "./static/imgs/" new_path = "./static/up ...
- 移动端1px的适配问题
先看个概念: window.devicePixelRatio = 物理像素 / dips(独立像素) window.devicePixelRatio是设备的物理像素和独立像素的比例,可以叫设备像素比. ...
- 使用twisted将mysql插入变成异步执行
python 异步MySQL存库 对于异步框架而言,这些延迟是无法接受的.因此, Twisted 提供了 twisted.enterprise.adbapi, 遵循DB-API 2.0协议的一个异 ...
- 事务特性,事务的隔离级别以及spring中定义的事务传播行为
.katex { display: block; text-align: center; white-space: nowrap; } .katex-display > .katex > ...
- DJango中开启事务的两种方式
目录 Django中开启事务的两种方式 第一种 第二种 Django中开启事务的两种方式 第一种 from django.db import transaction with transaction. ...
- Js中的window.parent ,window.top,window.self 了解
在应用有frameset或者iframe的页面时,parent是父窗口,top是最顶级父窗口(有的窗口中套了好几层frameset或者iframe),self是当前窗口, opener是用open方法 ...
- SQLserver用Image格式储存图片
前言 最近项目更新一个新需求,要求把图片储存在SQLserver中,而不是储存在本地磁盘.很好,又有新东西可以学了. 正文 一.建表 这里大概建几个字段演示一下 CREATE TABLE [dbo]. ...
- vs2017打包exe安装包
1,安装扩展程序Install Projects 2,在打开的界面搜索Install,找到Install Projects 3,在要打包的项目解决方案下创建一个生成exe的项目 4,在打包项目的文件系 ...