Nginx集群之WCF分布式身份验证(支持Soap)
目录
1 大概思路... 1
2 Nginx集群之WCF分布式身份验证... 1
3 BasicHttpBinding、ws2007HttpBinding. 2
4 Windows证书生成私钥、公钥(X.509证书)... 3
5 编写WCF服务、客户端程序... 7
6 URL保留项... 13
7 部署WCF服务程序到局域网内3台PC机... 14
8 Nginx集群配置搭建... 15
9 SoapUI和WCF客户端程序的运行结果... 16
10 总结... 18
1 大概思路
l Nginx集群之WCF分布式身份验证
l BasicHttpBinding、Ws2007HttpBinding
l Windows证书生成公钥、私钥(x509证书)
l 编写WCF服务、客户端程序
l URL保留项
l 部署WCF服务程序到局域网内3台PC机
l Nginx集群配置搭建
l SoapUI和WCF客户端程序的运行结果
l 总结
2 Nginx集群之WCF分布式身份验证
Nginx是个轻量级的反向代理,当然,也有相应的SSL身份认证。本文主要采用一种自我寄宿的方式,使用Nginx集群,通过windows证书(X.509证书),讲述客户端如何访问服务器的方法。
本文源代码主要分类:
l HighlyConcurrentHosting
使用BasicHttpBinding的源代码(本文主要以这种方式进行Nginx集群)
l HighlyConcurrentHosting_Ws2007HttpBinding
使用ws2007HttpBinding的源代码(这是一种点对点的Windows认证方式)
l Nginx配置
nginx.conf
l Windows证书
wcf_zhyongfeng.cer(客户端需要安装的证书)
wcf_zhyongfeng.pfx(服务器需要安装的证书)
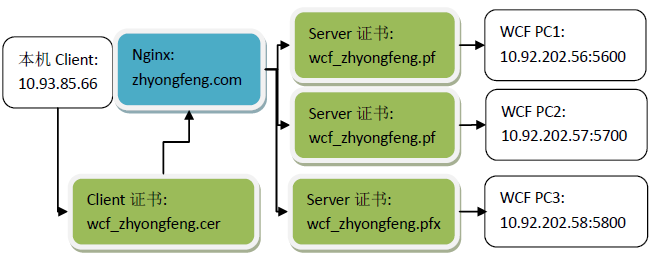
以下是本文讲述的主要结构图:
客户端以BasicHttpBinding进行访问Nginx,然后Nginx进行负载均衡,将消息分发到后端任意一台WCF的PC机,后端需要被访问的WCF服务器,都要安装Windows证书(仅被访问的服务器需要安装wcf_zhyongfegn.pfx证书)。
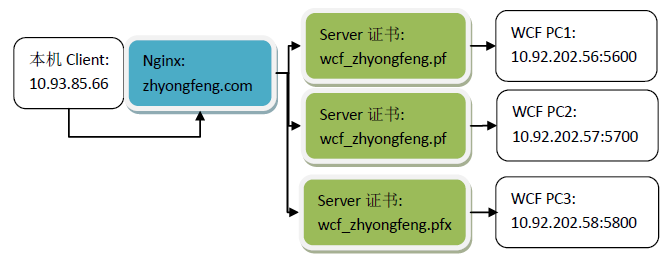
若以ws2007HttpBinding进行点对点Windows认证,则Nginx只能起到通过划分IP绑定特定一台服务器访问的作用,并不能起到集群负载均衡,同时除了服务器要wcf_zhyongfeng.pfx安装证书外,客户端也需要进行安装wcf_zhyongfeng.cer证书,这里不作为重点讲述。
3 BasicHttpBinding、ws2007HttpBinding
这里WCF的Ningx集群,主要用的是BasicHttpBinding。BasicHttpBinding的默认安全模式是None,即没有任何安全设置,消息都以明文传送,对客户端也不进行验证。 但是basicHttpBinding绑定可以实现安全传输,也可以通过传输层和消息层来保证消息的安全性。 basicHttpBinding设置为Transport安全模式,传输层的安全是使用IIS的安全机制,比如基本身份验证、集成windows验证、SSL安全通道等等
.NET Framework 3.5 介绍了一种用于Web 服务交互称为ws2007HttpBinding绑定的新的绑定。这个绑定类似于ws2007HttpBinding绑定除了它支持最新的WS-* 消息,安全,可信赖消息和事务标准。
ws2007HttpBinding支持的标准:
|
WS-SecureConversation v1.3 |
WS-Security的扩展,为多个消息交换提供一个安全上下文 |
|
WS-Trust v1.3 |
WS-Security的扩展,请求并标记问题,管理可依赖关系。 |
|
WS-SecurityPolicy v1.2 |
WS-Security的安全断言,WS-Security转换以及使用WS-Policy表达的WS-Trust |
|
Web Services Reliable Messaging v1.1 |
保证消息被传递,适当编码且不会重复接收的协议 |
|
Web Services Coordination v1.1 |
为分布式平台的动作合作提供协议的平台 |
4 Windows证书生成私钥、公钥(X.509证书)
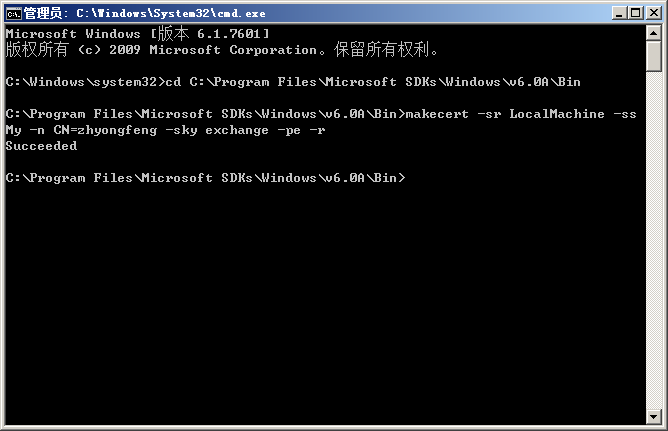
进行C:\Windows\system32,以管理员运行cmd.ext
Microsoft Windows [版本 6.1.7601]

版权所有 (c) 2009 Microsoft Corporation。保留所有权利。

C:\Windows\system32>cd C:\Program Files\Microsoft SDKs\Windows\v6.0A\Bin

C:\Program Files\Microsoft SDKs\Windows\v6.0A\Bin>makecert -r -pe -n "CN=wcf_zhyongfeng" -ss My -sky exchange

Succeeded

C:\Program Files\Microsoft SDKs\Windows\v6.0A\Bin>
查看Windows证书的生成,开始->运行,输入:
certmgr.msc
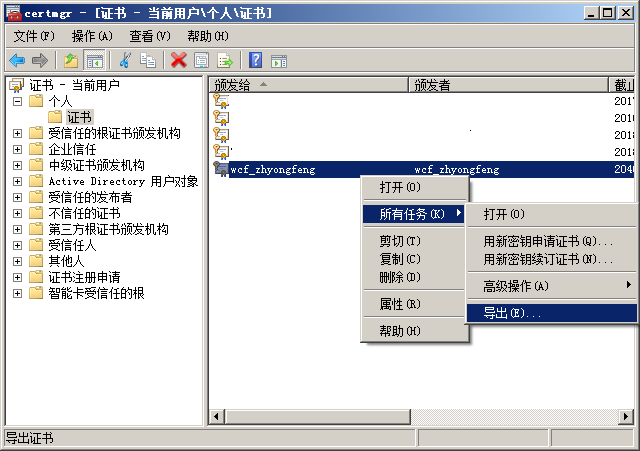
Windows导出wcf_zhyongfeng.pfx服务端证书:
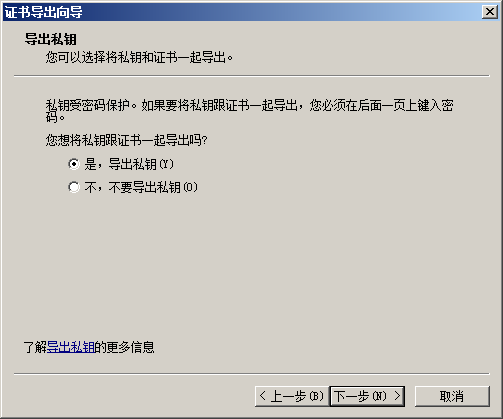
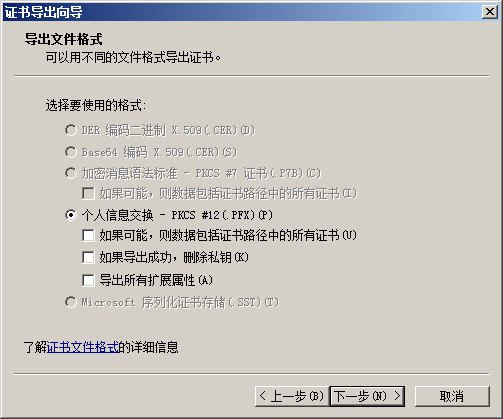


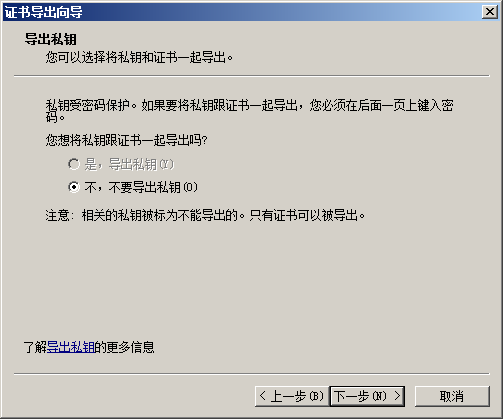
Windows导出wcf_zhyongfeng.cer客户端证书:


5 编写WCF服务、客户端程序
l WCF服务程序
Program.cs
using Service;

using System;

using System.ServiceModel;

namespace HighlyConcurrentHosting

{

    class Program

    {

        static void Main(string[] args)

        {

            using (ServiceHost host = new ServiceHost(typeof(OutputSomething)))

            {

                host.Opened += delegate

                {

                    Console.WriteLine(host.Description.Endpoints[].Address.Uri + "已经启动,按任意键终止服务!");

                };

                host.Open();

                Console.Read();

            }

        }

    }

    /// <summary>

    /// 证书验证帐户名,密码

    /// </summary>

    public class UserNamePasswordValidator : System.IdentityModel.Selectors.UserNamePasswordValidator

    {

        public override void Validate(string userName, string password)

        {

            if (userName != "zhyongfeng" || password != "")

            {

                throw new System.IdentityModel.Tokens.SecurityTokenException("Unknown Username or Password");

            }

        }

    }

}
服务端配置文件:
<?xml version="1.0" encoding="utf-8" ?>

<configuration>

  <system.serviceModel>

    <behaviors>

      <serviceBehaviors>

        <behavior name="metadataBehavior">

          <serviceMetadata httpGetEnabled="true"/>

          <!-- 要接收故障异常详细信息以进行调试,请将以下值设置为 true。在部署前设置为 false 以避免泄漏异常信息 -->

          <serviceDebug includeExceptionDetailInFaults="true"/>

          <serviceCredentials>

            <!--指定一个 X.509 证书,用户对认证中的用户名密码加密解密-->

            <!--C:\Program Files\Microsoft SDKs\Windows\v6.0A\Bin,使用makecert -r -pe -n "CN=wcf_zhyongfeng" -ss My -sky exchange-->

            <serviceCertificate findValue="wcf_zhyongfeng" x509FindType="FindBySubjectName" storeLocation="CurrentUser" storeName="My"/>

            <clientCertificate>

              <!--自定义对客户端进行证书认证方式 这里为 None-->

              <authentication certificateValidationMode="None"></authentication>

            </clientCertificate>

            <!--自定义用户名和密码验证的设置-->

            <userNameAuthentication userNamePasswordValidationMode="Custom" customUserNamePasswordValidatorType="HighlyConcurrentHosting.UserNamePasswordValidator,HighlyConcurrentHosting" />

          </serviceCredentials>

        </behavior>

      </serviceBehaviors>

    </behaviors>

    <bindings>

      <basicHttpBinding>

        <!--这个是需要输入用户名密码的-->

        <binding name="YesCertificate">

          <security mode="TransportCredentialOnly">

            <transport clientCredentialType="Basic"></transport>

            <message clientCredentialType="UserName"/>

          </security>

        </binding>

      </basicHttpBinding>

  </bindings>

    <services>

      <service name="Service.OutputSomething" behaviorConfiguration="metadataBehavior" >

        <host>

          <baseAddresses>

            <add baseAddress="http://127.0.0.1:5600/hello"/>

          </baseAddresses>

        </host>

        <endpoint binding="basicHttpBinding" bindingConfiguration="YesCertificate" contract="Service.Interface.IOutputSomething"/>

        <endpoint binding="basicHttpBinding" bindingConfiguration="YesCertificate" contract="Service.Interface.IOutputSomethingCertificate" />

      </service>

    </services>

  </system.serviceModel>

  <startup>

    <supportedRuntime version="v4.0" sku=".NETFramework,Version=v4.5" />

  </startup>

</configuration>
l 客户端程序
using HighlyConcurrentClient.HighlyConcurrentService;

using System;

using System.Net;

namespace HighlyConcurrentClient

{

    class Program

    {

        static void Main(string[] args)

        {

            string AddressIP = string.Empty;

            foreach (IPAddress _IPAddress in Dns.GetHostEntry(Dns.GetHostName()).AddressList)

            {

                if (_IPAddress.AddressFamily.ToString() == "InterNetwork")

                {

                    AddressIP = _IPAddress.ToString();

                }

            }

            Console.WriteLine(string.Format("本机IP是:{0}", AddressIP));

            using (OutputSomethingCertificateClient proxy = new OutputSomethingCertificateClient())

            {

                proxy.ClientCredentials.UserName.UserName = "zhyongfeng";

                proxy.ClientCredentials.UserName.Password = "";

                for (int i = ; i < ; i++)

                {

                    Console.WriteLine(proxy.GetCertContentData(i));

                }

            }

            Console.Read();

        }

    }

}
客户端配置文件:
<?xml version="1.0" encoding="utf-8" ?>

<configuration>

  <configSections>

  </configSections>

  <startup>

    <supportedRuntime version="v4.0" sku=".NETFramework,Version=v4.5" />

  </startup>

  <system.serviceModel>

    <bindings>

      <basicHttpBinding>

        <binding name="BasicHttpBinding_IOutputSomething">

          <security mode="TransportCredentialOnly">

            <transport clientCredentialType="Basic" />

          </security>

        </binding>

        <binding name="BasicHttpBinding_IOutputSomethingCertificate">

          <security mode="TransportCredentialOnly">

            <transport clientCredentialType="Basic" />

          </security>

        </binding>

      </basicHttpBinding>

    </bindings>

    <client>

      <endpoint address="http://zhyongfeng.com/hello" binding="basicHttpBinding"

        bindingConfiguration="BasicHttpBinding_IOutputSomething" contract="HighlyConcurrentService.IOutputSomething"

        name="BasicHttpBinding_IOutputSomething" />

      <endpoint address="http://zhyongfeng.com/hello" binding="basicHttpBinding"

        bindingConfiguration="BasicHttpBinding_IOutputSomethingCertificate"

        contract="HighlyConcurrentService.IOutputSomethingCertificate"

        name="BasicHttpBinding_IOutputSomethingCertificate" />

    </client>

  </system.serviceModel>

</configuration>
客户端添加引用时,会产生
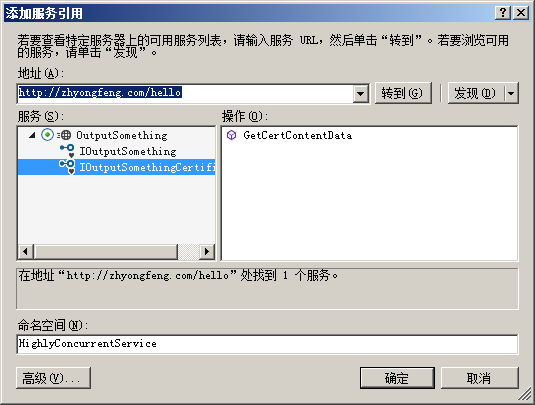

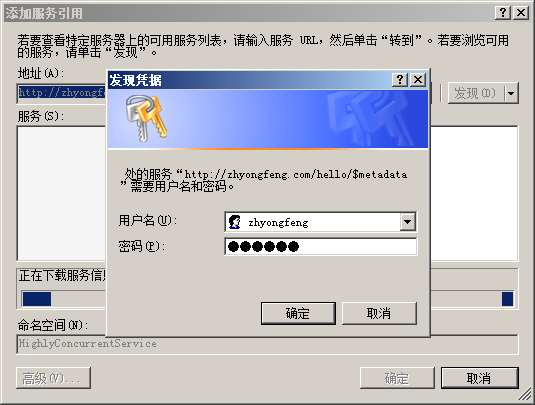
客户端添加服务引用后,Address可能是某一台PC机的IP地址(例如:address="http:// 10.92.202.56:5600/hello")这是需要修改为以下Nginx的地址
address="http://zhyongfeng.com/hello".
即如图所示:

6 URL保留项
详见:http://www.cnblogs.com/yongfeng/p/7851039.html
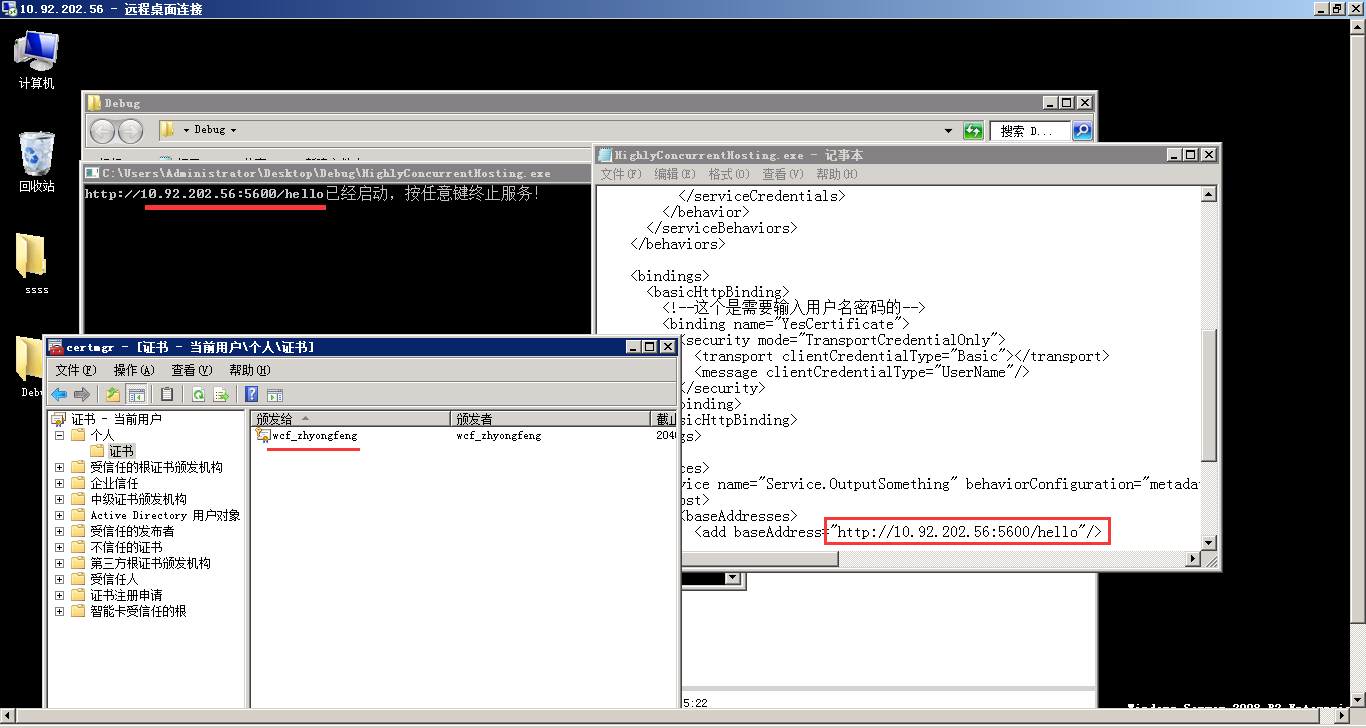
7 部署WCF服务程序到局域网内3台PC机
远程进行部署WCF服务程序时,需要双击安装服务器wcf_zhyongfeng.pfx证书、修改config三台机的配置文件:10.92.202.56:5600、10.92.202.57:5700、10.92.202.58:5800
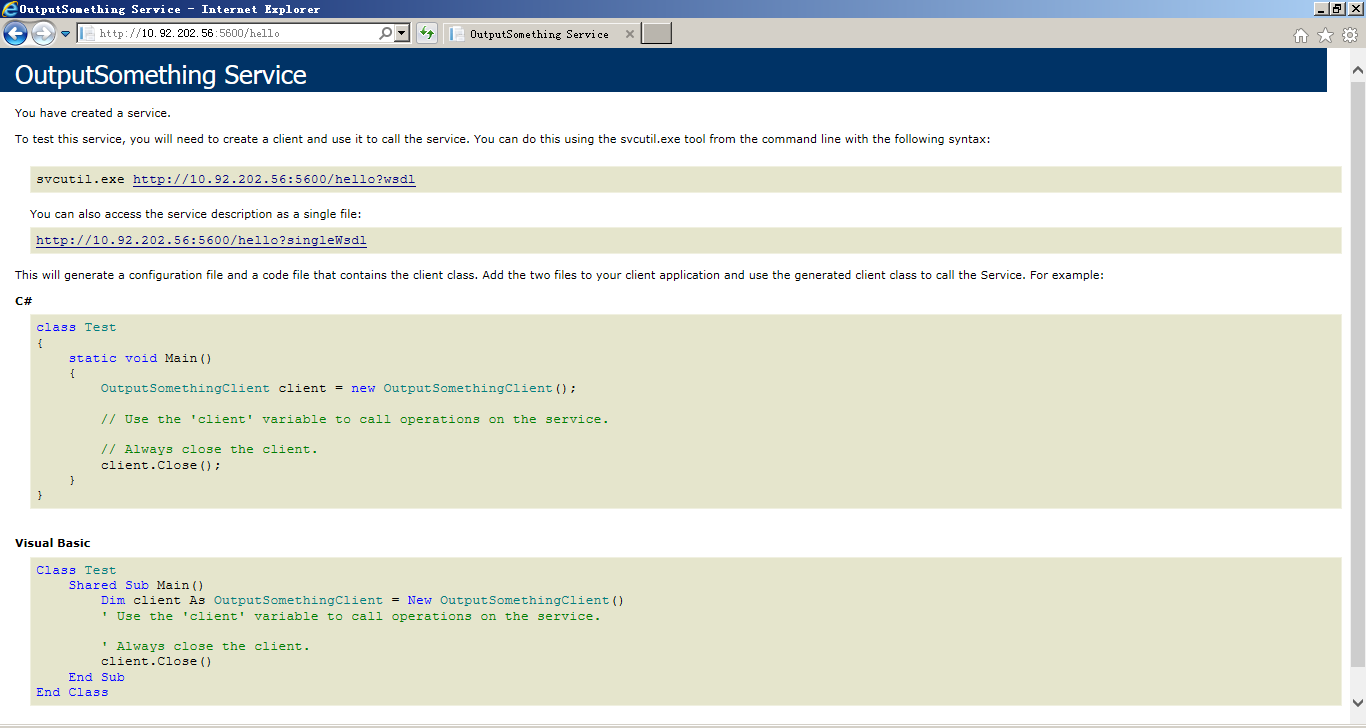
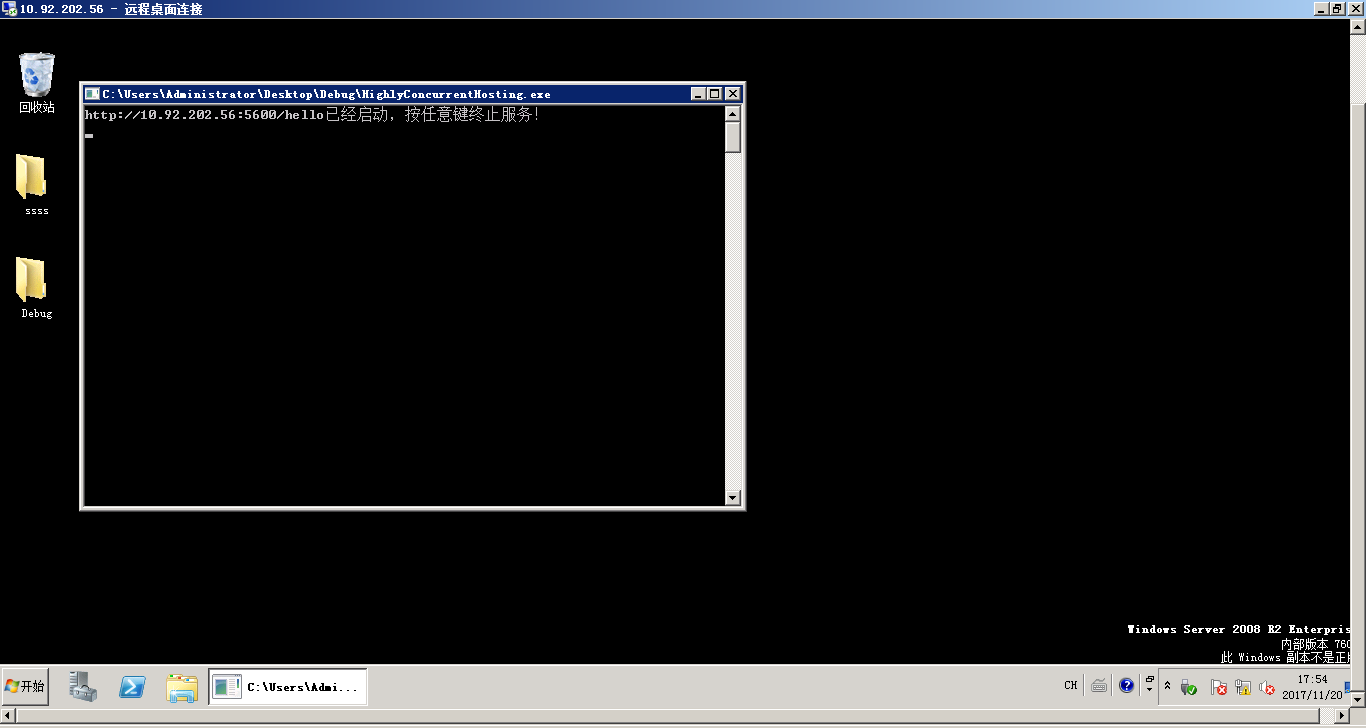
然后启动远程计算机的WCF服务程序,运行效果如下:

本机IE上访问WCF服务端的运行效果:
8 Nginx集群配置搭建
通过自主义域名zhyongfeng.com:80端口进行负载均衡集群访问,则访问C:\Windows\System32\drivers\etc\hosts,添加下列“本机IP 自定义的域名”:
10.93.85.66 zhyongfeng.com
针对WCF部署的多台PC机配置(设置了proxy_connect_timeout为10s,如果其中一台机down掉了,可以转发到另一台机器)如下:
worker_processes  1;

events {

    worker_connections  1024;

}

http {

    include       mime.types;

    default_type  application/octet-stream;

    sendfile        on;

    keepalive_timeout  65;

    upstream zhyongfeng.com {

        server    10.92.202.56:5600;

        server    10.92.202.57:5700;

        server    10.92.202.58:5800;

    }

    server {

        listen       80;

        server_name  zhyongfeng.com;

        location / {

            proxy_pass   http://zhyongfeng.com;

            proxy_connect_timeout       10s;

        }

    }

}
运行CMD:
D:\DTLDownLoads\nginx-1.10.2>start nginx

D:\DTLDownLoads\nginx-1.10.2>nginx -s reload
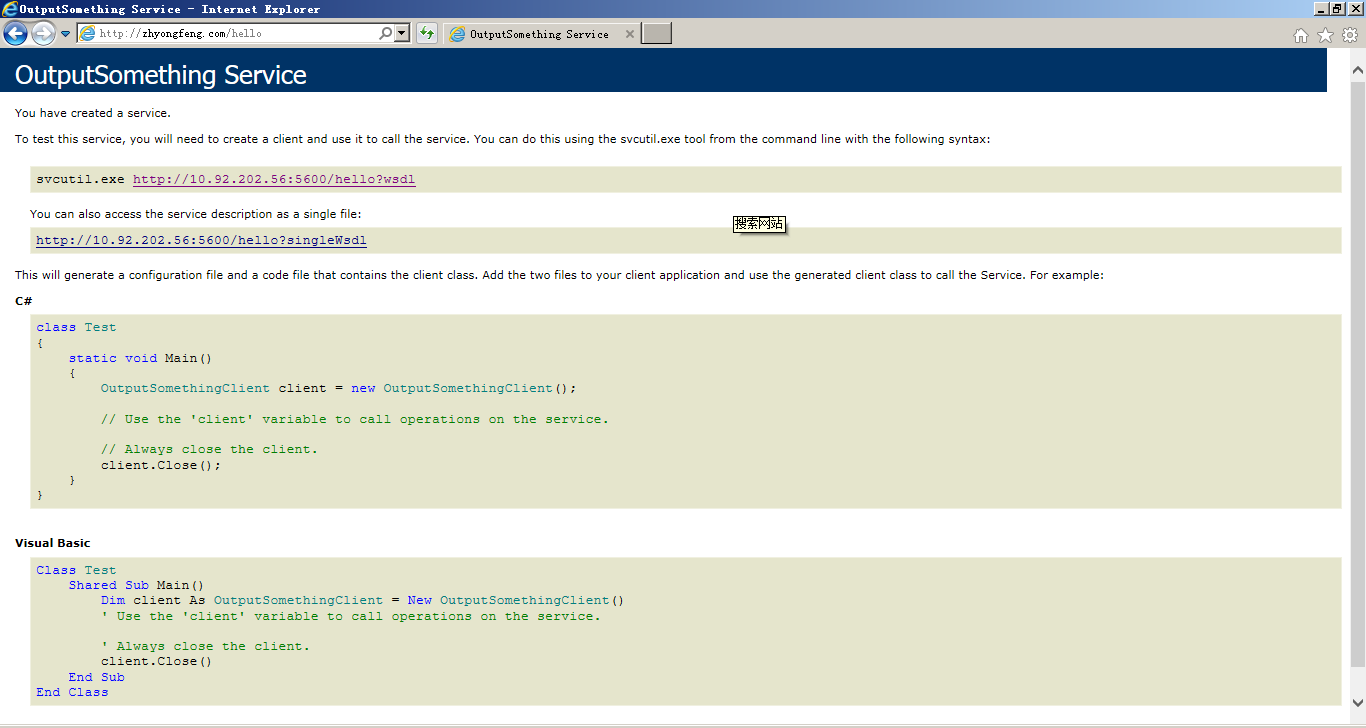
访问WCF服务端:http://zhyongfeng.com/hello,运行结果:
9 SoapUI和WCF客户端程序的运行结果
Soap协议,可以使用SoapUI测试并添加WCF的wsdl:http://zhyongfeng.com/hello?wsdl,运行效果如下:

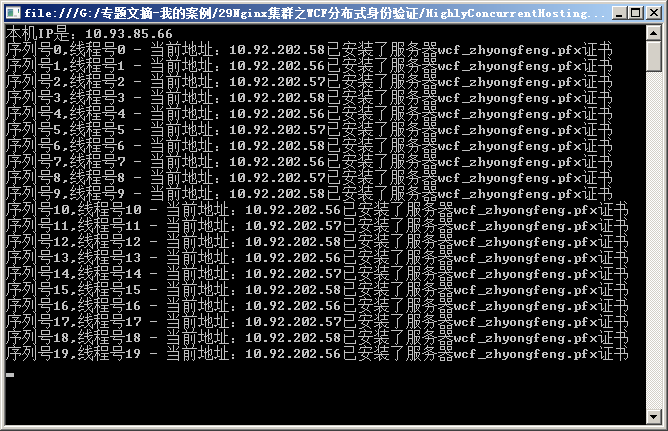
启动WCF客户端程序,运行效果图如下:
远程桌面关掉其中一台10.92.202.56:5600的PC机:
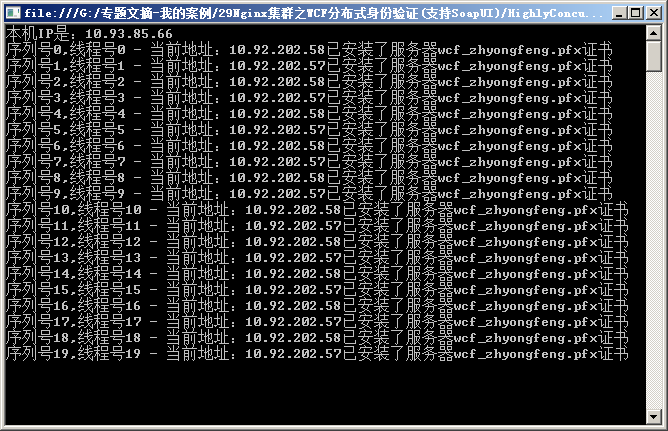
重新启动WCF客户端程序,因为Nginx配置文件设置了proxy_connect_timeout为10s,则关闭的PC机10.92.202.56:5600在10s后会将它的消息转发给10.92.202.57:5700,继续由其它2台PC机执行:
10 总结
通过使用BasicHttpBinding,除了能让WCF客户端访问之外,还增加了WSDL的访问方式。Nginx集群让WCF客户端具备用户名密码验证的同时,达到负载均衡分布式处理的效果。
源代码下载:
http://download.csdn.net/download/ruby_matlab/10126187
PDF下载:
Nginx集群之WCF分布式身份验证(支持soap).pdf
Nginx集群之WCF分布式身份验证(支持Soap)的更多相关文章
- Nginx集群之WCF分布式局域网应用
目录 1 大概思路... 1 2 Nginx集群WCF分布式局域网结构图... 1 3 关于WCF的BasicHttpBinding. 1 4 编写WC ...
- Nginx集群之WCF分布式消息队列
目录 1 大概思路... 1 2 Nginx集群之WCF分布式消息队列... 1 3 MSMQ消息队列... 2 4 编写WCF服务.客户端程序... ...
- Nginx集群之WCF大文件上传及下载(支持6G传输)
目录 1 大概思路... 1 2 Nginx集群之WCF大文件上传及下载... 1 3 BasicHttpBinding相关配置解析... 2 4 编写 ...
- 扎实基础之从零开始-Nginx集群分布式.NET应用
1 扎实基础之快速学习Nginx Nginx是一款轻量级的Web 服务器/反向代理服务器及电子邮件(IMAP/POP3)代理服务器,并在一个BSD-like 协议下发行.其特点是占有内存少 ...
- Nginx集群之SSL证书的WebApi令牌验证
目录 1 大概思路... 1 2 Nginx集群之SSL证书的WebApi令牌验证... 1 3 Openssl生成SSL证书... 2 4 编写.NE ...
- Nginx集群之基于Redis的WebApi身份验证
目录 1 大概思路... 1 2 Nginx集群之基于Redis的WebApi身份验证... 1 3 Redis数据库... 2 4 Visualbox ...
- Nginx集群之SSL证书的WebApi身份验证
目录 1 大概思路... 1 2 Nginx集群之SSL证书的WebApi身份验证... 1 3 AuthorizeAttribute类... 2 4 ...
- Nginx集群之SSL证书的WebApi微服务
目录 1 大概思路... 1 2 Nginx集群之SSL证书的WebApi微服务... 1 3 HTTP与HTTPS(SSL协议)... 1 4 Ope ...
- XNginx - nginx 集群可视化管理工具
之前团队的nginx管理,都是运维同学每次去修改配置文件,然后重启,非常不方便,一直想找一个可以方便管理nginx集群的工具,翻遍web,未寻到可用之物,于是自己设计开发了一个. 效果预览 集群gro ...
随机推荐
- 基于Jmeter的接口自动化测试实践
在去年实施了一年的三端(PC.无线M站.无线APP[Android.IOS])后,今年7月份开始,我们开始进行接口自动化的实施,目前已完成了整个框架的搭建以及接口的持续测试集成.今天做个简单的分享. ...
- Python的字典
1. Python的字典 1.1. 字典的定义 在Python中,字典是一种key-value的数据类型,也是唯一的映射类型:字典还是另一种可变容器类型,且可存储任意类型对象,其中也可包括其他容器 ...
- UML总结复习指南
用例图 1. 參与者(Actor) 表示与您的应用程序或系统进行交互的用户.组织或外部系统.用一个小人表示. 2. 用例(Use Case) 用例就是外部可见的系统功能,对系统提供的服务进行描 ...
- JAVA入门[3]—Spring依赖注入
Spring支持属性注入和构造器注入,它支持XML和注解两种方式.本文介绍Spring控制反转容器加载包含beans的XML文件,实现依赖注入. 一.创建bean实例 暂且抛开对象依赖,我们先看下如何 ...
- springMVC学习总结(一)快速入门
springMVC学习总结(一)快速入门 一.初步认识 springMVC执行流程 主要组件 DispatcherServlet(中央控制器) 配置在web.xml中的前端控制器,客户端请求的入口,调 ...
- 深入理解计算机系统_3e 第八章家庭作业 CS:APP3e chapter 8 homework
8.9 关于并行的定义我之前写过一篇文章,参考: 并发与并行的区别 The differences between Concurrency and Parallel +---------------- ...
- sqlserver 存储过程 修改
CREATE PROCEDURE [dbo].[UpdateMessage] @strTable varchar(), --要修改的表 @strColumn varchar(),--要修改的列名(如果 ...
- 在 ReactNative 的 App 中,集成 Bugly 你会遇到的一些坑
一.前言 最近开新项目,准备尝试一下 ReactNative,所以前期做了一些调研工作,ReactNative 的优点非常的明显,可以做到跨平台,除了少部分 UI 效果可能需要对不同的平台进行单独适配 ...
- java.lang.StringBuilder和java.lang.StringBuffer (JDK1.8)
这两个类都是继承自AbstractStringBuilder,AbstractStringBuilder有两个成员属性 char[] value; int count; 前者用于存储字符串,后者用于统 ...
- java随机生成验证码
package com.yuyuchen.util; import java.awt.Color; import java.awt.Font; import java.awt.Graphics; im ...