UWP 用Thumb 控件仿制一个可拖动悬浮 Button
参考了 http://www.cnblogs.com/zhanggaoxing/p/6403430.html,并加以改进。
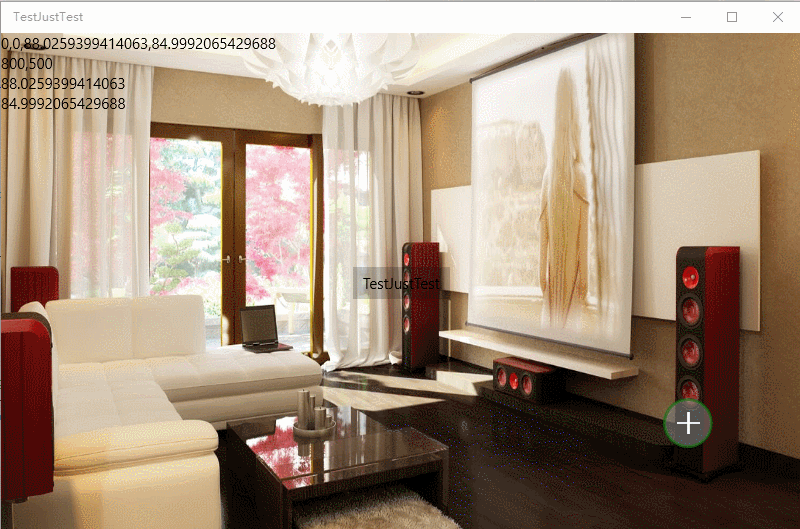
最终效果:::
Thumb 的原生事件 DragStarted,DragDelta,DragCompleted。
DragStarted 和字面意思差不多,开始拖动的时候发生的。
DragDelta 拖动进行中,只要你鼠标不放就会一直进行。
DragCompleted 拖动结束后发生。
首先需要在合适的页面敲上一个 <Thumb />,给它个 Name="RootThumb",我是把它放在页面右下角的。
<Thumb x:Name="RootThumb" Width="" Height="" Margin="0,0,50,50" HorizontalAlignment="Right" VerticalAlignment="Bottom" Canvas.ZIndex="" Tapped="RootThumb_Tapped" DragDelta="RootThumb_DragDelta">

</Thumb>
这时设计器右下角应该出现了一个方块,但它不是我需要的圆形,下面打开 Blend 进行样式定制.
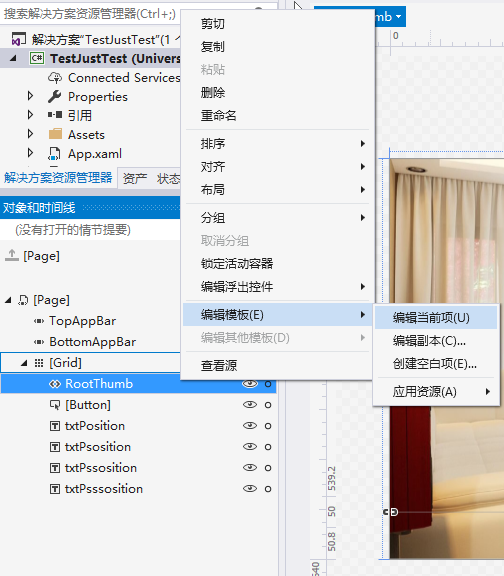
点击编辑后,加载了默认的 Thumb 样式。
替换Style,
<Style x:Key="ThumbStyle1" TargetType="Thumb">
<Setter Property="Background" Value="Transparent"/>
<Setter Property="BorderThickness" Value=""/>
<Setter Property="IsTabStop" Value="False"/>
<Setter Property="BorderBrush" Value="{ThemeResource ThumbBorderBrush}"/>
<Setter Property="Template">
<Setter.Value>
<ControlTemplate TargetType="Thumb">
<Grid x:Name="RootGrid">
<VisualStateManager.VisualStateGroups>
<VisualStateGroup x:Name="CommonStates">
<VisualState x:Name="Normal"/>
<VisualState x:Name="PointerOver">
<Storyboard>
<DoubleAnimation Duration="" To="" Storyboard.TargetProperty="Opacity" Storyboard.TargetName="BackgroundPointerOver"/>
<DoubleAnimation Duration="" To="" Storyboard.TargetProperty="Opacity" Storyboard.TargetName="Background"/>
</Storyboard>
</VisualState>
<VisualState x:Name="Pressed">
<Storyboard>
<DoubleAnimation Duration="" To="" Storyboard.TargetProperty="Opacity" Storyboard.TargetName="BackgroundPressed"/>
<DoubleAnimation Duration="" To="" Storyboard.TargetProperty="Opacity" Storyboard.TargetName="Background"/>
</Storyboard>
</VisualState>
<VisualState x:Name="Disabled"/>
</VisualStateGroup>
</VisualStateManager.VisualStateGroups>
<Rectangle RadiusY="" RadiusX="" Fill="Gray" Opacity="0.6" Stroke="{ThemeResource SystemControlBackgroundAccentBrush}" StrokeThickness="" />
<TextBlock FontFamily="Segoe MDL2 Assets" Text="" FontSize="" Foreground="White" HorizontalAlignment="Center" VerticalAlignment="Center" FontWeight="Bold" />
<Border x:Name="Background" BorderBrush="{TemplateBinding BorderBrush}" BorderThickness="{TemplateBinding BorderThickness}" Background="{TemplateBinding Background}"/>
<Border x:Name="BackgroundPointerOver" BorderBrush="{ThemeResource ThumbBorderBrushPointerOver}" BorderThickness="{TemplateBinding BorderThickness}" Background="Transparent" Opacity=""/>
<Border x:Name="BackgroundPressed" BorderBrush="{ThemeResource ThumbBorderBrushPressed}" BorderThickness="{TemplateBinding BorderThickness}" Background="Transparent" Opacity=""/>
</Grid>
</ControlTemplate>
</Setter.Value>
</Setter>
</Style>
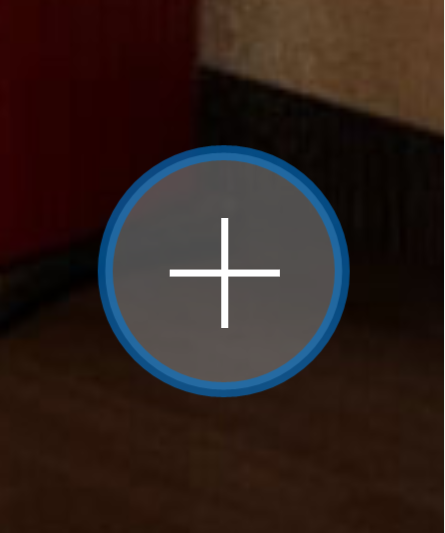
定制好的样式就粗来啦,那个周边颜色根据系统色而改变的
Button 的 Click 事件怎么实现呢?有 PointerPressed 和 Tapped 两个备选事件。现在的交互事件有三种:Mouse Events(鼠标事件),Touch Events(触摸事件)和 Pointer Events(指针事件),分别为不同的设备提供不同的交互方式。说这么多废话其实直接试试就好了。。。在 Thumb 的 xml 标记里添加 Tapped="RootThumb_Tapped",事件代码如下
private async void RootThumb_Tapped(object sender, TappedRoutedEventArgs e)

{

ContentDialog cd = new ContentDialog

{

Title = "消息提示",

PrimaryButtonText = "确定",

SecondaryButtonText = "取消",

Content = "当前设置尚未保存,你确认要退出该页面吗?",

};

cd.PrimaryButtonClick += Cd_PrimaryButtonClick;

await cd.ShowAsync();

}
下面说说拖动怎么实现,需要编写 DragDelta 事件。由于 Win10 设备体系庞大,UWP 上谈控件坐标没啥意义,这也正是 WPF 上的控件拖动方案没用的原因。如果你在设计器里像 WinForm 一样拖拽控件设计布局的话,xaml 会给被拖拽的控件一个 Margin,因此 Thumb 的拖拽实现也用的 Margin。首先你需要定义两个 double 私有字段记录 X, Y 轴的位移量。设计目的是 Thumb 在右下角,而页面的坐标零点在左上角,只需要将 Thumb 的 Margin 的 Right,Bottom 给一个位移量的负值即可。完整代码如下。
private double thumbX = -, thumbY = -;

private void RootThumb_DragDelta(object sender, DragDeltaEventArgs e)

{

// 两个 double 类型,用来记录偏移量

thumbX += e.HorizontalChange;

thumbY += e.VerticalChange;

if (-thumbX <  && -thumbY < )

{

RootThumb.Margin = new Thickness(, , , );

thumbX = ; thumbY = ;

}

else if (-thumbX < )

{

RootThumb.Margin = new Thickness(, , , -thumbY);

thumbX = ;

}

else if (-thumbY < )

{

RootThumb.Margin = new Thickness(, , -thumbX, );

thumbY = ;

}

else if (-thumbX > (Window.Current.Bounds.Width - RootThumb.Width) && -thumbY > (Window.Current.Bounds.Height - RootThumb.Height))

{

thumbX = -(Window.Current.Bounds.Width - RootThumb.Width);

thumbY = -(Window.Current.Bounds.Height - RootThumb.Height);

RootThumb.Margin = new Thickness(, , Window.Current.Bounds.Width - RootThumb.Width, Window.Current.Bounds.Height - RootThumb.Height);

}

else if(-thumbX > (Window.Current.Bounds.Width - RootThumb.Width))

{

thumbX = -(Window.Current.Bounds.Width - RootThumb.Width);

RootThumb.Margin = new Thickness(, , Window.Current.Bounds.Width - RootThumb.Width, -thumbY);

}

else if (-thumbY > (Window.Current.Bounds.Height - RootThumb.Height))

{

thumbY = -(Window.Current.Bounds.Height - RootThumb.Height);

RootThumb.Margin = new Thickness(, , -thumbX, Window.Current.Bounds.Height - RootThumb.Height);

}

else

{

RootThumb.Margin = new Thickness(, , -thumbX, -thumbY);

}

}
上述代码完成了,但是有个问题,就是窗口从大变小之后,浮动按钮还是按照原来的margin,所以会消失。我这里直接给了一个固定的值,就不消失了。
private void Page_SizeChanged(object sender, SizeChangedEventArgs e)

{

//防止窗体改变大小后消失

RootThumb.Margin = new Thickness(, , , );

thumbX = -; thumbY = -;

}
UWP 用Thumb 控件仿制一个可拖动悬浮 Button的更多相关文章
- 张高兴的 UWP 开发笔记:用 Thumb 控件仿制一个可拖动 Button
在 WPF 上可用的控件拖动方法在 UWP 上大多没用,那干脆用 Thumb 仿制一个吧. 关于 Thumb 控件的教程也不多,毕竟在 WPF 控件拖动有很多种方法, Thumb 就显得很鸡肋了.下面 ...
- 继续聊WPF——Thumb控件
这个控件,真不好介绍,MSDN上也是草草几句,反正就是可以让用户拖动的玩意儿,但是,你会发现,当你在该控件上拖动时,它没有反响,也就是说这个东西默认不做任何操作的,它是赖在那里什么都不干,除非你去踢上 ...
- 注意Android里TextView控件的一个小坑,用android:theme来设置样式时动态载入的layout会丢失该样式
注意Android里TextView控件的一个小坑,用android:theme来设置样式时动态载入的layout会丢失该样式 这个坑,必须要注意呀, 比如在用ListView的时候,如果在List_ ...
- iOS开发UI篇—使用picker View控件完成一个简单的选餐应用
iOS开发UI篇—使用picker View控件完成一个简单的选餐应用 一.实现效果 说明:点击随机按钮,能够自动选取,下方数据自动刷新. 二.实现思路 1.picker view的有默认高度为162 ...
- 自定义两个控件,一个是显示图标和文字的矩形,一个是带边框的label(但是不是label)
记录遇到的两个坑 坑1. 一开始我继承button 来实现下面的控件1,后面发现button没有双击事件.就改成继承UserControl了.重新编译,导致设计时的控件文本全部被清空,因为UserCo ...
- 给easyui datebox时间框控件扩展一个清空的实例
给easyui datebox扩展一个清空的实例 步骤一:拓展插件 /** * 给时间框控件扩展一个清除的按钮 */ $.fn.datebox.defaults.cleanText = '清空'; ( ...
- CAD向控件注册一个命令
_DMxDrawX::RegistUserCustomCommand 向控件注册一个命令,用户在命令行输入命令名这个字符串,就会触发执行命令事件 命令事件的id就是该注册时的id值,成功返回true. ...
- CAD向控件注册一个命令(com接口VB语言)
主要用到函数说明: MxDrawXCustomFunction::Mx_RegistUserCustomCommand 向控件注册一个命令,用户在命令行输入命令名这个字符串,就会触发执行命令事件 命令 ...
- 背水一战 Windows 10 (31) - 控件(按钮类): ButtonBase, Button, HyperlinkButton, RepeatButton, ToggleButton, AppBarButton, AppBarToggleButton
[源码下载] 背水一战 Windows 10 (31) - 控件(按钮类): ButtonBase, Button, HyperlinkButton, RepeatButton, ToggleButt ...
随机推荐
- [Bayesian] “我是bayesian我怕谁”系列 - Variational Inference
涉及的领域可能有些生僻,骗不了大家点赞.但毕竟是人工智能的主流技术,在园子却成了非主流. 不可否认的是:乃值钱的技术,提高身价的技术,改变世界观的技术. 关于变分,通常的课本思路是: GMM --&g ...
- R学习笔记 第五篇:数据变换和清理
在使用R的分组操作之前,首先要了解R语言包,包实质上是实现特定功能的,预先写好的代码库(library),R拥有大量的软件包,许多包都是由某一领域的专家编写的,但并不是所有的包都有很高的质量的,在使用 ...
- 阿里JAVA开发手册零度的思考理解(二)
转载请注明原创出处,谢谢! 说在前面 人生的大道上默默地走,就必须要有一盏灯亮着为你引导方向!而这盏灯抑或只是一句话,一句鼓励,一个赞美,一次承认,一次认可,一次相识一次交流-- 上篇文章:阿里JAV ...
- LNK4098: 默认库“MSVCRT”与其他库的使用冲突
LNK4098: 默认库"MSVCRT"与其他库的使用冲突 修改的方法:在项目属性中,在连接器-输入选项中,在忽略特定库中添加相应的库,具体添加那些苦请参照下面的表格. 下面的内容 ...
- 0_Simple__matrixMulCUBLAS
使用CUDA的线性代数库cuBLAS来计算矩阵乘法.这里主要记录调用规则,关于乘法函数中详细的参数说明和调用规则见另一篇随笔. ▶ 源代码: #include <assert.h> #in ...
- 解决Android下元素滑动问题
移动端左右.上下滑动: 当页面中既需要页面滑动操作,又需要上下或左右滑动页面上的某个元素时,直接使用zepto中提供的swipe事件是不能直接达到目的的,原因如下: (1)在Android低端机上to ...
- 状态码为 200 from cache和304 Not modified的区别
1.请求状态码为 200 from cache: 表示该资源已经被缓存过,并且在有效期内,所以不再向浏览器发出请求,直接使用本地缓存. 如下图: 2.状态码为 304 Not modified: 表 ...
- ⑩bootstrap组件 导航 使用基础案例
<!DOCTYPE html> <html lang="en"> <head> <meta charset="UTF-8 ...
- Linux 基本命令-----常用操作分类
Linux/Unix 命令格式: 命令名 [选项] [参数] 注:[]中的内容代表内容可以省略 例:$ ls $ ls -l #-l 是选项 开始符号: 文件名 或 文件夹名 .当前文件夹 ..上一级 ...
- SQLSERVER实现更改表名,更改列名,更改约束代码
1.修改表名 格式:sp_rename tablename,newtablename ? 1 sp_rename tablename,newtablename 2.修改字段名 格式:sp_rename ...