SnowFlake分布式ID生成及反解析
概述
分布式id生成算法的有很多种,Twitter的SnowFlake就是其中经典的一种,SnowFlake算法生成id的结果是一个64bit大小的整数,它的结构如下图:
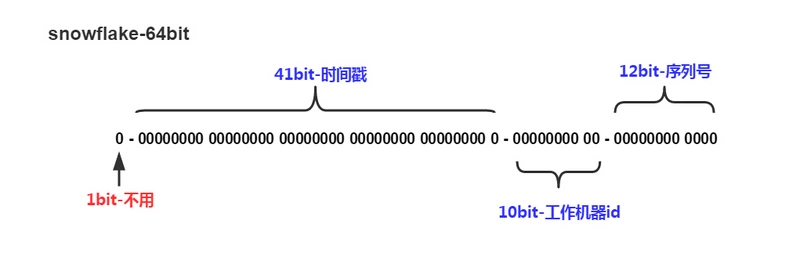
1位,不用。二进制中最高位为1的都是负数,但是我们生成的id一般都使用整数,所以这个最高位固定是041位,用来记录时间戳(毫秒)。- 41位可以表示$2^{41}-1$个数字,
- 如果只用来表示正整数(计算机中正数包含0),可以表示的数值范围是:0 至 $2^{41}-1$,减1是因为可表示的数值范围是从0开始算的,而不是1。
- 也就是说41位可以表示$2^{41}-1$个毫秒的值,转化成单位年则是$(2^{41}-1) / (1000 * 60 * 60 * 24 * 365) = 69$年
10位,用来记录工作机器id。- 可以部署在$2^{10} = 1024$个节点,包括
5位datacenterId和5位workerId 5位(bit)可以表示的最大正整数是$2^{5}-1 = 31$,即可以用0、1、2、3、....31这32个数字,来表示不同的datecenterId或workerId
- 可以部署在$2^{10} = 1024$个节点,包括
12位,序列号,用来记录同毫秒内产生的不同id。12位(bit)可以表示的最大正整数是$2^{12}-1 = 4095$,即可以用0、1、2、3、....4094这4095个数字,来表示同一机器同一时间截(毫秒)内产生的4095个ID序号
由于在Java中64bit的整数是long类型,所以在Java中SnowFlake算法生成的id就是long来存储的。
SnowFlake可以保证:
- 所有生成的id按时间趋势递增
- 整个分布式系统内不会产生重复id(因为有datacenterId和workerId来做区分)
以下是Twitter官方原版的,用Scala写的
package com.twitter.service.snowflake

import com.twitter.ostrich.stats.Stats

import com.twitter.service.snowflake.gen._

import java.util.Random

import com.twitter.logging.Logger

/**

 * An object that generates IDs.

 * This is broken into a separate class in case

 * we ever want to support multiple worker threads

 * per process

 */

class IdWorker(val workerId: Long, val datacenterId: Long, private val reporter: Reporter, var sequence: Long = 0L)

extends Snowflake.Iface {

  private[this] def genCounter(agent: String) = {

    Stats.incr("ids_generated")

    Stats.incr("ids_generated_%s".format(agent))

  }

  private[this] val exceptionCounter = Stats.getCounter("exceptions")

  private[this] val log = Logger.get

  private[this] val rand = new Random

  val twepoch = 1288834974657L

  private[this] val workerIdBits = 5L

  private[this] val datacenterIdBits = 5L

  private[this] val maxWorkerId = -1L ^ (-1L << workerIdBits)

  private[this] val maxDatacenterId = -1L ^ (-1L << datacenterIdBits)

  private[this] val sequenceBits = 12L

  private[this] val workerIdShift = sequenceBits

  private[this] val datacenterIdShift = sequenceBits + workerIdBits

  private[this] val timestampLeftShift = sequenceBits + workerIdBits + datacenterIdBits

  private[this] val sequenceMask = -1L ^ (-1L << sequenceBits)

  private[this] var lastTimestamp = -1L

  // sanity check for workerId

  if (workerId > maxWorkerId || workerId < 0) {

    exceptionCounter.incr(1)

    throw new IllegalArgumentException("worker Id can't be greater than %d or less than 0".format(maxWorkerId))

  }

  if (datacenterId > maxDatacenterId || datacenterId < 0) {

    exceptionCounter.incr(1)

    throw new IllegalArgumentException("datacenter Id can't be greater than %d or less than 0".format(maxDatacenterId))

  }

  log.info("worker starting. timestamp left shift %d, datacenter id bits %d, worker id bits %d, sequence bits %d, workerid %d",

    timestampLeftShift, datacenterIdBits, workerIdBits, sequenceBits, workerId)

  def get_id(useragent: String): Long = {

    if (!validUseragent(useragent)) {

      exceptionCounter.incr(1)

      throw new InvalidUserAgentError

    }

    val id = nextId()

    genCounter(useragent)

    reporter.report(new AuditLogEntry(id, useragent, rand.nextLong))

    id

  }

  def get_worker_id(): Long = workerId

  def get_datacenter_id(): Long = datacenterId

  def get_timestamp() = System.currentTimeMillis

  protected[snowflake] def nextId(): Long = synchronized {

    var timestamp = timeGen()

    if (timestamp < lastTimestamp) {

      exceptionCounter.incr(1)

      log.error("clock is moving backwards.  Rejecting requests until %d.", lastTimestamp);

      throw new InvalidSystemClock("Clock moved backwards.  Refusing to generate id for %d milliseconds".format(

        lastTimestamp - timestamp))

    }

    if (lastTimestamp == timestamp) {

      sequence = (sequence + 1) & sequenceMask

      if (sequence == 0) {

        timestamp = tilNextMillis(lastTimestamp)

      }

    } else {

      sequence = 0

    }

    lastTimestamp = timestamp

    ((timestamp - twepoch) << timestampLeftShift) |

      (datacenterId << datacenterIdShift) |

      (workerId << workerIdShift) |

      sequence

  }

  protected def tilNextMillis(lastTimestamp: Long): Long = {

    var timestamp = timeGen()

    while (timestamp <= lastTimestamp) {

      timestamp = timeGen()

    }

    timestamp

  }

  protected def timeGen(): Long = System.currentTimeMillis()

  val AgentParser = """([a-zA-Z][a-zA-Z\-0-9]*)""".r

  def validUseragent(useragent: String): Boolean = useragent match {

    case AgentParser(_) => true

    case _ => false

  }

}
Sharding-jdbc基于Java版的实现:
/*

 * Copyright 1999-2015 dangdang.com.

 * <p>

 * Licensed under the Apache License, Version 2.0 (the "License");

 * you may not use this file except in compliance with the License.

 * You may obtain a copy of the License at

 *

 *      http://www.apache.org/licenses/LICENSE-2.0

 *

 * Unless required by applicable law or agreed to in writing, software

 * distributed under the License is distributed on an "AS IS" BASIS,

 * WITHOUT WARRANTIES OR CONDITIONS OF ANY KIND, either express or implied.

 * See the License for the specific language governing permissions and

 * limitations under the License.

 * </p>

 */

package io.shardingjdbc.core.keygen;

import com.google.common.base.Preconditions;

import lombok.Setter;

import lombok.extern.slf4j.Slf4j;

import java.text.SimpleDateFormat;

import java.util.Calendar;

import java.util.Date;

/**

 * Default distributed primary key generator.

 *

 * <p>

 * Use snowflake algorithm. Length is 64 bit.

 * </p>

 *

 * <pre>

 * 1bit   sign bit.

 * 41bits timestamp offset from 2016.11.01(Sharding-JDBC distributed primary key published data) to now.

 * 10bits worker process id.

 * 12bits auto increment offset in one mills

 * </pre>

 *

 * <p>

 * Call @{@code DefaultKeyGenerator.setWorkerId} to set.

 * </p>

 *

 * @author gaohongtao

 */

@Slf4j

public final class DefaultKeyGenerator implements KeyGenerator {

    public static final long EPOCH;

    private static final long SEQUENCE_BITS = 12L;

    private static final long WORKER_ID_BITS = 10L;

    private static final long SEQUENCE_MASK = (1 << SEQUENCE_BITS) - 1;

    private static final long WORKER_ID_LEFT_SHIFT_BITS = SEQUENCE_BITS;

    private static final long TIMESTAMP_LEFT_SHIFT_BITS = WORKER_ID_LEFT_SHIFT_BITS + WORKER_ID_BITS;

    private static final long WORKER_ID_MAX_VALUE = 1L << WORKER_ID_BITS;

    @Setter

    private static TimeService timeService = new TimeService();

    private static long workerId;

    static {

        Calendar calendar = Calendar.getInstance();

        calendar.set(2016, Calendar.NOVEMBER, 1);

        calendar.set(Calendar.HOUR_OF_DAY, 0);

        calendar.set(Calendar.MINUTE, 0);

        calendar.set(Calendar.SECOND, 0);

        calendar.set(Calendar.MILLISECOND, 0);

        EPOCH = calendar.getTimeInMillis();

    }

    private long sequence;

    private long lastTime;

    /**

     * Set work process id.

     *

     * @param workerId work process id

     */

    public static void setWorkerId(final long workerId) {

        Preconditions.checkArgument(workerId >= 0L && workerId < WORKER_ID_MAX_VALUE);

        DefaultKeyGenerator.workerId = workerId;

    }

    /**

     * Generate key.

     *

     * @return key type is @{@link Long}.

     */

    @Override

    public synchronized Number generateKey() {

        long currentMillis = timeService.getCurrentMillis();

        Preconditions.checkState(lastTime <= currentMillis, "Clock is moving backwards, last time is %d milliseconds, current time is %d milliseconds", lastTime, currentMillis);

        if (lastTime == currentMillis) {

            if (0L == (sequence = ++sequence & SEQUENCE_MASK)) {

                currentMillis = waitUntilNextTime(currentMillis);

            }

        } else {

            sequence = 0;

        }

        lastTime = currentMillis;

        if (log.isDebugEnabled()) {

            log.debug("{}-{}-{}", new SimpleDateFormat("yyyy-MM-dd HH:mm:ss.SSS").format(new Date(lastTime)), workerId, sequence);

        }

        return ((currentMillis - EPOCH) << TIMESTAMP_LEFT_SHIFT_BITS) | (workerId << WORKER_ID_LEFT_SHIFT_BITS) | sequence;

    }

    private long waitUntilNextTime(final long lastTime) {

        long time = timeService.getCurrentMillis();

        while (time <= lastTime) {

            time = timeService.getCurrentMillis();

        }

        return time;

    }

}
写个测试,把参数都写死,并运行打印信息,方便后面来核对计算结果:
public static void main(String[] args) {

    long timestamp = 1505914988849L;

    long twepoch = 1288834974657L;

    long datacenterId = 17L;

    long workerId = 25L;

    long sequence = 0L;

    System.out.printf("\ntimestamp: %d \n",timestamp);

    System.out.printf("twepoch: %d \n",twepoch);

    System.out.printf("datacenterId: %d \n",datacenterId);

    System.out.printf("workerId: %d \n",workerId);

    System.out.printf("sequence: %d \n",sequence);

    System.out.println();

    System.out.printf("(timestamp - twepoch): %d \n",(timestamp - twepoch));

    System.out.printf("((timestamp - twepoch) << 22L): %d \n",((timestamp - twepoch) << 22L));

    System.out.printf("(datacenterId << 17L): %d \n" ,(datacenterId << 17L));

    System.out.printf("(workerId << 12L): %d \n",(workerId << 12L));

    System.out.printf("sequence: %d \n",sequence);

    long result = ((timestamp - twepoch) << 22L) |

        (datacenterId << 17L) |

        (workerId << 12L) |

        sequence;

    System.out.println(result);

}
SnowFlake ID 反向解析
我们将生成的ID(353337843935870976)转换为2进制:
11011111101000001100100111100101010000001001111000000000000

将其进行拆分

1101111110100001110010000011011001 00000 00010001 000000000000
然后在将各个位置的二进制编码转换为10进制就OK
实例代码:
import java.util.Calendar;

import java.util.Date;

import com.alibaba.fastjson.JSONObject;

import io.shardingjdbc.core.keygen.DefaultKeyGenerator;

public class SonwFlakeId {

    private static long twepoch = 1288834974657L;

    private long workerIdBits = 5L;

    private long datacenterIdBits = 5L;

    private static final long sequenceBits = 12L;

    private long workerIdShift = sequenceBits;

    private long dataCenterIdShift = sequenceBits + workerIdBits;

    private long timestampLeftShift = sequenceBits + workerIdBits + datacenterIdBits;

    static {

        Calendar calendar = Calendar.getInstance();

        calendar.set(2016, Calendar.NOVEMBER, 1);

        calendar.set(Calendar.HOUR_OF_DAY, 0);

        calendar.set(Calendar.MINUTE, 0);

        calendar.set(Calendar.SECOND, 0);

        calendar.set(Calendar.MILLISECOND, 0);

        twepoch = calendar.getTimeInMillis();

    }

    public JSONObject parseInfo(long id) {

        String sonwFlakeId = Long.toBinaryString(id);

        int len = sonwFlakeId.length();

        JSONObject jsonObject = new JSONObject();

        int sequenceStart = (int) (len < workerIdShift ? 0 : len - workerIdShift);

        int workerStart = (int) (len < dataCenterIdShift ? 0 : len - dataCenterIdShift);

        int timeStart = (int) (len < timestampLeftShift ? 0 : len - timestampLeftShift);

        String sequence = sonwFlakeId.substring(sequenceStart, len);

        String workerId = sequenceStart == 0 ? "0" : sonwFlakeId.substring(workerStart, sequenceStart);

        String dataCenterId = workerStart == 0 ? "0" : sonwFlakeId.substring(timeStart, workerStart);

        String time = timeStart == 0 ? "0" : sonwFlakeId.substring(0, timeStart);

        int sequenceInt = Integer.valueOf(sequence, 2);

        jsonObject.put("sequence", sequenceInt);

        int workerIdInt = Integer.valueOf(workerId, 2);

        jsonObject.put("workerId", workerIdInt);

        int dataCenterIdInt = Integer.valueOf(dataCenterId, 2);

        jsonObject.put("dataCenter", dataCenterIdInt);

        long diffTime = Long.parseLong(time, 2);

        long timeLong = diffTime + twepoch;

        Date date = fromatTime(timeLong);

        jsonObject.put("date", date);

        return jsonObject;

    }

    public static Date getSonwFlakeDate(long id) {

        SonwFlakeId sonwFlakeId = new SonwFlakeId();

        JSONObject jsonObject = sonwFlakeId.parseInfo(id);

        Object dateObj = jsonObject.get("date");

        return (Date) dateObj;

    }

    private static Date fromatTime(long date) {

        Calendar calendar = Calendar.getInstance();

        calendar.setTimeInMillis(date);

        return calendar.getTime();

    }

    public static void main(String[] args) {

        DefaultKeyGenerator defaultKeyGenerator = new DefaultKeyGenerator();

        long id = defaultKeyGenerator.generateKey().longValue();

        SonwFlakeId sonwFlakeId = new SonwFlakeId();

        JSONObject jsonObject = sonwFlakeId.parseInfo(id);

        System.out.println("------------------------------------------");

        System.out.println(jsonObject);

        Object dateObj = jsonObject.get("date");

        System.out.println("date:" + dateObj);

        System.out.println("------------------------------------------");

    }

}
扩展
在理解了这个算法之后,其实还有一些扩展的事情可以做:
- 根据自己业务修改每个位段存储的信息。算法是通用的,可以根据自己需求适当调整每段的大小以及存储的信息。
- 解密id,由于id的每段都保存了特定的信息,所以拿到一个id,应该可以尝试反推出原始的每个段的信息。反推出的信息可以帮助我们分析。比如作为订单,可以知道该订单的生成日期,负责处理的数据中心等等。
SnowFlake分布式ID生成及反解析的更多相关文章
- Twitter的SnowFlake分布式id生成算法
二进制相关知识回顾 1.所有的数据都是以二进制的形式存储在硬盘上.对于一个字节的8位到底是什么类型 计算机是如何分辨的呢? 其实计算机并不负责判断数据类型,数据类型是程序告诉计算机该如何解释内存块. ...
- SnowFlake --- 分布式id生成算法
转载自:https://segmentfault.com/a/1190000011282426 概述 SnowFlake算法生成id的结果是一个64bit大小的整数,它的结构如下图: 1位,不用.二进 ...
- 理解分布式id生成算法SnowFlake
理解分布式id生成算法SnowFlake https://segmentfault.com/a/1190000011282426#articleHeader2 分布式id生成算法的有很多种,Twitt ...
- 分布式ID生成系统 UUID与雪花(snowflake)算法
Leaf——美团点评分布式ID生成系统 -https://tech.meituan.com/MT_Leaf.html 网游服务器中的GUID(唯一标识码)实现-基于snowflake算法-云栖社区-阿 ...
- 分布式 ID 生成算法 — SnowFlake
一.概述 分布式 ID 生成算法的有很多种,Twitter 的 SnowFlake 就是其中经典的一种. SnowFlake 算法生成 ID 的结果是一个 64bit 大小的整数,它的结构如下图: 1 ...
- Leaf——美团点评分布式ID生成系统 UUID & 类snowflake
Leaf——美团点评分布式ID生成系统 https://tech.meituan.com/MT_Leaf.html
- spring boot / cloud (十六) 分布式ID生成服务
spring boot / cloud (十六) 分布式ID生成服务 在几乎所有的分布式系统或者采用了分库/分表设计的系统中,几乎都会需要生成数据的唯一标识ID的需求, 常规做法,是使用数据库中的自动 ...
- 分布式ID生成方案
系统唯一ID是设计一个系统的时候常常会遇到的问题,也常常为这个问题而纠结. 生成ID的方法有很多,适应不同的场景.需求以及性能要求.所以有些比较复杂的系统会有多个ID生成的策略. 0. 分布式ID要求 ...
- 分布式ID生成服务,真的有必要搞一个
目录 阐述背景 Leaf snowflake 模式介绍 Leaf segment 模式介绍 Leaf 改造支持RPC 阐述背景 不吹嘘,不夸张,项目中用到ID生成的场景确实挺多.比如业务要做幂等的时候 ...
随机推荐
- Linux 计划任务管理
实际的生产环境中,总会做一些定期的任务,比如数据备份,我们不可能总等到那个时间去手动执行,这时计划任务就派上用场了. 一次性计划任务 at 一次性计划任务 at [HH:MM] [YYYY-MM-DD ...
- Linux操作系统启动故障排错之"/etc/fstab"文件被删除恢复案例
Linux操作系统启动故障排错之"/etc/fstab"文件被删除恢复案例 作者:尹正杰 版权声明:原创作品,谢绝转载!否则将追究法律责任. 一.模拟故障 [root@yinzhe ...
- jquery 子元素 后代元素 兄弟元素 相邻元素
<!DOCTYPE html> <html> <head> <meta http-equiv="Content-type" content ...
- 将照片转成base64时候,使用下面的这个包更加安全一些
import org.apache.commons.net.util.Base64; 在项目中将照片转成base64时候,使用下面的这个包更加安全一些
- PHP程序员最容易犯的Mysql错误
对于大多数web应用来说,数据库都是一个十分基础性的部分.如果你在使用PHP,那么你很可能也在使用MySQL—LAMP系列中举足轻重的一份子. 对于很多新手们来说,使用PHP可以在短短几个小时之内轻松 ...
- python写入csv
import xlwtimport csvnewfile=open("wu.csv","w",newline="")filewriter=c ...
- django-用户认证模型
django本身会在mysql里存储一个user数据库 为了和django本身的user表区分 要在第一次迁移数据库前配置认证系统使用的用户模型 settings.py # django认证系统使用的 ...
- ARDUIN人体检测模块
http://henrysbench.capnfatz.com/henrys-bench/arduino-sensors-and-input/arduino-hc-sr501-motion-senso ...
- B/S大附件上传,支持断点续传
核心原理: 该项目核心就是文件分块上传.前后端要高度配合,需要双方约定好一些数据,才能完成大文件分块,我们在项目中要重点解决的以下问题. * 如何分片: * 如何合成一个文件: * 中断了从哪个分片开 ...
- CLR内部异常(中)
不捕捉某一个异常 常常有这种情况,代码不需要捕捉异常,但需要执行一些清理或者修正操作.虽然不总是,支持物(holders)经常用在这种场景里.在支持物(holders)不适用的情况里,CLR提供了两个 ...