[转]理解Vuex的辅助函数mapState, mapActions, mapMutations用法
原文地址:https://www.cnblogs.com/tugenhua0707/p/9794423.html
在讲解这些属性之前,假如我们项目的目录的结构如下:

### 目录结构如下:

demo1                                       # 工程名

|   |--- dist                               # 打包后生成的目录文件

|   |--- node_modules                       # 所有的依赖包

|   |--- app

|   | |---index

|   | | |-- views                           # 存放所有vue页面文件

|   | | | |-- parent.vue                    # 父组件

|   | | | |-- child.vue                     # 子组件

|   | | | |-- index.vue

|   | | |-- components                      # 存放vue公用的组件

|   | | |-- js                              # 存放js文件的

|   | | |-- store                           # store仓库

|   | | | |--- actions.js

|   | | | |--- mutations.js

|   | | | |--- state.js

|   | | | |--- mutations-types.js

|   | | | |--- index.js

|   | | |-- app.js                          # vue入口配置文件

|   | | |-- router.js                       # 路由配置文件

|   |--- views

|   | |-- index.html                        # html文件

|   |--- webpack.config.js                  # webpack配置文件

|   |--- .gitignore

|   |--- README.md

|   |--- package.json

|   |--- .babelrc                           # babel转码文件
具体理解vuex的项目构建可以看这篇文章(https://www.cnblogs.com/tugenhua0707/p/9763177.html). 下面讲解的也是在这篇文章项目结构基础之上进行讲解的。当然如果你对 vuex熟悉的话,就不用看了,直接跳过即可。
注意:下面的代码都是在 webpack+vue+route+vuex 中构建的,可以把下面的代码 复制到该项目中运行即可。
一:理解mapState的使用
当我们的组件需要获取多个状态的时候,将这些状态都声明为计算属性会有些重复和冗余,为了解决这个问题,我们可以使用mapState的辅助函数来帮助我们生成计算属性。
mapState函数返回的是一个对象,我们需要使用一个工具函数将多个对象合并为一个,这样就可以使我们将最终对象传给computed属性。
上面的表述可能会有些模糊,下面我们来做个简单的demo来演示一下:
项目架构如上面示意图所示,先看看 app/index/store/state.js 代码如下:
export default {

  add: 0,

  errors: '',

  counts: 0

};
app/index/store/mutations.js 代码如下:
import * as types from './mutations-types';

export default {

  [types.ADD] (state, payload) {

    state.add = payload;

  },

  [types.SETERROR] (state, payload) {

    state.errors = payload;

  },

  [types.COUNTASYNC] (state, payload) {

    state.counts = payload;

  }

}
app/index/store/mutations-types.js 代码如下:
// 新增list

export const ADD = 'ADD';

// 设置错误提示

export const SETERROR = 'SETERROR';

// 异步操作count

export const COUNTASYNC = 'COUNTASYNC';
app/index/store/index.js 代码如下:
import Vue from 'vue';

import Vuex from 'vuex';

import state from './state';

import mutations from './mutations';

import actions from './actions';

Vue.use(Vuex);

Vue.config.devtools = true;

export default new Vuex.Store({

  state,

  mutations,

  actions

});
app/index/store/actions.js 代码请看github
如上代码所示,现在我们在 app/index/views/parent.vue 这个路由下,在mounted生命周期打印一下 console.log(this);这句代码的时候,如下代码:
<template>

  <div></div>

</template>

<script type="text/javascript">

  export default {

    data() {

      return {

      }

    },

    methods: {

    },

    mounted() {

      console.log(this);

    }

  }

</script>
在浏览器运行后,如下图所示:
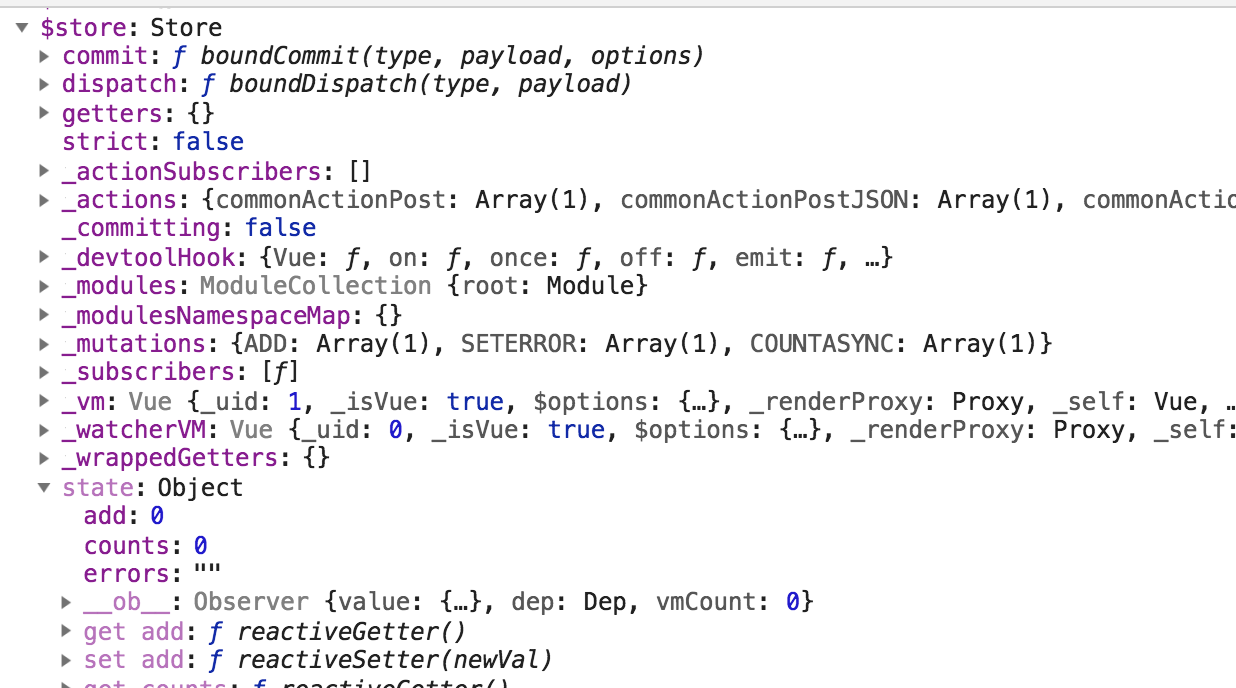
如果我们想获取add,或 count的时候,我们需要使用 this.store.state.add或this.store.state.add或this.store.state.count 这样的。
现在我们使用 mapState的话,代码就变成如下了:
<template>

  <div>

  </div>

</template>

<script type="text/javascript">

  import { mapState } from 'vuex';

  export default {

    data() {

      return {

      }

    },

    methods: {

    },

    computed: {

        ...mapState({

          add: state => state.add,

          counts: state => state.counts

        })

    },

    mounted() {

      console.log(this.add); // 打印出 0

      console.log(this.counts); // 打印 0

    }

  }

</script>
如上代码,我们使用 mapState工具函数会将store中的state映射到局部计算属性中。
我们在mounted方法内,直接使用 this.xx 即可使用到对应computed中对应的属性了。也就是 我们使用 this.add 就直接映射到 this.$store.state.add 了 。
当然mapState也可以接受一个数组,如下简单代码:
computed: {

  /*

  ...mapState({

    add: state => state.add,

    counts: state => state.counts

  })

  */

  ...mapState([

    'add',

    'counts'

  ])

},

mounted() {

  console.log(this);

}
然后我们再在控制台查看输出的this的值,如下:
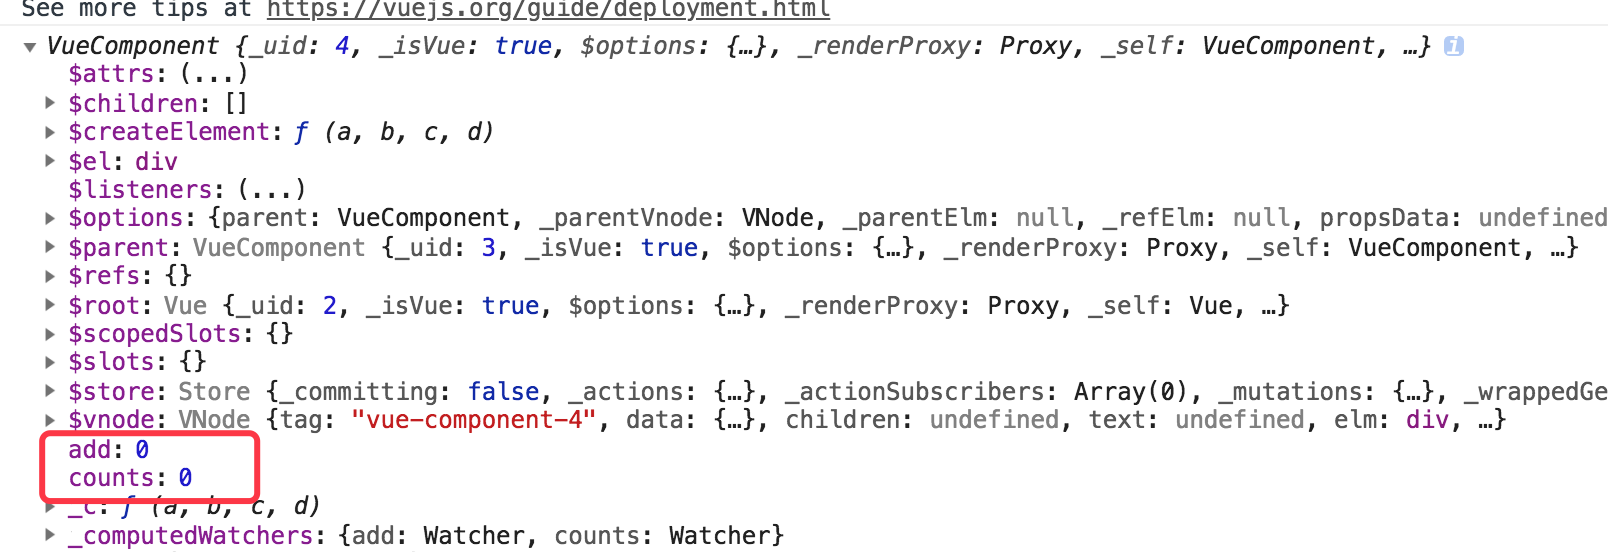
可以看到,接受数组也是可以的,在mounted生命周期内,我们直接可以使用 this.add 或 this.counts 可以获取到值了。
切记:mapState的属性的时候,一定要和state的属性值相对应,也就是说 state中定义的属性值叫add,那么mapState就叫add,如果我们改成add2的话,就获取不到add的值了,并且add2的值也是 undefined,如下所示: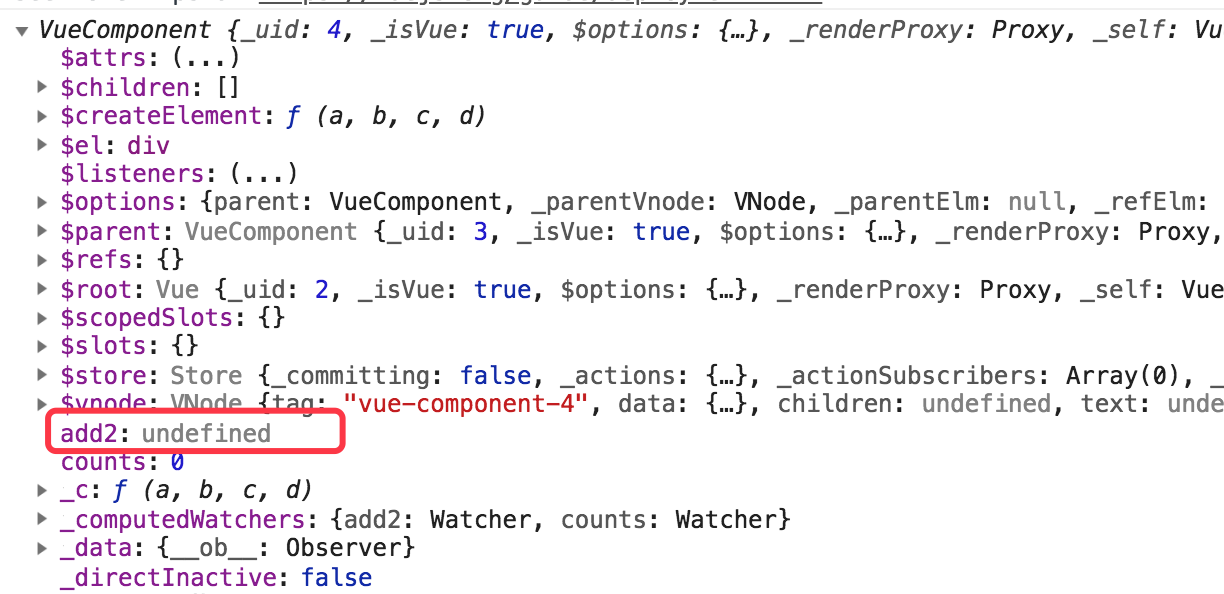
二:理解mapActions的使用
mapActions 的思想 和 mapState 一样的,下面我们直接看代码的使用方法哦,如下代码:
如果我们不使用 mapActions 的话,我们调用某个方法需要如下代码所示:
<template>

  <div></div>

</template>

<script type="text/javascript">

  export default {

    data() {

      return {

      }

    },

    created() {

      this.test();

    },

    methods: {

      test() {

        // 调用action 需要时使用 this.$store.dispatch 这样的

        Promise.all([this.$store.dispatch('commonActionGet', ['getPower', {}])]).then((res) =>{

        });

      }

    },

    computed: {

    },

    mounted() {

    }

  }

</script>
下面我们使用 mapActions的话,代码如下所示:
<template>

  <div>

  </div>

</template>

<script type="text/javascript">

  import { mapActions } from 'vuex';

  export default {

    data() {

      return {

      }

    },

    created() {

      this.test();

    },

    methods: {

      test() {

        // 调用

        Promise.all([this.commonActionGet(['getPower', {}])]).then((res) => {

        });

      },

      // mapActions 使用方法一 将 this.commonActionGet() 映射为 this.$store.dispatch('commonActionGet')

      ...mapActions(['commonActionGet', 'commonActionGetJSON', 'commonActionPost', 'commonActionPostJSON'])

      /*

       // 第二种方式

       ...mapActions({

         'commonActionGet': 'commonActionGet',

         'commonActionGetJSON': 'commonActionGetJSON',

         'commonActionPost': 'commonActionPost',

         'commonActionPostJSON': 'commonActionPostJSON'

       })

      */

    }

  }

</script>
三:理解 mapMutations 的使用。
首先我们不使用 mapMutations的话,调用mutations里面的方法,是如下代码:
<template>

  <div>

  </div>

</template>

<script type="text/javascript">

  export default {

    data() {

      return {

      }

    },

    created() {

      this.test();

    },

    methods: {

      test() {

        // 调用Mutations 需要时使用 this.$store.commit('ADD', 1) 这样的

        Promise.all([this.$store.commit('ADD', 1)]).then(() =>{

          console.log(this);

        });

      }

    }

  }

</script>
打印 如上 this代码后,看到如下图所示:
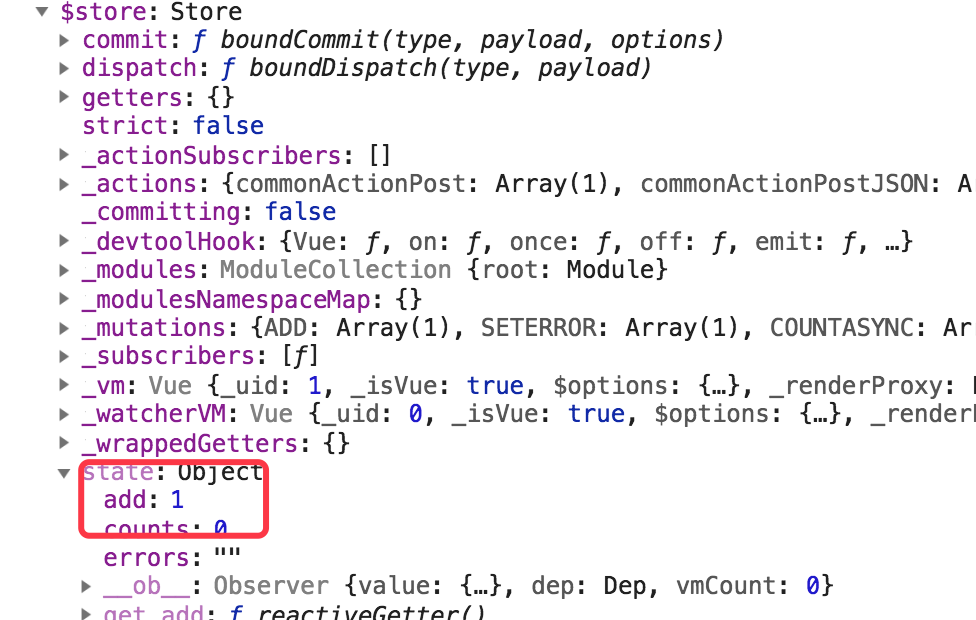
想获取值,使用 this.$store.state.add 就等于1了。
下面我们使用 mapMutations话,代码需要改成如下代码:
<template>

  <div>

  </div>

</template>

<script type="text/javascript">

  import { mapMutations } from 'vuex';

  export default {

    data() {

      return {

      }

    },

    created() {

      this.test();

    },

    methods: {

      test() {

        // 使用 mapMutations 调用方式如下:

        Promise.all([this.ADD(1)]).then(() => {

          console.log(this);

        });

      },

      /*

      // mapMutations 使用方法1

      ...mapMutations(['ADD']), // 会将 this.ADD 映射成 this.$store.commit('ADD')

      */

      // mapMutations 使用方法2

      ...mapMutations({

        'ADD': 'ADD'

      })

    }

  }

</script>
[转]理解Vuex的辅助函数mapState, mapActions, mapMutations用法的更多相关文章
- 理解Vuex的辅助函数mapState, mapActions, mapMutations用法
在讲解这些属性之前,假如我们项目的目录的结构如下: ### 目录结构如下: demo1 # 工程名 | |--- dist # 打包后生成的目录文件 | |--- node_modules # 所有的 ...
- vuex 的使用 mapState, mapGetters, mapMutations, mapActions
state => 基本数据getters => 从基本数据派生的数据mutations => 提交更改数据的方法,同步!actions => 像一个装饰器,包裹mutation ...
- vuex 源码:深入 vuex 之辅助函数 mapState
前言 当一个组件要获取多个 state 的时候,声明计算属性就会变得重复和冗余了.我们可以使用到辅助函数 mapState 来更快更简洁地生成计算属性. 所以我们得清楚,mapState 的作用就是帮 ...
- vuex之 mapState, mapGetters, mapActions, mapMutations 的使用
一.介绍 vuex里面的四大金刚:State, Mutations,Actions,Getters (上次记得关于vuex笔记 http://www.cnblogs.com/adouwt/p/8283 ...
- vuex中mapState、mapMutations、mapAction的理解
当一个组件需要获取多个状态时候,将这些状态都声明为计算属性会有些重复和冗余.为了解决这个问题,我们可以使用 mapState 辅助函数帮助我们生成计算属性. // 在单独构建的版本中辅助函数为 Vue ...
- Vue学习之--------深入理解Vuex之getters、mapState、mapGetters(2022/9/3)
这一篇博客的内容是在上一篇博客的基础上进行:深入理解Vuex.原理详解.实战应用 @ 目录 1.getters的使用 1.1 概念 1.2 用法 1.3 如何读取数据 2.getters在项目中的实际 ...
- 理解vuex的状态管理模式架构
理解vuex的状态管理模式架构 一: 什么是vuex?官方解释如下:vuex是一个专为vue.js应用程序开发的状态管理模式.它采用集中式存储管理应用的所有组件的状态,并以相应的规则保证以一种可预测的 ...
- vuex中辅助函数的使用方法
mapState import { mapState } from 'vuex' export default { // ... computed:{ ...mapState({ // 箭头函数可使代 ...
- Vue学习之--------深入理解Vuex之模块化编码(2022/9/4)
在以下文章的基础上 1.深入理解Vuex.原理详解.实战应用:https://blog.csdn.net/weixin_43304253/article/details/126651368 2.深入理 ...
随机推荐
- iview 多选下拉列表选项回显问题
如,简单的多选Select, <Select v-model="model" filterable clearable transfer multiple > < ...
- Integrated SOA Gateway 不是当前用户的有效责任。请联系您的系统管理员。
问题:给用户新增职责集成SOA网关,点击路径进入时出现报错:"Integrated SOA Gateway 不是当前用户的有效责任.请联系您的系统管理员." 解决:功能管理员职责, ...
- 3.kettle-定时执行任务
kettle定时任务可以 用两种方法. 第一种如下,但这种缺点也很明显,就是该job窗口不能关闭.(重复时间含义问题截图来自https://www.cnblogs.com/biehongli/p/10 ...
- Win10下免安装版MySQL5.7的安装和配置
1.MySQL5.7解压 2.新建配置文件my.ini放在D:\Free\mysql-5.7.26-winx64目录下 [mysql] # 设置mysql客户端默认字符集 default-charac ...
- 《linux就该这么学》课堂笔记10 SWAP、磁盘容量配额、软硬链接、RAID
1988年,加利福尼亚大学伯克利分校首次提出并定义了RAID技术的概念.RAID技术通过把多个硬盘设备组合成一个容量更大.安全性更好的磁盘阵列,并把数据切割成多个区段后分别存放在各个不同的物理硬盘设备 ...
- Httpd服务入门知识-正向代理和反向代理
Httpd服务入门知识-正向代理和反向代理 作者:尹正杰 版权声明:原创作品,谢绝转载!否则将追究法律责任. 一.正向代理和反向代理 启用反向代理 ProxyPass "/" &q ...
- Mock Server之flask_restful(python+flask)
一.结构设计 上一篇,写了Mock Server的基础实现与被测系统的对接 当我们要mock 的 api越来越多的时候,路由与相关的方法都堆在app.py中就不合适了,不可拔插,可读性也比较差,因此要 ...
- RIG exploit kit:恶意活动分析报告——像大多数exploit kit一样,RIG会用被黑的网站和恶意广告进行流量分发
RIG exploit kit:恶意活动分析报告 from:https://www.freebuf.com/articles/web/110835.html 在过去的几周里,我们曾撰文讨论过Neutr ...
- Java8新特性(1)—— Stream集合运算流入门学习
废话,写在前面 好久没写博客了,懒了,以后自觉写写博客,每周两三篇吧! 简单记录自己的学习经历,算是对自己的一点小小的督促! Java8的新特性很多,比如流处理在工作中看到很多的地方都在用,是时候扔掉 ...
- python应用-猜数字游戏
import random def main(): answer = random.randint(1, 100) counter = 0 while True: counter += 1 numbe ...