iOS开发15:自定义UITableViewCell
上篇文章介绍了如何用UITableView显示表格,并讲了几种UITableViewCell的风格。不过有时候我们需要自己定义 UITableViewCell的风格,其实就是向行中添加子视图。添加子视图的方法主要有两种:使用代码以及从.xib文件加载。当然后一种方法比较直 观。
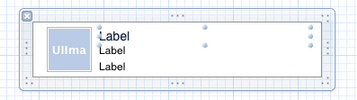
我们这次要自定义一个Cell,使得它像QQ好友列表的一行一样:左边是一张图片,图片的右边是三行标签:

当然,我们不会搞得这么复杂,只是有点意思就行。
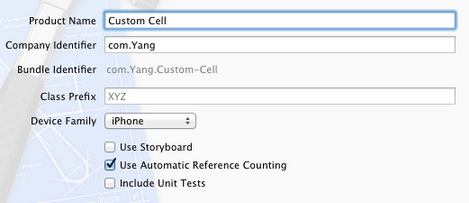
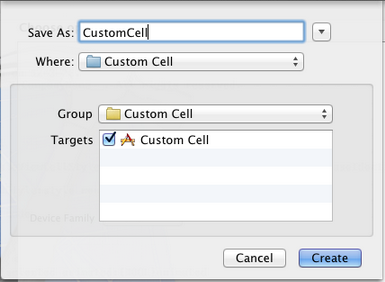
1、运行Xcode 4.2,新建一个Single View Application,名称为Custom Cell:
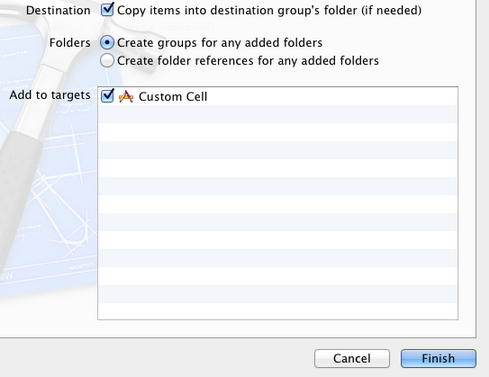
2、将图片资源导入到工程。为此,我找了14张50×50的.png图片,名称依次是1、2、……、14,放在一个名为Images的文件夹中。将此文件夹拖到工程中,在弹出的窗口中选中Copy items into…
添加完成后,工程目录如下:

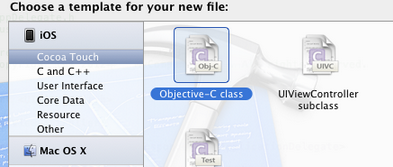
3、创建一个UITableViewCell的子类:选中Custom Cell目录,依次选择File — New — New File,在弹出的窗口,左边选择Cocoa Touch,右边选择Objective-C class:
单击Next,输入类名CustomCell,Subclass of选择UITableViewCell:

之后选择Next和Create,就建立了两个文件:CustomCell.h和CustomCell.m。
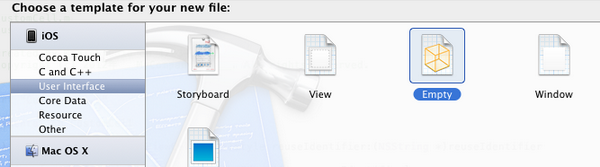
4、创建CustomCell.xib:依次选择File — New — New File,在弹出的窗口,左边选择User Interface,右边选择Empty:
单击Next,选择iPhone,再单击Next,输入名称为CustomCell,选择好位置:
单击Create,这样就创建了CustomCell.xib。
5、打开CustomCell.xib,拖一个Table View Cell控件到面板上:

选中新加的控件,打开Identity Inspector,选择Class为CustomCell;然后打开Size Inspector,调整高度为60。
6、向新加的Table View Cell添加控件:拖放一个ImageView控件到左边,并设置大小为50×50。然后在ImageView右边添加三个Label,设置标签字号,最上边的是14,其余两个是12:
接下来向CustomCell.h添加Outlet映射,将ImageView与三个Label建立映射,名称分别为imageView、nameLabel、decLabel以及locLable,分别表示头像、昵称、个性签名,地点。
选中Table View Cell,打开Attribute Inspector,将Identifier设置为CustomCellIdentifier:

为了充分使用这些标签,还要自己创建一些数据,存在plist文件中,后边会做。
7、打开CustomCell.h,添加属性:
@property (copy, nonatomic) UIImage *image;

@property (copy, nonatomic) NSString *name;

@property (copy, nonatomic) NSString *dec;

@property (copy, nonatomic) NSString *loc;
8、打开CustomCell.m,向其中添加代码:
8.1 在@implementation下面添加代码:
@synthesize image;

@synthesize name;

@synthesize dec;

@synthesize loc;
8.2 在@end之前添加代码:
- (void)setImage:(UIImage *)img {

    if (![img isEqual:image]) {

        image = [img copy];

        self.imageView.image = image;

    }

}

-(void)setName:(NSString *)n {

    if (![n isEqualToString:name]) {

        name = [n copy];

        self.nameLabel.text = name;

    }

}

-(void)setDec:(NSString *)d {

    if (![d isEqualToString:dec]) {

        dec = [d copy];

        self.decLabel.text = dec;

    }

}

-(void)setLoc:(NSString *)l {

    if (![l isEqualToString:loc]) {

        loc = [l copy];

        self.locLabel.text = loc;

    }

}
这相当于重写了各个set函数,从而当执行赋值操作时,会执行我们自己写的函数。
好了,现在自己定义的Cell已经可以使用了。
不过在此之前,我们先新建一个plist,用于存储想要显示的数据。建立plist文件的方法前面的文章有提到。我们建好一个friendsInfo.plist,往其中添加数据如下:

注意每个节点类型选择。
9、打开ViewController.xib,拖一个Table View到视图上,并将Delegate和DataSource都指向File’ Owner,就像上一篇文章介绍的一样。
10、打开ViewController.h,向其中添加代码:
#import <UIKit/UIKit.h>

@interface ViewController : UIViewController<UITableViewDelegate, UITableViewDataSource>

@property (strong, nonatomic) NSArray *dataList;

@property (strong, nonatomic) NSArray *imageList;

@end
11、打开ViewController.m,添加代码:
11.1 在首部添加:
#import "CustomCell.h"
11.2 在@implementation后面添加代码:
@synthesize dataList;

@synthesize imageList;
11.3 在viewDidLoad方法中添加代码:
- (void)viewDidLoad

{

    [super viewDidLoad];

    // Do any additional setup after loading the view, typically from a nib.

    //加载plist文件的数据和图片

    NSBundle *bundle = [NSBundle mainBundle];

    NSURL *plistURL = [bundle URLForResource:@"friendsInfo" withExtension:@"plist"];

    NSDictionary *dictionary = [NSDictionary dictionaryWithContentsOfURL:plistURL];

    NSMutableArray *tmpDataArray = [[NSMutableArray alloc] init];

    NSMutableArray *tmpImageArray = [[NSMutableArray alloc] init];

    for (int i=0; i<[dictionary count]; i++) {

        NSString *key = [[NSString alloc] initWithFormat:@"%i", i+1];

        NSDictionary *tmpDic = [dictionary objectForKey:key];

        [tmpDataArray addObject:tmpDic];

        NSString *imageUrl = [[NSString alloc] initWithFormat:@"%i.png", i+1];

        UIImage *image = [UIImage imageNamed:imageUrl];

        [tmpImageArray addObject:image];

    }

    self.dataList = [tmpDataArray copy];

    self.imageList = [tmpImageArray copy];

}
11.4 在ViewDidUnload方法中添加代码:
self.dataList = nil;

self.imageList = nil;
11.5 在@end之前添加代码:
#pragma mark -

#pragma mark Table Data Source Methods

- (NSInteger)tableView:(UITableView *)tableView numberOfRowsInSection:(NSInteger)section {

    return [self.dataList count];

}

- (UITableViewCell *)tableView:(UITableView *)tableView cellForRowAtIndexPath:(NSIndexPath *)indexPath {

    static NSString *CustomCellIdentifier = @"CustomCellIdentifier";

    static BOOL nibsRegistered = NO;

    if (!nibsRegistered) {

        UINib *nib = [UINib nibWithNibName:@"CustomCell" bundle:nil];

        [tableView registerNib:nib forCellReuseIdentifier:CustomCellIdentifier];

        nibsRegistered = YES;

    }

    CustomCell *cell = [tableView dequeueReusableCellWithIdentifier:CustomCellIdentifier];

    NSUInteger row = [indexPath row];

    NSDictionary *rowData = [self.dataList objectAtIndex:row];

    cell.name = [rowData objectForKey:@"name"];

    cell.dec = [rowData objectForKey:@"dec"];

    cell.loc = [rowData objectForKey:@"loc"];

    cell.image = [imageList objectAtIndex:row];

    return cell;

}

#pragma mark Table Delegate Methods

- (CGFloat)tableView:(UITableView *)tableView heightForRowAtIndexPath:(NSIndexPath *)indexPath {

    return 60.0;

}

- (NSIndexPath *)tableView:(UITableView *)tableView

  willSelectRowAtIndexPath:(NSIndexPath *)indexPath {

    return nil;

}
12、运行:

iOS开发15:自定义UITableViewCell的更多相关文章
- iOS开发UI篇—UITableviewcell的性能问题
iOS开发UI篇—UITableviewcell的性能问题 一.UITableviewcell的一些介绍 UITableView的每一行都是一个UITableViewCell,通过dataSource ...
- iOS开发UI篇—UITableviewcell的性能优化和缓存机制
iOS开发UI篇—UITableviewcell的性能问题 一.UITableviewcell的一些介绍 UITableView的每一行都是一个UITableViewCell,通过dataSource ...
- iOS开发之自定义表情键盘(组件封装与自动布局)
下面的东西是编写自定义的表情键盘,话不多说,开门见山吧!下面主要用到的知识有MVC, iOS开发中的自动布局,自定义组件的封装与使用,Block回调,CoreData的使用.有的小伙伴可能会问写一个自 ...
- 详解iOS开发之自定义View
iOS开发之自定义View是本文要将介绍的内容,iOS SDK中的View是UIView,我们可以很方便的自定义一个View.创建一个 Window-based Application程序,在其中添加 ...
- 【转】iOS 通过xib自定义UITableViewCell【原创】
原文网址:http://blog.it985.com/9683.html 在使用tableView的时候,如果cell的布局过于复杂,通过代码搭建的话不够直观.并且要不停的调整位置,字体什么的.这时, ...
- iOS学习之自定义UItableViewCell
在项目开发中,大部分情况下我们都需要自定义UITableViewCell, 今天就重点整理一下目前自己已经学过的自定义Cell的一些注意事项; 分步骤来写吧: 1.将自定义的Cell定义为属性; 2. ...
- 【Swift】IOS开发中自定义转场动画
在IOS开发中,我们model另外一个控制器的时候,一般都使用默认的转场动画. 其实我们可以自定义一些转场动画.达到不同的转场效果. 步骤如下:(photoBrowser是目标控制器) 1.在源控制器 ...
- iOS开发-UITableView自定义Cell
UITableView在iOS中开发的重要地位是毋庸置疑的,基本上应用中用到的比例是一半左右,而且大部分情况都是需要自定义单元格的,这样用户看到的App才能更有美感.之前写过UITableView的基 ...
- IOS开发之自定义系统弹出键盘上方的view(转载)
这篇文章解决的一个开发中的实际问题就是:当弹出键盘时,自定义键盘上方的view.目前就我的经验来看,有两种解决方法.一个就是利用UITextField或者UITextView的inputAccesso ...
随机推荐
- typescript语言
百度百科:2013年6月19日,在经历了一个预览版之后微软正式发布了正式版TypeScript 0.9
- Java服务器端消息队列实战
服务端口监听--报文接收--报文解码--业务处理--报文编码--写回客户端 从服务端与客户端成功握手并产生一个socket后,为了提高吞吐能力,接下来的事情就可以交给多线程去处理. 为了对接入的请求做 ...
- ES6 Destructuring Assignment All In One
ES6 Destructuring Assignment All In One ES6 & Destructuring Assignment Axios, vue https://develo ...
- MVC4.0 bug 神奇的是事情 bool 值变成了 onclick ,非常奇怪的
foreach (var item in ViewBag.PhotoGroupList) { // 这里很奇怪 item.IS_DISPLAY 是布尔值 如果直接写 @item.IS_DISPLAY ...
- EXTJS4.0 grid 可编辑模式 配置
首先配置这个参数 plugins:[//插件 Ext.create("Ext.grid.plugin.CellEditing",{ clicksToEdit:1//单元格 点一下就 ...
- Codeforces 672D Robin Hood(二分好题)
D. Robin Hood time limit per test 1 second memory limit per test 256 megabytes input standard input ...
- [codeforces] 97B Superset || 平面分治
原题 给出一个平面的一些点,让你添加点,使得所有点对满足以下三个要求中的一个: 1.在一个水平面上 2.在一个竖直线上 3.以这两个点为对角的矩形内包含有其他点 输出一种可行解 因为只需要可行解,且只 ...
- BZOJ2535 [Noi2010]Plane 航空管制 【贪心 + 堆】
题目链接 BZOJ2535 题解 航班之间的关系形成了一个拓扑图 而且航班若要合法,应尽量早出发 所以我们逆拓扑序选点,能在后面出发的尽量后面出发,不会使其它点变得更劣,容易知是正确的 第二问只需枚举 ...
- 交叉编译HTOP并移植到ARM嵌入式Linux系统
原创作品,允许转载,转载时请务必以超链接形式标明文章.作者信息和本声明,否则将追究法律责任. 最近一直在完善基于Busybox做的ARM Linux的根文件系统,由于busybox是一个精简的指令集组 ...
- 【POJ 2976 Dropping tests】
Time Limit: 1000MSMemory Limit: 65536K Total Submissions: 13849Accepted: 4851 Description In a certa ...