
云中树莓派(4):利用声音传感器控制Led灯
云中树莓派(2):将传感器数据上传到AWS IoT 并利用Kibana进行展示
云中树莓派(3):通过 AWS IoT 控制树莓派上的Led
1. 声音传感器及其配置
声音传感器如下图所示:
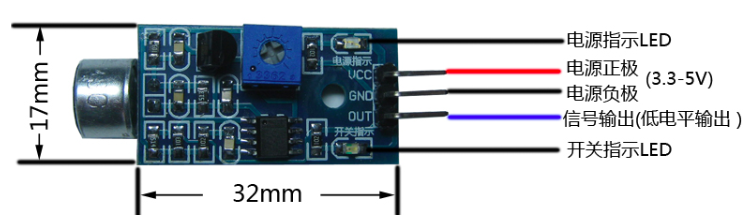
将 VCC 引脚接入树莓派 5V 引脚,将 GND 引脚接入树莓派 GND 引脚,将 OUT 引脚接入树莓派 GPIO20。
要注意,模块在环境声音强度达不到设定阈值时,OUT输出高电平(1),当外界环境声音强度超过设定阈值时,模块OUT输出低电平(0)。
2. GPIO Event 机制
树莓派提供了三种电信号事件反馈机制。
(1)GPIO.wait_for_edge:直接等待电信号达到某种条件(升高还是降低或者任意),并且可以设置超时时间。在超时时间内,函数会一直等待,直到期望的电信号改变出现,或者超时。
# wait for up to 5 seconds for a rising edge (timeout is in milliseconds)

channel = GPIO.wait_for_edge(channel, GPIO_RISING, timeout=5000)

if channel is None:

    print('Timeout occurred')

else:

    print('Edge detected on channel', channel)
(2)GPIO.add_event_detect:设置事件触发检测,一旦检测到,会返回True。
GPIO.add_event_detect(channel, GPIO.RISING)  # add rising edge detection on a channel

do_something()

if GPIO.event_detected(channel):

    print('Button pressed')
(3)GPIO.add_event_detect:回调函数机制。注册回调函数,一旦指定事件触发,回调函数会被调用。
def my_callback(channel):

    print('This is a edge event callback function!')

    print('Edge detected on channel %s'%channel)

    print('This is run in a different thread to your main program')

GPIO.add_event_detect(channel, GPIO.RISING, callback=my_callback)  # add rising edge detection on a channel
3. 利用声音检查模块控制Led灯
实现目标:当检测到声音时,改变Led 灯的状态。
3.1 代码
import RPi.GPIO as GPIO

import time

from time import sleep

SOUND_PIN_NUM = 20 #声音模块的输出引脚接的GPIO

LED_PIN_NUM = 26   #LED 的长脚接的GPIO

state = 0  #保存led 的状态

timeLast = time.time()  #保存上次触发的时间

# in one sounding, the callback function will be invoked for a few times, so need wait for some time to

validDuration = 0.1

GPIO.setmode(GPIO.BCM)

GPIO.setup(SOUND_PIN_NUM, GPIO.IN)

GPIO.setup(LED_PIN_NUM, GPIO.OUT)

def callback_fun_soundOccurred(input_pint):

    global timeLast

    timeNow = time.time()

    duration = timeNow - timeLast

    if (duration < validDuration):

        print("ignored because duration " + str(duration) + " is too short")

        timeLast = timeNow

        return

    print("accepted for valid duration " + str(duration))

    timeLast = timeNow

    switchLed()

def switchLed():

    global state

    if (state):

      turnOffLed()

      state = 0

    else:

      turnOnLed()

      state = 1

def turnOnLed():

    print("Turn on")

    GPIO.output(LED_PIN_NUM,GPIO.HIGH)

def turnOffLed():

    print("Turn off")

    GPIO.output(LED_PIN_NUM, GPIO.LOW)

GPIO.add_event_detect(SOUND_PIN_NUM, GPIO.RISING, callback=callback_fun_soundOccurred)

try:

    while True:

        sleep(0.1)

except KeyboardInterrupt:

    GPIO.remove_event_detect(SOUND_PIN_NUM)

    GPIO.cleanup()
3.2 两个小技巧
(1)尽管一个只需要一块五毛钱,但声音检测模块的灵敏度是可以调节的。使用螺丝刀转动上面的旋钮,边转变说话,看其开关指示灯的反应,亮表示检测到声音,亮度表示声音大小。旋到合适的位置即可。默认时,它非常灵敏,任何细小的声音都会触发它。
(2)在一句话说话过程中,回调函数会被触发好多次。因此,需要的话,如上面代码,可以计算两次调用之间的事件间隔,把太短的间隔过滤掉。下面是一句短话过程中函数被触发的情况:
ignored because duration 0.000501155853271 is too short

ignored because duration 0.000110864639282 is too short

ignored because duration 0.00215411186218 is too short

ignored because duration 0.000218868255615 is too short

ignored because duration 0.000470161437988 is too short

ignored because duration 0.000167846679688 is too short

ignored because duration 0.000583171844482 is too short

ignored because duration 0.000425815582275 is too short

ignored because duration 0.0010621547699 is too short

ignored because duration 0.000314950942993 is too short

ignored because duration 0.000555038452148 is too short

ignored because duration 0.000130891799927 is too short

ignored because duration 0.000461101531982 is too short

ignored because duration 0.00022292137146 is too short

ignored because duration 0.00274705886841 is too short

ignored because duration 0.000133037567139 is too short

ignored because duration 0.00597095489502 is too short

ignored because duration 0.000155925750732 is too short

ignored because duration 0.00107598304749 is too short

ignored because duration 0.000198125839233 is too short
参考链接:
- https://raspi.tv/2013/how-to-use-interrupts-with-python-on-the-raspberry-pi-and-rpi-gpio-part-2
- https://sourceforge.net/p/raspberry-gpio-python/wiki/Inputs/
欢迎大家关注我的个人公众号:

云中树莓派(4):利用声音传感器控制Led灯的更多相关文章
- 树莓派开机运行Python脚本 控制LED灯闪烁
一.新建一个开机运行文件 在 /home/pi/.config 下创建一个文件夹,名称为 autostart,并在该文件夹下创建一个led.desktop文件(文件名以.desktop结尾) 编辑le ...
- C#与Arduino通过串口通信来控制LED灯的状态
一.引言 最近摆弄了一段时间的Arduino,发现Arduino做一些电子类项目.监控.机器人.电子玩具比较容易,并且Arduino与.NET程序集成也不难.接下来介绍一个简单的小程序,C#做的一个W ...
- 嵌入式Linux学习入门:控制LED灯
记录自己linux学习过程,让自己能够一直坚持下去 1.原理图分析: nLED_1, nLED_2, nLED_4, 给低电平则对应LED灯亮,高电平则对应LED灯灭, S3C2440芯片GPF4-G ...
- arduino 红外遥控器控制LED灯
/* 日期:2016.9.1 功能:红外遥控器控制LED灯 开,关,闪烁,呼吸 元件: 跳线公公头 * 5 led 220欧电阻 红外接收管,红外遥控 接线: 红外灯面向自己从左到右分别接 IO3 , ...
- arduino入门学习实现语音控制LED灯
需要的准备的硬件arduino+PC+麦克风实现语音命令控制LED灯的亮灭. 首先需要将写好的arduino程序烧录到arduino uno主板中,下面是代码如下: int val;//定义变量val ...
- BLE 安卓APP控制LED灯的实现(转)
源:BLE 安卓APP控制LED灯的实现 //注:参考AmoMcu源代码修改. 打开APP,检查蓝牙是否打开 BluetoothAdapter mBluetoothAdapter; final Blu ...
- enc28J60 网页控制LED灯
软件IDE:Arduino 1.6.3 1.库的安装: 从https://github.com/jcw/ethercard 下载源码包,解压,复制ethercard-master文件夹到Arduino ...
- Arduino控制LED灯(开关控制)
问题:当使用"digitalRead(BUT) == 1"控制LED灯时会出现"digitalWrite(LED, ledState);"的值出现跳动. 原因: ...
- 树莓派 使用python来操作GPIO 控制LED灯
一.创建python驱动和控制GPIO 先新建一个文件夹用于放置脚本 mkdir python_gpio 进入文件夹内新建一个gpio_blink.py的脚本 cd python_gpio touch ...
随机推荐
- time,datetime模块
time & datetime 模块 在平常的代码中,我们常常需要与时间打交道.在Python中,与时间处理有关的模块就包括:time,datetime,calendar(很少用,不讲),下面 ...
- java依赖注入(injection)
和SpringSource分别通过其开源项目Guice及Spring Framework提供了依赖注入的功能.然而直到现在开发者也没有一种标准的.独立于供应商的方式从而无需修改其源文件就能在这些框架之 ...
- 数字int字符串str(深入学习)
数字int字符串str 查看一个对象的类 如:如查看对象变量a是什么类 用到函数type(),函数值是要查看的对象变量 1 #!/usr/bin/env python 2 # -*- ...
- hdu4705 Y 树形DP
给出一颗数,求没有一条路径穿过的节点三元集合个数. 这样的三元集合呈现Y字形,求出反面情况,三点为子节点和两个祖先节点,或一个祖先节点与它子树中非父子关系的节点.可由树形DP求得. #pragma c ...
- 【HAOI2012】容易题
终于自己做出一道题了quq 原题: 为了使得大家高兴,小Q特意出个自认为的简单题(easy)来满足大家,这道简单题是描述如下:有一个数列A已知对于所有的A[i]都是1~n的自然数,并且知道对于一些A[ ...
- 黑马-Spring(IOC&DI) AOP
IOC(控制翻转) 概念 把对象的创建.初始化.销毁等工作交给spring容器来做 案例 环境 步骤 1. 写一个HelloWorld类 2. 写一个配置文件 把hello类放到spring容 ...
- nginx常用参数设置
1)隐藏nginx header 版本号 使用curl -I http://www.10.0.3.46 会发现server那里显示版本号 在nginx.conf的http里添加参数server_tok ...
- 获取和设置用户id以及组id
#include<unistd.h> uid_t getuid(void); uid_t geteuid(void);//获取有效用户id gid_t getgid(void); gid_ ...
- JDBC事务的处理-----模拟银行转账业务
定义: 数据库事务(简称:事务)是数据库管理系统执行过程中的一个逻辑单位,由一个有限的数据库操作序列构成. 概要: 一个数据库事务通常包含了一个序列的对数据库的读/写操作.它的存在包含有以下两个目的: ...
- Compoxure example 应用说明
Compoxure 官方提供了一个demo应用,包含了cache,error,layout 等功能 环境准备 demo 使用docker-compose 运行 clone 代码 git clone h ...