unittest多线程生成报告-----BeautifulReport
原文地址https://www.cnblogs.com/yoyoketang/p/8404204.html
前言
selenium多线程跑用例,这个前面一篇已经解决了,如何生成一个测试报告这个是难点,刚好在github上有个大神分享了BeautifulReport,完美的结合起来,就能生成报告了。
环境必备:
- python3.6 : BeautifulReport不支持2.7
- tomorrow : pip install tomorrow安装
- BeautifulReport : github下载后放到/Lib/site-packages/目录下
BeautifulReport
1.BeautifulReport下载地址:BeautifulReport
2.下载方法:
- 方法一 会使用git的直接用git下载到本地
- git clone https://github.com/TesterlifeRaymond/BeautifulReport

- 方法二 点Clone or Download按钮,Download ZIP就能下载到本地了


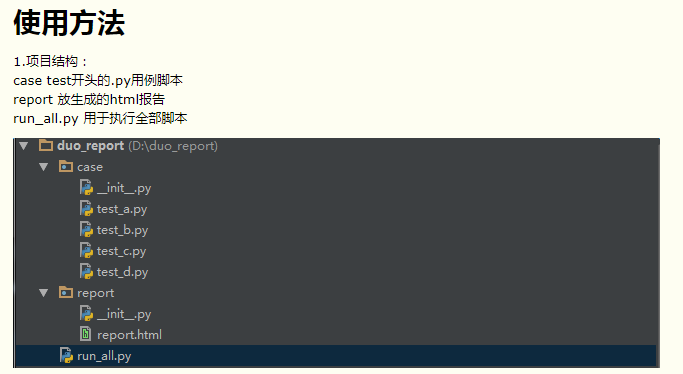
2.单个测试脚本test_a.py参考
# coding:utf-8

import unittest

from selenium import webdriver

import time

class Testaa(unittest.TestCase):

    u'''测试用例a的集合'''

    @classmethod

    def setUpClass(cls):

        cls.driver = webdriver.Firefox()

    def setUp(self):

        self.driver.get("https://www.cnblogs.com/yoyoketang/")

    def test_01(self):

        u'''用例1:用例1的操作步骤'''

        t = self.driver.title

        print(t)

        self.assertIn("悠悠", t)

    def test_02(self):

        u'''用例2:用例2的操作步骤'''

        t = self.driver.title

        print(t)

        self.assertIn("悠悠", t)

    def test_03(self):

        u'''用例3:用例3的操作步骤'''

        t = self.driver.title

        print(t)

        self.assertIn("悠悠", t)

    @classmethod

    def tearDownClass(cls):

        cls.driver.quit()

if __name__ == "__main__":

    unittest.main()
3.run_all代码
# coding=utf-8

import unittest

from BeautifulReport import BeautifulReport

import os

from tomorrow import threads

# 获取路径

curpath = os.path.dirname(os.path.realpath(__file__))

casepath = os.path.join(curpath, "case")

if not os.path.exists(casepath):

    print("测试用例需放到‘case’文件目录下")

    os.mkdir(casepath)

reportpath = os.path.join(curpath, "report")

if not os.path.exists(reportpath): os.mkdir(reportpath)

def add_case(case_path=casepath, rule="test*.py"):

    '''加载所有的测试用例'''

    discover = unittest.defaultTestLoader.discover(case_path,

                                                  pattern=rule,

                                                  top_level_dir=None)

    return discover

@threads(3)

def run(test_suit):

    result = BeautifulReport(test_suit)

    result.report(filename='report.html', description='测试deafult报告', log_path='report')

if __name__ == "__main__":

    # 用例集合

    cases = add_case()

    print(cases)

    for i in cases:

        print(i)

        run(i)
4.报告效果图
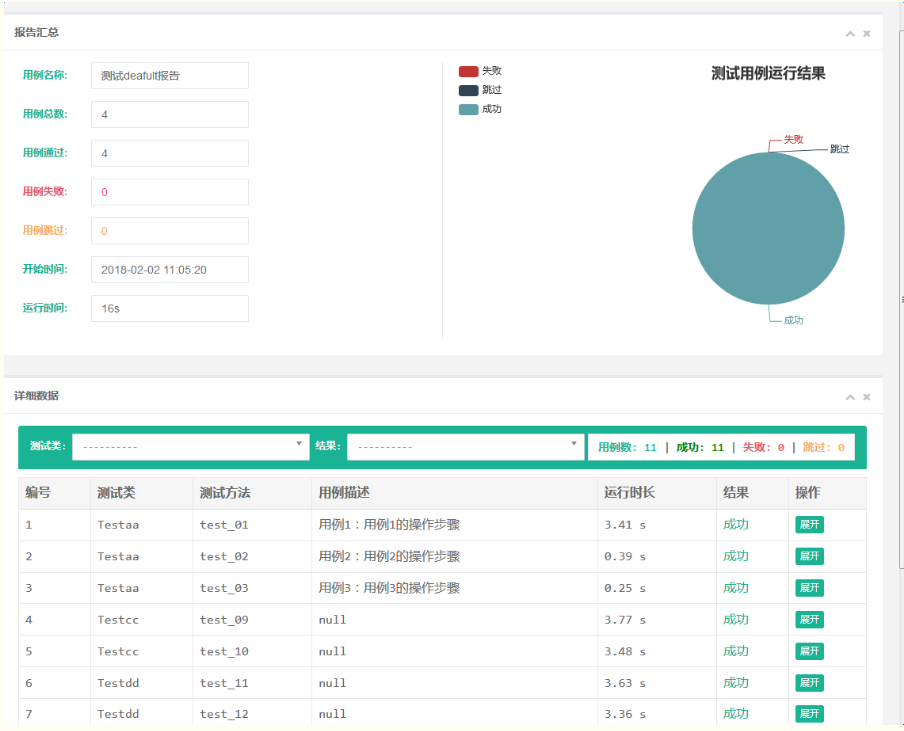
备注:BeautifulReport是某大神在github分享的框架,这里借花献佛了,更多使用方法参考地址:https://github.com/TesterlifeRaymond/BeautifulReport
BeautifulReport下载地址:
https://pan.baidu.com/disk/home#/all?vmode=list&path=%2Fpython%E6%8E%A5%E5%8F%A3%E8%87%AA%E5%8A%A8%E5%8C%96--unittest--beautifulReport
unittest多线程生成报告-----BeautifulReport的更多相关文章
- unittest多线程生成报告(BeautifulReport)
前言 selenium多线程跑用例,这个前面一篇已经解决了,如何生成一个测试报告这个是难点,刚好在github上有个大神分享了BeautifulReport,完美的结合起来,就能生成报告了. 环境必备 ...
- selenium+python自动化91-unittest多线程生成报告(BeautifulReport)
前言 selenium多线程跑用例,这个前面一篇已经解决了,如何生成一个测试报告这个是难点,刚好在github上有个大神分享了BeautifulReport,完美的结合起来,就能生成报告了. 环境必备 ...
- selenium+python-unittest多线程生成报告
前言 selenium多线程跑用例,这个前面一篇已经解决了,如何生成一个测试报告这个是难点,刚好在github上有个大神分享了BeautifulReport,完美的结合起来,就能生成报告了. 环境必备 ...
- Python-Unittest多线程生成报告
前言 selenium多线程跑用例,这个前面一篇已经解决了,如何生成一个测试报告这个是难点,刚好在github上有个大神分享了BeautifulReport,完美的结合起来,就能生成报告了. 环境必备 ...
- unittest自动化测试举例:自动读取ymal用例&调用接口并生成报告
用unittest框架写的接口自动化实现过程: 1.编写ymal格式用例: 2.导入ddt模块,该模块的主要功能是帮你读取ymal用例文件,自动获取内容并循环调用函数,具体见代码. 3.导入Beaut ...
- unittest框架,漂亮的报告BeautifulReport配置与错误截图详细解说
1.下载BeautifulReport模块 下载地址:https://github.com/TesterlifeRaymond/BeautifulReport 2.解压与存放路径 下载Beautifu ...
- 『心善渊』Selenium3.0基础 — 29、使用HTMLTestRunner生成unittest的HTML报告
目录 1.HTMLTestRunner介绍 2.HTMLTestRunner的使用 3.测试报告示例 4.封装成模块 1.HTMLTestRunner介绍 HTMLTestRunner是一个基于uni ...
- selenium,unittest——自动化执行多个py文件脚本并生成报告
将多个py文件的自动化脚本顺序运行,并生成报告,运行run_all_case后会自动运行文件内所有test开头的py文件并在指定文件夹report生成由脚本时间命名的报告 脚本执行后结果: 生成报告并 ...
- day11_单元测试_读取yaml文件中的用例,自动获取多个yaml文件内容执行生成报告
一.使用.yaml格式的文件直接可以存放字典类型数据,如下图,其中如果有-下一行有缩进代表这是个list,截图中是整体是一个list,其中有两部分,第二部分又包含另外一个list 二.单元测试:开发自 ...
随机推荐
- secureCRT修改背景色、字体颜色
参考: http://blog.csdn.net/jediael_lu/article/details/37729465 http://blog.csdn.net/dagefeijiqumeiguo/ ...
- 质量团队在VUCA时代如何走?
如今,VUCA时代已到来.在VUCA时代(易变性volatility.不确定性uncertainty.复杂性complexity.模糊性ambiguity),面对外部环境的复杂和不确定性,测试圈是否已 ...
- SMB服务简介
1.Samba简介 Samba是种自由软件,用来让UNIX系列的操作系统与微软Windows操作系统的SMB/CIFS(Server Message Block/Common Internet F ...
- elasticsearch 安装配置详解
一.安装 简单的安装与启动于前文ElasticSearch初探(一)已有讲述,这里不再重复说明. 二.启动 1.自带脚本启动 1)bin/elasticsearch,不太任何参数,默认在前端启动 2) ...
- Python爬虫加速神器的小试
大名鼎鼎的aiohttp,相信如果你学习Python或者爬虫的时候,肯定听说过这个东西.没听过也不要紧,今天看完文章,只要记住,aiohttp这个东西,在写爬虫的时候,很牛逼就行了. aiohttp ...
- UI自动化遇到的问题
1.找不到元素:查看是否有[frame]或者[iframe]元素 2.click无响应:1)使用sendkeys(Keys.Enter) 还是无响应:使用js定位 3.弹框处理: 确认:switcht ...
- idea的基本使用
对于Idea没有workspace的概念,但是它把每个项目都看成是maven的一个模块,在一个idea窗口要想显示多个项目时就和eclipse不太一样,下面会详细介绍. 另外maven的setting ...
- 20165336 2017-2018-2 《Java程序设计》第5周学习总结
20165336 2017-2018-2 <Java程序设计>第5周学习总结 教材学习内容总结 内部类的类体中不可以声明类变量和类方法. 内部类仅供他的外嵌类使用,其他类不可以用某个类的内 ...
- 基于Gogs+Drone搭建的私有CI/CD平台
请移步 基于Gogs+Drone搭建的私有CI/CD平台
- 对vue生命周期的理解
总共分为8个阶段,创建前/后,载入前/后,更新前/后,销毁前/后: 创建前/后:在beforeCreated阶段,vue实例的挂载元素$el和数据对象data都为undefined,还未初始化.在cr ...