TensorRT学习总结
--- 如何安装
https://docs.nvidia.com/deeplearning/sdk/tensorrt-install-guide/index.html#installing
tensorrt安装后的so如下图所示.所以一台机器只能有一个版本的tensorrt.

TensorRT是什么
建议先看看这篇https://zhuanlan.zhihu.com/p/35657027
深度学习
- 训练
- 部署
平常自学深度学习的时候关注的更多是训练的部分,即得到一个模型.而实际工作很大一块的工作内容集中于如何将模型部署到具体的芯片上.你自己写的模型效果是很难优于成熟的知名的模型的.
以无人驾驶为例,拍摄到图片后,芯片上的加载的模型要能够识别出图片里是什么.对自动驾驶这种场景而言,对实时性地要求是非常高的.试想,从图片输入到模型,到模型识别出图片中前方有个人花了1分钟,你正以100km/h行驶,后果自然是灾难性的.
这就引出了推理引擎.model里的信息其实就是一些权重矩阵信息而已.输入图片数据后,进行一大堆的矩阵运算,得到最终图片的分类.推理引擎干的事情就是优化矩阵运算,缩短运算时间.

CUDA cuDNN
https://blog.csdn.net/u014380165/article/details/77340765
- CUDA是NVIDIA推出的用于自家GPU的并行计算框架,也就是说CUDA只能在NVIDIA的GPU上运行,而且只有当要解决的计算问题是可以大量并行计算的时候才能发挥CUDA的作用
- cuDNN(CUDA Deep Neural Network library):是NVIDIA打造的针对深度神经网络的加速库,是一个用于深层神经网络的GPU加速库。如果你要用GPU训练模型,cuDNN不是必须的,但是一般会采用这个加速库
查看TensorRT版本
dpkg -l | grep TensorRT
convert_to_uff安装在哪里?

使用TensorRT推导SSD网络
以下是TensorRT中自带的一个例子
The sampleUffSSD example is based on the following paper, SSD: Single Shot MultiBox

Detector (https://arxiv.org/abs/1512.02325). The SSD network performs the

task of object detection and localization in a single forward pass of the network.

The tensorflow SSD network was trained on the InceptionV2 architecture using

the MSCOCO dataset.

The sample makes use of TensorRT plugins to run the SSD network. To use these

plugins the TensorFlow graph needs to be preprocessed.

Steps to generate UFF file:

    0. Make sure you have the UFF converter installed. For installation instructions, see:

        https://docs.nvidia.com/deeplearning/sdk/tensorrt-api/#python and click on the 'TensorRT Python API' link.

    1. Get the pre-trained Tensorflow model (ssd_inception_v2_coco) from:

        http://download.tensorflow.org/models/object_detection/ssd_inception_v2_coco_2017_11_17.tar.gz

    2. Call the UFF converter with the preprocessing flag set (-p [config_file]).

        The config.py script specifies the preprocessing operations necessary for SSD TF graph.

        It must be copied to the working directory for the file to be imported properly.

        The plugin nodes and plugin parameters used in config.py should match the registered plugins

        in TensorRT. Please read the plugins documentation for more details.

        'convert-to-uff --input-file frozen_inference_graph.pb -O NMS -p config.py'

This script saves the converted .uff file in the same directory as the input with

the name frozen_inference_graph.pb.uff. Copy this converted .uff file to the

data directory as sample_ssd_relu6.uff <TensorRT Install>/data/ssd/sample_ssd_relu6.uff

The sample also requires a labels .txt file with a list of all labels used to

train the model. Current example for this network is <TensorRT Install>/data/ssd/ssd_coco_labels.txt

Steps to run the network:

    1. To run the network in FP32 mode, ./sample_uff_ssd

    2. To run the network in INT8 mode, ./sample_uff_ssd --int8

To run the network in INT8 mode, refer to BatchStreamPPM.h for details on how

calibration can be performed. Currently we require a file (list.txt) with

a list of all PPM images for calibration in the <TensorRT Install>/data/ssd/ folder.

The PPM images to be used for calibration can also reside in the same folder.

NOTE - There might be some precision loss when running the network in INT8

mode causing some objects to go undetected. Our general observation is that

\>500 images is a good number for calibration purposes.
Python API
- Graph Surgeon API
- UFF API
Included within the Python API is the UFF API; a package that contains a set of utilities to convert trained models from various frameworks to a common format.
The UFF API is located in uff/uff.html and contains two conversion type tool classes called Tensorflow Modelstream to UFF and Tensorflow Frozen Protobuf Model to UFF.
TensorRT的python_api地址:https://docs.nvidia.com/deeplearning/sdk/tensorrt-api/python_api/index.html
官方的readme是有问题的.
'convert-to-uff --input-file frozen_inference_graph.pb -O NMS -p config.py'
**开始排坑之旅! **
convert-to-uff并不是一个二进制文件,而是一个.py脚本. 位置在/usr/lib/python2.7/dist-packages/uff/bin/convert_to_uff.py,
/usr/lib/python3.6/dist-packages/uff/bin
具体参见这个https://devtalk.nvidia.com/default/topic/1025246/jetson-tx2/where-is-convert-to-uff/2
以及下面link中'3.2.4. Importing From TensorFlow Using Python'
https://docs.nvidia.com/deeplearning/sdk/tensorrt-developer-guide/index.html#python_samples_section
运行脚本,提示
Traceback (most recent call last):

  File "/usr/lib/python2.7/dist-packages/uff/bin/convert_to_uff.py", line 15, in <module>

    import uff

  File "/usr/lib/python2.7/dist-packages/uff/__init__.py", line 1, in <module>

    from uff import converters, model  # noqa

  File "/usr/lib/python2.7/dist-packages/uff/model/__init__.py", line 1, in <module>

    from . import uff_pb2 as uff_pb  # noqa

  File "/usr/lib/python2.7/dist-packages/uff/model/uff_pb2.py", line 6, in <module>

    from google.protobuf.internal import enum_type_wrapper

ImportError: No module named google.protobuf.internal
安装protobuf.ubuntu18.04默认是没安装pip的.要先装pip.
- sudo apt update
- sudo apt install python-pip
- pip install protobuf
再次执行脚本,报错
Traceback (most recent call last):

  File "/usr/lib/python2.7/dist-packages/uff/bin/convert_to_uff.py", line 15, in <module>

    import uff

  File "/usr/lib/python2.7/dist-packages/uff/__init__.py", line 2, in <module>

    from uff.converters.tensorflow.conversion_helpers import from_tensorflow  # noqa

  File "/usr/lib/python2.7/dist-packages/uff/converters/tensorflow/conversion_helpers.py", line 12, in <module>

    from .converter_functions import *  # noqa

  File "/usr/lib/python2.7/dist-packages/uff/converters/tensorflow/converter_functions.py", line 12, in <module>

    from uff.converters.tensorflow.converter import TensorFlowToUFFConverter as tf2uff

  File "/usr/lib/python2.7/dist-packages/uff/converters/tensorflow/converter.py", line 24, in <module>

    https://www.tensorflow.org/install/""".format(err))

ImportError: ERROR: Failed to import module (No module named tensorflow)

Please make sure you have TensorFlow installed.
安装tensorflow
pip install tensorflow-gpu

Collecting tensorflow-gpu

  Could not find a version that satisfies the requirement tensorflow-gpu (from versions: )

No matching distribution found for tensorflow-gpu
https://www.tensorflow.org/install/pip?lang=python2
尝试用以下方式安装
pip install --upgrade https://storage.googleapis.com/tensorflow/linux/gpu/tensorflow_gpu-1.12.0-cp27-none-linux_x86_64.whl
再次报错!
tensorflow_gpu-1.12.0-cp27-none-linux_x86_64.whl is not a supported wheel on this platform.
nvidia官方提供了官方说明,如何install TensorFlow for Jetson Platform
https://docs.nvidia.com/deeplearning/dgx/install-tf-xavier/index.html
- sudo apt-get install libhdf5-serial-dev hdf5-tools
- sudo apt-get install python3-pip
- pip3 install -U pip
- sudo apt-get install zlib1g-dev zip libjpeg8-dev libhdf5-dev
- sudo pip3 install -U numpy grpcio absl-py py-cpuinfo psutil portpicker grpcio six mock requests gast h5py astor termcolor
又报错!!!
nano@nano-desktop:/usr/src/tensorrt/samples/sampleUffSSD$ sudo pip3 install -U numpy grpcio absl-py py-cpuinfo psutil portpicker grpcio six mock requests gast h5py astor termcolor

Traceback (most recent call last):

  File "/usr/bin/pip3", line 9, in <module>

    from pip import main

ImportError: cannot import name 'main'
搜索了一大圈,说啥的都有.应该是pip本身的bug.
https://stackoverflow.com/questions/54420766/python3-6-importerror-cannot-import-name-main-after-upgrading-pip-from-8-1-1
将pip3 install替换成python3 -m pip install.
或者按照有的文章里说的比如这篇https://blog.csdn.net/zong596568821xp/article/details/80410416去修改试一下/usr/bin/pip3.
- sudo python3 -m pip install -U numpy grpcio absl-py py-cpuinfo psutil portpicker grpcio six mock requests gast h5py astor termcolor
这一步要耐心的多尝试几次,动不动就http连接失败,即便我已经用代理翻墙的情况下也是如此.
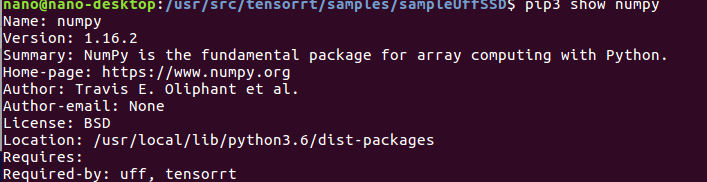
查看包安装到了什么位置:pip show命令
这里自己打开那个http地址看一下.官方文档里的版本1.12.0不存在.
- pip3 install --extra-index-url https://developer.download.nvidia.com/compute/redist/jp/v42 tensorflow-gpu==1.13.1+nv19.3
等待一段时间.会自动卸载掉之前安装的版本过低的protobuf,重新安装符合要求的protobuf.
Successfully installed keras-applications-1.0.7 keras-preprocessing-1.0.9 markdown-3.1 protobuf-3.7.1 tensorboard-1.13.1 tensorflow-estimator-1.13.0 tensorflow-gpu-1.13.1+nv19.3 werkzeug-0.15.2
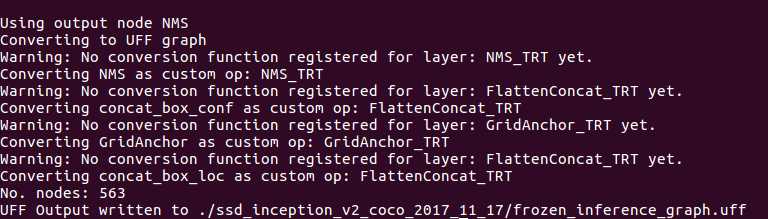
把.pb格式的模型转换为uff格式(TensorRT可以识别的格式)
python3 /usr/lib/python3.6/dist-packages/uff/bin/convert_to_uff.py --input-file ./ssd_inception_v2_coco_2017_11_17/frozen_inference_graph.pb -O NMS -p config.py
运行ssd模型
#拷贝uff模型文件到data/ssd下
cp ./ssd_inception_v2_coco_2017_11_17/frozen_inference_graph.uff ~/tensorrt/data/ssd/sample_ssd_relu6.uff
#去tensort/bin下执行sample_uff_ssd程序
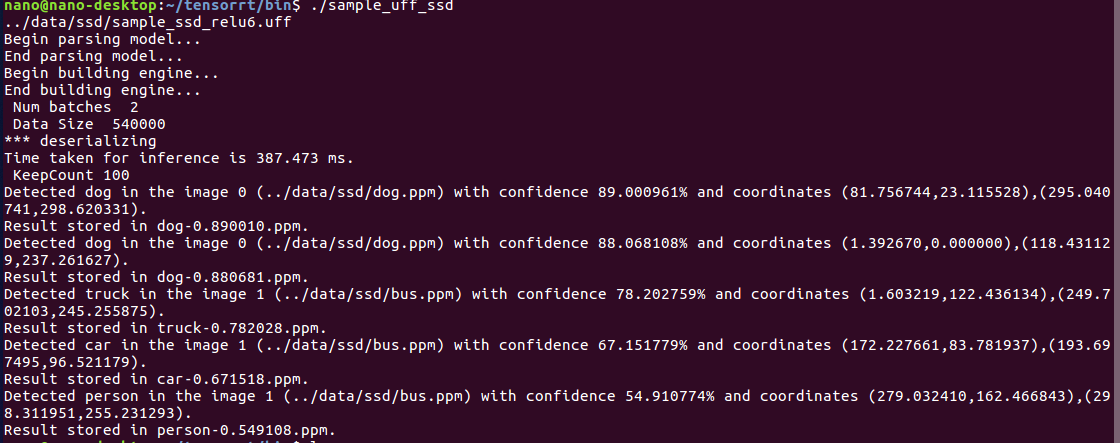
~/tensorrt/bin$ ./sample_uff_ssd
坑又来啦!!!
nano@nano-desktop:~/tensorrt/bin$ ./sample_uff_ssd

../data/ssd/sample_ssd_relu6.uff

Begin parsing model...

End parsing model...

Begin building engine...

Killed
一番搜索,https://devtalk.nvidia.com/default/topic/1046206/tensorrt5-sample_uff_ssd-can-t-run/ 有说官方readme里的link下载的model不对.
https://github.com/tensorflow/models/blob/master/research/object_detection/g3doc/detection_model_zoo.md
tensorflow官方提供的pretrained-model.
换个模型重新做一次转换.
这里尝试了2个不同的模型,均来自tensorflow官方github.一个在转uff格式时失败,一个转换后解析模型时失败 to do.
换回了最初的模型,尝试成功了,原因不明.........
--- update 20200306
https://s0docs0nvidia0com.icopy.site/deeplearning/sdk/tensorrt-install-guide/index.html
TensorRT学习总结的更多相关文章
- TensorRT 7.2.1 开发概要(上)
TensorRT 7.2.1 开发概要(上) Abstract 这个TysRR7.2.1开发者指南演示了如何使用C++和Python API来实现最常用的深层学习层.它展示了如何使用深度学习框架构建现 ...
- TensorRT深度学习训练和部署图示
TensorRT深度学习训练和部署 NVIDIA TensorRT是用于生产环境的高性能深度学习推理库.功率效率和响应速度是部署的深度学习应用程序的两个关键指标,因为它们直接影响用户体验和所提供服务的 ...
- NVIDIA TensorRT高性能深度学习推理
NVIDIA TensorRT高性能深度学习推理 NVIDIA TensorRT 是用于高性能深度学习推理的 SDK.此 SDK 包含深度学习推理优化器和运行时环境,可为深度学习推理应用提供低延迟和高 ...
- TensorRT层和每个层支持的精度模式
下表列出了TensorRT层和每个层支持的精确模式.它还列出了该层在深度学习加速器(DLA)上运行的能力.有关附加约束的更多信息,请参见 DLA Supported Layershttps://doc ...
- 由微软打造的深度学习开放联盟ONNX成立
导读 如今的微软已经一跃成为全球市值最高的高科技公司之一.2018年11月底,微软公司市值曾两次超越了苹果,成为全球市值最高的公司,之后也一直处于与苹果胶着的状态.市场惊叹微软是一家有能力改造自己并取 ...
- TensorRT简介-转载
前言 NVIDIA TensorRT是一种高性能神经网络推理(Inference)引擎,用于在生产环境中部署深度学习应用程序,应用有 图像分类.分割和目标检测等,可提供最大的推理吞吐量和效率.Tens ...
- 初见-TensorRT简介<转>
下面是TensorRT的介绍,也可以参考官方文档,更权威一些:https://developer.nvidia.com/tensorrt 关于TensorRT首先要清楚以下几点: 1. TensorR ...
- TX2之多线程读取视频及深度学习推理
背景 一般在TX2上部署深度学习模型时,都是读取摄像头视频或传入视频文件进行推理,从视频中抽取帧进行目标检测等任务.对于大点的模型,推理的速度是赶不上摄像头或视频的帧率的,如果我们使用单线程进行处理, ...
- NVIDIA TensorRT 让您的人工智能更快!
NVIDIA TensorRT 让您的人工智能更快! 英伟达TensorRT™是一种高性能深度学习推理优化器和运行时提供低延迟和高通量的深度学习推理的应用程序.使用TensorRT,您可以优化神经网络 ...
随机推荐
- mysql事务隔离级别和MVCC
一.三种问题: 脏读(Drity Read):事务A更新记录但未提交,事务B查询出A未提交记录. 不可重复读(Non-repeatable read):在一个事务的两次查询之中数据不一致,这可能是两次 ...
- vue笔记 递归组件的使用
递归组件 什么是递归组件? 组件自身去调用组件自身. 代码示例 DetailList.vue(子组件-递归组件) <template> <div> <div class= ...
- php session序列化攻击面浅析
目录 0x00 首先,session_start()是什么? 0x01 初识php-session序列化机制 0x02 php_serialize引擎(反)序列化测试 0x03 当使用不同的引擎来处理 ...
- XiaomiPushDemo【小米推送集成,基于V3.6.12版本】
版权声明:本文为HaiyuKing原创文章,转载请注明出处! 前言 这个Demo只是记录小米推送的集成,不能运行. 使用步骤 一.项目组织结构图 注意事项: 1. 导入类文件后需要change包名以 ...
- html5中的indexDB
1.关系型数据库和非关系型数据库 一致性: 事务完成时,必须让所有的数据具有一致的状态,例如要写入100个数据,前99个成功了,结果第100个不合法,此时事务会回滚到最初状态.这样保证事务结束和开始时 ...
- Sqlserver事务隔离级别详解
sqlserver存储方式 页 sqlserver是以页的形式存储数据,每个数据页的大小为8KB,sqlserver会把空间分为多个页,sqlserver与数据交互单位最小的io操作就是页级 ...
- Bootstarp的安装以及简单的使用方法(pycharm中)
一.安装 首先打开Bootstarp的官网:https://v3.bootcss.com 下载完成后,解压压缩包,把解压后的文件导入pycham中 在HTML页面中的style中导入bootstrap ...
- 理解css之position属性
之前css学的一直不精致而且没有细节,为了成为一个完美的前端工作人员,所以决定重新学习css的属性.当然会借鉴MDZ文档(MDZ文档)或其他博主的经验来总结.在这里会注明借鉴或引用文章的出处.侵权即删 ...
- HTML 练习实现遮罩层
<!DOCTYPE html> <html lang="en"> <head> <meta charset="UTF-8&quo ...
- 轻松搞定表白女朋友:Android版APP (零基础也可直接下载软件)
在我们平时生活当中,经常会看到一些表白女朋友的html网页,但是Android端的表白软件可以说是基本没有,笔者在全网搜了一下,就没有一个可以用的.安卓端可以给人一种定制和精美的感觉,这是网页所做不到 ...