vue学习记录④(路由传参)
通过上篇文章对路由的工作原理有了基本的了解,现在我们一起来学习路由是如何传递参数的,也就是带参数的跳转。
带参数的跳转,一般是两种方式:
①.a标签直接跳转。
②点击按钮,触发函数跳转。
在上篇文章中我们已经有两个页面(Helloworld.vue&Hello.vue),现在我准备往Hello.vue里面添加3个链接,分别对应两种情况的跳转。
第一步:在原来的Hello.vue里添加路由链接跳转的代码(见第38-44行代码),添加后的Hello.vue代码如下:
 <template>

   <div class="hello">

     <h1>{{ msg }}</h1>

     <h2>Essential Links</h2>

     <ul>

       <li>

         <a href="https://vuejs.org" target="_blank">Core Docs</a>

       </li>

       <li>

         <a href="https://forum.vuejs.org" target="_blank">Forum</a>

       </li>

       <li>

         <a href="https://chat.vuejs.org" target="_blank">Community Chat</a>

       </li>

       <li>

         <a href="https://twitter.com/vuejs" target="_blank">Twitter</a>

       </li>

       <br>

       <li>

         <a href="http://vuejs-templates.github.io/webpack/" target="_blank">Docs for This Template</a>

       </li>

     </ul>

     <h2>Ecosystem</h2>

     <ul>

       <li>

         <a href="http://router.vuejs.org/" target="_blank">vue-router</a>

       </li>

       <li>

         <a href="http://vuex.vuejs.org/" target="_blank">vuex</a>

       </li>

       <li>

         <a href="http://vue-loader.vuejs.org/" target="_blank">vue-loader</a>

       </li>

       <li>

         <a href="https://github.com/vuejs/awesome-vue" target="_blank">awesome-vue</a>

       </li>

     </ul>

     <div>

       <router-link :to="{path:'/helloworld/123'}">参数传递1</router-link>

       <br>

       <router-link :to="{path:'/helloworld/789',query:{userid:9527,name:'Tom_Lo'}}">参数传递2</router-link>

       <br>

       <button @click="toNewpage">点击跳转</button>

     </div>

   </div>

 </template>

 <script>

 export default {

   name: 'hello',

   data() {

     return {

       msg: 'Welcome to Your Vue.js App'

     }

   },

    methods: {

     toNewpage: function() {

       this.$router.push({ path: '/helloworld/999', query: { userid: 128, name: 'Tom' } });

     }

   }

 }

 </script>

 <!-- Add "scoped" attribute to limit CSS to this component only -->

 <style scoped>

 h1,

 h2 {

   font-weight: normal;

 }

 ul {

   list-style-type: none;

   padding: 0;

 }

 li {

   display: inline-block;

   margin: 0 10px;

 }

 a {

   color: #42b983;

 }

 </style>
第38-44行代码的路由链接跳转写法是固定的,记住会用就好了。<router-link>默认会被渲染成一个 `<a>` 标签 ,to指令跳转到指定路径 。
第二步:Hello.vue传递了参数,那么我们就用Helloworld.vue接收参数。见更新后的Helloworld.vue代码:
 <!--模板部分-->

 <template>

   <div class="container">

     <h1>hello,world!</h1>

     <p>{{test}}</p>

     <p>接收的参数id:

       <span class="hint">{{id}}</span>

     </p>

     <p>接收的参数userid:

       <span class="hint">{{userid}}</span>

     </p>

     <p>接收的参数name:

       <span class="hint">{{username}}</span>

     </p>

   </div>

 </template>

 <!--js部分-->

 <script>

 export default {

   name: 'helloworld',

   data() {

     return {

       test: 'this is a test',

       id: this.$route.params.id,//接收参数

       userid: this.$route.query.userid,

       username: this.$route.query.name

     }

   }

 }

 </script>

 <!--样式部分-->

 <style>

 .container {

   background: #aaa;

   color: blue;

 }

 </style>
上面的第6-14行就是接收参数的容器。
注意:Hello.vue中的$router是用来传递参数的,而Helloworld.vue中的$route是用来接收参数的。
第三步:路由变化了,当然还得在index.js里面体现(见第16行),见更新后的index.js代码:
 import Vue from 'vue'

 import Router from 'vue-router'

 import Hello from '@/components/Hello'

 import HelloWorld from '@/components/Helloworld'//我们新定义的组件

 Vue.use(Router)

 export default new Router({

   routes: [

     {

       path: '/',

       name: 'Hello',

       component: Hello

     },

     {//新路由

       path: '/helloworld/:id',

       name: 'HelloWorld',

       component: HelloWorld

     }

   ]

 })
第四步:入口文件App.vue不用动。路由定义、发送参数、接收参数都具备了,下面咱们就跑一下试试吧~~
运行跳转成功后如下图:
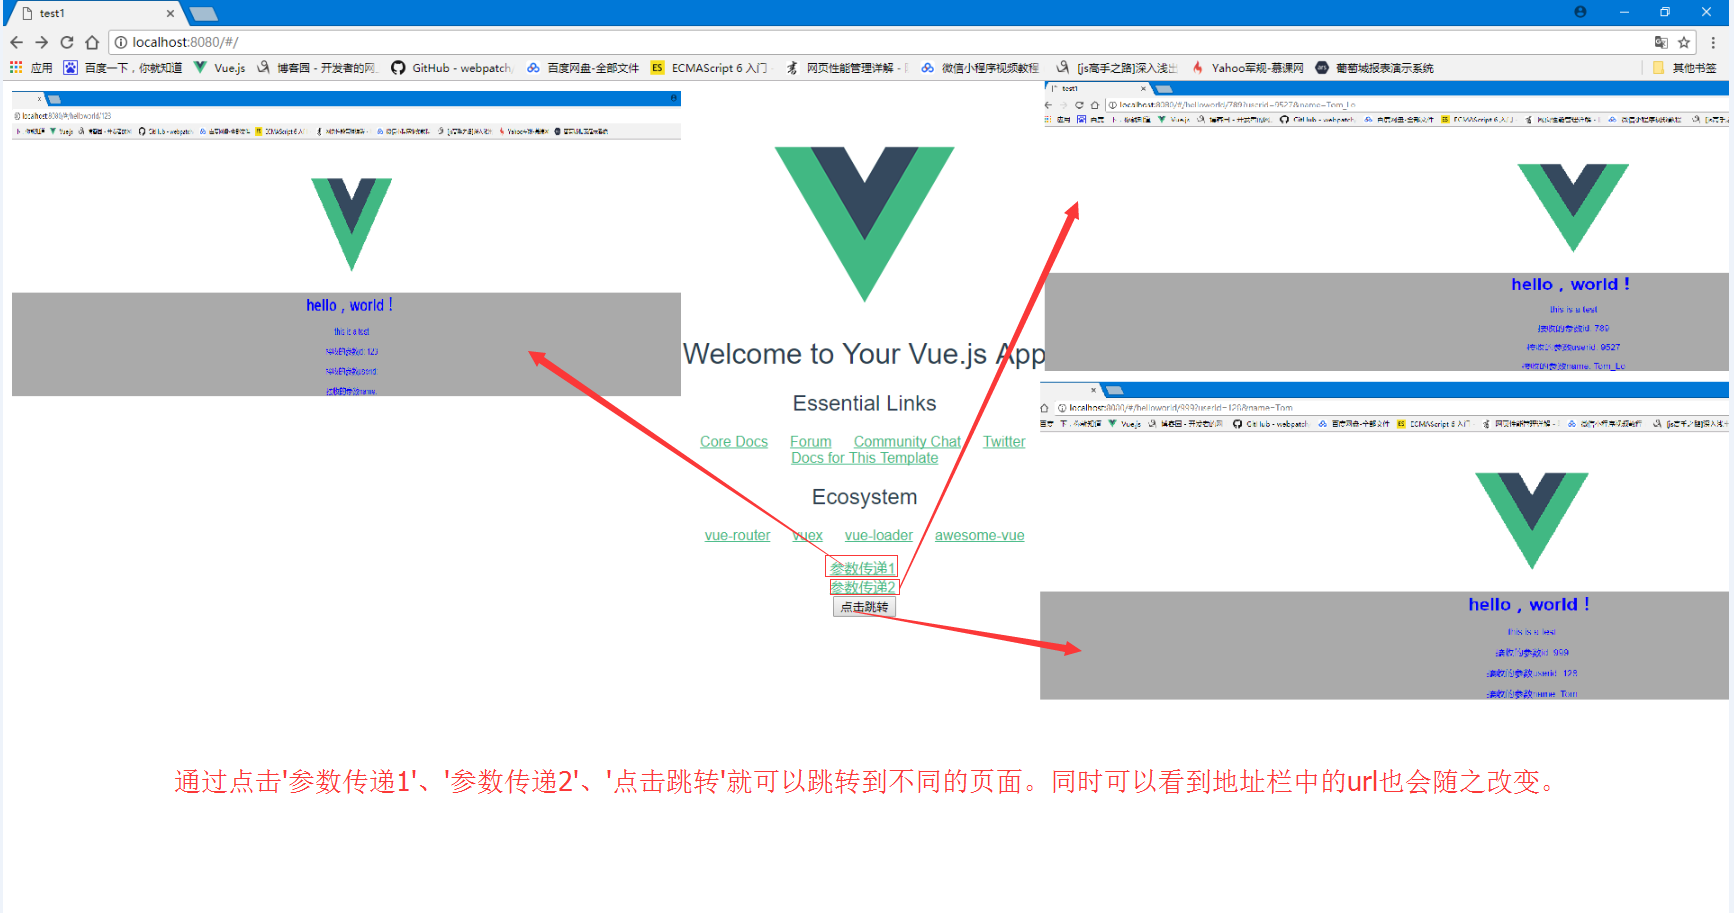
通过图示我们看到,参数都可以正常拿到了。
同时注意url的变化。首先url是有个#号,这个就代表是单页面的路由(hash模式);然后我们的参数实际都是放在url上传输的,要注意别超出url的长度范围。
下面我们再来看下子路由。
子路由也就是在父页面下,单独划出一个div容器,里面再塞进一个路由。
我们把Helloworld设定为父路由,再设定两个两个子路由。分别是info和content。
更新后的Helloworld.vue代码如下:
 <!--模板部分-->

 <template>

   <div class="container">

     <h1>hello,world!</h1>

     <p>{{test}}</p>

     <p>接收的参数id:

       <span class="hint">{{id}}</span>

     </p>

     <p>接收的参数userid:

       <span class="hint">{{userid}}</span>

     </p>

     <p>接收的参数name:

       <span class="hint">{{username}}</span>

     </p>

     <div class="subrouter">

       <h2 class="hint">子路由:</h2>

       <router-view></router-view>

     </div>

   </div>

 </template>

 <!--js部分-->

 <script>

 export default {

   name: 'helloworld',

   data() {

     console.log(this.$route);

     return {

       test: '这是一个测试',

       id: this.$route.params.id,//接收参数

       userid: this.$route.query.userid,

       username: this.$route.query.name

     };

   }

 }

 </script>

 <!--样式部分-->

 <style>

 .container {

   background: #ccc;

   color: greenyellow;

   height: 500px;

 }

 .hint {

   color: darkred;

   font-weight: bold;

 }

 .subrouter {

   background: #aaa;

   width: 500px;

   height: 100px;

   margin: 0 auto;

 }

 </style>
第15-18行创建了子路由的容器。然后在components下,创建新目录subpage,并在subpage下新建两个子组件info.vue和content.vue。
info.vue代码如下:
<template>

 <div class="info">info page--id:{{id}}</div>

</template>

<script>

export default {

 name: 'info',

 data () {

  return {

   id: this.$route.params.id

  }

 }

}

</script>

<style>

.info{

color:blue;

}

</style>
content.vue代码如下:
<template>

 <div class="content">

  content page

  <div>ID:{{id}}</div>

 </div>

</template>

<!--js部分-->

<script>

export default {

 name:'content',

 data() {

  return {

   id:this.$route.params.id

  };

 }

}

</script>

<style>

.content{

color:blueviolet;

}

</style>
子路由建好了,那怎么把他们串起来呢?这里就要更新index.js了。index.js代码如下:
import Vue from 'vue'

import Router from 'vue-router'

import Hello from '@/components/Hello'

import HelloWorld from '@/components/Helloworld' //我们新定义的组件

// 引入子页面

import Info from '@/components/subpage/info.vue'

import Content from '@/components/subpage/content.vue'

Vue.use(Router)

export default new Router({

  routes: [{

      path: '/',

      name: 'Hello',

      component: Hello

    },

    { //新路由

      path: '/helloworld/:id',

      name: 'HelloWorld',

      component: HelloWorld,

      children: [{

          path: 'info/:id',

          component: Info

        },

        {

          path: 'content/:id',

          component: Content

        }

      ]

    }

  ]

})
首先要引入子页面,然后在父路由下配置一下即可。
到了这里就算是配置好了,运行看看吧~~~~


vue学习记录④(路由传参)的更多相关文章
- react router @4 和 vue路由 详解(六)vue怎么通过路由传参?
完整版:https://www.cnblogs.com/yangyangxxb/p/10066650.html 8.vue怎么通过路由传参? a.通配符传参数 //在定义路由的时候 { path: ' ...
- vue中的路由传参及跨组件传参
路由跳转 this.$router.push('/course'); this.$router.push({name: course}); this.$router.go(-1); this.$r ...
- vue父子组件路由传参的方式
一.get方式(url传参): 1.动态路由传参: 父组件: selectItem (item) { this.$router.push({ path: `/recommend/${item.id}` ...
- Vue的Router路由传参
一.文件结构 二.vue.js 打开此链接 https://cdn.bootcss.com/vue/2.6.10/vue.js 复制粘贴页面的所有内容 三.vue-router.js 打开此链接 h ...
- vue路由传参刷新丢失
没有系统学习过vue,以前使用路由传参都是直接this.$router.push({name:'main',params:{'id': 123}})的,没有在路由定义中配置参数,如下: router: ...
- [Vue 牛刀小试]:第十三章 - Vue Router 基础使用再探(命名路由、命名视图、路由传参)
一.前言 在上一章的学习中,我们简单介绍了前端路由的概念,以及如何在 Vue 中通过使用 Vue Router 来实现我们的前端路由.但是在实际使用中,我们经常会遇到路由传参.或者一个页面是由多个组件 ...
- vue链接传参与路由传参
1.链接传参: 例如:链接是:http://localhost:3333/#/index?id=001 我们要获取参数:console.log(this.$route.query.id):即可 2.路 ...
- vue路由传参的三种方式区别(params,query)
最近在做一个项目涉及到列表到详情页的参数的传递,网上搜索一下路由传参,结合自己的写法找到一种适合自己的,不过也对三种写法都有了了解,在此记录一下 <ul class="table_in ...
- vue路由传参的三种方式以及解决vue路由传参页面刷新参数丢失问题
最近项目中涉及到跨页面传参数和后台进行数据交互,看到需求之后第一反应就是用路由传参来解决:Vue中给我们提供了三种路由传参方式,下面我们一个一个的来看一下: 方法一:params传参: this.$r ...
- Vue框架(四)——路由跳转、路由传参、cookies、axios、跨域问题、element-ui模块
路由跳转 三种方式: $router.push / $router.go / router-link to this.$router.push('/course'); this.$router.pus ...
随机推荐
- Python_性能测试
使用pip安装Python扩展库memory_profiler from memory_profiler import profile @profile #修饰器 def isPrime(n): if ...
- codeforces 983B XOR-pyramid
题意: 定义一个函数f(a): 给出一个数组a,有q个询问,每次询问回答在l到r的区间内,连续子串的f函数的最大值. 思路: 画图,来自codeforces SheepRanger 由此图可知,f(l ...
- Pat1108: Finding Average
1108. Finding Average (20) 时间限制 400 ms 内存限制 65536 kB 代码长度限制 16000 B 判题程序 Standard 作者 CHEN, Yue The b ...
- js中点与方括号及for...in
中括号运算符总是能代替点运算符.但点运算符却不一定能全部代替中括号运算符. 当用中括号代替点时,属性名需加双引号. 中括号运算符可以用字符串变量的内容作为属性名.点运算符不能. 中括号运算符可以用纯数 ...
- springmvc配置详解 教程
https://www.cnblogs.com/sunniest/p/4555801.html
- springMVC框架在js中使用window.location.href请求url时IE不兼容问题解决
是使用springMVC框架时,有时候需要在js中使用window.location.href来请求url,比如下面的路径: window.location.href = 'forecast/down ...
- openfire推送离线聊天信息的插件
插件说明 在手机的聊天应用中,经常出现的一个需求就是把用户的离线消息通过推送系统推送到用户的手机上,为了实现这个功能,本人就开发了本插件,这个openfire 插件是拦截了发给openfire用户的离 ...
- 从头到尾彻底解析Hash 表算法
作者:July.wuliming.pkuoliver 出处:http://blog.csdn.net/v_JULY_v. 说明:本文分为三部分内容, 第一部分为一道百度面试题Top K算法的 ...
- bzoj3598 [Scoi2014]方伯伯的商场之旅
数位dp,我们肯定枚举集合的位置,但是如果每次都重新dp的话会很麻烦,所以我们可以先钦定在最低位集合,dp出代价,然后再一步步找到正确的集合点,每次更改的代价也dp算就好了. #include < ...
- bzoj 3759 Hungergame 博弈论+线性基
和nim游戏类似 易证必败状态为:当前打开的箱子中石子异或和为0,没打开的箱子中不存在一个子集满足异或和为0 因为先手无论是取石子还是开箱子,后手都可以通过取石子来使状态变回原状态 所以只需判定是否有 ...