
潭州课堂25班:Ph201805201 django 项目 第四十四课 项目部署 (课堂笔记)
项目部署
稳定,并发,效益,
一、Django配置
1.settings.py配置
复制全局settings.py配置文件,创建一个副本命名为MyBlog/pro_settings.py,修改DEBUG为False。
DEBUG = False
将不再提供静态文件服务
# 填写你自己的ip和域名
ALLOWED_HOSTS = ["www.youkou.site", "39.108.191.165", "localhost", "127.0.0.1"]
# 此处设置可以访问服务器的IP地址,*为允许所以地址
生产环境中的项目入口 wsgi.py
2.wsgi.py配置
# 修改MyBlog/wsgi.py文件
import os
from django.core.wsgi import get_wsgi_application
os.environ.setdefault('DJANGO_SETTINGS_MODULE', 'MyBlog.pro_settings')
application = get_wsgi_application()

3.生成requirements.txt文件
# 在xshell中生成requirements.txt文件(将项目中安装的包,存放到requirements.txt文件中)
pip freeze > requirements.txt
把安装好的包打包冷冻
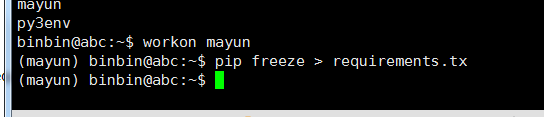
把 requirements.txt 复制到生产环境下
在部署的环境下

4.上传至服务器
将项目本地目录上传至服务器(可以是阿里云ECS服务器)
方法一:
可以使用xshell连接阿里云服务器,通过rz命令将本地项目目录压缩为zip之后,上传至服务器
在阿里云服务器上,使用unzip 解压项目压缩文件
unzip 你的项目压缩文件.zip
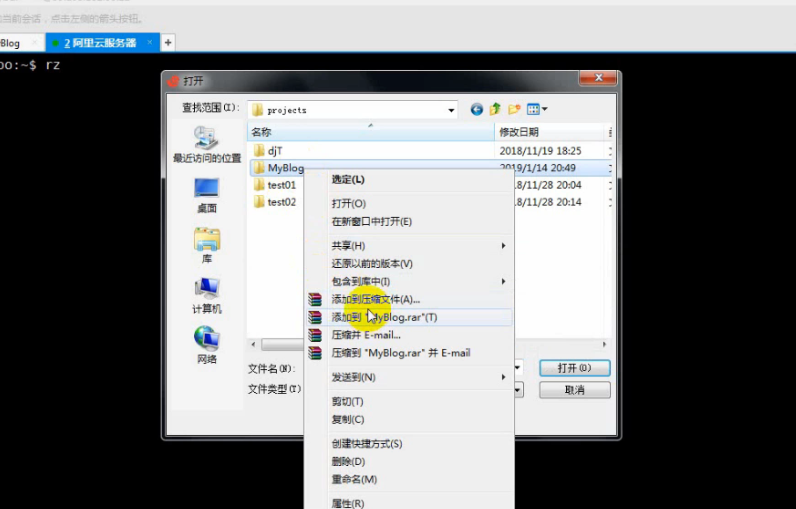
rz 只能上传文件,所以要压缩,上传完成后在报备是解压,
方法二:
可以使用提供ssh连接的工具,将项目目录发送到服务器家目录中
scp -r 你的项目目录 服务器用户名@服务器IP:~/ -p ssh服务端口
# 例如
scp -r /home/Conner/MyBlog root@服务器IP:~/ -p 22
5.安装python3以及虚拟环境
安装python3、virtualwrapper,请查看官方文档,步骤略。
创建虚拟环境
# 虚拟环境名,随意命名
mkvirtualenv dj_pro
安装项目相关包
# 进入到虚拟环境
workon dj_pro
# 安装包
# 需要把requirements.txt文件中的fdfs-client-py删除
pip install -r requirements.txt
# 安装fdfs_client.zip
pip install fdfs_client.zip
uwsg 服务器,只要是 python 开发的都 可以用这种协议,
6.uwsgi安装测试
# 进入到虚拟环境
workon dj_pro
# 安装uwsgi
pip install uwsgi
进入虚拟环境安装

测试uwsgi是否安装成功:

# 测试py文件
# test.py
def application(env, start_response):
start_response('200 OK', [('Content-Type','text/html')])
return [b"Hello World"] # python3
#return ["Hello World"] # python2
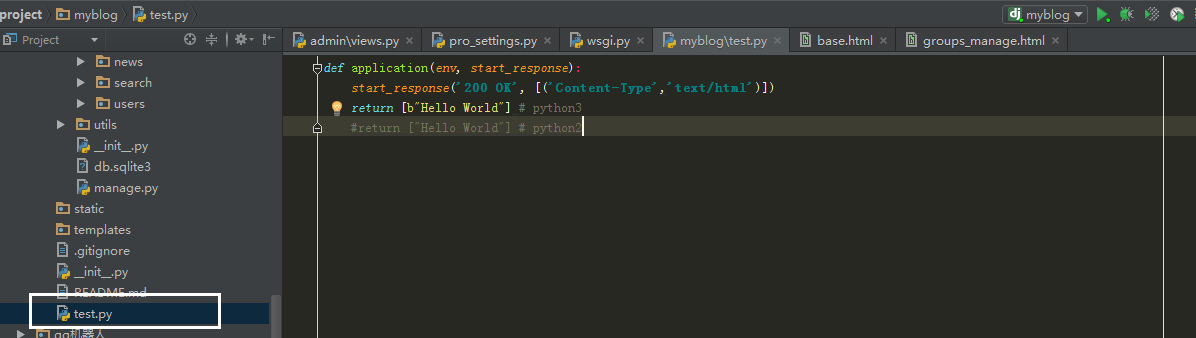
运行uwsgi:
cd 到 test.py 的目录下
uwsgi --http :8000 --wsgi-file test.py
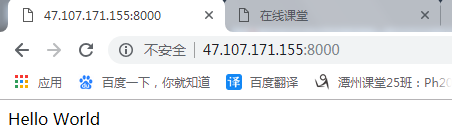
测试uwsgi运行是否正常:
curl 127.0.0.1:8000
uwsgi 提供的动态文件服务
7.uwsgi配置
在项目根目录中创建deploy目录,新建uwsgi_conf.ini文件。
[uwsgi]
# 使用nginx连接时使用,Django程序所在服务器地址
# 选择内网IP和端口 ip a
socket=172.18.168.123:8000
# 项目根目录 pwd
chdir=/home/Conner/MyBlog
#项目中wsgi.py文件的相对目录
wsgi-file=MyBlog/wsgi.py
# 进程数
processes=2
# 线程数
threads=2
# uwsgi服务器的角色
master=True
# 存放进程编号的文件
pidfile=uwsgi.pid
# 日志文件,因为uwsgi可以脱离终端在后台运行,日志看不见。以前的runserver是依赖终端的
daemonize=logs/uwsgi.log
# 指定虚拟环境所在目录,不能填相对目录
virtualenv=/home/Conner/.virtualenvs/dj_pro
虚拟环境目录的查找,
cd 到家目录,ls -al 找到 .virtualenvs 文件
之后 cd 进去

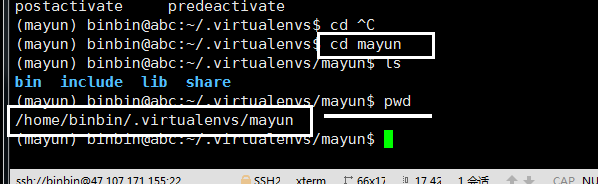
8.启动uwsgi
切换到deploy目录中,创建logs文件夹,用于存放日志文件
# 启动uwsgi
在虚拟环境下,
uwsgi --ini uwsgi_conf.ini &
# 停止uwsgi
uwsgi --stop uwsgi.pid
killall -9 uwsgi
二、在Ubuntu 18.04中安装配置Nginx
1.Installing Nginx
提供静态文件服务,正向代理,可以让为他是个中间件,
# 安装nginx
sudo apt update -y
sudo apt install nginx -y
# 启动nginx,查看启动状态,如果启动状态未active,则代表启动成功
sudo systemctl start nginx && sudo systemctl status nginx
# 默认开启80端口,可以查看一下是否提供web服务
curl -I 127.0.0.1
2.nginx 管理命令
To stop your web server, type:
# 停止
sudo systemctl stop nginx
To start the web server when it is stopped, type:
# 启动
sudo systemctl start nginx
To stop and then start the service again, type:
# 重启
sudo systemctl restart nginx
If you are simply making configuration changes, Nginx can often reload without dropping connections. To do this, type:
# 加载配置,修改配置之后要重新加载
sudo systemctl reload nginx
To stop and then start the service again, type:
sudo systemctl restart nginx
If you are simply making configuration changes, Nginx can often reload without dropping connections. To do this, type:
sudo systemctl reload nginx
By default, Nginx is configured to start automatically when the server boots. If this is not what you want, you can disable this behavior by typing:
sudo systemctl disable nginx
To re-enable the service to start up at boot, you can type:
sudo systemctl enable nginx
3.nginx配置
创建/etc/nginx/conf_d/nginx_dj_pro.conf文件
upstream MyBlog {

    # 此处为uwsgi运行的ip地址和端口号

    server 172.18.168.123:8000;

}

server {

    # 监听端口

    listen      80;

    # 服务器域名或者ip地址

    server_name 39.108.191.165 .youkou.site;

    # 编码

    charset     utf-8;

    # 文件最大上传大小

    client_max_body_size 75M;

    # 媒体文件

    location /media  {

        alias /home/Conner/MyBlog/media;

    }

    # 静态文件

    location /static {

        alias /home/Conner/MyBlog/static;

    }

    # 主目录

    location / {

        uwsgi_pass  MyBlog;

        include    /etc/nginx/uwsgi_params;

    }

}
把这个配置文件复制到如下目录
sudo cp nginx_dj_pro.conf /etc/nginx/conf.d/
修改 nginx.conf 文件的 user
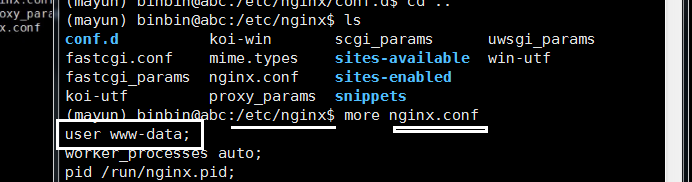
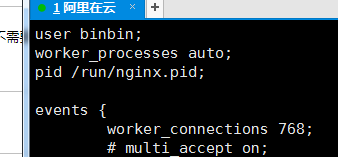
wq! 退出
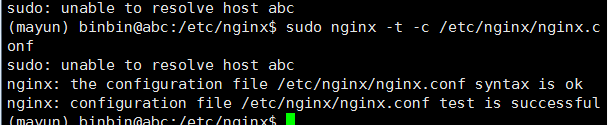
# 测试nginx配置文件是否正确,

sudo nginx -t -c /etc/nginx/nginx.conf

# 打印如下内容,则没问题

nginx: the configuration file /etc/nginx/nginx.conf syntax is ok

nginx: configuration file /etc/nginx/nginx.conf test is successful
# 重新加载配置

sudo nginx -s reload -c /etc/nginx/nginx.conf
三、Troubleshooting
部分同学会出现开启'django.middleware.csrf.CsrfViewMiddleware'中间件之后,前端使用ajax发起post请求,出现403异常。
可能原因一:js中没有携带X-CSRFToken头
// 在js文件中添加这几个方法
// get cookie using jQuery
function getCookie(name) {
let cookieValue = null;
if (document.cookie && document.cookie !== '') {
let cookies = document.cookie.split(';');
for (let i = 0; i < cookies.length; i++) {
let cookie = jQuery.trim(cookies[i]);
// Does this cookie string begin with the name we want?
if (cookie.substring(0, name.length + 1) === (name + '=')) {
cookieValue = decodeURIComponent(cookie.substring(name.length + 1));
break;
}
}
}
return cookieValue;
}
function csrfSafeMethod(method) {
// these HTTP methods do not require CSRF protection
return (/^(GET|HEAD|OPTIONS|TRACE)$/.test(method));
}
// Setting the token on the AJAX request
$.ajaxSetup({
beforeSend: function (xhr, settings) {
if (!csrfSafeMethod(settings.type) && !this.crossDomain) {
xhr.setRequestHeader("X-CSRFToken", getCookie('csrftoken'));
}
}
});
可能原因二:django没有设置csrftoken cookie
# 使用中间件强制django设置csrftoken cookie
# 创建apps/users/middleware.py文件
from django.utils.deprecation import MiddlewareMixin
from django.middleware.csrf import get_token
class MyMiddleware(MiddlewareMixin):
def process_request(self, request):
csrf_token = get_token(request)
# 在dj_pre_class/pro_settings.py中
MIDDLEWARE = [
# 添加自定义中间件
'users.middleware.MyMiddleware',
]
潭州课堂25班:Ph201805201 django 项目 第四十四课 项目部署 (课堂笔记)的更多相关文章
- Android项目实战(四十四):Zxing二维码切换横屏扫描
原文:Android项目实战(四十四):Zxing二维码切换横屏扫描 Demo链接 默认是竖屏扫描,但是当我们在清单文件中配置横屏显示的时候: <activity android:name=&q ...
- 潭州课堂25班:Ph201805201 django框架 第十一课 保持登录,注册,登录 (课堂笔记)
保持登录 在 django 中的内置 sessions 在项目的主目录中的配置文件 在数据库中 在视图函数中写登录 在页面登录后会出现 查看数据库内容 这样就实现保持登录 退出登录 注册: 1,创建模 ...
- 潭州课堂25班:Ph201805201 django框架 第十二课 自定义中间件,上下文处理,admin后台 (课堂笔记)
中间件 在项目主目录下的配置文件 在项目主目录下创建文件 写个自定义异常处理 方法1 要让其生效,要在主目录下,的中间件中进行注册 主目录下.该文件名.类名 在进入视图函数之前进行判断, 给 req ...
- 潭州课堂25班:Ph201805201 WEB 之 页面编写 第四课 登录注册 (课堂笔记)
index.html 首页 <!DOCTYPE html> <html lang="en"> <head> <meta charset=& ...
- 潭州课堂25班:Ph201805201 WEB 之 页面编写 第三课 (课堂笔记)
index.html <!DOCTYPE html> <html lang="en"> <head> <meta charset=&quo ...
- 潭州课堂25班:Ph201805201 WEB 之 页面编写 第二课 (课堂笔记)
index.html <!DOCTYPE html> <html lang="en"> <head> <meta charset=&quo ...
- 潭州课堂25班:Ph201805201 WEB 之 页面编写 第一课 (课堂笔记)
index.html <!DOCTYPE html> <html lang="en"> <head> <meta charset=&quo ...
- 潭州课堂25班:Ph201805201 第十课 类的定义,属性和方法 (课堂笔记)
类的定义 共同属性,特征,方法者,可分为一类,并以名命之 class Abc: # class 定义类, 后面接类名 ( 规则 首字母大写 ) cls_name = '这个类的名字是Abc' # 在类 ...
- 潭州课堂25班:Ph201805201 爬虫高级 第九课 scrapyd 部署 (课堂笔记)
c rapyd是 scrapy 的部署, 是官方提供的一个爬虫管理工具, 通过他可以非常方便的上传控制爬虫的运行, 安装 : pip install scapyd 他提供了一个json ,web, s ...
随机推荐
- Windows安装MongoDB
一.简介 MongoDB 是一个基于分布式 文件存储的NoSQL数据库 由C++语言编写,运行稳定,性能高 旨在为 WEB 应用提供可扩展的高性能数据存储解决方案 查看官方网站 MongoDB特点 模 ...
- python selenium打开新窗口,多窗口切换
# coding=utf-8 from selenium import webdriver browser=webdriver.Firefox() browser.maximize_window() ...
- Python 读写excel类
#-*- coding: utf8 -*- import xlrd import xlwt from Public import GlobalClass def openexcel(path): tr ...
- 如何使用VisualSVN Server建立版本库
首先打开VisualSVN Server Manager,如图: 可以在窗口的右边看到版本库的一些信息,比如状态,日志,用户认证,版本库等.要建立版本库,需要右键单击左边窗口的Repositores, ...
- 任务超时退出的方法 C#
超出时间方法退出.防止卡住. 方法: private static bool ImportTaskTimeout(Action method, int hours) { try { var task ...
- python中利用上下文管理器来实现mysql数据库的封装
from pymysql import connect class DB(object): def __init__(self, password, database): # 1.连接数据库 self ...
- Python Day-1 练习
作业1 要求:1.输入用户密码 2.认真成功后显示欢迎信息 3.输入三次锁定 代码如下: __author__ = 'zhang.ning' username = "zhangning&qu ...
- SpringMVC - 1.快速入门
1. HelloWorld 步骤: 加入 jar 包 mons-logging-1.1.3.jar spring-aop-4.0.0.RELEASE.jar spring-beans-4.0.0.RE ...
- wb 黑名单批量操作
0. 参考 yu961549745/WeiboBlackList 微博批量拉黑 1. 代码 block.py 更新内容:多线程,urllib.request 改为 requests + sessio ...
- TypeScript学习笔记 (一)基础特性
一. 字符串新特性 1. 多行字符串 var str = ``; 2. 字符串模板 var world = "world"; var str = `hello ${world}`; ...