安装Nginx到CentOS(YUM)
运行环境
系统版本:CentOS Linux release 7.3.1611
软件版本:nginx-1.12.2
硬件要求:无
安装过程
1、配置YUM源
[root@localhost ~]# rpm -i https://dl.fedoraproject.org/pub/epel/epel-release-latest-7.noarch.rpm

[root@localhost ~]# yum clean all

[root@localhost ~]# yum makecache
2、安装NGINX
RPM版的NGINX软件包分为主软件包和扩展模板包,主软件包只提供基本的WEB+反向代理功能,则其他扩展模块包则实现一些其他的高级功能,默认情况下安装主软件包,则扩展模块包也会安装。
[root@localhost ~]# yum search nginx

nginx-all-modules.noarch : A meta package that installs all available Nginx modules

nginx-filesystem.noarch : The basic directory layout for the Nginx server

nginx-mod-http-geoip.x86_64 : Nginx HTTP geoip module

nginx-mod-http-image-filter.x86_64 : Nginx HTTP image filter module

nginx-mod-http-perl.x86_64 : Nginx HTTP perl module

nginx-mod-http-xslt-filter.x86_64 : Nginx XSLT module

nginx-mod-mail.x86_64 : Nginx mail modules

nginx-mod-stream.x86_64 : Nginx stream modules

nginx.x86_64 : A high performance web server and reverse proxy server(主程序包)

[root@localhost ~]# yum -y install nginx
3、编辑主配置文件,添加一个新Web站点的配置
[root@localhost ~]# vim /etc/nginx/nginx.conf

user nginx;

worker_processes auto;

error_log /var/log/nginx/error.log;

pid /run/nginx.pid;

include /usr/share/nginx/modules/*.conf;

events {

    worker_connections 1024;

}

http {

    log_format  main  '$remote_addr - $remote_user [$time_local] "$request" '

                      '$status $body_bytes_sent "$http_referer" '

                      '"$http_user_agent" "$http_x_forwarded_for"';

    access_log  /var/log/nginx/access.log  main;

    sendfile            on;

    tcp_nopush          on;

    tcp_nodelay         on;

    keepalive_timeout   65;

    types_hash_max_size 2048;

    include             /etc/nginx/mime.types;

    default_type        application/octet-stream;

    include /etc/nginx/conf.d/*.conf;

    #==WEB站点配置==#

    server {

        listen       80 default_server;

        #监听IPV4的地址与端口,地址为空表示监听所有,“default_server”即默认服务器,DNS映射一个域名

        #到该主机,但是当用户访问的这个域名与这些WEB虚拟主机绑定的域名都不匹配的情况下,默认由监

        #听“default_server”的虚拟主机呈现内容。

        listen       [::]:80 default_server;

        #监听IPV6的地址与端口。

        server_name  _;

        #域名绑定,绑定一个域名。

        location / {

        #匹配“/”,即用户访问“server_name/”时则呈现里面定义的内容。

          root	/usr/share/nginx/html;

          #WEB应用根目录。

    	  index index.html;

          #默认呈现的首页文件,当用户访问域名或IP地址是自动索引呈现该文件中的内容。

        }

        error_page 404 /404.html;

       #HTTP请求错误响应码,反馈给用户的页面文件位置。

        location = /40x.html {

        #匹配上面的错误页面。

        }

        error_page 500 502 503 504 /50x.html;

            location = /50x.html {

        }

    }

}
4、创建一个静态页面存放到站点配置所指定的发布目录下
[root@localhost ~]# vim /usr/share/nginx/html/index.html
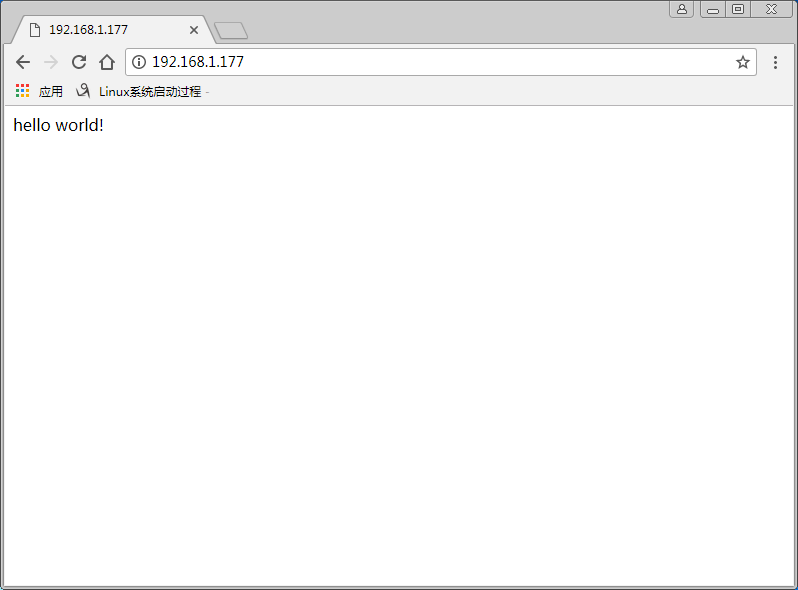
hello world!
5、开启服务
[root@localhost ~]# systemctl start nginx

[root@localhost ~]# netstat -lnupt |grep :80

tcp    0      0 0.0.0.0:80    0.0.0.0:*       LISTEN      14379/nginx: master
6、使用浏览器访问WEB
在浏览器输入:http://Server_IP
7、查看NGINX版本和安装了那些模块
[root@localhost ~]# nginx -V

nginx version: nginx/1.12.2

built by gcc 4.8.5 20150623 (Red Hat 4.8.5-16) (GCC)

built with OpenSSL 1.0.2k-fips  26 Jan 2017

TLS SNI support enabled

configure arguments: --prefix=/usr/share/nginx --sbin-path=/usr/sbin/nginx --modules-path=/usr/lib64/nginx/modules --conf-path=/etc/nginx/nginx.conf --error-log-path=/var/log/nginx/error.log --http-log-path=/var/log/nginx/access.log --http-client-body-temp-path=/var/lib/nginx/tmp/client_body --http-proxy-temp-path=/var/lib/nginx/tmp/proxy --http-fastcgi-temp-path=/var/lib/nginx/tmp/fastcgi --http-uwsgi-temp-path=/var/lib/nginx/tmp/uwsgi --http-scgi-temp-path=/var/lib/nginx/tmp/scgi --pid-path=/run/nginx.pid --lock-path=/run/lock/subsys/nginx --user=nginx --group=nginx --with-file-aio --with-ipv6 --with-http_auth_request_module --with-http_ssl_module --with-http_v2_module --with-http_realip_module --with-http_addition_module --with-http_xslt_module=dynamic --with-http_image_filter_module=dynamic --with-http_geoip_module=dynamic --with-http_sub_module --with-http_dav_module --with-http_flv_module --with-http_mp4_module --with-http_gunzip_module --with-http_gzip_static_module --with-http_random_index_module --with-http_secure_link_module --with-http_degradation_module --with-http_slice_module --with-http_stub_status_module --with-http_perl_module=dynamic --with-mail=dynamic --with-mail_ssl_module --with-pcre --with-pcre-jit --with-stream=dynamic --with-stream_ssl_module --with-google_perftools_module --with-debug --with-cc-opt='-O2 -g -pipe -Wall -Wp,-D_FORTIFY_SOURCE=2 -fexceptions -fstack-protector-strong --param=ssp-buffer-size=4 -grecord-gcc-switches -specs=/usr/lib/rpm/redhat/redhat-hardened-cc1 -m64 -mtune=generic' --with-ld-opt='-Wl,-z,relro -specs=/usr/lib/rpm/redhat/redhat-hardened-ld -Wl,-E'
安装Nginx到CentOS(YUM)的更多相关文章
- Centos 7下安装nginx,使用yum install nginx,提示没有可用的软件包
Centos 7下安装nginx,使用yum install nginx,提示没有可用的软件包. 18 (flaskApi) [root@67 flaskDemo]# yum -y install n ...
- Docker 实战(二)——centos7镜像安装nginx,将安装nginx的centos容器生成新的镜像,并导出
Docker centos7镜像安装nginx 1.安装docker 使用yum安装docker不再重复:见 Linux常用命令 2.pull centos 1)在docker仓库中搜索centos ...
- 使用nginx代理centos yum 源
我们在安装centos 服务器时,可能会有以下情况: 局域网内有若干台服务器,但是只有一台服务器可以连接外网,其余服务器都不可以连接外网,但通过局域网与外网机器联通. 那么我们再使用 yum 安装软件 ...
- Docker容器安装nginx基本步骤Yum版
首先我们来科普一下nginx: Nginx (engine x) 是一个高性能的HTTP和反向代理web服务器,同时也提供了IMAP/POP3/SMTP服务.Nginx是由伊戈尔·赛索耶夫为俄罗斯访问 ...
- 安装Nginx:通过yum方式
1.配置yum源: 在/etc/yum.repos.d中新建后缀为.repo的文件,此处以nginx.repo为例. 2.更新yum源: yum clean all yum makecache 3 ...
- Ejabberd2:安装和操作指南(centos yum 安装ejabberd)
(1)首先安装EPEL Repository ## RHEL/CentOS 6 32-Bit ## # wget http://download.fedoraproject.org/pub/ ...
- 服务器 CentOS上yum安装Nginx服务
一.更改yum源为网易的源加快速度 vi /etc/yum.repos.d/CentOS-Base.repo 更改内容如下 # CentOS-Base.repo # # This file uses ...
- CentOS 7 yum 安装 Nginx
1.添加Nginx到YUM源 添加CentOS 7 Nginx yum资源库,打开终端,使用以下命令: sudo rpm -Uvh http://nginx.org/packages/centos/7 ...
- CentOS上yum安装Nginx服务
一.更改yum源为网易的源加快速度 vi /etc/yum.repos.d/CentOS-Base.repo更改内容如下 # CentOS-Base.repo # # This file uses a ...
随机推荐
- CTF--HTTP服务--暴力破解
开门见山 1. 扫描靶机ip,发现PCS 192.168.1.103 2. 用nmap扫描靶机开放服务和服务版本 3. 再扫描全部信息 4. 用nikto探测敏感文件 5. 打开敏感网页发掘信息 6. ...
- Git详解之分布式应用
前言 为了便于项目中的所有开发者分享代码,我们准备好了一台服务器存放远程 Git 仓库.经过前面几章的学习,我们已经学会了一些基本的本地工作流程中所需用到的命令.接下来,我们要学习下如何利用 Git ...
- 用 C# 写一个 Redis 数据同步小工具
用 C# 写一个 Redis 数据同步小工具 Intro 为了实现 redis 的数据迁移而写的一个小工具,将一个实例中的 redis 数据同步到另外一个实例中.(原本打算找一个已有的工具去做,找了一 ...
- AS中使用真机调试时出现解析错误的问题
时间:2019/12/8 今天使用usb调试程序时手机上出现了解析错误的问题,其实这个问题很简单,主要可能是你想要调试的程序的最低版本号大于你手机的安卓版本号的原因,只需要修改下面这个地方: buil ...
- 实验18:HDLC和PPP
实验15-1:HDLC 和PPP 封装 Ø 实验目的通过本实验,读者可以掌握如下技能:(1) 串行链路上的封装概念(2) HDLC 封装(3) PPP 封装 Ø 实验拓扑 实验步骤n ...
- Codeforces_714
A.相遇时间段l = max(l1,l2),r = min(r1,r2),再判断k是否在里面. #include <iostream> using namespace std; long ...
- python修改获取xlsx数据
刚才要修改一个表格的数据,在网上搜了下方法,做出以下总结: 简单的取出数据以及写入数据 import xlrd data = xlrd.open_workbook(r'C:\Users\亦清\Desk ...
- SQLYOG导入数据时报错,出现找不到Microsoft office 元驱动程式,并且无法安装64位office Access驱动
当我们使用mysql导入外部数据时(如Excel表),有时会出现如下的错误问题,即找不到64位access驱动.为了解决这个问题,我们需要下载相应的驱动,通过下图中的点击此链接即可进入下载页面(htt ...
- qt creator源码全方面分析(2-10-2)
目录 Creating Your First Plugin 创建一个插件项目 构建并运行插件 文件结构 qmake项目 插件元数据模板 插件类 头文件 源文件 Creating Your First ...
- 二. 大数据常用的算法和数据结构 <<大数据日知录>> 读书笔记
基本上是hash实用的各种举例 布隆过滤器 Bloom Filter 常用来检测某个原色是否是巨量数据集合中的成员,优势是节省空间,不会有漏判(已经存在的数据肯定能够查找到),缺点是有误判(不存在的数 ...