MySQL8.0安装与使用
Windows:
1.下载:https://dev.mysql.com/downloads/mysql/
推荐使用镜像:http://mirrors.sohu.com/mysql/MySQL-8.0/

2.下载完成之后, 解压到目录下,例如:D:\mysql-8.0.22-winx64
3. 设置环境变量
变量名称:MYSQL_HOME
变量值:D:\mysql-8.0.22-winx64

4. 生成data目录
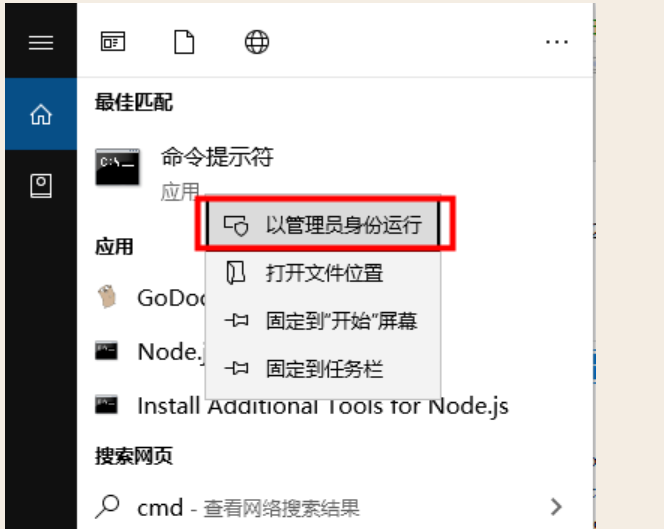
注意: 以管理员身份运行cmd
进入到bin目录下D:\mysql-8.0.22-winx64\bin
执行命令:
mysqld --initialize-insecure --user=mysql
则会在bin目录的同级生成data目录
5. 安装MySQL
mysqld -install

6. 启动服务
net start MySQL

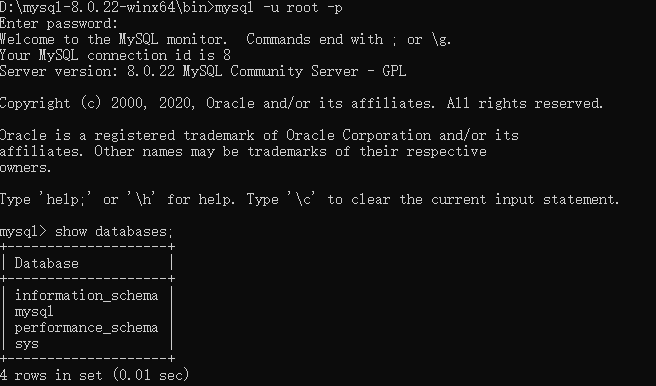
7. 登录MySQL
mysql  -u root -p

//默认没有设置密码, 直接回车即可
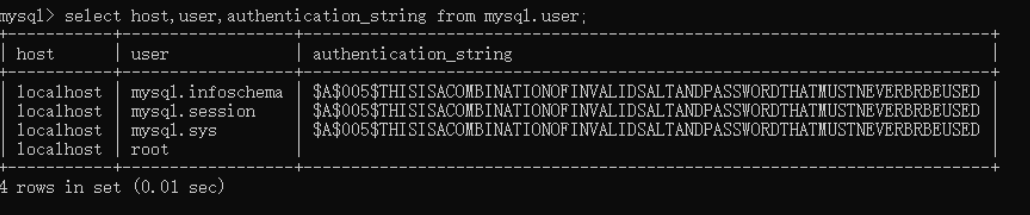
8)查询用户密码
select host,user,authentication_string from mysql.user
9)密码修改
use mysql;

ALTER USER 'root'@'localhost' IDENTIFIED WITH mysql_native_password BY '123456';

flush privileges;
10)再次登录
11)mysql配置
默认mysql8.0是data目录中是不存在my.ini配置文件的,如有需要新建即可
# For advice on how to change settings please see

# http://dev.mysql.com/doc/refman/5.6/en/server-configuration-defaults.html

# *** DO NOT EDIT THIS FILE. It's a template which will be copied to the

# *** default location during install, and will be replaced if you

# *** upgrade to a newer version of MySQL.

[client]

default-character-set = utf8mb4

[mysql]

default-character-set = utf8mb4

[mysqld]

character-set-client-handshake = FALSE

character-set-server = utf8mb4

collation-server = utf8mb4_bin

init_connect='SET NAMES utf8mb4'

# Remove leading # and set to the amount of RAM for the most important data

# cache in MySQL. Start at 70% of total RAM for dedicated server, else 10%.

innodb_buffer_pool_size = 128M

# Remove leading # to turn on a very important data integrity option: logging

# changes to the binary log between backups.

# log_bin

# These are commonly set, remove the # and set as required.

basedir = D:\mysql-8.0.22-winx64

datadir = D:\mysql-8.0.22-winx64\data

port = 3306

# server_id = .....

# Remove leading # to set options mainly useful for reporting servers.

# The server defaults are faster for transactions and fast SELECTs.

# Adjust sizes as needed, experiment to find the optimal values.

join_buffer_size = 128M

sort_buffer_size = 16M

read_rnd_buffer_size = 16M

sql_mode=NO_ENGINE_SUBSTITUTION,STRICT_TRANS_TABLES
设置完成之后, 可以设置mysql默认的配置文件
mysqld --defaults-file="D:\mysql-8.0.22-winx64\data\my.ini"
然后重启服务即可, 如果你在开始安装的时候已经创建了配置文件,可以在安装的时候直接指定即可
mysqld --install "MySql80" --defaults-file="C:\install\mysql\mysql-8.0.16-winx64\my.ini"
其他相关命令:
1. 停止MySQL服务
net stop mysql
Linux
1.下载rpm包
Wget https://dev.mysql.com/get/mysql80-community-release-el7-3.noarch.rpm
2.使用yum进行安装
yum install mysql80-community-release-el7-3.noarch.rpm
3.查看yum中的mysql版本
yum repolist all | grep mysql
4.使用yum-config-manager进行安装
yum-config-manager  命令不存在的时候,安装yum-config-manager

yum -y install yum-utils
5.选择安装的mysql版本
sudo yum-config-manager --disable mysql57-community

sudo yum-config-manager --enable mysql80-community
6.查看已选择的版本
yum repolist enabled | grep mysql
如果系统是centos8的话,需要单独操作
sudo yum module disable mysql
7.使用yum进行安装
yum install mysql

由于网络等问题, 使用yum下载MySQL相关包失败, 无奈只能使用rpm进行安装
rpm:
1)检查mysql是否安装
rpm -qa|grep mysql

Rpm -qa|grep mariadb

如果存在mariadb则卸载

Yum remove mariadb-libs-...
2)设置阿里云yum源
wget -O /etc/yum.repos.d/CentOS-Base.repo http://mirrors.aliyun.com/repo/Centos-7.repo
3)生成缓存
Yum makecache
4)下载rpm包(http://mirrors.ustc.edu.cn/mysql-ftp/Downloads)
1)下载server

http://mirrors.ustc.edu.cn/mysql-ftp/Downloads/MySQL-8.0/mysql-community-server-8.0.22-1.el7.x86_64.rpm

2)Client

http://mirrors.ustc.edu.cn/mysql-ftp/Downloads/MySQL-8.0/mysql-community-client-8.0.22-1.el7.x86_64.rpm

3)Common

http://mirrors.ustc.edu.cn/mysql-ftp/Downloads/MySQL-8.0/mysql-community-common-8.0.22-1.el7.x86_64.rpm

4)Lib

http://mirrors.ustc.edu.cn/mysql-ftp/Downloads/MySQL-8.0/mysql-community-libs-8.0.22-1.el7.x86_64.rpm
5)首先安装环境依赖
yum install -y perl.x86_64

yum install -y libaio.x86_64

yum install -y net-tools.x86_64
6)安装
rpm -ivh mysql-community-common-5.7.25-1.el7.x86_64.rpm

rpm -ivh mysql-community-libs-5.7.25-1.el7.x86_64.rpm

rpm -ivh mysql-community-client-5.7.25-1.el7.x86_64.rpm

rpm -ivh mysql-community-server-5.7.25-1.el7.x86_64.rpm
7)启动mysql服务
Systemctl start mysqld
8)安装之后,查看默认的登录密码
Grep ‘temporary password’ /var/log/mysqld.log
9)登录设置修改初始密码,并允许远程连接
Mysql -u root -p 123456

Alter user ‘root’@’localhost’ identified with mysql_native_password by ‘password’;

允许远程访问:

update user set Host='%' where Host='localhost' and 'User'='root';

立即生效:

Flush privileges;
10)开放相应端口
-- 查看已经开放的端口

firewall-cmd --list-ports

-- 开启端口

firewall-cmd --zone=public --add-port=3306/tcp --permanent
注意点:
- 修改密码8.0版本中已经没有password函数
需要使用mysql_native_password 来进行修改
2. mysql8.0版本必须符合长度(默认是8位),且必须含有数字,小写或大写字母,特殊字符。因为实在我本地自己的库,所以我修改了密码最小长度和密码的策略
3. 远程连接数据库 出现 Client does not support authentication protocol requested by server(使用mysql_native_password 操作)
ALTER USER 'root'@'localhost' IDENTIFIED WITH mysql_native_password BY '123456';
4.使用docker运行mysql8之后就行链接报错:
Can't connect to local MySQL server through socket '/tmp/mysql.sock
最后发现是我连接的时候没有指定 -h 需要指定一下-h 127.0.0.1 即可
MySQL8.0安装与使用的更多相关文章
- Mysql8.0安装步骤
Mysql8.0安装步骤 2018年05月10日 14:39:05 93年的香槟 阅读数:19628 标签: mysql 更多 个人分类: 数据库 版权声明:本文为博主原创文章,未经博主允许不得转 ...
- windows版mysql8.0安装详解
2018年07月04日 13:37:40 Zn昕 阅读数 6433更多 分类专栏: mysql 版权声明:本文为博主原创文章,遵循CC 4.0 by-sa版权协议,转载请附上原文出处链接和本声明. ...
- VMware workstation16 中Centos7下MySQL8.0安装过程+Navicat远程连接
1.MySQL yum源安装 2.安装后,首次登录mysql以及密码配置3.远程登录问题(Navicat15为例) 一.CentOS7+MySQL8.0,yum源安装1.安装mysql前应卸载原有my ...
- 最新版-MySQL8.0 安装 - 改密码 之坑
1. 需求背景 最近需要在一台性能一般的电脑上使用数据库,所以决定安装MySQL数据库,以前安装都是使用WorkBench自动化安装,但安装过程太慢占用空间过大,于是下载zip压缩包.之所以选择选择M ...
- mysql-8.0 安装教程(自定义配置文件,密码方式已修改)
下载zip安装包: MySQL8.0 For Windows zip包下载地址:https://dev.mysql.com/downloads/file/?id=476233,进入页面后可以不登录.后 ...
- MySQL8.0安装
背景 MySQl 8.0 出来已经有段时间了,据说性能有很大提高,在网上看过很多安装教程,大同小异, 在这里亲身实战实战下MySQL8.0在Windows10系统下的安装,以下为详细的安装步骤. 1. ...
- win 10 mysql8.0安装
1.解压缩安装包(记住自己的解压到那个目录,后面需要) 2.找到此电脑,然后找到属性(小编这里win10) 3.点击左侧高级系统设置 4.选择下面的环境变量 5.选择下面的新建,然后看图片,上面输入M ...
- mysql8.0 安装
之前一直使用的是zabbix3.4和mariadb5.5;感觉良好!!!但是...因其他原因需要重新部署 这次规划使用zabbix4.0和mysql8.0结合使用:嗯~~应该不会错吧!!! zabbi ...
- mysql8.0 安装 修改密码 允许远程连接
转自:https://www.cnblogs.com/xyabk/p/8967990.html mysql从5.7一下子跳跃到了8.0,其中的改变还是很大,有点这里就不说了,小伙伴们自己去百度了解一下 ...
- win10+mysql8.0安装
一.下载 mysql8.0 windows zip包下载地址: https://dev.mysql.com/downloads/mysql/ 1540951981(1).png 二.安装 1.解压 ...
随机推荐
- 受 LabelImg 启发的基于 web 的图像标注工具,基于 Vue 框架
受 LabelImg 启发的基于 web 的图像标注工具,基于 Vue 框架 哟,网友们好,年更鸽子终于想起了他的博客园密码.如标题所述,今天给大家带来的是一个基于 vue2 的图像标注工具.至于 ...
- PHP 程序员学会了 Go 语言就能唬住面试官吗?
大家好,我是码农先森. 唬住了 50k ,唬不住就 5k .这句话一直是 PHP 程序员之间相互吹捧.吹牛逼的笑点,每次面试过后都会挠挠头上仅剩的几根头发,回想自己是否吹牛逼会过了头.我经常在微信程序 ...
- JS处理html的编码(encode)与解码(decode)
一.用浏览器内部转换器实现转换 代码: var HtmlUtil = { // 1.用浏览器内部转换器实现html编码 htmlEncode: function(html) { // 创建一个元素容器 ...
- RDK X5首发上手体验!真的太帅啦!!!
RDK X5首发上手体验!真的太帅啦!!! 本Blog同步发表于: 地瓜机器人开发者论坛: CSDN: 一年多以前无意中了解到了RDK X3,之后我便迅速的被地平线机器人开发者论坛(现在改名为了地瓜机 ...
- Response状态码
1.数据是否正常 2.文件是否存在 3.地址自动跳转 4.服务提供错误 注:容错处理识别 •-1xx:指示信息-表示请求已接收,继续处理. •-2xx:成功-表示请求已经被成功接收.理解.接受. •- ...
- 阿里云Centos7修改MariaDB数据库连接时间,解决连接mysql报Too many connection的问题
在测项目的时候突然发现数据库连接不上了,提示Too many connection. 产生问题的原因是MySQL的Sleep进程占用了大量的连接,当时是重启mysql解决的这个问题!后来又配置了连接池 ...
- 《Vue.js 设计与实现》读书笔记 - 第11章、快速 Diff 算法
第11章.快速 Diff 算法 11.1 相同的前置元素和后置元素 快速 Diff 算法包含预处理步骤,这借鉴了纯文本 Diff 算法的思路. 先把相同的前缀后缀进行处理,然后再比较中间部分. fun ...
- Android Perfetto 系列 2:Perfetto Trace 抓取
使用 Perfetto 分析问题跟使用 Systrace 分析问题的步骤是一样的: 首先你需要抓取 Perfetto 文件 在ui.perfetto.dev 中打开 Trace 文件进行分析或者使用命 ...
- KSM的使用
使能KSM KSM只会处理通过madvise系统调用显式指定的用户进程地址空间,因此用户程序想使用这个功能就必须在分配地址空间时显式地调用madvise(addr,length,MADV_MERGEA ...
- mmap映射类型
文件映射和匿名映射都是操作系统中对于内存映射的两种类型,主要应用于进程间的通信或者大量数据的处理. 文件映射,也就是内存映射文件,是把一个文件或者文件的一部分映射到进程的地址空间,它允许对文件进行随机 ...