有Redis为什么还要本地缓存?谈谈你对本地缓存的理解?
本地缓存是将数据存储在应用程序所在的本地内存中的缓存方式。既然,已经有了 Redis 可以实现分布式缓存了,为什么还需要本地缓存呢?接下来,我们一起来看。
为什么需要本地缓存?
尽管已经有 Redis 缓存了,但本地缓存也是非常有必要的,因为它有以下优点:
- 速度优势:本地缓存直接利用本地内存,访问速度非常快,能够显著降低数据访问延迟。
- 减少网络开销:使用本地缓存可以减少与远程缓存(如 Redis)之间的数据交互,从而降低网络 I/O 开销。
- 降低服务器压力:本地缓存能够分担服务器的数据访问压力,提高系统的整体稳定性。
因此,在生产环境中,我们通常使用本地缓存+Redis 缓存一起组合成多级缓存,来共同保证程序的运行效率。
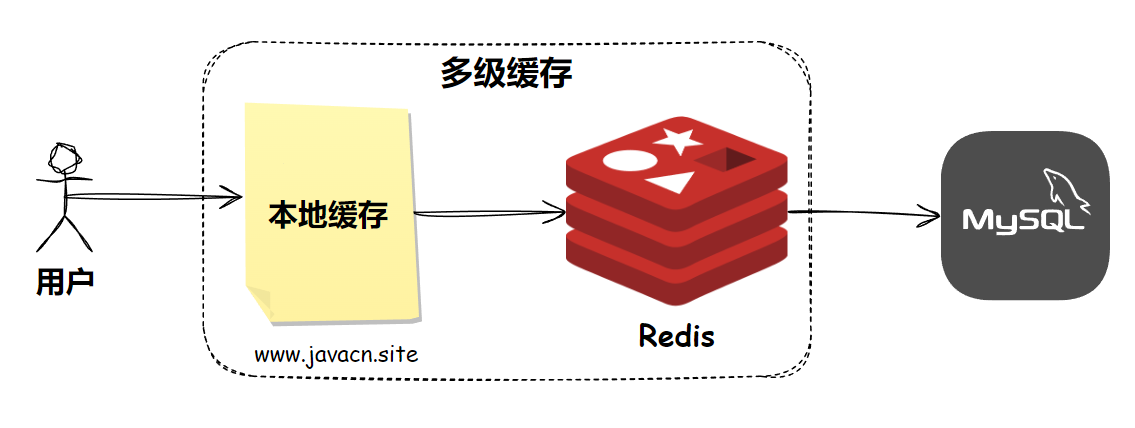
多级缓存
多级缓存是一种缓存架构策略,它使用多个层次的缓存来存储数据,以提高数据访问速度和系统性能,最简单的多级缓存就是由本地缓存 + Redis 分布式缓存组成的,如图所示:
多级缓存在获取时的实现代码如下:
public Object getFromCache(String key) {

    // 先从本地缓存中查找

    Cache.ValueWrapper localCacheValue = cacheManager.getCache("localCache").get(key);

    if (localCacheValue!= null) {

        return localCacheValue.get();

    }

    // 如果本地缓存未命中,从 Redis 中查找

    Object redisValue = redisTemplate.opsForValue().get(key);

    if (redisValue!= null) {

        // 将 Redis 中的数据放入本地缓存

        cacheManager.getCache("localCache").put(key, redisValue);

        return redisValue;

    }

    return null;

}
本地缓存的实现
本地缓存常见的方式实现有以下几种:
- Ehcache
- Caffeine
- Guava Cache
它们的基本使用如下。
1.Ehcache
1.1 添加依赖
在 pom.xml 文件中添加 Ehcache 依赖:
<dependency>

  <groupId>org.springframework.boot</groupId>

  <artifactId>spring-boot-starter-cache</artifactId>

</dependency>

<dependency>

  <groupId>org.ehcache</groupId>

  <artifactId>ehcache</artifactId>

</dependency>
1.2 配置 Ehcache
在 src/main/resources 目录下创建 ehcache.xml 文件:
<ehcache xmlns:xsi="http://www.w3.org/2001/XMLSchema-instance"

  xsi:noNamespaceSchemaLocation="http://www.ehcache.org/ehcache.xsd">

  <cache name="myCache"

    maxEntriesLocalHeap="1000"

    eternal="false"

    timeToIdleSeconds="120"

    timeToLiveSeconds="120"/>

</ehcache>
1.3 启用缓存
在 Spring Boot 应用的主类或配置类上添加 @EnableCaching 注解:
import org.springframework.boot.SpringApplication;

import org.springframework.boot.autoconfigure.SpringBootApplication;

import org.springframework.cache.annotation.EnableCaching;

@SpringBootApplication

@EnableCaching

public class CacheApplication {

    public static void main(String[] args) {

        SpringApplication.run(CacheApplication.class, args);

    }

}
1.4 使用缓存
创建一个服务类并使用 @Cacheable 注解:
import org.springframework.cache.annotation.Cacheable;

import org.springframework.stereotype.Service;

@Service

public class MyService {

    @Cacheable(value = "myCache", key = "#id")

    public String getData(String id) {

        // 模拟耗时操作

        try {

            Thread.sleep(1000);

        } catch (InterruptedException e) {

            e.printStackTrace();

        }

        return "Data for " + id;

    }

}
2.Caffeine
2.1 添加依赖
在 pom.xml 文件中添加 Caffeine 依赖:
<dependency>

  <groupId>org.springframework.boot</groupId>

  <artifactId>spring-boot-starter-cache</artifactId>

</dependency>

<dependency>

  <groupId>com.github.ben-manes.caffeine</groupId>

  <artifactId>caffeine</artifactId>

</dependency>
2.2 启用缓存
在 Spring Boot 应用的主类或配置类上添加 @EnableCaching 注解:
import org.springframework.boot.SpringApplication;

import org.springframework.boot.autoconfigure.SpringBootApplication;

import org.springframework.cache.annotation.EnableCaching;

@SpringBootApplication

@EnableCaching

public class CacheApplication {

    public static void main(String[] args) {

        SpringApplication.run(CacheApplication.class, args);

    }

}
2.3 配置 Caffeine 缓存
创建一个配置类来配置 Caffeine 缓存:
import com.github.benmanes.caffeine.cache.Caffeine;

import org.springframework.cache.CacheManager;

import org.springframework.cache.caffeine.CaffeineCacheManager;

import org.springframework.context.annotation.Bean;

import org.springframework.context.annotation.Configuration;

@Configuration

public class CacheConfig {

    @Bean

    public CacheManager cacheManager() {

        CaffeineCacheManager cacheManager = new CaffeineCacheManager("myCache");

        cacheManager.setCaffeine(Caffeine.newBuilder()

                                 .maximumSize(1000)

                                 .expireAfterWrite(120, TimeUnit.SECONDS));

        return cacheManager;

    }

}
2.4 使用缓存
创建一个服务类并使用 @Cacheable 注解:
import org.springframework.cache.annotation.Cacheable;

import org.springframework.stereotype.Service;

@Service

public class MyService {

    @Cacheable(value = "myCache", key = "#id")

    public String getData(String id) {

        // 模拟耗时操作

        try {

            Thread.sleep(1000);

        } catch (InterruptedException e) {

            e.printStackTrace();

        }

        return "Data for " + id;

    }

}
3.Guava Cache
3.1 添加依赖
在 pom.xml 文件中添加 Guava 依赖:
<dependency>

  <groupId>org.springframework.boot</groupId>

  <artifactId>spring-boot-starter-cache</artifactId>

</dependency>

<dependency>

  <groupId>com.google.guava</groupId>

  <artifactId>guava</artifactId>

</dependency>
3.2 启用缓存
在 Spring Boot 应用的主类或配置类上添加 @EnableCaching 注解:
import org.springframework.boot.SpringApplication;

import org.springframework.boot.autoconfigure.SpringBootApplication;

import org.springframework.cache.annotation.EnableCaching;

@SpringBootApplication

@EnableCaching

public class CacheApplication {

    public static void main(String[] args) {

        SpringApplication.run(CacheApplication.class, args);

    }

}
3.3 配置 Guava 缓存
创建一个配置类来配置 Guava 缓存:
import com.google.common.cache.CacheBuilder;

import org.springframework.cache.Cache;

import org.springframework.cache.CacheManager;

import org.springframework.cache.concurrent.ConcurrentMapCache;

import org.springframework.cache.concurrent.ConcurrentMapCacheManager;

import org.springframework.context.annotation.Bean;

import org.springframework.context.annotation.Configuration;

import java.util.concurrent.TimeUnit;

@Configuration

public class CacheConfig {

    @Bean

    public CacheManager cacheManager() {

        ConcurrentMapCacheManager cacheManager = new ConcurrentMapCacheManager() {

            @Override

            protected Cache createConcurrentMapCache(String name) {

                return new ConcurrentMapCache(name,

                                              CacheBuilder.newBuilder()

                                              .maximumSize(1000)

                                              .expireAfterWrite(120, TimeUnit.SECONDS)

                                              .build().asMap(), false);

            }

        };

        return cacheManager;

    }

}
3.4 使用缓存
创建一个服务类并使用 @Cacheable 注解:
import org.springframework.cache.annotation.Cacheable;

import org.springframework.stereotype.Service;

@Service

public class MyService {

    @Cacheable(value = "myCache", key = "#id")

    public String getData(String id) {

        // 模拟耗时操作

        try {

            Thread.sleep(1000);

        } catch (InterruptedException e) {

            e.printStackTrace();

        }

        return "Data for " + id;

    }

}
知识扩展:@Cacheable、@CachePut、@CacheEvict
在 Spring 框架中,@Cacheable、@CachePut 和 @CacheEvict 是用于缓存管理的注解,它们的含义如下:
- @Cacheable:用于声明一个方法的返回值是可以被缓存的。当方法被调用时,Spring Cache 会先检查缓存中是否存在相应的数据。如果存在,则直接返回缓存中的数据,避免重复执行方法;如果不存在,则执行方法并将返回值存入缓存中。它的使用示例如下:
@Cacheable(value = "users", key = "#id")

public User getUserById(String id) {

// 模拟从数据库中获取用户信息

System.out.println("Fetching user from database: " + id);

return new User(id, "User Name " + id);

}
- @CachePut:用于更新缓存中的数据。与 @Cacheable 不同,@CachePut 注解的方法总是会执行,并将返回值更新到缓存中。无论缓存中是否存在相应的数据,该方法都会执行,并将新的数据存入缓存中(如果缓存中已存在数据,则覆盖它)。它的使用示例如下:
@CachePut(value = "users", key = "#user.id")

public User updateUser(User user) {

// 模拟更新数据库中的用户信息

System.out.println("Updating user in database: " + user.getId());

// 假设更新成功

return user;

}
- @CacheEvict:用于删除缓存中的数据。当方法被调用时,指定的缓存项将被删除。这可以用于清除旧数据或使缓存项失效。它的使用示例如下:
@CacheEvict(value = "users", key = "#id")

public void deleteUser(String id) {

// 模拟从数据库中删除用户信息

System.out.println("Deleting user from database: " + id);

}

// 清除整个缓存,而不仅仅是特定的条目

@CacheEvict(value = "users", allEntries = true)

public void clearAllUsersCache() {

    System.out.println("Clearing all users cache");

}
小结
生产环境通常会使用本地缓存 + Redis 缓存,一起实现多级缓存,以提升程序的运行效率,而本地缓存的常见实现有 Ehcache、Caffeine、Guava Cache 等。然而,凡事有利就有弊,那么多级缓存最大的问题就是数据一致性问题,对于多级缓存的数据一致性问题要如何保证呢?
本文已收录到我的面试小站 www.javacn.site,其中包含的内容有:并发编程、MySQL、Redis、Spring、Spring MVC、Spring Boot、Spring Cloud、MyBatis、JVM、设计模式、消息队列等模块。
有Redis为什么还要本地缓存?谈谈你对本地缓存的理解?的更多相关文章
- lua模块demo(redis,http,mysql,cjson,本地缓存)
1. lua模块demo(redis,http,mysql,cjson,本地缓存) 1.1. 配置 在nginx.conf中设置lua_shared_dict my_cache 128m; 开启ngi ...
- 同时使用Redis缓存和Google Guava本地缓存注意事项(深拷贝和浅拷贝)
目录 1.问题场景及说明 2.Redis 缓存是深拷贝 3.Guava本地缓存直接获取则是浅拷贝 4.如何实现Guava获取本地缓存是深拷贝? 1.问题场景及说明 系统中同时使用 Redis 缓存和 ...
- 本地缓存google.guava及分布式缓存redis 随笔
近期项目用到了缓存,我选用的是主流的google.guava作本地缓存,redis作分布式 缓存,先说说我对本地缓存和分布式缓存的理解吧,可能不太成熟的地方,大家指出,一起 学习.本地缓存的特点是速度 ...
- 【开源项目系列】如何基于 Spring Cache 实现多级缓存(同时整合本地缓存 Ehcache 和分布式缓存 Redis)
一.缓存 当系统的并发量上来了,如果我们频繁地去访问数据库,那么会使数据库的压力不断增大,在高峰时甚至可以出现数据库崩溃的现象.所以一般我们会使用缓存来解决这个数据库并发访问问题,用户访问进来,会先从 ...
- 基于.NET CORE微服务框架 -谈谈Cache中间件和缓存降级
1.前言 surging受到不少.net同学的青睐,也提了不少问题,提的最多的是什么时候集成API 网关,在这里回答大家最近已经开始着手研发,应该在1,2个月内会有个初版API网关,其它像Token身 ...
- Redis的n种妙用,不仅仅是缓存
redis是键值对的数据库,常用的五种数据类型为字符串类型(string),散列类型(hash),列表类型(list),集合类型(set),有序集合类型(zset) Redis用作缓存,主要两个用途: ...
- Redis 多级缓存架构和数据库与缓存双写不一致问题
采用三级缓存:nginx本地缓存+redis分布式缓存+tomcat堆缓存的多级缓存架构 时效性要求非常高的数据:库存 一般来说,显示的库存,都是时效性要求会相对高一些,因为随着商品的不断的交易,库存 ...
- Redis: 缓存过期、缓存雪崩、缓存穿透、缓存击穿(热点)、缓存并发(热点)、多级缓存、布隆过滤器
Redis: 缓存过期.缓存雪崩.缓存穿透.缓存击穿(热点).缓存并发(热点).多级缓存.布隆过滤器 2019年08月18日 16:34:24 hanchao5272 阅读数 1026更多 分类专栏: ...
- Redis 雪崩、穿透、击穿、并发、缓存讲解以及解决方案
1.缓存雪崩 数据未加载到缓存中,或者缓存同一时间大面积的失效,从而导致所有请求都去查数据库,导致数据库CPU和内存负载过高,甚至宕机. 比如一个雪崩的简单过程 1.redis集群大面积故障 2.缓存 ...
- JAVA中使用最广泛的本地缓存?Ehcache的自信从何而来3 —— 本地缓存变身分布式集群缓存,打破本地缓存天花板
大家好,又见面了. 本文是笔者作为掘金技术社区签约作者的身份输出的缓存专栏系列内容,将会通过系列专题,讲清楚缓存的方方面面.如果感兴趣,欢迎关注以获取后续更新. 上一篇文章中,我们知晓了如何在项目中通 ...
随机推荐
- Orleans初体验
Orleans: 是一个跨平台框架,用于构建可靠且可缩放的分散式应用. 分布式应用定义为跨多个进程的应用,通常使用对等通信来超越硬件边界. 从单个本地服务器扩展到了云中数千个分布式.高度可用的应用. ...
- 这次轮到AntV增强Awesome-Graphs
前不久,Awesome-Graphs刚Release完1.1.0版本后,我在<从论文到图谱,或许只差一个html>一文中,向大家详细展示了Awesome-Graphs的产品能力与交互形态. ...
- spring声明事务失效问题
问题: 在项目开发中遇到了一个spring事务失效的问题,检查配置文档,都没有问题,其他的类中的方法都能进行事务管理,而这个类中的方法却不行. 分析 查看代码发现三个问题: 原因1 ...
- MATLAB 绘制 K 线图
需要安装 Financial Toolbox. % 示例数据 openPrices = [100, 102, 104, 103, 105]; highPrices = [105, 107, 106, ...
- 在stable diffussion中控制生成图片的光线
在摄影中,光线起着至关重要的作用,它对图像的整体质量和氛围有着显著的影响.您可以使用光线来增强主题,创造深度和维度,传达情感,以及突出重要细节. 在这篇文章中,我会告诉你如何在stable diffu ...
- 在 windows 上部署 django
环境 Django 4.1.7 python 3.11.2 Apache 2.4.46 1:安装配置 Apache 1.1:下载 Apache Apache官方下载链接 按照系统版本选择对应的,以下是 ...
- c++ push_back()和emplace_back()区别
c++ push_back()和emplace_back()区别 References C++中push_back和emplace_back的区别 push_back v.s. emplace_bac ...
- 【转】git常用操作
创建版本库 git clone url 克隆远程版本库 git init 初始化本地版本库 配置 git config --global user.name 'chengcp' 配置global级别的 ...
- EF Core – 8.0 new features
参考 Docs – What's New in EF Core 8 Support DateOnly and TimeOnly SQL Server 早在 2008 年就已经支持 date 和 tim ...
- CSS – display, visibility, opacity, transparent 的区别
前言 要让一个元素"消失", 有 3 种做法. 它们有一点点的不同. 在实战时要清楚什么时候用什么哦. 例子说明 <div class="abc"> ...