iOS开发CoreAnimation解读之三——几种常用Layer的使用解析
iOS开发CoreAnimation解读之三——几种常用Layer的使用解析
一、CAEmitterLayer
CAEmitterLayer是CoreAnimation框架中的粒子发射层,在以前的一片博客中有详细的介绍和范例,这里不再重复,地址如下:
粒子效果的应用和火焰范例:http://my.oschina.net/u/2340880/blog/485095
二、CAGradientLayer
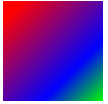
CAGradientLayer是用于色彩梯度展示的layer图层,通过CAGradientLayer,我们可以很轻松的创建出有过渡效果的色彩图。其中属性如下:
|
1
2
3
4
5
6
7
8
9
10
11
12
13
14
15
16
17
18
19
20
|
/*颜色数组,设置我们需要过的的颜色,必须是CGColor对象*/@property(nullable, copy) NSArray *colors;/*颜色开始进行过渡的位置这个数组中的元素是NSNumber类型,单调递增的,并且在0——1之间例如,如果我们设置两个颜色进行过渡,这个数组中写入0.5,则第一个颜色会在达到layer一半的时候开始向第二个颜色过渡*/@property(nullable, copy) NSArray<NSNumber *> *locations;/*下面两个参数用于设置渲染颜色的起点和终点 取值范围均为0——1默认起点为(0.5 ,0) 终点为(0.5 ,1),颜色的过渡范围就是沿y轴从上向下*/@property CGPoint startPoint;@property CGPoint endPoint;/*渲染风格 iOS中只支持一种默认的kCAGradientLayerAxial,我们无需手动设置*/@property(copy) NSString *type; |
用如下代码创建一个度过视图的效果:
|
1
2
3
4
5
6
7
8
|
CAGradientLayer * layer = [CAGradientLayer layer]; layer.colors = @[(id)[UIColor redColor].CGColor,(id)[UIColor blueColor].CGColor,(id)[UIColor greenColor].CGColor]; layer.locations = @[@0.1,@0.7,@1]; layer.bounds = CGRectMake(0, 0, 100, 100); layer.position = CGPointMake(100, 100); layer.startPoint = CGPointMake(0, 0); layer.endPoint = CGPointMake(1, 1); [self.view.layer addSublayer:layer]; |
效果如下:
三、CAReplicatorLayer
CAReplocatorLayer是拷贝视图容器,我们可以通过它,将其中的子layer进行拷贝,并进行一些差异处理,其中常用属性方法如下:
|
1
2
3
4
5
6
7
8
9
10
11
12
13
14
15
16
|
//拷贝的次数@property NSInteger instanceCount;//是否开启景深效果@property BOOL preservesDepth;//当CAReplicatorLayer的子Layer层进行动画的时候,拷贝的副本执行动画的延时@property CFTimeInterval instanceDelay;//拷贝副本的3D变换@property CATransform3D instanceTransform;//拷贝副本的颜色变换@property(nullable) CGColorRef instanceColor;//每个拷贝副本的颜色偏移参数@property float instanceRedOffset;@property float instanceGreenOffset;@property float instanceBlueOffset;//每个拷贝副本的透明度偏移参数@property float instanceAlphaOffset; |
例如,通过拷贝一个色块,使其产生平移排列:
|
1
2
3
4
5
6
7
8
9
10
11
12
13
14
|
CAReplicatorLayer *reLayer = [CAReplicatorLayer layer]; reLayer.position = CGPointMake(0, 0); CALayer * layer= [CALayer layer]; [reLayer addSublayer:layer]; [self.view.layer addSublayer:reLayer]; layer.bounds = CGRectMake(0, 0, 20, 20); layer.position = CGPointMake(30, 100); layer.backgroundColor = [UIColor redColor].CGColor; //每个副本向右平移25px reLayer.instanceTransform=CATransform3DMakeTranslation(25, 0, 0); //如果进行动画,副本延时一秒执行 reLayer.instanceDelay = 1; //拷贝十个副本 reLayer.instanceCount = 10; |
效果如下:

四、CAShapeLayer
CAShapeLayer是图形layer层,我们可以自定义这个层的形状。先来看其中我们可以使用的属性和方法:
|
1
|
@property(nullable) CGPathRef path; |
path属性为CAShapeLayer设置一个边界路径,例如我们可以创建一个三角形的路径通过如下代码:
|
1
2
3
4
5
6
7
8
|
CAShapeLayer * layer = [CAShapeLayer layer]; layer.position=CGPointMake(0,0); CGMutablePathRef path = CGPathCreateMutable(); CGPathMoveToPoint(path, 0, 100, 100); CGPathAddLineToPoint(path, 0, 300, 100); CGPathAddLineToPoint(path, 0, 200, 200); CGPathAddLineToPoint(path, 0, 100, 100); layer.path=path; |
仅仅有路径,不能将我们想要的形状画出来,下面一些属性可以对图形的一些基础属性进行设置:
|
1
2
3
4
5
6
7
8
9
10
11
12
13
14
15
16
17
18
19
20
21
22
23
24
25
26
27
28
29
30
31
32
33
34
35
36
37
38
39
40
|
//设置图形的填充颜色@property(nullable) CGColorRef fillColor;/*设置图形的填充规则 选项如下:非零填充 NSString *const kCAFillRuleNonZero; 奇偶填充 NSString *const kCAFillRuleEvenOdd;*/@property(copy) NSString *fillRule;//设置线条颜色@property(nullable) CGColorRef strokeColor;//设置线条的起点与终点 0-1之间@property CGFloat strokeStart;@property CGFloat strokeEnd;//设置线条宽度@property CGFloat lineWidth;//设置两条线段相交时锐角斜面长度@property CGFloat miterLimit;/*设置线条首尾的外观可选参数如下无形状 NSString *const kCALineCapButt; 圆形 NSString *const kCALineCapRound; 方形 NSString *const kCALineCapSquare;*/@property(copy) NSString *lineCap;/*设置线段的链接方式棱角 NSString *const kCALineJoinMiter; 平滑 NSString *const kCALineJoinRound; 折线 NSString *const kCALineJoinBevel;*/@property(copy) NSString *lineJoin; |
修改一下上面的代码,如下:
|
1
2
3
4
5
6
7
8
9
10
11
12
13
14
15
16
17
|
CAShapeLayer * layer = [CAShapeLayer layer]; layer.position=CGPointMake(0,0); CGMutablePathRef path = CGPathCreateMutable(); CGPathMoveToPoint(path, 0, 100, 100); CGPathAddLineToPoint(path, 0, 300, 100); CGPathAddLineToPoint(path, 0, 200, 200); CGPathAddLineToPoint(path, 0, 100, 100); layer.path=path; layer.fillColor= [UIColor redColor].CGColor; layer.fillRule = kCAFillRuleEvenOdd; layer.strokeColor = [UIColor blueColor].CGColor; layer.strokeStart =0; layer.strokeEnd =0.5; layer.lineWidth = 5; layer.miterLimit = 1; layer.lineJoin = kCALineJoinMiter; [self.view.layer addSublayer:layer]; |
效果如下:

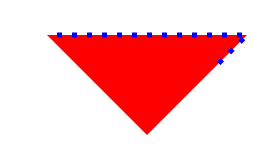
除此之外,我们还可以设置边界的线条为虚线,通过下面两个属性:
|
1
2
3
4
5
6
7
|
//设置线段的宽度为5px 间距为10px /* 这个数组中还可以继续添加,会循环进行设置 例如 5 2 1 3 则第一条线段5px,间距2px,第二条线段1px 间距3px再开始第一条线段 */ layer.lineDashPattern = @[@05,@10]; //设置从哪个位置开始 layer.lineDashPhase =5; |
如下:
五、CATextLayer
CATextLayer可以进行文本的绘制,属性方法如下:
|
1
2
3
4
5
6
7
8
9
10
11
12
13
14
15
16
17
18
19
20
21
22
23
24
25
26
27
28
29
30
|
//渲染的文字字符串@property(nullable, copy) id string;//设置字体@property(nullable) CFTypeRef font;//设置字号@property CGFloat fontSize;//设置文字颜色@property(nullable) CGColorRef foregroundColor;//是否换行@property(getter=isWrapped) BOOL wrapped;/*设置截断模式 NSString * const kCATruncationNone; 截断前部分 NSString * const kCATruncationStart; 截断后部分 NSString * const kCATruncationEnd; 截断中间 NSString * const kCATruncationMiddle;*/@property(copy) NSString *truncationMode;/*设置文字对齐模式 NSString * const kCAAlignmentNatural; NSString * const kCAAlignmentLeft; NSString * const kCAAlignmentRight; NSString * const kCAAlignmentCenter; NSString * const kCAAlignmentJustified;*/@property(copy) NSString *alignmentMode; |
iOS开发CoreAnimation解读之三——几种常用Layer的使用解析的更多相关文章
- iOS开发CoreAnimation解读之二——对CALayer的分析
iOS开发CoreAnimation解读之二——对CALayer的分析 一.UIView中的CALayer属性 1.Layer专门负责view的视图渲染 2.自定义view默认layer属性的类 二. ...
- iOS开发CoreAnimation解读之一——初识CoreAnimation核心动画编程
iOS开发CoreAnimation解读之一——初识CoreAnimation核心动画编程 一.引言 二.初识CoreAnimation 三.锚点对几何属性的影响 四.Layer与View之间的关系 ...
- IOS开发效率之为Xcode添加常用的代码片段
IOS开发效率之为Xcode添加常用的代码片段 原文地址:http://blog.csdn.net/pingchangtan367/article/details/30041285 tableview ...
- iOS 开发之模糊效果的五种实现
前言 在iOS开发中我们经常会用到模糊效果使我们的界面更加美观,而iOS本身也提供了几种达到模糊效果的API,如:Core Image,使用Accelerate.Framework中的vImage A ...
- iOS性能检测之Instrunments - 几种常用工具简单介绍
Instrunments: 没错,就是这货,很多人平时开发可能不一定会用到这个,但我要说的是,学会使用它,会让你加分不少哦 先来一张全家福: 1.打开方式 或者 两种方式都行. 2.今天主要介绍一下 ...
- iOS开发——底层OC篇&运行时常用
运行时常用 什么是Runtime(前面的文章已经说的很清楚了,这里就简单的介绍一下) 我们写的代码在程序运行过程中都会被转化成runtime的C代码执行,例如[target doSomething]; ...
- ios开发——实用技术总结Swift篇&swift常用开发技术总结
swift常用开发技术总结 懒加载:属性,数组(字典),控件... 数组(懒加载): lazy var shops:Array<Dictionary<String, String>& ...
- ios开发逆向传值的几种方法整理
第一种:代理传值 第二个控制器: @protocol WJSecondViewControllerDelegate <NSObject> - (void)changeText:(NSStr ...
- iOS开发——动画总结OC篇&所有常用动画总结
所有常用动画总结 先来装下B,看不懂没关系,其实我也看不懂-
随机推荐
- 为iPhone6设计自适应布局(一)
译者的话:本文是自适应布局的巩固篇,所以对布局约束的添加操作步骤等没有详细的说明.如果看着吃力的话请先移步Swift自适应布局(Adaptive Layout)教程. Apple从iOS6加入了Aut ...
- WebSphere性能优化的几个方法
1.更改http server的配置文件参数KeepAlive. 原因:这个值说明是否保持客户与HTTP SERVER的连接,如果设置为ON,则请求数到达MaxKeepAliveRequest ...
- Oracle instr 及 like
原文: http://www.cnblogs.com/crazyjava/archive/2012/10/31/2748202.html instr(string1,string2[,start_po ...
- 实现VS2010整合NUnit进行单元测试
1.下载安装NUnit(最新win版本为NUnit.3.2.1.msi) http://www.nunit.org/index.php?p=download 2.下载并安装VS的Visual Nuni ...
- asp.net mvc 删除栏目、栏目下又有子栏目的处理方式
- java基础知识再学习--maven
maven 下载安装: Eclipse中创建maven项目: 查询jar包的坐标:search.maven.org 添加完一个jar包的依赖以后,这个jar包所依赖的其他jar包也被导入到项目的bui ...
- lunix安装jdk(rpm格式)
1.下载后,首先把jdk-7u3-linux-x64.rpm复制到/usr/local/src#cp jdk-7u3-linux-x64.rpm /usr/local/src/2.给所有用户添加可执行 ...
- POJ1459 最大网络流
问题: POJ1459 涉及内容:最大网络流 分析: 本题问题看似非常复杂,实际上可以转化为单源点单汇点的最大网络流问题. 1)因为电量只在发电站产生,故增加源点S,构建从S到每个发电站的有向边,边的 ...
- Song of Pi
def main(): pi = ' # 预先给出需要比较的值 t = int(raw_input()) for _ in xrange(t): song = raw_input().strip(). ...
- python time模块函数
# -*-coding=utf-8 -*- __author__ = 'piay' import time def get_struct_time(): ''' 可以使用list或者字符串格式化 tm ...