LeNet训练MNIST
jupyter notebook: https://github.com/Penn000/NN/blob/master/notebook/LeNet/LeNet.ipynb
LeNet训练MNIST
 import warnings
 warnings.filterwarnings('ignore')  # 不打印 warning

 import tensorflow as tf
 import numpy as np
 import os
加载MNIST数据集
分别加载MNIST训练集、测试集、验证集
 from tensorflow.examples.tutorials.mnist import input_data

 mnist = input_data.read_data_sets("MNIST_data/", one_hot=True)
 X_train, y_train = mnist.train.images, mnist.train.labels
 X_test, y_test = mnist.test.images, mnist.test.labels
 X_validation, y_validation = mnist.validation.images, mnist.validation.labels
Extracting MNIST_data/train-images-idx3-ubyte.gz
Extracting MNIST_data/train-labels-idx1-ubyte.gz
Extracting MNIST_data/t10k-images-idx3-ubyte.gz
Extracting MNIST_data/t10k-labels-idx1-ubyte.gz
 print("Image Shape: {}".format(X_train.shape))
 print("label Shape: {}".format(y_train.shape))
 print()
 print("Training Set:   {} samples".format(len(X_train)))
 print("Validation Set: {} samples".format(len(X_validation)))
 print("Test Set:       {} samples".format(len(X_test)))
Image Shape: (55000, 784)
label Shape: (55000, 10)

Training Set:   55000 samples
Validation Set: 5000 samples
Test Set:       10000 samples
数据处理
由于LeNet的输入为32x32xC(C为图像通道数),而MNIST每张图像的尺寸为28x28,所以需要对图像四周进行填充,并添加一维,使得每幅图像的形状为32x32x1。
 # 使用0对图像四周进行填充
 X_train = np.array([np.pad(X_train[i].reshape((28, 28)), (2, 2), 'constant')[:, :, np.newaxis] for i in range(len(X_train))])
 X_validation = np.array([np.pad(X_validation[i].reshape((28, 28)), (2, 2), 'constant')[:, :, np.newaxis] for i in range(len(X_validation))])
 X_test = np.array([np.pad(X_test[i].reshape((28, 28)), (2, 2), 'constant')[:, :, np.newaxis] for i in range(len(X_test))])

 print("Updated Image Shape: {}".format(X_train.shape))
Updated Image Shape: (55000, 32, 32, 1)
MNIST数据展示
 import random
 import numpy as np
 import matplotlib.pyplot as plt
 %matplotlib inline

 index = random.randint(0, len(X_train))
 image = X_train[index].squeeze().reshape((32, 32))

 plt.figure(figsize=(2,2))
 plt.imshow(image, cmap="gray")
 print(y_train[index])
[0. 0. 0. 0. 0. 1. 0. 0. 0. 0.]

LeNet网络结构

Input
The LeNet architecture accepts a 32x32xC image as input, where C is the number of color channels. Since MNIST images are grayscale, C is 1 in this case. LeNet的输入为32x32xC的图像,C为图像的通道数。在MNIST中,图像为灰度图,因此C等于1。
Architecture
Layer 1: Convolutional. 输出为28x28x6的张量。
Activation. 激活函数。
Pooling. 输出为14x14x6的张量。
Layer 2: Convolutional. 输出为10x10x16的张量。
Activation. 激活函数。
Pooling. 输出为5x5x16的张量。
Flatten. 将张量展平为一维向量,使用tf.contrib.layers.flatten可以实现。
Layer 3: Fully Connected. 输出为120长度的向量。
Activation. 激活函数。
Layer 4: Fully Connected. 输出为84长度的向量。
Activation. 激活函数。
Layer 5: Fully Connected (Logits). 输出为10长度的向量。
 # 卷积层
 def conv_layer(x, filter_shape, stride, name):
     with tf.variable_scope(name):
         W = tf.get_variable('weights', shape=filter_shape, initializer=tf.truncated_normal_initializer())
         b = tf.get_variable('biases', shape=filter_shape[-1], initializer=tf.zeros_initializer())
     return tf.nn.conv2d(x, W, strides=stride, padding='VALID', name=name) + b
 # 全连接层
 def fc_layer(x, in_size, out_size, name):
     with tf.variable_scope(name):
         W = tf.get_variable('weights', shape=(in_size, out_size), initializer=tf.truncated_normal_initializer())
         b = tf.get_variable('biases', shape=(out_size), initializer=tf.zeros_initializer())

     return tf.nn.xw_plus_b(x, W, b, name=name)
 def relu_layer(x, name):
     return tf.nn.relu(x, name=name)
 from tensorflow.contrib.layers import flatten

 def LeNet(x):
     conv1 = conv_layer(x, filter_shape=(5, 5, 1, 6), stride=[1, 1, 1, 1], name='conv1')
     relu1 = relu_layer(conv1, 'relu1')
     max_pool1 = max_pool_layer(relu1,  kernel_size=[1, 2, 2, 1], stride=[1, 2, 2, 1], name='max_pool1')

     conv2 = conv_layer(max_pool1, filter_shape=(5, 5, 6, 16), stride=[1, 1, 1, 1], name='conv2')
     relu2 = relu_layer(conv2, 'relu2')
     max_pool2 = max_pool_layer(relu2,  kernel_size=[1, 2, 2, 1], stride=[1, 2, 2, 1], name='max_pool1')

     flat = flatten(max_pool2)

     fc3 = fc_layer(flat, 400, 120, name='fc3')
     relu3 = relu_layer(fc3, 'relu3')

     fc4 = fc_layer(relu3, 120, 84, name='fc4')
     relu4 = relu_layer(fc4, 'relu4')

     logits = fc_layer(relu4, 84, 10, name='fc5')

     return logits
TensorFlow设置
 EPOCHS = 10
 BATCH_SIZE = 128
 log_dir = './log/'

 x = tf.placeholder(tf.float32, (None, 32, 32, 1))
 y = tf.placeholder(tf.int32, (None, 10))

 # 定义损失函数
 logits = LeNet(x)
 cross_entropy = tf.nn.softmax_cross_entropy_with_logits(labels=y, logits=logits)
 loss = tf.reduce_mean(cross_entropy)
 train = tf.train.AdamOptimizer(learning_rate=0.01).minimize(loss)
训练
 from sklearn.utils import shuffle
 import shutil
 log_dir = './logs/'
 if os.path.exists(log_dir):
     shutil.rmtree(log_dir)
 os.makedirs(log_dir)
 train_writer = tf.summary.FileWriter(log_dir+'train/')
 valid_writer = tf.summary.FileWriter(log_dir+'valid/')

 ckpt_path = './ckpt/'
 saver = tf.train.Saver()

 with tf.Session() as sess:
     sess.run(tf.global_variables_initializer())
     n_samples = len(X_train)

     step = 0
     for i in range(EPOCHS):
         X_train, y_train = shuffle(X_train, y_train) # 打乱数据
         # 使用mini-batch训练
         for offset in range(0, n_samples, BATCH_SIZE):
             end = offset + BATCH_SIZE
             batch_x, batch_y = X_train[offset:end], y_train[offset:end]
             sess.run(train, feed_dict={x: batch_x, y: batch_y})

             train_loss = sess.run(loss, feed_dict={x: batch_x, y: batch_y})
             train_summary = tf.Summary(value=[
                 tf.Summary.Value(tag="loss", simple_value=train_loss)
             ])
             train_writer.add_summary(train_summary, step)
             train_writer.flush()
             step += 1

         # 每个epoch使用验证集对网络进行验证
         valid_loss = sess.run(loss, feed_dict={x: X_validation, y: y_validation})
         valid_summary = tf.Summary(value=[
                 tf.Summary.Value(tag="loss", simple_value=valid_loss)
         ])
         valid_writer.add_summary(valid_summary, step)
         valid_writer.flush()

         print('epoch', i, '>>> loss:', valid_loss)

     # 保存模型
     saver.save(sess, ckpt_path + 'model.ckpt')
     print("Model saved")
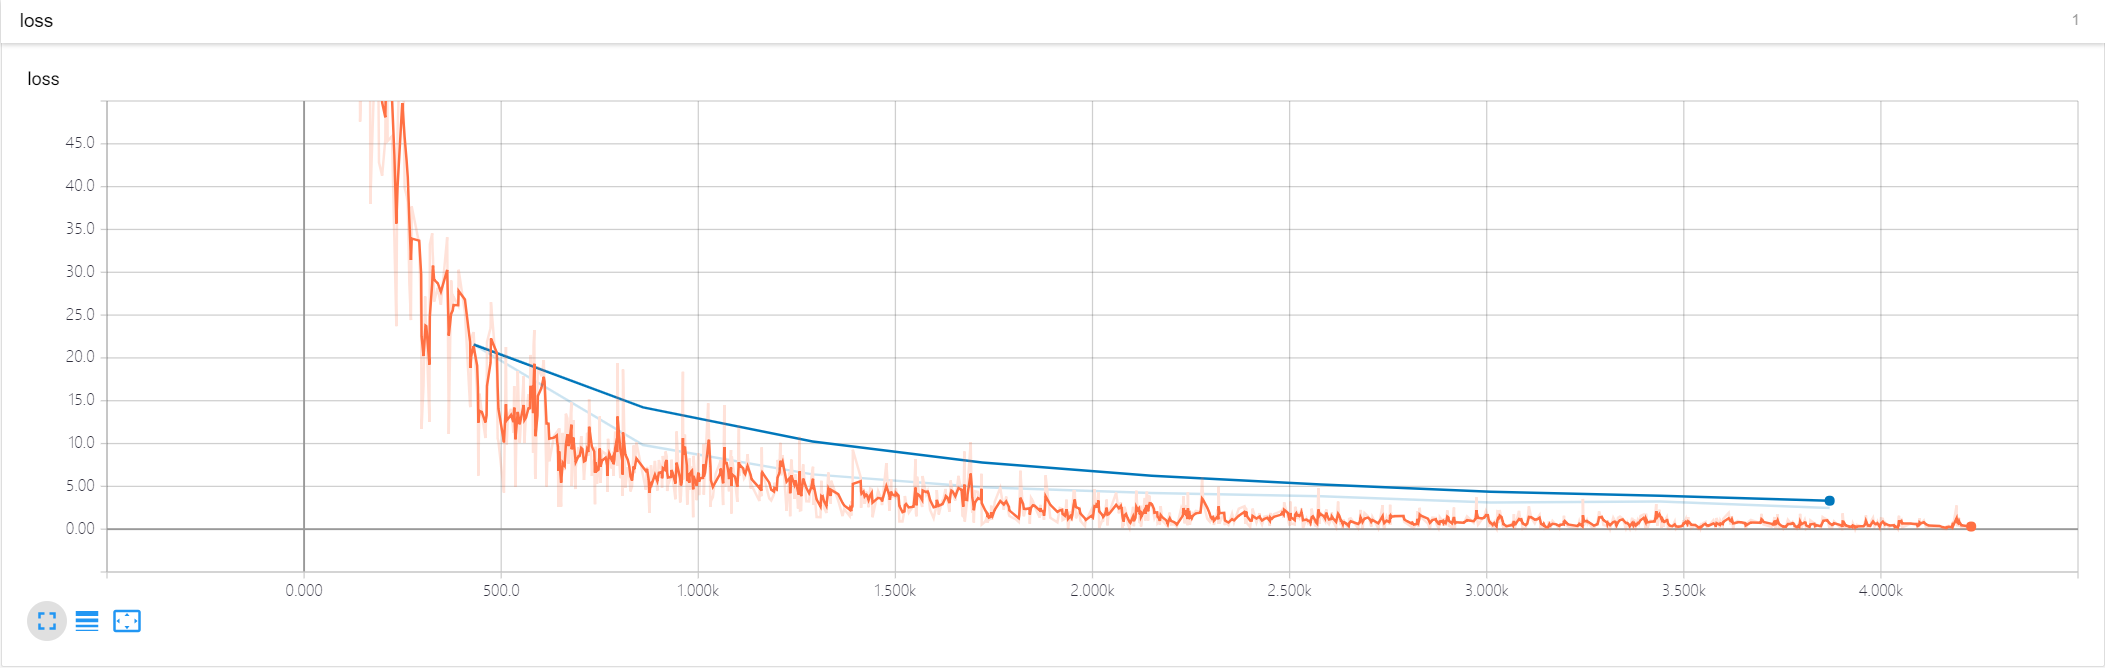
epoch 0 >>> validation loss: 39.530758
epoch 1 >>> validation loss: 19.649899
epoch 2 >>> validation loss: 11.780323
epoch 3 >>> validation loss: 8.7316675
epoch 4 >>> validation loss: 6.396747
epoch 5 >>> validation loss: 5.4544454
epoch 6 >>> validation loss: 4.5326686
epoch 7 >>> validation loss: 3.5578024
epoch 8 >>> validation loss: 3.2353864
epoch 9 >>> validation loss: 3.5096574
Model saved
训练和验证的loss曲线
测试
 correct = tf.equal(tf.argmax(logits, 1), tf.argmax(y, 1))
 accuracy = tf.reduce_mean(tf.cast(correct, tf.float32))

 with tf.Session() as sess:
     saver.restore(sess, tf.train.latest_checkpoint('./ckpt'))

     test_accuracy = sess.run(accuracy, feed_dict={x: X_test, y: y_test})
     print("Test Accuracy = {}".format(test_accuracy))
INFO:tensorflow:Restoring parameters from ./ckpt/model.ckpt
Test Accuracy = 0.9574000239372253
LeNet训练MNIST的更多相关文章
- Window10 上MindSpore(CPU)用LeNet网络训练MNIST
本文是在windows10上安装了CPU版本的Mindspore,并在mindspore的master分支基础上使用LeNet网络训练MNIST数据集,实践已训练成功,此文为记录过程中的出现问题: ( ...
- 使用caffe训练mnist数据集 - caffe教程实战(一)
个人认为学习一个陌生的框架,最好从例子开始,所以我们也从一个例子开始. 学习本教程之前,你需要首先对卷积神经网络算法原理有些了解,而且安装好了caffe 卷积神经网络原理参考:http://cs231 ...
- 实践详细篇-Windows下使用VS2015编译的Caffe训练mnist数据集
上一篇记录的是学习caffe前的环境准备以及如何创建好自己需要的caffe版本.这一篇记录的是如何使用编译好的caffe做训练mnist数据集,步骤编号延用上一篇 <实践详细篇-Windows下 ...
- CAFFE学习笔记(一)Caffe_Example之训练mnist
0.参考文献 [1]caffe官网<Training LeNet on MNIST with Caffe>; [2]薛开宇<读书笔记4学习搭建自己的网络MNIST在caffe上进行训 ...
- Caffe_Example之训练mnist
0.参考文献 [1]caffe官网<Training LeNet on MNIST with Caffe>; [2]薛开宇<读书笔记4学习搭建自己的网络MNIST在caffe上进行训 ...
- 【Caffe 测试】Training LeNet on MNIST with Caffe
Training LeNet on MNIST with Caffe We will assume that you have Caffe successfully compiled. If not, ...
- 2、TensorFlow训练MNIST
装载自:http://www.tensorfly.cn/tfdoc/tutorials/mnist_beginners.html TensorFlow训练MNIST 这个教程的目标读者是对机器学习和T ...
- TensorFlow训练MNIST报错ResourceExhaustedError
title: TensorFlow训练MNIST报错ResourceExhaustedError date: 2018-04-01 12:35:44 categories: deep learning ...
- mxnet卷积神经网络训练MNIST数据集测试
mxnet框架下超全手写字体识别—从数据预处理到网络的训练—模型及日志的保存 import numpy as np import mxnet as mx import logging logging. ...
随机推荐
- 《Tornado介绍》—— 读后总结
- RichText 富文本开源项目总结
在Android开发中,我们不免会遇到富文本的编辑和展示的需求,以下是本人之前star的富文本编辑器的开源项目,供大家参考: 一.RichEditor 开源项目地址:https://github.co ...
- API接口开发(持续更新)
1. 接口调用失败时的处理方式 接口调用失败时分为 请求失败和业务失败. 请求失败的相关信息可通过HTTP状态码体现出来, 业务失败的相关信息需要在返回数据中体现出来. 2. 分页查询 批量查询时需要 ...
- Powermock2.0.0 详细 总结
目录 1 单元测试 2 Junit测试框架 2.1 Junit是什么 2.2 Junit 能做什么? 3 Junit测试的局限性 4 Mock技术 5 相关的Mock工具 5.1 Mockito.Ea ...
- [原创]K8Cscan插件之端口扫描C#源码
[原创]K8 Cscan 大型内网渗透自定义扫描器 https://www.cnblogs.com/k8gege/p/10519321.html Cscan简介:何为自定义扫描器?其实也是插件化,但C ...
- 破解第二课 JMP法
首先,我用录屏大师自制了一个视频,给视频加上密码.任意输入,看到报错信息“密码不对,请重新输入” 第一步 反汇编窗口右键点击“中文搜索引擎”---“智能搜索”,搜索引擎界面再次搜索“不对”,结果如下: ...
- Asp.Net Core Web Api图片上传(一)集成MongoDB存储实例教程
Asp.Net Core Web Api图片上传及MongoDB存储实例教程(一) 图片或者文件上传相信大家在开发中应该都会用到吧,有的时候还要对图片生成缩略图.那么如何在Asp.Net Core W ...
- 全网最全的Windows下Anaconda2 / Anaconda3里正确下载安装爬虫框架Scrapy(离线方式和在线方式)(图文详解)
不多说,直接上干货! 参考博客 全网最全的Windows下Anaconda2 / Anaconda3里正确下载安装OpenCV(离线方式和在线方式)(图文详解) 第一步:首先,提示升级下pip 第二步 ...
- Android内存优化之磁盘缓存
前言: 在上一篇文章中介绍了内存缓存,内存缓存的优点就是很快,但是它又有缺点: 空间小,内存缓存不可能很大: 内存紧张时可能被清除: 在应用退出时就会消失,做不到离线: 基于以上的缺点有时候又需要另外 ...
- Mysql 调优和水平扩展思路
系统调优参数 一些比较重要的参数: back_log:back_log值指出在MySQL暂时停止回答新请求之前的短时间内多少个请求可以被存在堆栈中.如果MySql的连接数据达到max_connecti ...