
elasticsearch集群安装+安全验证+kibana安装
准备环境
- 启动4个centos容器, 并暴露相对应端口 (我的本机ip为172.16.1.236,以下涉及到的地方需要修改为自己的ip)
| node_name | ip | http port | transport port |
|---|---|---|---|
| es01 | docker宿主机ip | 9205:9200 | 9305: 9300 |
| es02 | docker宿主机ip | 9206:9200 | 9306: 9300 |
| es03 | docker宿主机ip | 9207:9200 | 9307: 9300 |
kibana : 5601:5601
- 执行以下命令启动centos容器并暴露相应端口(使用-p 来对外映射docker容器端口)
docker run -tid --name centos1 -p 9205:9200 -p9305:9300 --privileged=true centos:latest /sbin/init

docker run -tid --name centos2 -p 9206:9200 -p9306:9300 --privileged=true centos:latest /sbin/init

docker run -tid --name centos3 -p 9207:9200 -p9307:9300 --privileged=true centos:latest /sbin/init

#centos4用于kibana安装

docker run -tid --name centos4 -p 5601:5601 --privileged=true centos:latest /sbin/init
- 注意:如果使用shell工具连接,增加 -p22:22 参数
- 参考es快速启动准备es安装包等数据
配置修改
修改system.conf配置 /etc/systemd/system.conf
sed -i "s/#DefaultLimitMEMLOCK=/DefaultLimitMEMLOCK=infinity/g" /etc/systemd/system.conf
修改limits.cong配置 /etc/security/limits.conf
- 修改如下
# nofile 最大打开文件描述符数

# nproc 最大进程数

# memlock 最大内存锁定

echo "* soft nofile 65536

* hard nofile 131072

* soft nproc 4096

* hard nproc 4096

* soft memlock unlimited

* hard memlock unlimited" >> /etc/security/limits.conf
修改sysctl配置 /etc/sysctl.conf
- 修改如下
echo "vm.max_map_count = 262145" >> /etc/sysctl.conf

#生效

sysctl -p
修改es占用内存 /opt/es01/config/jvm.options
sed -i "s/-Xms1g/-Xms"800m"/g" /opt/es/config/jvm.options

sed -i "s/-Xmx1g/-Xmx"800m"/g" /opt/es/config/jvm.options
开启ES内存锁定 /opt/es01/config/elasticsearch.yml
- 增加如下配置
bootstrap.memory_lock: true
ES配置文件详解
节点类型
- 主节点
候选主节点的设置方法是设置node.mater为true,默认情况下,node.mater和node.data的值都为true,即该节点既可以做候选主节点也可以做数据节点。由于数据节点承载了数据的操作,负载通常都很高,所以随着集群的扩大,建议将二者分离,设置专用的候选主节点。当我们设置node.data为false,就将节点设置为专用的候选主节点了。
node.master: true

node.data: false
- 数据节点
数据节点负责数据的存储和相关具体操作,比如CRUD、搜索、聚合。所以,数据节点对机器配置要求比较高,首先需要有足够的磁盘空间来存储数据,其次数据操作对系统CPU、Memory和IO的性能消耗都很大。通常随着集群的扩大,需要增加更多的数据节点来提高可用性。
node.master: false

node.data: true
- client节点
即不会被选作主节点,也不会存储任何索引数据。该节点只能处理路由请求,处理搜索,分发索引操作等,从本质上来说该客户节点表现为智能负载平衡器。
 node.master = false

 node.data = false
配置集群名称
- 不同的节点配置同一个cluster.name可组成同一个集群,确保不同的集群使用不同的cluster.name
- 配置如下 :
cluster.name: es-cluster-test
配置ES节点名称
- node.name表示集群节点的名称,集群中节点进行区分,如果不配置则默认为主机名
- 配置如下
node.name: es01
配置ES节点监听地址
- 如果不配置,默认是监听在127.0.0.1 和 [::1],同时以development的方式启动。
#监听在指定ip上

network.host : 172.17.0.1

#监听在所有ip上

network.host : 0.0.0.0
日志数据路径配置
- 配置方式
path.data: /opt/data/es

path.logs: /opt/log/es

path:

    data: /opt/data/es

    logs: /opt/log/es
- path.data, 可以设置多个目录
path:

    logs: /opt/log/es

    data:

        - /opt/data/es-A

        - /opt/data/es-B

        - /opt/data/es-C
集群发现配置
- discovery.seed_hosts 配置方式如下
用于多个集群节点进行发现,组成集群
discovery.seed_hosts: ["192.168.1.10:9300", "192.168.1.11", "seeds.mydomain.com"]

discovery.seed_hosts:

   - 192.168.1.10:9300

   - 192.168.1.11

   - seeds.mydomain.com
- cluster.initial_master_nodes 配置方式如下
用于集群在第一次启动时,指定可以参与选举的主节点列表 (node.master: true)
cluster.initial_master_nodes: ["es01", "es02", "es03"]

cluster.initial_master_nodes:

    -es01

    -es02

    -es03
- discovery.seed_hosts 如果不配置,会自动监听本地回环地址 将本地多个elasticsearch实例加入到集群中。
jvm配置
- /opt/es/config/jvm.options (一般配置为机器内存大小的一般)
sed -i "s/-Xms1g/-Xms"800m"/g" /opt/es/config/jvm.options

sed -i "s/-Xmx1g/-Xmx"800m"/g" /opt/es/config/jvm.options
配置Elasticsearch(本次测试配置)
es01
cluster.name: es-cluster-test

node.name: es01

path.logs: /opt/log/es

path.data: /opt/data/es

bootstrap.memory_lock: true

network.host: 0.0.0.0

http.port: 9200

transport.tcp.port: 9300

discovery.seed_hosts: ["172.16.1.236:9306", "172.16.1.236:9307"]

cluster.initial_master_nodes: ["es01", "es02", "es03"]
es02
cluster.name: es-cluster-test

node.name: es02

path.logs: /opt/log/es

path.data: /opt/data/es

bootstrap.memory_lock: true

network.host: 0.0.0.0

http.port: 9200

transport.tcp.port: 9300

discovery.seed_hosts: ["172.16.1.236:9305", "172.16.1.236:9307"]

cluster.initial_master_nodes: ["es01", "es02", "es03"]
es03
cluster.name: es-cluster-test

node.name: es03

path.logs: /opt/log/es

path.data: /opt/data/es

bootstrap.memory_lock: true

network.host: 0.0.0.0

http.port: 9200

transport.tcp.port: 9300

discovery.seed_hosts: ["172.16.1.236:9305", "172.16.1.236:9306"]

cluster.initial_master_nodes: ["es01", "es02", "es03"]
启动Elasticsearch
启动
- 分别进入不同的容器启动elasticsearch
- 命令如下
/opt/es/bin/elasticsearch -d
查看容器状况(容器内)
- 查看集群是否启动成功
[elasticsearch@813bf8515935 /]$ curl localhost:9200/_cat/nodes

172.17.0.7 28 91  9 0.58 0.66 0.90 dilm - es02

172.17.0.6 15 91  5 0.58 0.66 0.90 dilm - es01

172.17.0.8 35 91 13 0.58 0.66 0.90 dilm * es03
- 查看当前节点
[elasticsearch@813bf8515935 /]$ curl localhost:9200

{

  "name" : "es03",

  "cluster_name" : "es-cluster-test",

  "cluster_uuid" : "Syj18FUrR1GdnGzghBIacQ",

  "version" : {

    "number" : "7.6.2",

    "build_flavor" : "default",

    "build_type" : "tar",

    "build_hash" : "ef48eb35cf30adf4db14086e8aabd07ef6fb113f",

    "build_date" : "2020-03-26T06:34:37.794943Z",

    "build_snapshot" : false,

    "lucene_version" : "8.4.0",

    "minimum_wire_compatibility_version" : "6.8.0",

    "minimum_index_compatibility_version" : "6.0.0-beta1"

  },

  "tagline" : "You Know, for Search"

}
- 查看节点健康状况
[elasticsearch@813bf8515935 /]$ curl localhost:9200/_cat/health?v

epoch      timestamp cluster         status node.total node.data shards pri relo init unassign pending_tasks max_task_wait_time active_shards_percent

1605859559 08:05:59  es-cluster-test green           3         3      0   0    0    0        0             0

      -                100.0%
查看容器状况(宿主机)
- 由于使用docker容器安装,因此也可以通过宿主机映射端口访问,本次测试宿主机为windows
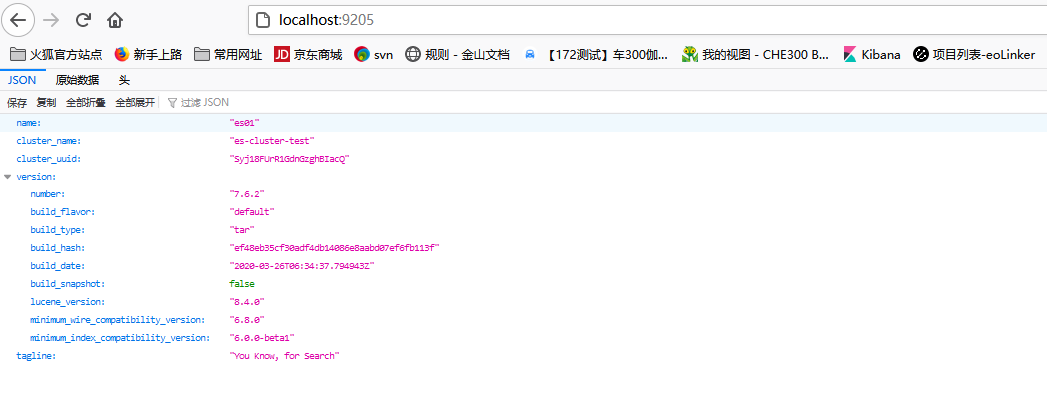
开启集群安全验证
修改配置
- 分别在不同的Es节点修改配置开启安全验证
echo "xpack.security.enabled: true" >> /opt/es/config/elasticsearch.yml

echo "xpack.security.transport.ssl.enabled: true" >> /opt/es/config/elasticsearch.yml
生成证书
- 选择其中一个节点生成CA证书,默认情况下生成证书放在 /opt/es
#创建ca证书   /opt/es/bin/elasticsearch-certutil ca -v

[elasticsearch@c824e845075b es]$ /opt/es/bin/elasticsearch-certutil ca -v

This tool assists you in the generation of X.509 certificates and certificate

signing requests for use with SSL/TLS in the Elastic stack.

The 'ca' mode generates a new 'certificate authority'

This will create a new X.509 certificate and private key that can be used

to sign certificate when running in 'cert' mode.

Use the 'ca-dn' option if you wish to configure the 'distinguished name'

of the certificate authority

By default the 'ca' mode produces a single PKCS#12 output file which holds:

    * The CA certificate

    * The CA's private key

If you elect to generate PEM format certificates (the -pem option), then the output will

be a zip file containing individual files for the CA certificate and private key

Please enter the desired output file [elastic-stack-ca.p12]:    #输入回车,使用默认

Enter password for elastic-stack-ca.p12 :      #回车,暂不输入密码
- 与上一步骤同一个节点创建节点见认证用的证书
#创建节点间证书  /opt/es/bin/elasticsearch-certutil cert --ca elastic-stack-ca.p12

[elasticsearch@c824e845075b es]$ /opt/es/bin/elasticsearch-certutil cert --ca elastic-stack-ca.p12

This tool assists you in the generation of X.509 certificates and certificate

signing requests for use with SSL/TLS in the Elastic stack.

The 'cert' mode generates X.509 certificate and private keys.

    * By default, this generates a single certificate and key for use

       on a single instance.

    * The '-multiple' option will prompt you to enter details for multiple

       instances and will generate a certificate and key for each one

    * The '-in' option allows for the certificate generation to be automated by describing

       the details of each instance in a YAML file

    * An instance is any piece of the Elastic Stack that requires an SSL certificate.

      Depending on your configuration, Elasticsearch, Logstash, Kibana, and Beats

      may all require a certificate and private key.

    * The minimum required value for each instance is a name. This can simply be the

      hostname, which will be used as the Common Name of the certificate. A full

      distinguished name may also be used.

    * A filename value may be required for each instance. This is necessary when the

      name would result in an invalid file or directory name. The name provided here

      is used as the directory name (within the zip) and the prefix for the key and

      certificate files. The filename is required if you are prompted and the name

      is not displayed in the prompt.

    * IP addresses and DNS names are optional. Multiple values can be specified as a

      comma separated string. If no IP addresses or DNS names are provided, you may

      disable hostname verification in your SSL configuration.

    * All certificates generated by this tool will be signed by a certificate authority (CA).

    * The tool can automatically generate a new CA for you, or you can provide your own with the

         -ca or -ca-cert command line options.

By default the 'cert' mode produces a single PKCS#12 output file which holds:

    * The instance certificate

    * The private key for the instance certificate

    * The CA certificate

If you specify any of the following options:

    * -pem (PEM formatted output)

    * -keep-ca-key (retain generated CA key)

    * -multiple (generate multiple certificates)

    * -in (generate certificates from an input file)

then the output will be be a zip file containing individual certificate/key files

Enter password for CA (elastic-stack-ca.p12) :      #暂留空

Please enter the desired output file [elastic-certificates.p12]: #默认

Enter password for elastic-certificates.p12 :        #ca证书密码,此次为空

Certificates written to /opt/es/elastic-certificates.p12

This file should be properly secured as it contains the private key for

your instance.

This file is a self contained file and can be copied and used 'as is'

For each Elastic product that you wish to configure, you should copy

this '.p12' file to the relevant configuration directory

and then follow the SSL configuration instructions in the product guide.

For client applications, you may only need to copy the CA certificate and

configure the client to trust this certificate.
- 配置ES节点使用这个证书
# 将生成证书拷贝到 /opt/es/config/certs目录下

[elasticsearch@c824e845075b es]$ mkdir -p  /opt/es/config/certs

[elasticsearch@c824e845075b config]$ mv /opt/es/elastic-* /opt/es/config/certs/

# 将certs目录拷贝到其它Es节点 (在宿主机进行该操作)

#拷贝certs目录到本地

PS C:\Users\Administrator> docker cp centos2:/opt/es/config/certs C:\Users\Administrator\Desktop

#拷贝certs目录到其它两个节点

PS C:\Users\Administrator> docker cp C:\Users\Administrator\Desktop\certs centos1:/opt/es/config

PS C:\Users\Administrator> docker cp C:\Users\Administrator\Desktop\certs centos3:/opt/es/config

#在每个节点修改 /opt/es/config/elasticsearch.yml 配置

[elasticsearch@813bf8515935 /]$ echo "xpack.security.transport.ssl.verification_mode: certificate

xpack.security.transport.ssl.keystore.path: certs/elastic-certificates.p12

xpack.security.transport.ssl.truststore.path: certs/elastic-certificates.p12" >> /opt/es/config/elasticsearch.yml
- 重启
#在每个容器杀死elastic进程并重启

[elasticsearch@c824e845075b config]$ kill -9 $(ps -ef | grep 'elasticsearch' | grep '/bin/java' | grep -v grep | awk '{print $2}')

#启动

[elasticsearch@c824e845075b config]$ /opt/es/bin/elasticsearch -d
- 任意一个节点生成密码
[elasticsearch@6ebd0bc8cc5d certs]$ /opt/es/bin/elasticsearch-setup-passwords interactive

Initiating the setup of passwords for reserved users elastic,apm_system,kibana,logstash_system,beats_system,remote_monitoring_user.

You will be prompted to enter passwords as the process progresses.

Please confirm that you would like to continue [y/N]y

Enter password for [elastic]:

Reenter password for [elastic]:

Enter password for [apm_system]:

Reenter password for [apm_system]:

Enter password for [kibana]:

Reenter password for [kibana]:

Enter password for [logstash_system]:

Reenter password for [logstash_system]:

Enter password for [beats_system]:

Reenter password for [beats_system]:

Enter password for [remote_monitoring_user]:

Reenter password for [remote_monitoring_user]:

Changed password for user [apm_system]

Changed password for user [kibana]

Changed password for user [logstash_system]

Changed password for user [beats_system]

Changed password for user [remote_monitoring_user]

Changed password for user [elastic]
- 测试
#此时直接访问会报无权限异常,需要增加 -u elastic 参数进行访问

[elasticsearch@6ebd0bc8cc5d certs]$ curl localhost:9200

{"error":{"root_cause":[{"type":"security_exception","reason":"missing authentication credentials for REST request [/]","header":{"WWW-Authenticate":"Basic realm=\"security\" charset=\"UTF-8\""}}],"type":"security_exception","reason":"missing authentication credentials for REST request [/]","header":{"WWW-Authenticate":"Basic realm=\"security\" charset=\"UTF-8\""}},"status":401}

#增加 -u elastic

[elasticsearch@6ebd0bc8cc5d certs]$ curl -u elastic localhost:9200

Enter host password for user 'elastic':

{

  "name" : "es01",

  "cluster_name" : "es-cluster-test",

  "cluster_uuid" : "Syj18FUrR1GdnGzghBIacQ",

  "version" : {

    "number" : "7.6.2",

    "build_flavor" : "default",

    "build_type" : "tar",

    "build_hash" : "ef48eb35cf30adf4db14086e8aabd07ef6fb113f",

    "build_date" : "2020-03-26T06:34:37.794943Z",

    "build_snapshot" : false,

    "lucene_version" : "8.4.0",

    "minimum_wire_compatibility_version" : "6.8.0",

    "minimum_index_compatibility_version" : "6.0.0-beta1"

  },

  "tagline" : "You Know, for Search"

}
kibana的安装配置
准备
- kibana版本号与elasticsearch相同,本文使用7.6.2
- 将主备好的kibana压缩包移动到容器内,并进入到容器
PS C:\Users\Administrator> docker cp C:\Users\Administrator\Downloads\kibana-7.6.2-linux-x86_64.tar.gz centos4:/opt

PS C:\Users\Administrator> docker exec -it centos4 /bin/bash
- 解压安装
[root@db0759d8c6c8 /]# useradd kibana

[root@db0759d8c6c8 /]# chown -R kibana /opt

[root@db0759d8c6c8 /]# su kibana

[kibana@db0759d8c6c8 /]$ cd /opt/

[kibana@db0759d8c6c8 opt]$ tar -zxvf /opt/kibana-7.6.2-linux-x86_64.tar.gz -C /opt && mv kibana-7.6.2-linux-x86_64 kibana
配置文件修改并启动
- kibana配置文件修改
[kibana@db0759d8c6c8 opt]$ vi kibana/config/kibana.yml

server.port: 5601

server.host: "0.0.0.0"

server.name: "mykibana"

elasticsearch.hosts: ["http://172.16.1.236:9205"]

kibana.index: ".kibana"

elasticsearch.username: "kibana"

elasticsearch.password: "123123"

i18n.locale: "zh-CN"
- 启动
[kibana@db0759d8c6c8 opt]$ /opt/kibana/bin/kibana
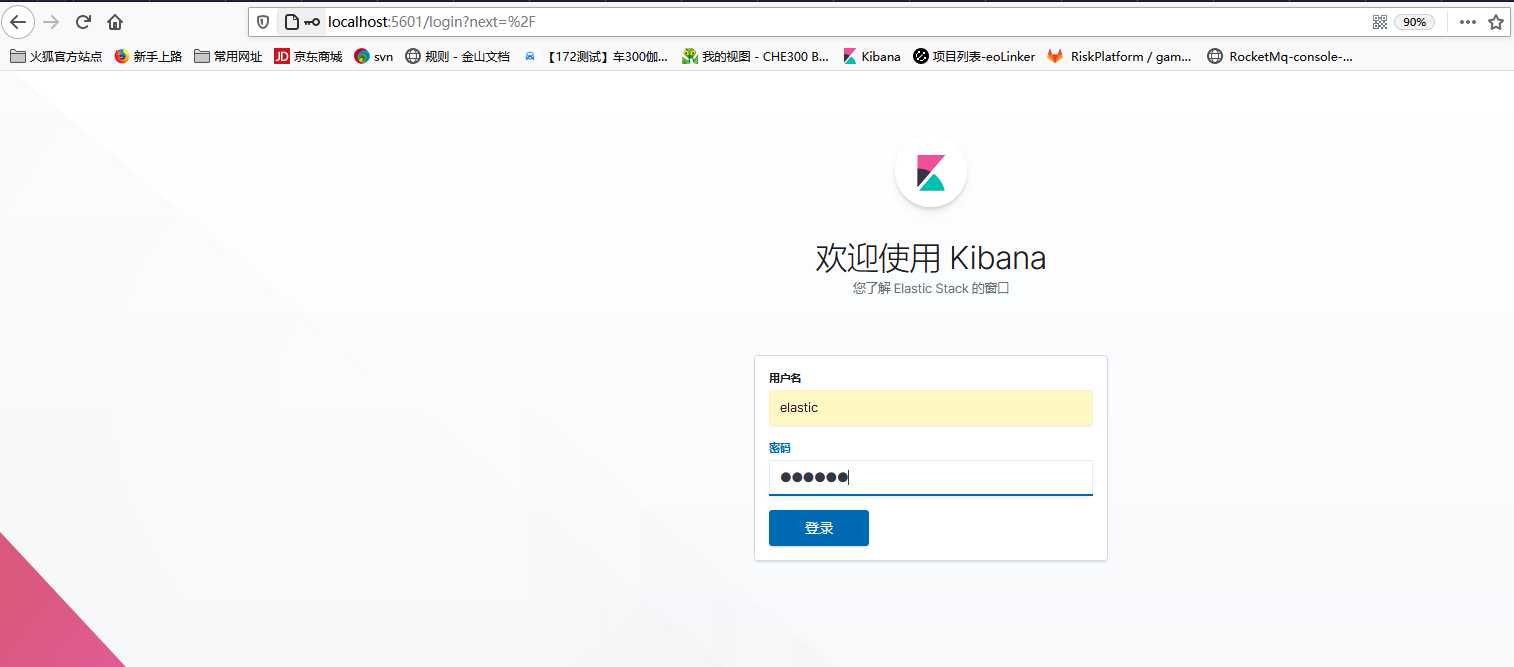
- 在宿主访问 127.0.0.1:5601 进行测试
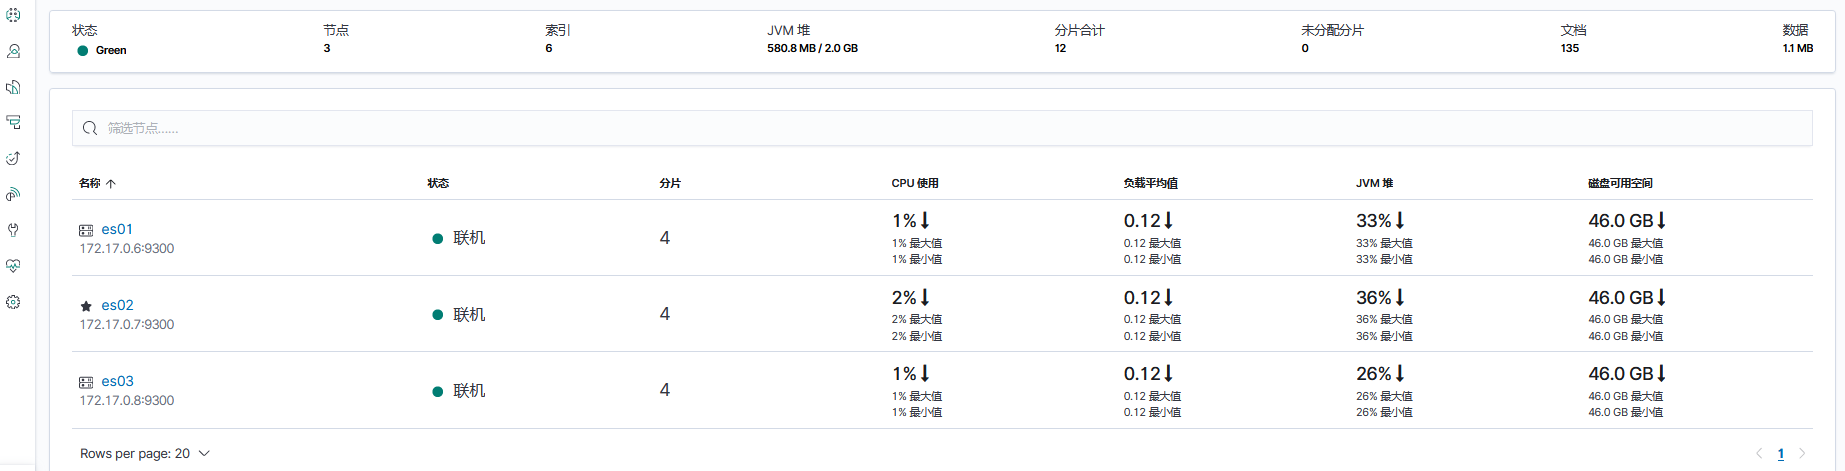
可以查看集群状态信息
elasticsearch集群安装+安全验证+kibana安装的更多相关文章
- Elasticsearch集群管理工具head插件安装
Elasticsearch-head是一个elasticsearch的集群管理工具,它是完全由html5编写的独立网页程序,你可以通过插件把它集成到es.或直接下载源码,在本地打开index.html ...
- elasticsearch集群部署以及head插件安装
环境准备 elasticsearch是Java程序写的因此必须装jdk,否则使用不了. [root@openstack ~]# java -versionopenjdk version "1 ...
- 使用Docker搭建Elasticsearch集群环境
本篇文章首发于头条号单机如何搭建Elasticsearch集群?使用容器技术快速构建集群环境,欢迎关注头条号和微信公众号"大数据技术和人工智能"(微信搜索bigdata_ai_te ...
- 批量搞机(二):分布式ELK平台、Elasticsearch介绍、Elasticsearch集群安装、ES 插件的安装与使用
一.分布式ELK平台 ELK的介绍: ELK 是什么? Sina.饿了么.携程.华为.美团.freewheel.畅捷通 .新浪微博.大讲台.魅族.IBM...... 这些公司都在使用 ELK!ELK! ...
- k8s上安装elasticsearch集群
官方文档地址:https://www.elastic.co/guide/en/cloud-on-k8s/current/k8s-quickstart.html yaml文件地址:https://dow ...
- ElasticSearch实战系列一: ElasticSearch集群+Kinaba安装教程
前言 本文主要介绍的是ElasticSearch集群和kinaba的安装教程. ElasticSearch介绍 ElasticSearch是一个基于Lucene的搜索服务器,其实就是对Lucene进行 ...
- Elasticsearch集群安装Version6.2.2
Elasticsearch集群安装, 基于Elasticsearch6.2.2版本, 在Linux上安装Elasticsearch集群. 1.安装规划 IP HostName Service Mast ...
- CentOS下 elasticsearch集群安装
1.进入root目录并下载elasticsearch cd /root wget https://download.elastic.co/elasticsearch/elasticsearch/ela ...
- elasticsearch 集群的安装部署
一 介绍 elasticsearch 是居于lucene的搜素引擎,可以横向集群扩展以及分片,开发者无需关注如何实现了索引的备份,集群同步,分片等,我们很容易通过简单的配置就可以启动elasticse ...
随机推荐
- 第二章 OSI参考模型
一.产生背景 1.伴随着计算机网络的飞跃发展,各大厂商根据自己的协议生产出了不同的硬件和软件 2.为了实现网络设备间的互相通讯,ISO和IEEE相继提出了OSI参考模型及其TCP/IP模型 二.OSI ...
- 优化Mysql数据库的8个方法
通过8个方法优化Mysql数据库:创建索引.复核索引.索引不会包含含有NULL值的列.使用短索引.排序的索引问题.like语句操作.不要在列上进行运算.不使用NOT IN 和<>操作 1 ...
- Java进阶专题(十五) 从电商系统角度研究多线程(下)
前言 本章节继上章节继续梳理:线程相关的基础理论和工具.多线程程序下的性能调优和电商场景下多线程的使用. 多线程J·U·C ThreadLocal 概念 ThreadLocal类并不是用来解决 ...
- Java9系列第8篇-Module模块化编程
我计划在后续的一段时间内,写一系列关于java 9的文章,虽然java 9 不像Java 8或者Java 11那样的核心java版本,但是还是有很多的特性值得关注.期待您能关注我,我将把java 9 ...
- Camera2使用textureView支持
SurfaceView 绘制会有独立窗口, TextureView 没有独立的窗口,可以像普通的 View 一样,更高效更方便 public class MainActivity extends Ap ...
- tf-tensorboard的一些注意事项
tensorboard --logdir = 绝对路径 1.注意的是绝对路径里面不能有中文 2. tensorboard 文件应放在一个最小子目录中
- 机器学习之K均值算法(K-means)聚类
K均值算法(K-means)聚类 [关键词]K个种子,均值 一.K-means算法原理 聚类的概念:一种无监督的学习,事先不知道类别,自动将相似的对象归到同一个簇中. K-Means算法是一种聚类分析 ...
- python网络编程(TCP/IP、发邮件)
TCP/IP 关注公众号"轻松学编程"了解更多. 计算机为了联网,就必须规定通讯协议,早期的计算机网络是由各个厂商规定的一些协议,他们之间互不兼容. 为了把全世界的电脑能够连接到一 ...
- jenkins任务
#################################jenkins任务1.打包.持续集成.部署.定时运行 2.创建自由风格的一个任务 3.一个任务的核心步骤就是,build即创建,即运行 ...
- (C#2,.net framework2.0,Visual Studio 2003)之前版本
(C#2,.net framework2.0,Visual Studio 2003)之前版本归为最初的版本(主要是针对.net framework),其主要定义了最基本的类型.特性. 1.基本的类型 ...