
.NET Core 微服务—API网关(Ocelot) 教程 [三]
前言:
前一篇文章《.NET Core 微服务—API网关(Ocelot) 教程 [二]》已经让Ocelot和目录api(Api.Catalog)、订单api(Api.Ordering)通过网关方式运行起来了。但在日常开发中Api并不是所有人都能访问的,是添加了认证、授权的。那么本篇文章就将继续介绍Ocelot如何和 IdentityServer4 认证服务如何配合使用的。
创建认证服务(Api.IdentityServer)
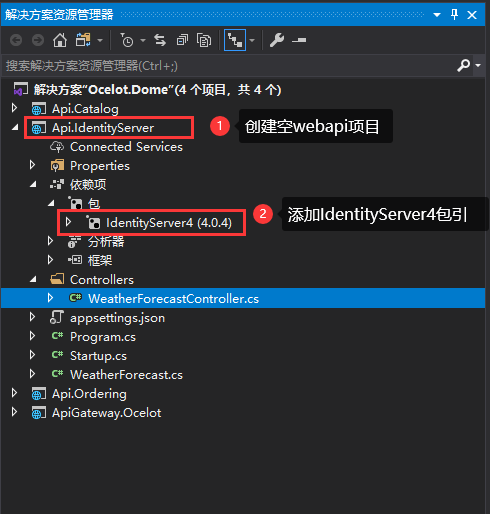
1、创建一个空的WebApi项目-Api.IdentityServer,并添加IdentityServer4项目引用:如下图:
Install-Package IdentityServer4
2、要启用IdentityServer服务,不仅要把 IdentityServer 注册到容器中, 还需要配置一下内容:
- Authorization Server 保护了哪些 API (资源);
哪些客户端 Client(应用) 可以使用这个 Authorization Server;
指定可以使用 Authorization Server 授权的 Users(用户)
a) 创建文件 InMemoryConfig.cs,用于设置以上相关内容:


 using IdentityServer4;

 using IdentityServer4.Models;

 using IdentityServer4.Test;

 using System;

 using System.Collections.Generic;

 using System.Linq;

 using System.Threading.Tasks;

 namespace Api.IdentityServer

 {

     public class InMemoryConfig

     {

         public static IEnumerable<IdentityResource> GetIdentityResourceResources()

         {

             return new List<IdentityResource>

             {

                 //必须要添加,否则报无效的scope错误

                 new IdentityResources.OpenId(),

             };

         }

         /// <summary>

         /// api资源列表

         /// </summary>

         /// <returns></returns>

         public static IEnumerable<ApiResource> GetApiResources()

         {

             //可访问的API资源(资源名,资源描述)

             return new List<ApiResource>

             {

                 new ApiResource("Api.Catalog", "Api.Catalog"),

                 new ApiResource("Api.Ordering", "Api.Ordering")

             };

         }

         /// <summary>

         /// 客户端列表

         /// </summary>

         /// <returns></returns>

         public static IEnumerable<Client> GetClients()

         {

             return new List<Client>

             {

                 new Client

                 {

                     ClientId = "client_Catalog", //访问客户端Id,必须唯一

                     //使用客户端授权模式,客户端只需要clientid和secrets就可以访问对应的api资源。

                     AllowedGrantTypes = GrantTypes.ClientCredentials,

                     ClientSecrets =

                     {

                         new Secret("secret".Sha256())

                     },

                     AllowedScopes = { "Api.Catalog", IdentityServerConstants.StandardScopes.OpenId,IdentityServerConstants.StandardScopes.Profile }

                 },

                 new  Client

                 {

                     ClientId = "client_Ordering",

                     ClientSecrets = new [] { new Secret("secret".Sha256()) },

                     //这里使用的是通过用户名密码和ClientCredentials来换取token的方式. ClientCredentials允许Client只使用ClientSecrets来获取token. 这比较适合那种没有用户参与的api动作

                     AllowedGrantTypes = GrantTypes.ResourceOwnerPasswordAndClientCredentials,

                     AllowedScopes = { "Api.Ordering", IdentityServerConstants.StandardScopes.OpenId,IdentityServerConstants.StandardScopes.Profile }

                 }

             };

         }

         /// <summary>

         /// 指定可以使用 Authorization Server 授权的 Users(用户)

         /// </summary>

         /// <returns></returns>

         public static IEnumerable<TestUser> Users()

         {

             return new[]

             {

                     new TestUser

                     {

                         SubjectId = "",

                         Username = "cba",

                         Password = "abc"

                     }

             };

         }

     }

 }
GetApiResources:这里指定了name和display name, 以后api使用authorization server的时候, 这个name一定要一致
GetClients: 认证客户端列表
Users: 这里的内存用户的类型是TestUser, 只适合学习和测试使用, 实际生产环境中还是需要使用数据库来存储用户信息的, 例如接下来会使用asp.net core identity. TestUser的SubjectId是唯一标识.
b) 在Startup.cs中启用IdentityServer服务
 using System;

 using System.Collections.Generic;

 using System.Linq;

 using System.Threading.Tasks;

 using Microsoft.AspNetCore.Builder;

 using Microsoft.AspNetCore.Hosting;

 using Microsoft.AspNetCore.Mvc;

 using Microsoft.Extensions.Configuration;

 using Microsoft.Extensions.DependencyInjection;

 using Microsoft.Extensions.Hosting;

 using Microsoft.Extensions.Logging;

 namespace Api.IdentityServer

 {

     public class Startup

     {

         public Startup(IConfiguration configuration)

         {

             Configuration = configuration;

         }

         public IConfiguration Configuration { get; }

         // This method gets called by the runtime. Use this method to add services to the container.

         public void ConfigureServices(IServiceCollection services)

         {

             services.AddControllers();

             services.AddIdentityServer()

                 .AddDeveloperSigningCredential()

 .AddInMemoryApiResources(InMemoryConfig.GetApiResources())

                 .AddInMemoryClients(InMemoryConfig.GetClients())

                 .AddTestUsers(InMemoryConfig.Users().ToList());

             services.AddAuthentication();//配置认证服务

         }

         // This method gets called by the runtime. Use this method to configure the HTTP request pipeline.

         public void Configure(IApplicationBuilder app, IWebHostEnvironment env)

         {

             if (env.IsDevelopment())

             {

                 app.UseDeveloperExceptionPage();

             }

             app.UseStaticFiles();

             app.UseRouting();

             app.UseIdentityServer();

             app.UseAuthentication();

             app.UseAuthorization();

             app.UseEndpoints(endpoints =>

             {

                 endpoints.MapControllers();

             });

         }

     }

 }
为ocelot项目集成IdentityServer
1、添加IdentityServer4.AccessTokenValidation的包,也可以通过程序包管理控制台执行以下命令
Install-Package IdentityServer4.AccessTokenValidation
添加包引用后,在Startup中的 ConfigureServices 中分别注册两个认证方案 Configure 中配置IdentityServer服务。
        public void ConfigureServices(IServiceCollection services)

        {

            services.AddAuthentication()

              .AddJwtBearer("Api.Catalog", i =>

              {

                  i.Audience = "Api.Catalog";

                  i.Authority = "http://localhost:5332";

                  i.RequireHttpsMetadata = false;

              }).AddJwtBearer("Api.Ordering", y =>

              {

                  y.Audience = "Api.Ordering";

                  y.Authority = "http://localhost:5331";

                  y.RequireHttpsMetadata = false;

              });

            services.AddOcelot();//注入Ocelot服务

            services.AddControllers();

        }
2、修改ocelot配置文件,在Routes中添加授权信息
调整ApiGateway.Ocelot项目中ocelot.json配置文件如下:
{

  "GlobalConfiguration": {

  },

  "Routes": [

    {

      "DownstreamPathTemplate": "/api/{controller}/{action}",

      "DownstreamScheme": "http",

      "DownstreamHostAndPorts": [

        {

          "Host": "localhost",

          "Port":

        }

      ],

      "UpstreamPathTemplate": "/Catalog/{controller}/{action}",

      "UpstreamHttpMethod": [ "Get", "Post" ],

      "LoadBalancerOptions": {

        "Type": "RoundRobin"

      },

      //授权信息

      "AuthenticationOptions": {

        "AuthenticationProviderKey": "Api.Catalog",

        "AllowedScopes": []

      }

    },

    {

      "DownstreamPathTemplate": "/api/{controller}/{action}",

      "DownstreamScheme": "http",

      "DownstreamHostAndPorts": [

        {

          "Host": "localhost",

          "Port":

        }

      ],

      "UpstreamPathTemplate": "/Ordering/{controller}/{action}",

      "UpstreamHttpMethod": [ "Get", "Post" ],

      "LoadBalancerOptions": {

        "Type": "RoundRobin"

      },

      //授权信息

      "AuthenticationOptions": {

        "AuthenticationProviderKey": "Api.Ordering",

        "AllowedScopes": []

      }

    }

  ]

}
Ocelot会去检查Routes是否配置了AuthenticationOptions节点。如果有会根据配置的认证方案进行身份认证。如果没有则不进行身份认证。
AuthenticationProviderKey 是刚才注册的认证方案。
AllowedScopes 是 AllowedScopes中配置的授权访问范围。
验证效果
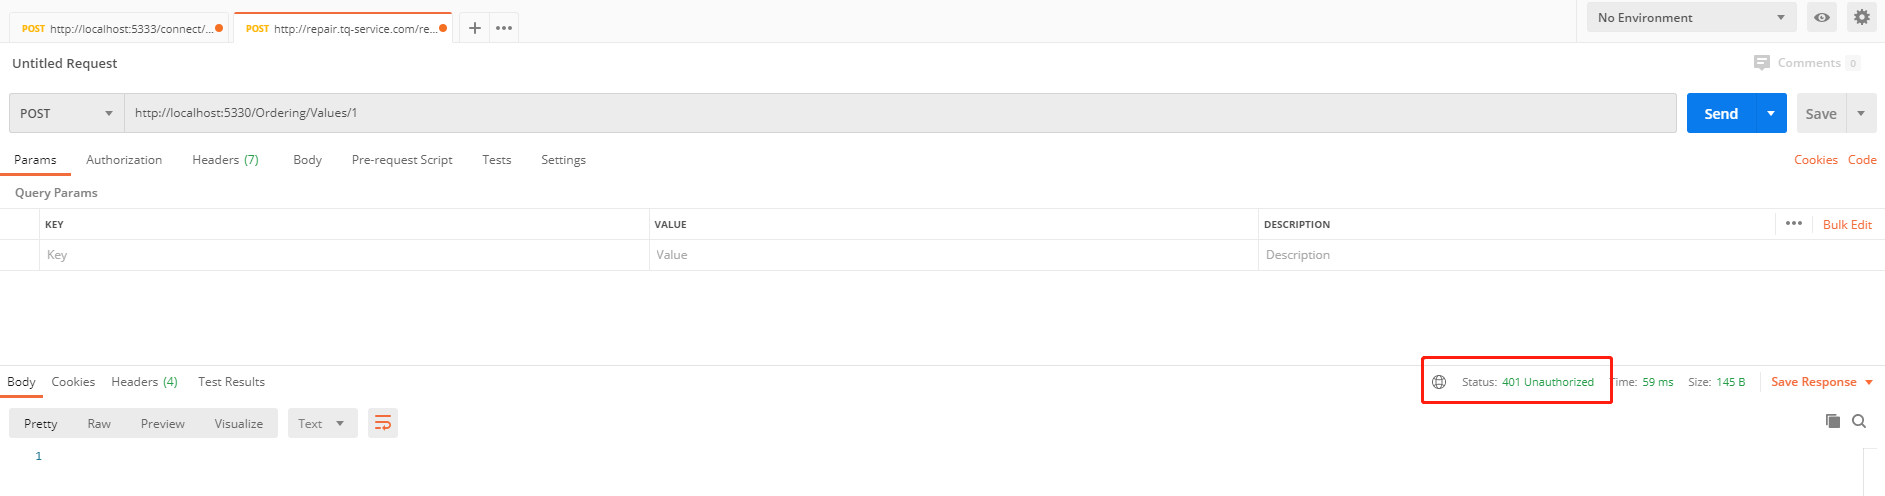
1、根据网关设置访问:目录api:http://localhost:5330/Ordering/Values/1
如图:401 Unauthorized 未认证
2、先获取Token后再访问该接口:
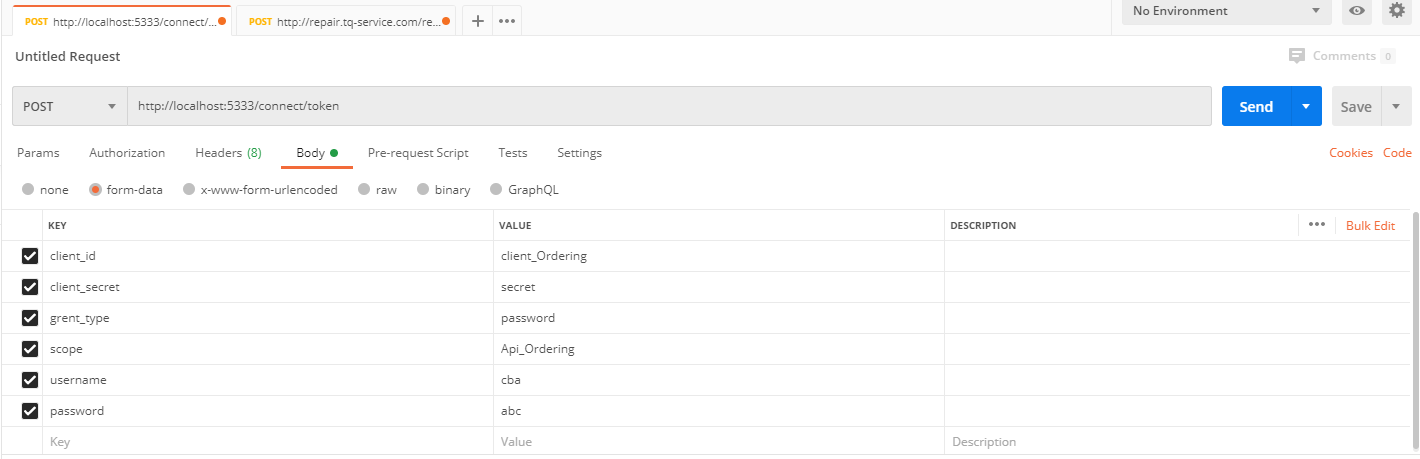
根据获取Token在http://localhost:5330/Ordering/Values/1 请求时,添加认证头信息,即可请求成功

回顾总结
1、在IdentityServer注册相关资源服务和客户端信息。
2、Ocelot通过注册认证方案,在配置文件中指定路由的认证方案
3、该认证是在Ocelot网关层对相关资源进行认证,并非资源服务认证
4、认证调用失败时,尝试把IdentityServer包版本降低尝试
源码:https://github.com/cwsheng/ocelot.Demo.git
.NET Core 微服务—API网关(Ocelot) 教程 [三]的更多相关文章
- .NET Core 微服务—API网关(Ocelot) 教程 [二]
上篇文章(.NET Core 微服务—API网关(Ocelot) 教程 [一])介绍了Ocelot 的相关介绍. 接下来就一起来看如何使用,让它运行起来. 环境准备 为了验证Ocelot 网关效果,我 ...
- .NET Core 微服务—API网关(Ocelot) 教程 [一]
前言: 最近在关注微服务,在 eShop On Containers 项目中存在一个API网关项目,引起想深入了解下它的兴趣. 一.API网关是什么 API网关是微服务架构中的唯一入口,它提供一个单独 ...
- .NET Core 微服务—API网关(Ocelot) 教程 [四]
前言: 上一篇 介绍了Ocelot网关和认证服务的结合使用,本篇继续介绍Ocelot相关请求聚合和Ocelot限流 一.请求聚合 Ocelot允许声明聚合路由,这样可以把多个正常的Routes打包并映 ...
- .NET Core微服务二:Ocelot API网关
.NET Core微服务一:Consul服务中心 .NET Core微服务二:Ocelot API网关 .NET Core微服务三:polly熔断与降级 本文的项目代码,在文章结尾处可以下载. 本文使 ...
- .NET Core微服务之基于Ocelot实现API网关服务
Tip: 此篇已加入.NET Core微服务基础系列文章索引 一.啥是API网关? API 网关一般放到微服务的最前端,并且要让API 网关变成由应用所发起的每个请求的入口.这样就可以明显的简化客户端 ...
- .NET Core微服务之基于Ocelot实现API网关服务(续)
Tip: 此篇已加入.NET Core微服务基础系列文章索引 一.负载均衡与请求缓存 1.1 负载均衡 为了验证负载均衡,这里我们配置了两个Consul Client节点,其中ClientServic ...
- .NET Core微服务之基于Ocelot+IdentityServer实现统一验证与授权
Tip: 此篇已加入.NET Core微服务基础系列文章索引 一.案例结构总览 这里,假设我们有两个客户端(一个Web网站,一个移动App),他们要使用系统,需要通过API网关(这里API网关始终作为 ...
- .NET Core微服务之基于Ocelot+Butterfly实现分布式追踪
Tip: 此篇已加入.NET Core微服务基础系列文章索引 一.什么是Tracing? 微服务的特点决定了功能模块的部署是分布式的,以往在单应用环境下,所有的业务都在同一个服务器上,如果服务器出现错 ...
- 【微服务】之六:轻松搞定SpringCloud微服务-API网关zuul
通过前面几篇文章的介绍,我们可以轻松搭建起来微服务体系中比较重要的几个基础构建服务.那么,在本篇博文中,我们重点讲解一下,如何将所有微服务的API同意对外暴露,这个就设计API网关的概念. 本系列教程 ...
随机推荐
- bzoj3526[Poi2014]Card*
bzoj3526[Poi2014]Card 题意: 有n张卡片在桌上一字排开,每张卡片上有两个数,第i张卡片上,正面的数为a[i],反面的数为b[i].有m个操作,第i个操作会交换c[i]和d[i]两 ...
- P1136 迎接仪式 题解
题目描述 LHX教主要来X市指导OI学习工作了.为了迎接教主,在一条道路旁,一群Orz教主er穿着文化衫站在道路两旁迎接教主,每件文化衫上都印着大字.一旁的Orzer依次摆出"欢迎欢迎欢迎欢 ...
- OSCP Learning Notes - Enumeration(1)
Installing Kioptrix: Level 1 Download the vm machine form https://www.vulnhub.com/entry/kioptrix-lev ...
- 12C oracle 12.1.0.2版本打补丁
从support 1454618.1文档 中可以下载到各版本的补丁和PSU. 此次采用的是28349311 版本号的psu 和28440711 版本号的jvm.opatch版本号6880880_12 ...
- node.js day01学习笔记:认识node.js
Node.js(JavaScript,everywhere) 1.Node.js 介绍 1.1. 为什么要学习Node.js 企业需求 + 具有服务端开发经验更好 + front-end + back ...
- Eclipse点击空格总是自动补全代码怎么办,如何自动补全代码,代码提示
Eclipse点击空格总是自动补全不想要的代码说明大家配置的时候出现了一点错误,下面的步骤将会解决它, 网上部分经验需要大家更改代码非常繁琐,下面是一个简单的步骤方法 步骤一:打开eclipse依次点 ...
- Inoreader - 在线Rss阅读器
- DNS反向查询
DNS反向查询是什么 DNS反向查询大概的一个定义就是: 从 IP 地址获取 PTR 记录.也就是说,通过使用一些网络工具可以将 IP 地址转换为主机名. 实际上,PRT 代表 POINTER,在 D ...
- 循序渐进nginx(二):反向代理、负载均衡、缓存服务、静态资源访问
目录 反向代理 使用 1.创建代理目标服务端: 2.配置nginx反向代理目标服务端: 3.测试使用: 负载均衡 使用 1.准备服务端 2.修改nginx配置 3.测试 负载均衡策略 负载均衡的额外参 ...
- 基于python实现查询ip地址来源
接口调用方法是在url后面直接加上IP地址. url = 'http://freeapi.ipip.net/218.192.3.42' #中文免费 url2 = 'http://ip-api.com/ ...