HamsterBear Linux Low Res ADC按键驱动的适配 + LVGL button移植
HamsterBear lradc按键驱动的适配
平台- F1C200sLinux版本- 5.17.2ADC按键- 4 KEY tablet
驱动程序位于主线内核:
drivers/input/keyboard/sun4i-lradc-keys.c
设备树binding
Documentation/devicetree/bindings/input/allwinner,sun4i-a10-lradc-keys.yaml
适配流程
开启驱动程序编译开关
进入kernel目录,执行make menuconfig
输入/后搜索KEYBOARD_SUN4I_LRADC
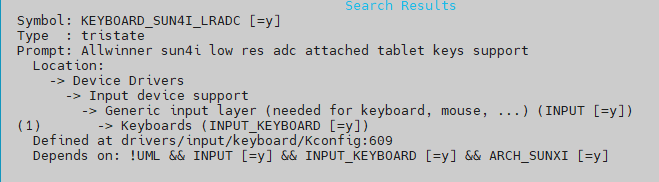
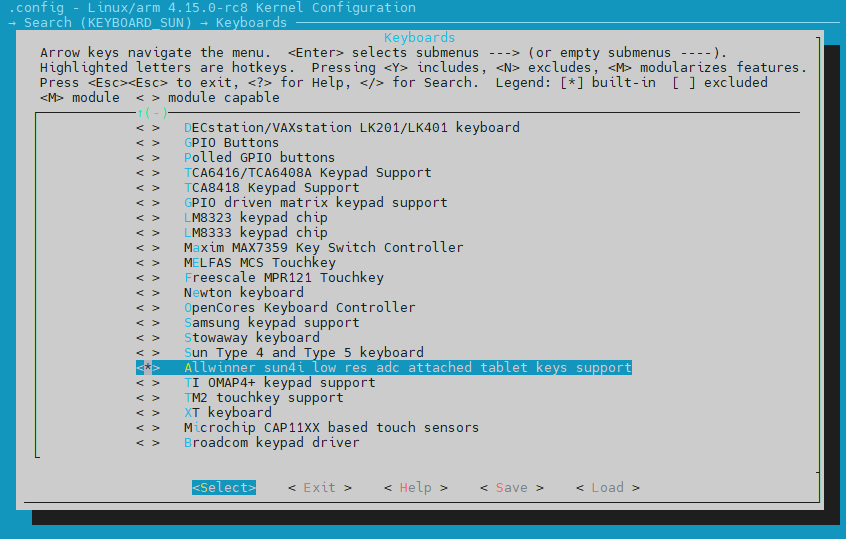
按1跳转到选项位置,修改选项为*后保存退出
查看设备树Binding,并修改添加设备树节点
示例如下
examples:
- |
lradc: lradc@1c22800 {
compatible = "allwinner,sun4i-a10-lradc-keys";
reg = <0x01c22800 0x100>;
interrupts = <31>;
vref-supply = <®_vcc3v0>;
button-191 {
label = "Volume Up";
linux,code = <115>;
channel = <0>;
voltage = <191274>;
};
button-392 {
label = "Volume Down";
linux,code = <114>;
channel = <0>;
voltage = <392644>;
};
};
修改后的lradc节点
底板有4个按键,linux,code对应input evnet按键code值
lradc: lradc@1c23400 {
compatible = "allwinner,sun4i-a10-lradc-keys";
reg = <0x01c23400 0x100>;
interrupts = <22>;
vref-supply = <®_vcc3v3>;
button-132 {
label = "PRE";
linux,code = <105>;
channel = <0>;
voltage = <174603>;
};
button-196 {
label = "NEXT";
linux,code = <106>;
channel = <0>;
voltage = <419047>;
};
button-233 {
label = "OK";
linux,code = <28>;
channel = <0>;
voltage = <698412>;
};
button-271 {
label = "BACK";
linux,code = <14>;
channel = <0>;
voltage = <803174>;
};
};
设备注册到/dev/input/event0
驱动程序上报的数据
[21037.576786] adckey val: 5, voltage: 174603

0000000 522d 0000 cecc 0008 0001 0069 0001 0000

0000010 522d 0000 cecc 0008 0000 0000 0000 0000

0000020 522d 0000 0bd6 000c 0001 0069 0000 0000

0000030 522d 0000 0bd6 000c 0000 0000 0000 0000

[21038.829430] adckey val: 12, voltage: 419047

0000040 522e 0000 aa05 000c 0001 006a 0001 0000

0000050 522e 0000 aa05 000c 0000 0000 0000 0000

0000060 522f 0000 f228 0000 0001 006a 0000 0000

0000070 522f 0000 f228 0000 0000 0000 0000 0000

[21041.763838] adckey val: 19, voltage: 663492

0000080 5231 0000 a9cd 000b 0001 001c 0001 0000

0000090 5231 0000 a9cd 000b 0000 0000 0000 0000

00000a0 5232 0000 4117 0000 0001 001c 0000 0000

00000b0 5232 0000 4117 0000 0000 0000 0000 0000

[21042.978050] adckey val: 25, voltage: 873015

00000c0 5232 0000 ee8e 000e 0001 000e 0001 0000

00000d0 5232 0000 ee8e 000e 0000 0000 0000 0000

00000e0 5233 0000 5964 0003 0001 000e 0000 0000

00000f0 5233 0000 5964 0003 0000 0000 0000 0000
LVGL的适配
修改官方移植模板文件lv_port_indev_template.c
/* lv_port_indev_linux.c */

void lv_port_indev_init(void)

{

    /**

     * Here you will find example implementation of input devices supported by LittelvGL:

     *  - Touchpad

     *  - Mouse (with cursor support)

     *  - Keypad (supports GUI usage only with key)

     *  - Encoder (supports GUI usage only with: left, right, push)

     *  - Button (external buttons to press points on the screen)

     *

     *  The `..._read()` function are only examples.

     *  You should shape them according to your hardware

     */

    static lv_indev_drv_t indev_drv;

	...

	...

    /*------------------

     * Button

     * -----------------*/

    /*Initialize your button if you have*/

    button_init();

    /*Register a button input device*/

    lv_indev_drv_init(&indev_drv);

    indev_drv.type = LV_INDEV_TYPE_BUTTON;

    indev_drv.read_cb = button_read;

    indev_button = lv_indev_drv_register(&indev_drv);

    /*Assign buttons to points on the screen*/

    static const lv_point_t btn_points[4] = {

        {102, 215},   /* Button 0 -> x:102; y:215 */

        {180, 216},   /* Button 1 -> x:180; y:216 */

        {140, 120},

        {142, 215},

    };

    lv_indev_set_button_points(indev_button, btn_points);

}

static int button_fd;

static struct input_event events[2];

static struct input_event event;

/*Initialize your buttons*/

static void *button_input_thread_function(void *privdata)

{

    while(1){

        if(read(button_fd, &events, 2*sizeof(struct input_event)) > 0){

                // printf("type : %d, code : %d, value : %d\n", events[0].type, events[0].code, events[0].value);

        }

        event = events[0];

        // pthread_mutex_lock(&g_mutex);

        // pthread_cond_signal(&g_cond);

        // pthread_mutex_unlock(&g_mutex);

    }

}

static void button_init(void)

{

    /*Your code comes here*/

    pthread_t tid;

    button_fd = open("/dev/input/event0", O_RDONLY);

    pthread_create(&tid, NULL, button_input_thread_function, NULL);

}

/*Will be called by the library to read the button*/

static void button_read(lv_indev_drv_t * indev_drv, lv_indev_data_t * data)

{

    static uint8_t last_btn = 0;

    /*Get the pressed button's ID*/

    int8_t btn_act = button_get_pressed_id();

    if(btn_act >= 0) {

        data->state = LV_INDEV_STATE_PR;

        last_btn = btn_act;

    }

    else {

        data->state = LV_INDEV_STATE_REL;

    }

    /*Save the last pressed button's ID*/

    data->btn_id = last_btn;

}

/*Get ID  (0, 1, 2 ..) of the pressed button*/

static int8_t button_get_pressed_id(void)

{

    uint8_t key = -1;

    /*Check to buttons see which is being pressed (assume there are 2 buttons)*/

    // pthread_mutex_lock(&g_mutex);

    // pthread_cond_wait(&g_cond, &g_mutex);

    // pthread_mutex_unlock(&g_mutex);

    switch(event.code){

    case KEY_LEFT:

        key = 0;

        break;

    case KEY_RIGHT:

        key = 1;

        break;

    case KEY_ENTER:

        key = 2;

        break;

    case KEY_BACKSPACE:

        key = 3;

        break;

    default:

        key = -1;

        break;

    }

    return (key + event.value)>key?key:-1;

    /*No button pressed*/

}

/*Test if `id` button is pressed or not*/

static bool button_is_pressed(uint8_t id)

{

    /*Your code comes here*/

    return false;

}
简单解释下代码中的一些操作:
在主init函数中设置的这个数组
static const lv_point_t btn_points[4] = {

	{102, 215},   /* Button 0 -> x:102; y:215 */

	{180, 216},   /* Button 1 -> x:180; y:216 */

	{140, 120},

	{142, 215},

};
是用来模拟点击lvgl屏幕的某个x,y位置,设置完该数组后,需要将其与indev_drv关联起来
//lv_indev_t * indev_button;

lv_indev_set_button_points(indev_button, btn_points);
为什么要一次读两个event?
static struct input_event events[2];

static struct input_event event;

/*Initialize your buttons*/

static void *button_input_thread_function(void *privdata)

{

    while(1){

        if(read(button_fd, &events, 2*sizeof(struct input_event)) > 0){
因为按下和松开都算一次event,只读一次会读到松开的value。
这个return是什么意思?
/*Get ID  (0, 1, 2 ..) of the pressed button*/

static int8_t button_get_pressed_id(void)

{

    uint8_t key = -1;

	...

    return (key + event.value)>key?key:-1;

}
过滤掉default的情况,event.value 值为 1 或 0
返回正确的按键id,这个id用来在上面提到的数组中确定是哪一组坐标。
button_is_pressed函数没用到,所以留空了。
最后,在button_read函数中btn_act就是刚才return的id,在
if中暂存,最后通过data->btn_id记录进indev_drv
HamsterBear Linux Low Res ADC按键驱动的适配 + LVGL button移植的更多相关文章
- linux输入子系统之按键驱动
上一节中,我们讲解了Linux input子系统的框架,到内核源码里详细分析了输入子系统的分离分层的框架等. 上一节文章链接:http://blog.csdn.net/lwj103862095/ar ...
- Linux按键驱动程序设计--从简单到不简单【转】
本文转载自:http://blog.csdn.net/coding__madman/article/details/51399353 混杂设备驱动模型: 1. 混杂设备描述 在Linux系统中,存在一 ...
- Linux按键驱动程序设计详解---从简单到不简单【转】
转自:http://blog.csdn.net/coding__madman/article/details/51399353 版权声明:本文为博主原创文章,未经博主允许不得转载. 混杂设备驱动模型: ...
- Linux驱动之按键驱动编写(中断方式)
在Linux驱动之按键驱动编写(查询方式)已经写了一个查询方式的按键驱动,但是查询方式太占用CPU,接下来利用中断方式编写一个驱动程序,使得CPU占有率降低,在按键空闲时调用read系统调用的进程可以 ...
- ARM Linux 驱动Input子系统之按键驱动测试
上一篇已经谈过,在现内核的中引入设备树之后对于内核驱动的编写,主要集中在硬件接口的配置上了即xxxx.dts文件的编写. 在自己的开发板上移植按键驱动: 1.根据开发板的原理图 确定按键的硬件接口为: ...
- linux字符驱动之poll机制按键驱动
在上一节中,我们讲解了如何自动创建设备节点,实现一个中断方式的按键驱动.虽然中断式的驱动,效率是蛮高的,但是大家有没有发现,应用程序的死循环里的读函数是一直在读的:在实际的应用场所里,有没有那么一种情 ...
- Linux嵌入式学习-烟雾传感器驱动-字符设备驱动-按键驱动
MQ-2烟雾气敏传感器模块在X210v3开发板上的驱动. 现在需要一个MQ-2烟雾气敏传感器模块的驱动.其检测烟雾超过一定的标准后,会返回一个不同的电平,和按键驱动差不多. 但是在编写驱动的时候,需要 ...
- Linux 进程间通信 --- 信号通信 --- signal --- signal(SIGINT, my_func); --- 按键驱动异步通知(转)
信号 ( signal ) 机制是 UNIX 系统中最为古老的进程间通信机制,很多条件可以产生一个信号. 信号的产生: 1,当用户按下某些按键时,产生信号. 2,硬件异常产生信号:除数为 0 ,无效 ...
- 基于ARM-contexA9按键驱动开发
之前我们写过LED和蜂鸣器的驱动,其实那两个都是一个模版的,因为都是将IO口配置成输出模式,然后用高低电平来驱动这些设备.其实linux设备驱动,说白了跟单片机开发的方式是差不多的,只不过内核的开发基 ...
随机推荐
- MySQL 里有 2000w 数据,redis 中只存 20w 的数据,如 何保证 redis 中的数据都是热点数据?
Redis 内存数据集大小上升到一定大小的时候,就会施行数据淘汰策略. 相关知识:Redis 提供 6 种数据淘汰策略: volatile-lru:从已设置过期时间的数据集(server.db[i]. ...
- 为什么 redis 需要把所有数据放到内存中?
答Redis 为了达到最快的读写速度将数据都读到内存中,并通过异步的方式将数 据写入磁盘.所以 redis 具有快速和数据持久化的特征.如果不将数据放在内存中, 磁盘 I/O 速度为严重影响 redi ...
- JRE、JDK、JVM 及 JIT 之间有什么不同?
JRE 代表 Java 运行时(Java run-time),是运行 Java 引用所必须的.JDK 代 表 Java 开发工具(Java development kit),是 Java 程序的开发工 ...
- volatile 修饰符的有过什么实践?
一种实践是用 volatile 修饰 long 和 double 变量,使其能按原子类型来读写. double 和 long 都是 64 位宽,因此对这两种类型的读是分为两部分的,第一次 读取第一个 ...
- 活字格发布新版本,插件公开,引领Web开发新潮流
日前,活字格Web 应用生成平台发布V4.0版本,首次公开插件机制,强大的扩展性和系统集成能力,引起业内瞩目. 活字格是由西安葡萄城自主研发的 Web 应用生成平台,提供易用的类Excel可视化设计器 ...
- python-使用函数输出指定范围内Fibonacci数的个数
本题要求实现一个计算Fibonacci数的简单函数,并利用其实现另一个函数,输出两正整数m和n(0<m<n≤100000)之间的所有Fibonacci数的数目. 所谓Fibonacci数列 ...
- Hadoop真分布式实现SSH免密登录
首先需要两台服务器(CentOS安装Linux见:https://www.cnblogs.com/syq816/p/12355115.html) 伪分布式的搭建见:https://www.cnblog ...
- 【合集】Python基础知识【第二版】
更新部分 为了避免冗长的代码影响大家观感,将部分案例拆开 增加部分知识点,为了减少大家阅读的负担,尽可能使用短句子,但知识点不可能全覆盖,笔者不是写书,就算是写书也不可能全面,请同学们自行去补充 增加 ...
- 服务器jupyter连接不上主机
首先安装jupyter pip3 install jupyter -i http://pypi.douban.com/simple/ --trusted-host pypi.douban.com 然后 ...
- Struts2-使用forEach标签+el标签获取值栈数据
import cn.web.body.User; import com.opensymphony.xwork2.ActionSupport; import java.util.ArrayList; i ...