Knockout.js随手记(2)
计算属性
konckout.js的API文档,写的极为详细和生动,透过MVVM的运作原理,开发时只需专注于定义ViewModel逻辑,不需耗费心力处理TextBox、Select的onchange、onclick等互动细节,就能达到UI元素与数据天人合一的境界。这一系列的konckout学习笔记,将逐一探讨knockout.js在常见网页情境上的应用。
Knockout.js随手记(1)开篇已经示范过最简单的应用,为<input>与<span>加上data-bind宣告,透过ko.applyBindings()绑定到定义好的ViewModel上,当input改变输入内容,会立即反应在span。然而,有些场合数据需经加工才能使用,例如: 指定日期格式,将数字相加... 等等,此时ko.computed()便派上用场。
使用ko.computed()时,最简单的做法是直接传入function,在其中引用其他的ViewModel属性处理运算后传回结果;因knockout具备强大的依赖关系追踪能力,能记下你引用了哪些属性,一旦被引用的属性来源改变,便会自动调用ko.computed()计算新值。
范例1
首先我们创建个ViewModel,然后将使用计算属性将结果返回给fullName.
 function AppViewModel() {

            this.firstName = ko.observable('Bob');

            this.lastName = ko.observable('Smith');

            this.fullName = ko.computed(function () { return this.firstName() + " " + this.lastName(); }, this);

        }

        ko.applyBindings(new AppViewModel());
现在我们做的事情就是绑定这些值
     <p>First name: <input data-bind="value: firstName"/></p>

     <p>Last name: <input data-bind="value: lastName"/></p>

     <h2>Hello,   <span data-bind="text: fullName"/>!</h2>
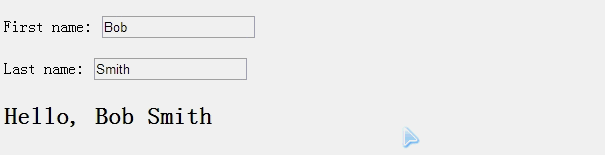
我们来查看下运行效果:
注意:由于this在不同的范围内又不同的含义,往往为了避免混淆,我们采用一项流行的约定,就是把这个this指向另一个习惯性的变量(self),我们的代码可以修改为如下:
<body>

     <p>First name: <input data-bind="value: firstName"/></p>

     <p>Last name: <input data-bind="value: lastName"/></p>

     <h2>Hello, <span data-bind="text: fullName"/>!</h2>

    <script  type="text/javascript">

        function AppViewModel() {

            var self = this;

            self.firstName = ko.observable('Bob');

            self.lastName = ko.observable('Smith');

            self.fullName = ko.computed(function () { return self.firstName() + " " + self.lastName(); }, this);

        }

        ko.applyBindings(new AppViewModel());

    </script>

</body>
使用self
范例2
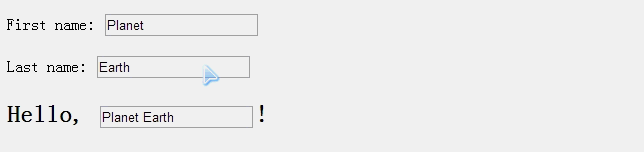
可能你和我一样在想,既然knockout支持依赖性追踪特性,那么,我可以通过更改fullName的值去动态修改first Name和 Last Name吗?
那么我们做的工作就是分解FullName的输入值。
  <p>First name: <input data-bind="value: firstName"/></p>

     <p>Last name: <input data-bind="value: lastName"/></p>

     <h2>Hello, <input data-bind="value: fullName"/>!</h2>

    <script  type="text/javascript">

        function MyViewModel() {

            var self = this;

            self.firstName = ko.observable('Planet');

            self.lastName = ko.observable('Earth');

            self.fullName = ko.computed({

                read: function () {

                    return self.firstName() + " " + self.lastName();

                },

                write: function (value) {

                    var lastSpacePos = value.lastIndexOf(" ");

                    if (lastSpacePos > 0) { // Ignore values with no space character

                        self.firstName(value.substring(0, lastSpacePos)); // Update "firstName"

                        self.lastName(value.substring(lastSpacePos + 1)); // Update "lastName"

                    }

                },

                owner: self

            });

        }

        ko.applyBindings(new MyViewModel());

    </script>
代码很简单,可以说也是最常见的js截取字符串的应用,我们只要注意其中的三个代理功能:read,write,owner就可以,实现的效果如下:
范例3
这例子其实算是对范例2的一个复习,主要功能是提供金额格式的自动转换(包括精度和格式)已经垃圾字符的过滤
<p>Enter bid price: <input data-bind="value: formattedPrice"/></p><br/>

    <script  type="text/javascript">

        function MyViewModel() {

            this.price = ko.observable(25.99);

            this.formattedPrice = ko.computed({

                read: function () {

                    return '¥' + this.price().toFixed(2);

                },

                write: function (value) {

                    // Strip out unwanted characters, parse as float, then write the raw data back to the underlying "price" observable

                    value = parseFloat(value.replace(/[^\.\d]/g, ""));

                    this.price(isNaN(value) ? 0 : value); // Write to underlying storage

                },

                owner: this

            });

        }

        ko.applyBindings(new MyViewModel());

    </script>
不管用户什么时候输入新价格,输入什么格式,text box里会自动更新为带有2位小数点和货币符号的数值。这样用户可以看到你的程序有多聪明,来告诉用户只能输入2位小数,否则的话自动删除多余的位数,当然也不能输入负数,因为write的callback函数会自动删除负号。
我们来查看下运行效果:

范例4 过滤并验证用户输入
 <p>Enter a numeric value: <input data-bind="value: attemptedValue"/>

      <span data-bind="visible:lastInputWasValid()">验证通过!</span>

  </p>

  <div data-bind="visible: !lastInputWasValid()">这不是一个合法的数字!</div>

    <script  type="text/javascript">

        function MyViewModel() {

            this.acceptedNumericValue = ko.observable(123);

            this.lastInputWasValid = ko.observable(true);

            this.attemptedValue = ko.computed({

                read: this.acceptedNumericValue,

                write: function (value) {

                    if (isNaN(value))

                        this.lastInputWasValid(false);

                    else {

                        this.lastInputWasValid(true);

                        this.acceptedNumericValue(value); // Write to underlying storage

                    }

                },

                owner: this

            });

        }

        ko.applyBindings(new MyViewModel());

    </script>
运行效果:

依赖跟踪是如何工作的
新手没必要知道太清楚,但是高级开发人员可以需要知道为什么依赖监控属性能够自动跟踪并且自动更新UI…
事实上,非常简单,甚至说可爱。跟踪的逻辑是这样的:
1. 当你声明一个依赖监控属性的时候,KO会立即调用执行函数并且获取初始化值。
2. 当你的执行函数运行的时候,KO会把所有需要依赖的依赖属性(或者监控依赖属性)都记录到一个Log列表里。
执行函数结束以后,KO会向所有Log里需要依赖到的对象进行订阅。订阅的callback函数重新运行你的执行函数。然后回头重新执行上面的第一步操作(并且注销不再使用的订阅)。
3.最后KO会通知上游所有订阅它的订阅者,告诉它们我已经设置了新值。
4.所有说,KO不仅仅是在第一次执行函数执行时候探测你的依赖项,每次它都会探测。举例来说,你的依赖属性可以是动态的:依赖属性A代表你是否依赖于依赖属性B或者C,这时候只有当A或者你当前的选择B或者C改变的时候执行函数才重新执行。你不需要再声明其它的依赖:运行时会自动探测到的。
另外一个技巧是:一个模板输出的绑定是依赖监控属性的简单实现,如果模板读取一个监控属性的值,那模板绑定就会自动变成依赖监控属性依赖于那个监控属性,监控属性一旦改变,模板绑定的依赖监控属性就会自动执行。嵌套的模板也是自动的:如果模板X render模板 Y,并且Y需要显示监控属性Z的值,当Z改变的时候,由于只有Y依赖它,所以只有Y这部分进行了重新绘制(render)。
范例5
knocut自动依赖性跟踪通常不正是您想要。但你有时可能需要控制观测值将更新计算观察到的,尤其是如果计算可观察执行某种操作,如一个Ajax请求。peek函数,可以让你访问到监控属性或计算属性,而无需创建一个依赖。
ko.computed(function() {

    var params = {

        page: this.pageIndex(),

        selected: this.selectedItem.peek()

    };

    $.getJSON('/Some/Json/Service', params, this.currentPageData);

}, this);
其中selectItem属性使用了Peek函数,所以计算属性会随时监控和更新PageIndex的值,但它忽略更改selectItem。
Computed Observable Reference

A computed observable can be constructed using one of the following forms:

ko.computed( evaluator [, targetObject, options] ) — This form supports the most common case of creating a computed observable.

evaluator — A function that is used to evaluate the computed observable’s current value.

targetObject — If given, defines the value of this whenever KO invokes your callback functions. See the section on managing this for more information.

options — An object with further properties for the computed observable. See the full list below.

ko.computed( options ) — This single parameter form for creating a computed observable accepts a JavaScript object with any of the following properties.

read — Required. A function that is used to evaluate the computed observable’s current value.

write — Optional. If given, makes the computed observable writeable. This is a function that receives values that other code is trying to write to your computed observable. It’s up to you to supply custom logic to handle the incoming values, typically by writing the values to some underlying observable(s).

owner — Optional. If given, defines the value of this whenever KO invokes your read or write callbacks.

deferEvaluation — Optional. If this option is true, then the value of the computed observable will not be evaluated until something actually attempts to access it. By default, a computed observable has its value determined immediately during creation.

disposeWhen — Optional. If given, this function is executed on each re-evaluation to determine if the computed observable should be disposed. A true-ish result will trigger disposal of the computed observable.

disposeWhenNodeIsRemoved — Optional. If given, disposal of the computed observable will be triggered when the specified DOM node is removed by KO. This feature is used to dispose computed observables used in bindings when nodes are removed by the template and control-flow bindings.

A computed observable provides the following functions:

dispose() — Manually disposes the computed observable, clearing all subscriptions to dependencies. This function is useful if you want to stop a computed observable from being updated or want to clean up memory for a computed observable that has dependencies on observables that won’t be cleaned.

extend(extenders) — Applies the given extenders to the computed observable.

getDependenciesCount() — Returns the current number of dependencies of the computed observable.

getSubscriptionsCount() — Returns the current number of subscriptions (either from other computed observables or manual subscriptions) of the computed observable.

isActive() — Returns whether the computed observable may be updated in the future. A computed observable is inactive if it has no dependencies.

peek() — Returns the current value of the computed observable without creating a dependency (see the section above on peek).

subscribe( callback [,callbackTarget, event] ) — Registers a manual subscription to be notified of changes to the computed observable.
Computed Observable相关的函数功能
备注:
本文版权归大家共用,不归本人所有,所有知识都来自于官网支持,书本,国内外论坛,大牛分享等等......后续将学习knockout.js的常用功能。
Knockout.js随手记(2)的更多相关文章
- Knockout.js随手记(8)
visible, disable, css绑定 这个例子非常简单,主要演示如何通过属性控制html元素的显示与否(visible),可用性(disable)以及根据属性添加相应的CSS样式. 先简单的 ...
- Knockout.js随手记(7)
数组元素的新增/移除事件 前两篇博客已经很清楚的知道knockout.js通过observableArray()数组元素增减,可以实时的反映在UI上.当然我们想在数组增加或移除元素时加上自定义逻辑就好 ...
- Knockout.js随手记(6)
实时反映对象属性的变化 在前一篇博客中我们使用了如下代码去新增user对象,即push方法: $("#btnAddUser").click(function () { vm.use ...
- Knockout.js随手记(5)
以列表方式呈现数据 处理以数组形式储存的多条数据,要先认识foreach.在ViewModel定义一个JavaScript Array或是ko.observableArray() (observab ...
- Knockout.js随手记(4)
动态绑定下拉列表 在<select> data-bind的options选项如果绑定到ko.observableArray(),就可以动态新增选项效果,也就是可以利用其完成常见的级联效果的 ...
- Knockout.js随手记(3)
下拉菜单 <select>也是网页设计重要的一环,knockout.js(以下简称KO)也有不错的支持.针对<select>,在data-bind除了用value可对应下拉菜单 ...
- Knockout.js随手记(1)
新的开始,knockout.js 1.首先去http://knockoutjs.com/index.html下载knockout.js,最新的版本是2.3 2.知道什么是Knockout?它是个Jav ...
- 【Knockout.js 学习体验之旅】(3)模板绑定
本文是[Knockout.js 学习体验之旅]系列文章的第3篇,所有demo均基于目前knockout.js的最新版本(3.4.0).小茄才识有限,文中若有不当之处,还望大家指出. 目录: [Knoc ...
- 【Knockout.js 学习体验之旅】(2)花式捆绑
本文是[Knockout.js 学习体验之旅]系列文章的第2篇,所有demo均基于目前knockout.js的最新版本(3.4.0).小茄才识有限,文中若有不当之处,还望大家指出. 目录: [Knoc ...
随机推荐
- 用类(function(){})()实现点击显示index索引值的详解
code: <script type="text/javascript"> ; i < ; i++){ var btn = document.createElem ...
- Scales小谈gulp
gulp是一个自动化构建工具,开发者可以使用它在项目开发过程中自动执行常见任务. 外网:http://gulpjs.com/ 中文官网:http://www.gulpjs.com.cn/ 易于使用 ...
- 前端相关html和css
#请参考http://www.cnblogs.com/pycode/p/5792142.html #html css 和js说明 ##1.什么是html? HTML(HyperText MarkUp ...
- MySQL 常用函数和语句笔记
CONCAT()函数 CONCAT()函数代表着字符串的链接,例子有 SELECT COUNT(1) FROM ums_commodity WHERE 1 = 1 and deleted=0 and ...
- jQuery-3~4章
jQuery-3~5章 JQuery003-JQuery中的DOM操作 jQuery中的DOM操作: 1.查找节点 A.查找元素节点 B. 查找属性节点 var s1 = $("ul li: ...
- nltk27_NLTK聚类分析
http://www.pythontip.com/blog/post/10044/ Python自然语言处理(三) -- 利用NLTK进行聚类 这篇文章介绍如何利用NLTK进行聚类,和上两篇文章Pyt ...
- 搭建haproxy
1:下载haproxy wget http://haproxy.1wt.eu/download/1.3/src/haproxy-1.3.20.tar.gz2:解压,编译,安装 tar zxf hapr ...
- linux REDHAT6.4下安装ArcGIS Server 10.1
1 安装环境 因为Linux的发行版本比较多,我们在使用的时候请严格按照官网给的给出的版本,在官网上给出的是经过严格测试的,如果采用其他的,即便安装上了,在后续的运作中出现问题,这个可就麻烦了,官网对 ...
- Gravatar注册
今天在学习falsk时需要用到头像扩展,需要使用gravatar到网上查了查好像没有被墙,就试着用qq邮箱注册了一个账号,结果等了好长时间也没有等到激活邮箱,就百度了一下发现了一个技巧,原来这封邮件被 ...
- ssh保持链接
修改/etc/ssh/sshd_config配置文件 ClientAliveInterval 300(默认为0), 参数的是意思是每5分钟,服务器向客户端发一个消息,用于保持连接,使用service ...