03_隐式意图打开activity
想让第一个activity把第二个activity打开的话,在清单文件里面声明一下并且


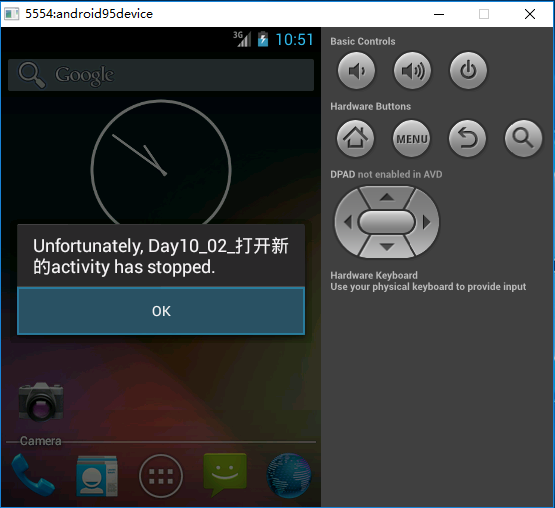
右键Debug As Android Application居然没有报错
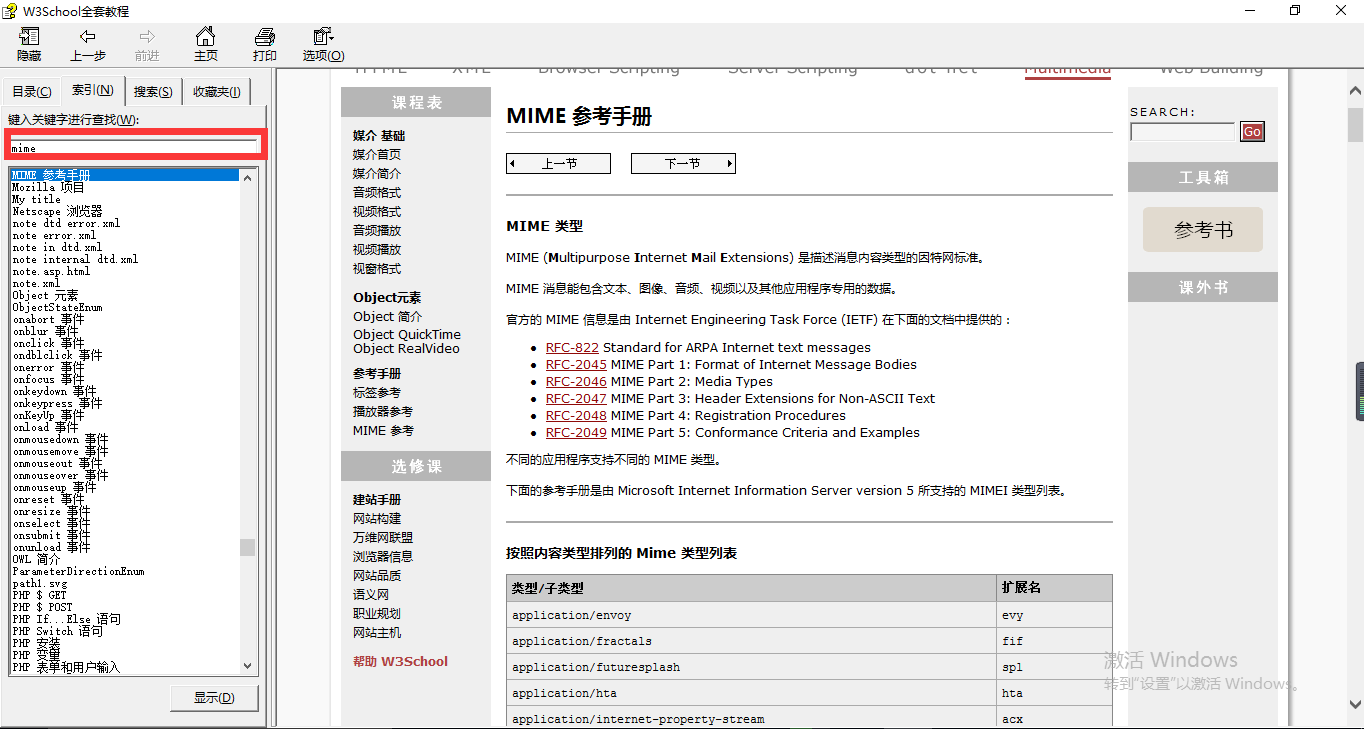
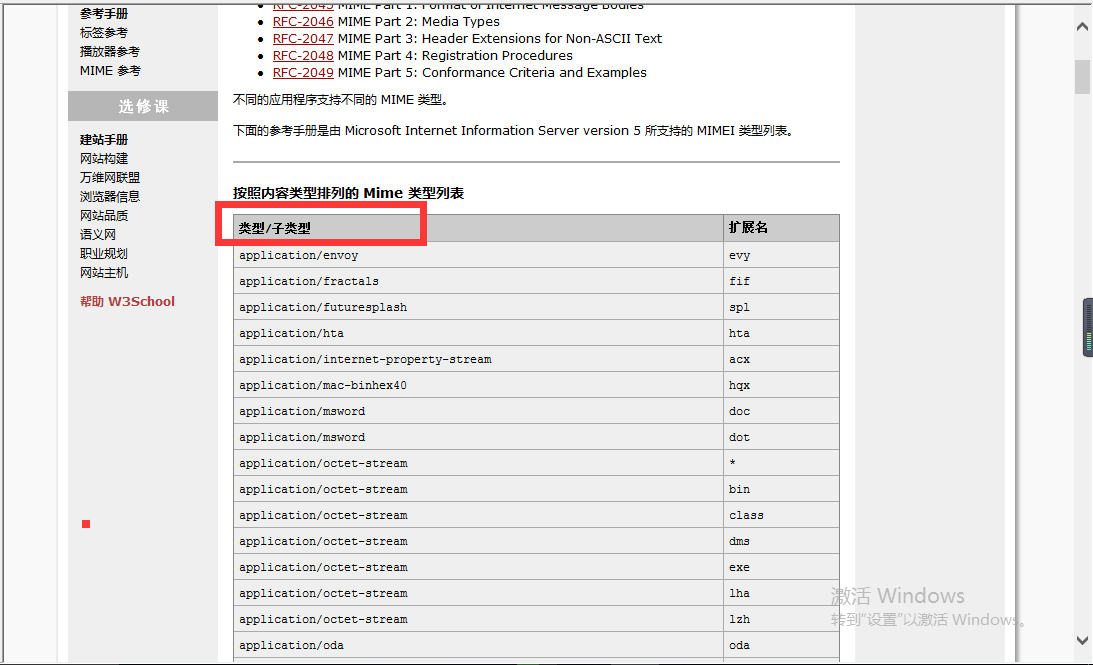
mimeType 讲HTML的时候就讲过的对应的一个响应头。setContentType("text/html").这个实际上就是一个mime。
通过mime就可以说明当前这个activity可以处理的数据。我当前这个activity接收什么样类型的数据?所以mime就是用来说明我当前应用可以处理的媒体类型都有哪些?可以打开的具体内容是怎么样的?
当然这个东西咱们也可以自定义。自定义的格式是:类型/子类型.
        <activity

            android:name="com.itheima.callnewactivity.SecondActivity">

            <intent-filter >

                <action android:name="com.itheima.second"/>

                <category android:name="android.intent.category.DEFAULT"/>

                <data android:scheme="itheima"/>

            </intent-filter>

            <intent-filter >

                <action android:name="com.itheima.second2"/>

                <category android:name="android.intent.category.DEFAULT"/>

                <data android:scheme="itheima"

                    android:mimeType="itcast/itheima"

                    />

            </intent-filter>

        </activity>
给SecondActivity搞了两个意图过滤器,实际上只需要匹配其中的一个。只要有一个完整的intent-filter被匹配上,我就可以把对应的activity给它打开。
Intent android.content.Intent.setType(String type)

Set an explicit MIME data type.

This is used to create intents that only specify a type and not data, for example to indicate the type of data to return.

This method automatically clears any data that was previously set (for example by setData).

Note: MIME type matching in the Android framework is case-sensitive, unlike formal RFC MIME types. As a result, you should always write your MIME types with lower case letters, or use normalizeMimeType or setTypeAndNormalize to ensure that it is converted to lower case.

Parameters:type The MIME type of the data being handled by this intent.Returns:Returns the same Intent object, for chaining multiple calls into a single statement.See Also:getTypesetTypeAndNormalizesetDataAndTypenormalizeMimeType

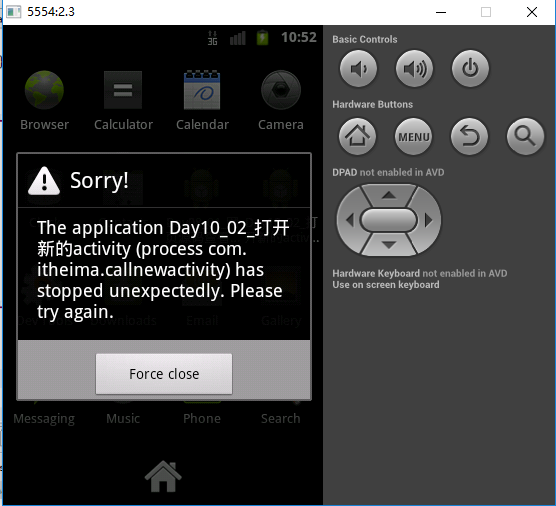
首先找FATAL EXCEPTION:main,从这儿开始的。

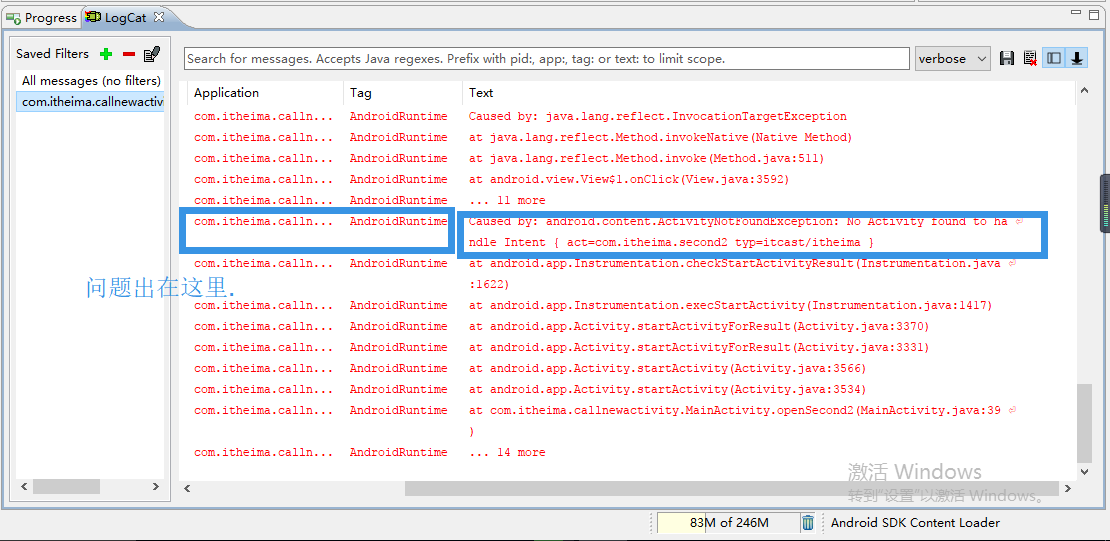
问题出在哪里?
Intent android.content.Intent.setType(String type)

Set an explicit MIME data type.

This is used to create intents that only specify a type and not data, for example to indicate the type of data to return.

This method automatically clears any data that was previously set (for example by setData).


Note: MIME type matching in the Android framework is case-sensitive, unlike formal RFC MIME types. As a result, you should always write your MIME types with lower case letters, or use normalizeMimeType or setTypeAndNormalize to ensure that it is converted to lower case.

Parameters:type The MIME type of the data being handled by this intent.Returns:Returns the same Intent object, for chaining multiple calls into a single statement.See Also:getTypesetTypeAndNormalizesetDataAndTypenormalizeMimeType
This method automatically clears any data that was previously set (for example by setData).
调用setType()方法会自动清除任何的data数据(通过setData()来设置对应的内容).
所以setType()会自动清除setData()所设置的内容.
办法是先调setType()再调setData().
Intent android.content.Intent.setData(Uri data)

Set the data this intent is operating on. This method automatically clears any type that was previously set by setType or setTypeAndNormalize.

Note: scheme matching in the Android framework is case-sensitive, unlike the formal RFC. As a result, you should always write your Uri with a lower case scheme, or use Uri.normalizeScheme or setDataAndNormalize to ensure that the scheme is converted to lower case.

Parameters:data The Uri of the data this intent is now targeting.Returns:Returns the same Intent object, for chaining multiple calls into a single statement.See Also:getDatasetDataAndNormalizeandroid.net.Intent.normalize
setData()会清除setType()的数据.这是一个死结。setData()和setType()是互斥的.
所以可以用setDataAndType()把Data和Type一并设置。
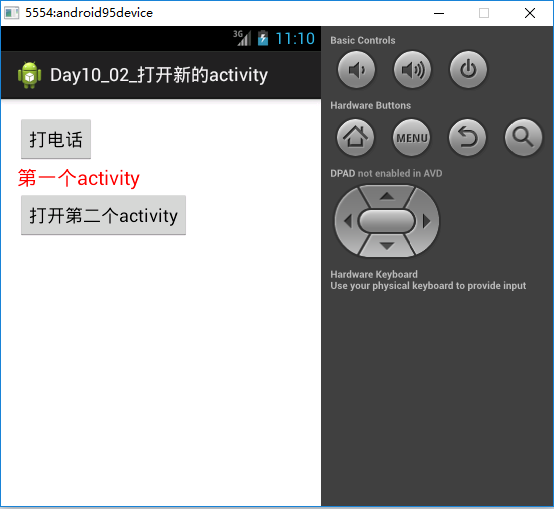
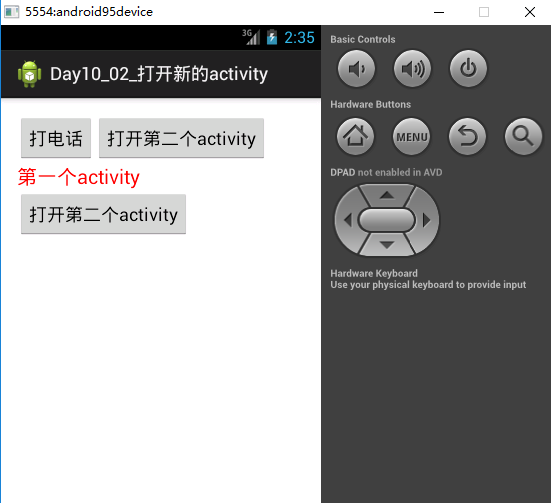
程序运行成功了:

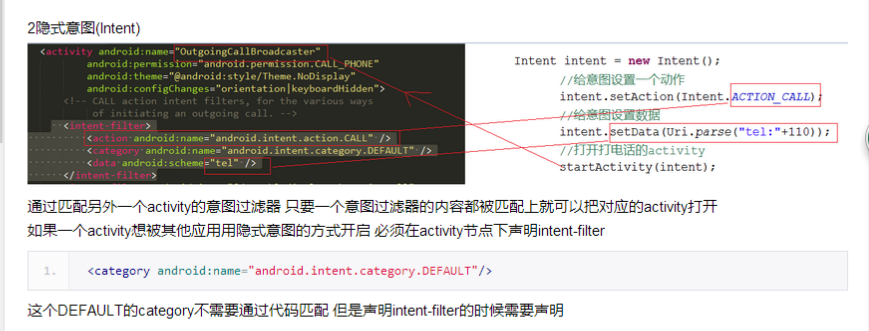
通过匹配第二个intent-filter可以把对应的activity给它打开。实际上咱们通过intent-filter方式打开一个activity这就叫一个隐式意图。隐式意图就是说我通过匹配某一个activity的意图过滤器,我把这个意图过滤器里面所有该匹配的内容都匹配上了,那我就可以把对应的activity打开。同样如果你的一个activity希望别人用隐式意图的方式打开,那你就必须设置一个intent-filter。这就是隐式意图。
你必须搞一个意图过滤器,有了意图过滤器别人才可以用隐式意图的方式打开。还有一点要注意:
<category android:name="android.intent.category.DEFAULT"/>
需要注意一点的是:category这个DEFAULT虽说不用匹配,但是这个东西必须得有。这个category DEFAULT虽说不需要通过代码的方式去匹配它,但是你想用隐式意图把这个打开,默认的这个category一定要在清单文件里面给它配置上。
<?xml version="1.0" encoding="utf-8"?>

<manifest xmlns:android="http://schemas.android.com/apk/res/android"

    package="com.itheima.callnewactivity"

    android:versionCode="1"

    android:versionName="1.0" >

    <uses-sdk

        android:minSdkVersion="8"

        android:targetSdkVersion="17" />

    <uses-permission android:name="android.permission.CALL_PHONE"/>

    <application

        android:allowBackup="true"

        android:icon="@drawable/ic_launcher"

        android:label="@string/app_name"

        android:theme="@style/AppTheme" >

        <activity

            android:name="com.itheima.callnewactivity.MainActivity"

            android:label="@string/app_name" >

            <intent-filter>

                <action android:name="android.intent.action.MAIN" />

                <category android:name="android.intent.category.LAUNCHER" />

            </intent-filter>

        </activity>

        <activity

            android:name="com.itheima.callnewactivity.SecondActivity">

            <intent-filter >

                <action android:name="com.itheima.second"/>

                <category android:name="android.intent.category.DEFAULT"/>

                <data android:scheme="itheima"/>

            </intent-filter>

            <intent-filter >

                <action android:name="com.itheima.second2"/>

                <category android:name="android.intent.category.DEFAULT"/>

                <data android:scheme="itheima"

                    android:mimeType="itcast/itheima"

                    />

            </intent-filter>

        </activity>

    </application>

</manifest>
<RelativeLayout xmlns:android="http://schemas.android.com/apk/res/android"
xmlns:tools="http://schemas.android.com/tools"
android:layout_width="match_parent"
android:layout_height="match_parent"
android:paddingBottom="@dimen/activity_vertical_margin"
android:paddingLeft="@dimen/activity_horizontal_margin"
android:paddingRight="@dimen/activity_horizontal_margin"
android:paddingTop="@dimen/activity_vertical_margin"
tools:context=".MainActivity" > <Button
android:id="@+id/btn"
android:layout_width="wrap_content"
android:layout_height="wrap_content"
android:onClick="call"
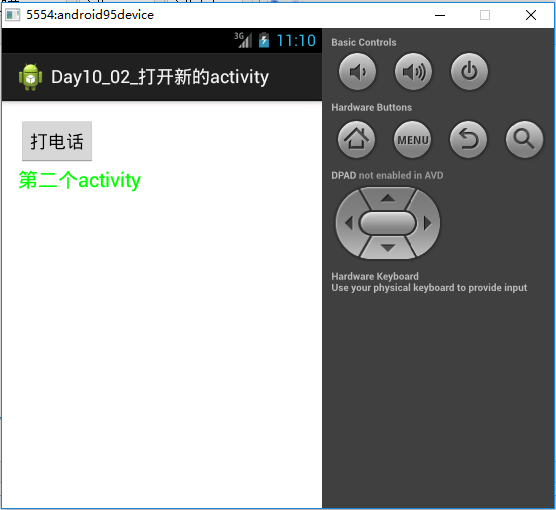
android:text="打电话" />
<TextView
android:id="@+id/tv"
android:layout_below="@id/btn"
android:layout_width="wrap_content"
android:layout_height="wrap_content"
android:textColor="#ff0000"
android:textSize="20sp"
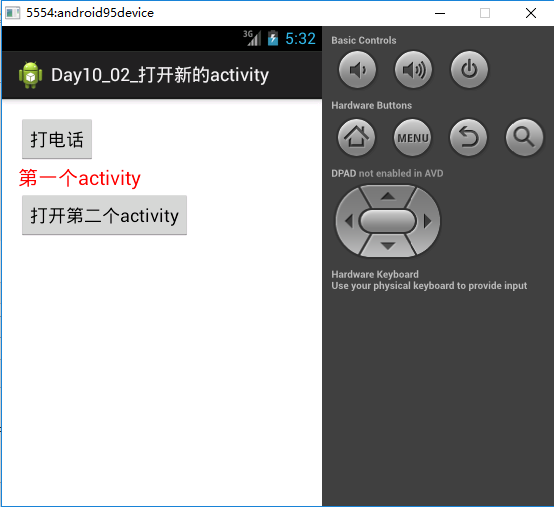
android:text="第一个activity"/>
<Button
android:layout_below="@id/tv"
android:layout_width="wrap_content"
android:layout_height="wrap_content"
android:onClick="openSecond"
android:text="打开第二个activity"/>
<Button
android:layout_toRightOf="@id/btn"
android:layout_width="wrap_content"
android:layout_height="wrap_content"
android:onClick="openSecond2"
android:text="打开第二个activity"/>
</RelativeLayout>
<RelativeLayout xmlns:android="http://schemas.android.com/apk/res/android"

    xmlns:tools="http://schemas.android.com/tools"

    android:layout_width="match_parent"

    android:layout_height="match_parent"

    android:paddingBottom="@dimen/activity_vertical_margin"

    android:paddingLeft="@dimen/activity_horizontal_margin"

    android:paddingRight="@dimen/activity_horizontal_margin"

    android:paddingTop="@dimen/activity_vertical_margin"

    tools:context=".MainActivity" >

    <Button

        android:id="@+id/btn"

        android:layout_width="wrap_content"

        android:layout_height="wrap_content"

        android:onClick="call"

        android:text="打电话" />

    <TextView

        android:layout_below="@id/btn"

        android:layout_width="wrap_content"

        android:layout_height="wrap_content"

        android:textColor="#00ff00"

        android:textSize="20sp"

        android:text="第二个activity"

        />

</RelativeLayout>
package com.itheima.callnewactivity;

import android.net.Uri;

import android.os.Bundle;

import android.app.Activity;

import android.content.Intent;

import android.view.Menu;

import android.view.View;

public class MainActivity extends Activity {

    @Override

    protected void onCreate(Bundle savedInstanceState) {

        super.onCreate(savedInstanceState);

        setContentView(R.layout.activity_main);

    }

    public void call(View v){

        Intent intent = new Intent();

        //给意图设置一个动作

        intent.setAction(Intent.ACTION_CALL);

        //给意图设置数据

        intent.setData(Uri.parse("tel:"+110));

        //打开打电话的activity

        startActivity(intent);

    }

   public void openSecond(View v){

       Intent intent = new Intent();

       intent.setAction("com.itheima.second");

       intent.setData(Uri.parse("itheima:"+1223));

       startActivity(intent);

   }

   public void openSecond2(View v){

       Intent intent = new Intent();

       intent.setAction("com.itheima.second2");

       //intent.setData(Uri.parse("itheima:"+1233));

       //intent.setType("itcast/itheima");//

       //intent.setData(Uri.parse("itheima:"+1233));

       intent.setDataAndType(Uri.parse("itheima:"+1223), "itcast/itheima");

       startActivity(intent);

   }

}
package com.itheima.callnewactivity;

import android.net.Uri;

import android.os.Bundle;

import android.app.Activity;

import android.content.Intent;

import android.view.Menu;

import android.view.View;

public class SecondActivity extends Activity {

    @Override

    protected void onCreate(Bundle savedInstanceState) {

        super.onCreate(savedInstanceState);

        //setContentView(R.layout.activity_main);

        setContentView(R.layout.activity_second);

    }

    public void call(View v){

        Intent intent = new Intent();

        //给意图设置一个动作

        intent.setAction(Intent.ACTION_CALL);

        //给意图设置数据

        intent.setData(Uri.parse("tel:"+110));

        //打开打电话的activity

        startActivity(intent);

    }

}
03_隐式意图打开activity的更多相关文章
- 无废话Android之smartimageview使用、android多线程下载、显式意图激活另外一个activity,检查网络是否可用定位到网络的位置、隐式意图激活另外一个activity、隐式意图的配置,自定义隐式意图、在不同activity之间数据传递(5)
1.smartimageview使用 <LinearLayout xmlns:android="http://schemas.android.com/apk/res/android&q ...
- android 21 隐式意图启动系统预定义activity
Intent intent=new Intent(LoginActivity.this, MainActivity.class);//显示意图启动,显示从一个activity到另一个activity, ...
- [android] 隐式意图激活另外一个activity
随着api的升级,系统的很多应用包名和类名都改掉了,所以很多时候,打开系统应用的时候会报错,隐式意图就是解决组件之间松耦合,描述动作行为 获取Intent对象,通过new出来 调用Intent对象的s ...
- 隐式意图启动一个Activity
隐式意图是通过指定一组动作或者属性实现,主要用于跨应用使用. 1.创建一个意图对象 Intent intent = new Intent(); 2.设置意图过滤器 intent.setAction(& ...
- android intent 隐式意图和显示意图(activity跳转)
android中的意图有显示意图和隐式意图两种, 显示意图要求必须知道被激活组件的包和class 隐式意图只需要知道跳转activity的动作和数据,就可以激活对应的组件 A 主activity B ...
- Activity组件:(一)通过显式意图和隐式意图来实现Activity间的跳转
一.通过显式意图来实现Activity间的跳转 显式意图是指在创建Intent对象时就指定接受者组件 /** * 下面是通过显式意图进行跳转,即明确写出要跳转到SecondActivity.class ...
- Activity组件(二):通过显式意图和隐式意图来跳转至第三方应用
一.显式意图来跳转到第三方应用 /** * 这个方法会在点击按钮的时候执行 * @param view */ public void skip2Browser(View view){ Log.d(TA ...
- [android] 隐式意图和显式意图的使用场景
激活系统的某些应用,并且往应用里面填一些数据,比如说短信应用 打开短信应用,查看logcat,找到ActivityManager, 看到Display.com.android.mms/.ui.Comp ...
- 04_显示意图打开activity
实际上用显式意图打开一个activity就很简单了.只需要指定你要打开的这个activity的class就可以了. 需要注意一点的是创建了一个ThirdActivity必须要在清单文件里面声明.如果没 ...
随机推荐
- UltraEdit-14.10.0.1024版本语法着色配置
用了UltraEdit有段时间了,一直没做语法着色,当做普通文本编辑器使用,这也太委屈这个“神器”了. 今天就让它物尽其用吧.体验一把UltraEdit的语法高亮功能. 参考:http://www.1 ...
- BZOJ2501: [usaco2010 Oct]Soda Machine
n<=50000个区间,求哪个点被覆盖区间数量最多,输出这个数量. 差分模板..然而数组忘开两倍.. #include<stdio.h> #include<string.h&g ...
- boost thread 在非正常退出时 内存泄露问题
在使用boost的thread库的时候,如果主程序退出,thread创建的线程不做任何处理,则会出现内存泄露. 解决方法: 在主线程退出时,对所有thread使用interrupt()命令,然后主程序 ...
- Flex的Combobox组件使用技巧
1.显示提示设置Prompt属性可以为Combobox添加一个默认提示.如果没有设置selectedIndex,默认selectedIndex=-1,就显示Prompt的内容.Flex3如果不设置Pr ...
- androidstudio Cannot resolve symbol 'xxx'
Android Studio 无法识别同一个 package 里的其他类,将其显示为红色,但是 compile 没有问题.鼠标放上去后显示 “Cannot resolve symbol XXX”,重启 ...
- Java学习--反码 原码 补码简析
关于课上实验中对小数的处理中出现的问题涉及到原码,反码,补码的问题,所以在网上进行了一下搜索.在原码,反码,补码中的解释可得知,无论是哪一种码,能够表示的数的范围是-2^(位数-1)+1至2^(位数- ...
- Ubuntu 16.04关闭Alt+鼠标左键移动窗口(转)
1.打开终端,菜单-编辑-配置文件首选项-命令,勾上“以登录Shell方式运行命令”,重启终端. 2.在终端输入 gsettings get org.gnome.desktop.wm.preferen ...
- uva live 12846 A Daisy Puzzle Game
假设下一个状态有必败.那么此时状态一定是必胜,否则此时状态一定是必败 状压DP #include<iostream> #include<map> #include<str ...
- poj 1258 Agri-Net(Prim)(基础)
Agri-Net Time Limit: 1000MS Memory Limit: 10000K Total Submissions: 44487 Accepted: 18173 Descri ...
- ASP.net MVC+ViewData VS ViewBag
在使用MVC框架的过程中,往界面传值,我们使用的ViewData.如ITOO部分代码图解: 当然除了ViewData,我们还能够使用同卵兄弟(ViewBag)来完毕相同的功能,详情 ...