html模板 练习(仿照抽屉网)
1.页面布局

<!DOCTYPE html>
<html lang="en">
<head>
<meta charset="UTF-8">
<title></title>
<style>
body{
margin: auto;
} .pg-header{
height: 48px;
background-color:#2459a2;
color: white;
line-height: 48px;
} .pg-content .menu{
position: absolute;
background-color: #dddddd;
top: 48px;
left: ;
bottom: ;
width: 200px;
}
.pg-content .content{
position: absolute;
background-color: #00bbee;
top: 48px;
right: ;
bottom: ;
left: 200px;
overflow: auto; #a模板b模板切换
} </style>
</head>
<body>
<div class="pg-header">
<div class="logo"><a>LOGO</a></div>
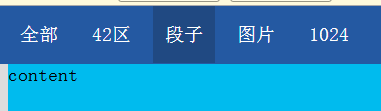
</div> <div class="pg-content"> <div class="menu"><a>菜单界面</a></div> <div class="content"><a>content</a></div> </div> <div class="pg-footer"></div>
</body>
</html>
2.pg-header
3个div进行添加上class,float浮动操作

 .pg-header .logo{

            float: left;

            width: 200px;

        }

        .pg-header .action-menu{

            float: left;

            width: 980px;

        }

        .pg-header .action-person{

            float: right;

            width: 200px;

        }
  <div class="pg-header">

         <div class="logo"><a>LOGO</a></div>

        <div class="action-menu">

            <a>全部</a>

            <a>42区</a>

            <a>段子</a>

            <a>图片</a>

            <a></a>

        </div>

        <div class="action-person">

            <a>注册</a>

            <a>登录</a>

        </div>

    </div>
注意:当页面缩小,float的消失不见了
3. menu菜单
menu 进行 padding,margin,hover操作
 .pg-header .menu{

            display: inline-block;

            padding:  10px  10px;

            color: white;

        }

.pg-header .menu:hover{

            background-color: #;

        }
<div class="pg-header">

         <div class="logo"><a>LOGO</a></div>

        <div class="action-menu">

            <a class="menu">全部</a>

            <a class="menu">42区</a>

            <a class="menu">段子</a>

            <a class="menu">图片</a>

            <a class="menu"></a>

        </div>

        <div class="action-person">

            <a class="menu">注册</a>

            <a class="menu">登录</a>

        </div>

</div>
4.添加按钮


<link rel="stylesheet" href="font-awesome-4.7.0/css/font-awesome.min.css">
        .pg-header .icons{

            display: inline-block;

            padding:  20px  ;

        }

        .pg-header .icons:hover{

            background-color: #;

        }
<div class="action-person"  style="position: relative;">

            <div  class="icons" style="position: absolute;left:0;">

                    <i class="fa fa-share-alt" aria-hidden="true"></i>

                    <span></span>

            </div>

            <div class="icons" style="position: absolute;left:80px;">

               <i class="fa fa-envelope-o" aria-hidden="true"></i>

               <span style="padding: 9px 7px;background-color: red;border-radius: 50%"></span>

</div> </div>
5.添加头像
        /*第5步 : 头像 */

        .pg-header .user-image{

            display: inline-block;

            height: 48px;

            width: 100px;

        }

   /*第6步 : 个人信息 */

        .pg-header .user-image .user-message {

            position: absolute;

            z-index: ;

            background-color: antiquewhite;

            top: 48px;

            width: 100px;

            display: none;

        }

        .pg-header .user-image:hover .user-message{

            display: block;

        }

        .pg-header .user-image .user-message a{

            display: block;

            color: black;

            text-align: center;

}
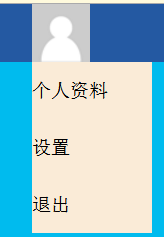
            <div class="user-image" style="position: absolute;right:20px;">

                <a><img src="data:images/user.png"></a>

                <div class="user-message" >

                    <a>个人资料</a>

                    <a>设置</a>

                    <a>退出</a>

                </div>

            </div>
6.完整代码
# css模板:font-awesome-4.7.0
<!DOCTYPE html>

<html lang="en">

<head>

    <meta charset="UTF-8">

    <title></title>

    <link rel="stylesheet" href="font-awesome-4.7.0/css/font-awesome.min.css">

    <style>

        body{

            margin: 0 auto;

        }

        .pg-header{

            height: 48px;

            background-color:#2459a2;

            color: white;

            line-height: 48px;

        }

        /*第二步:三个div进行 float*/

        .pg-header .logo{

            float: left;

            width: 200px;

        }

        .pg-header .action-menu{

            float: left;

            width: 880px;

        }

        .pg-header .action-person{

            float: right;

            width: 300px;

            height: 48px;

        }

        /********************** */

        /*第三步 : menu菜单 */

        .pg-header .menu{

            display: inline-block;

            padding: 0 10px 0 10px;

            color: white;

        }

        .pg-header .menu:hover{

            background-color: #204982;

        }

        /********************** */

         /*第4步 : icons图标 */

        .pg-header .icons{

            display: inline-block;

            padding: 0 20px  ;

        }

        .pg-header .icons:hover{

            background-color: #204982;

        }

        /*第5步 : 头像 */

        .pg-header .user-image{

            display: inline-block;

            height: 48px;

            width: 100px;

        }

        /*第6步 : 个人信息 */

        .pg-header .user-image .user-message {

            position: absolute;

            z-index: 21;

            background-color: antiquewhite;

            top: 48px;

            width: 100px;

            display: none;

        }

        .pg-header .user-image:hover .user-message{

            display: block;

        }

        .pg-header .user-image .user-message a{

            display: block;

            color: black;

            text-align: center;

        }

        .pg-content .menu{

            position: absolute;

            background-color: #dddddd;

            top: 48px;

            left: 0;

            bottom: 0;

            width: 200px;

        }

        .pg-content .content{

            position: absolute;

            background-color: #00bbee;

            top: 48px;

            right: 0;

            bottom: 0;

            left: 200px;

            overflow: auto;

            z-index: 20;

        }

    </style>

</head>

<body>

    <div class="pg-header">

        <!--第二步:div标签 添加上class-->

        <!--第二步:a标签 添加class menu-->

         <div class="logo">

             <a href="#"><img src="data:images/logo.png"></a>

         </div>

        <div class="action-menu">

            <a class="menu">全部</a>

            <a class="menu">42区</a>

            <a class="menu">段子</a>

            <a class="menu">图片</a>

            <a class="menu">1024</a>

        </div>

        <div class="action-person"  style="position: relative;">

            <div  class="icons" style="position: absolute;left:0;">

                    <i class="fa fa-share-alt" aria-hidden="true"></i>

                    <span style="padding: 9px 7px;background-color: red;border-radius: 50%">5</span>

            </div>

            <div class="icons" style="position: absolute;left:80px;">

               <i class="fa fa-envelope-o" aria-hidden="true"></i>

                <span>5</span>

            </div>

            <div class="user-image" style="position: absolute;right:20px;">

                <a><img src="data:images/user.png"></a>

                <div class="user-message" >

                    <a>个人资料</a>

                    <a>设置</a>

                    <a>退出</a>

                </div>

            </div>

        </div>

        <!----------------------------------->

    </div>

    <div class="pg-content">

        <div class="menu"><a>菜单界面</a>

        </div>

        <div class="content"><a>content</a></div>

    </div>

    <div class="pg-footer"></div>

</body>

</html>
html模板 练习(仿照抽屉网)的更多相关文章
- 爬虫 requests模块的其他用法 抽屉网线程池回调爬取+保存实例,gihub登陆实例
requests模块的其他用法 #通常我们在发送请求时都需要带上请求头,请求头是将自身伪装成浏览器的关键,常见的有用的请求头如下 Host Referer #大型网站通常都会根据该参数判断请求的来源 ...
- 第一个网页(仿照当当网,仅仅使用CSS)
这个网页是在学过CSS之后,对当当网首页进行模仿的网页,没有看当当网的网页源码,纯按照自己之前学的写的,由于是刚学过HTML和CSS才一个星期,所以里面有许多地方写的非常没有水平,仅仅用来学习使用,欢 ...
- Css进阶练习(实现抽屉网样式布局)
<!DOCTYPE html> <html lang="en"> <head> <meta charset="UTF-8&quo ...
- php第三方登录(微博登录,仿照慕课网)
https://www.cnblogs.com/haoyu521/p/5606931.html 1:开发之前,请大家先自行熟悉一下OAuth协议原理. 2:我们开发需要具备一个外网可访问的线上域名,如 ...
- HTML-CSS写抽屉网的置顶区域
1.在pycharm的已有工程中新建一个html文件. 2.在<body></body>标签内部写入要内容: <div class='head-box' > < ...
- 导航条且手机版.html——仿照官网例子
<!doctype html> <html> <head> <meta charset="utf-8"> <title> ...
- angular2系列教程(二)模板语法
今天我们要讲的是angualr2的模板语法,官网写的很清楚,但我也用通俗易懂的讲法再罗列一下吧! 例子
- DotNet 资源大全中文版,内容包括:编译器、压缩、应用框架、应用模板、加密、数据库、反编译、IDE、日志、风格指南等
DotNet 资源大全中文版 我想很多程序员应该记得 GitHub 上有一个 Awesome - XXX 系列的资源整理.awesome-dotnet 是由 quozd 发起和维护.内容包括:编译器. ...
- Smarty模板引擎技术
Smarty模板引擎技术 什么是模板引擎? 什么是Smarty模板引擎? 为何选择Smarty模板引擎? 如何使用Smarty模板引擎? 一.历史背景 场景一:回顾之前编写PHP项目的方式 //链接数 ...
随机推荐
- DOM节点中获取文本易混淆的属性
DOM 节点中对于获取文本易混淆的属性,innerText, innerHTML, outerHTML, textContent, nodeValue. 一个实例: <!DOCTYPE html ...
- jq弹框 (1)内容自适应宽度 2(内容框显示,几秒后自动消失)
<!DOCTYPE html> <html> <head lang="en"> <meta charset="UTF-8&q ...
- 利用memcached实现分布式锁
一 需求场景: (1) 需要限制用户创建提现订单的频率:目的一是防止前端bug引起的用户重复提交:二是防止并发攻击绕过提现策略(第一次提现和第二次提现门槛可能不同). (2) 需要限制秒杀下同一用户 ...
- 【node】安装
参考链接: http://www.runoob.com/nodejs/nodejs-install-setup.html http://blog.csdn.net/u010255310/article ...
- Java50道经典习题-程序33 杨辉三角
题目:打印出杨辉三角形(要求打印出10行如下图)分析: 1 1 1 1 2 1 1 3 3 1 1 4 6 4 11 5 10 10 5 ...
- Fedora Server 上配置 MariaDb 集群
下载与安装 MariaDB Galera Cluster 10.1之前的版本安装,输入以下命令进行安装: sudo dnf install mariadb-galera-server 如果电脑上还没安 ...
- ASP.NET如何批量保存动态生成的文本框?
对于OA系统,表单签核功能必不可少.而根据公司的情况,表单自然又五花八门,所以就要求能够让用户自己建立表单并设定表单的流程.填写内容等等.我之前写过一篇文章[地址:pivot的用法(SQL SERVE ...
- 一个实现 手机端“输入验证码 ”效果Demo
之前在“掘金”上看到这样一个demo 我觉得很有意思,于是今天把它搬下来,记在自己的“小本本”里也许会对以后的项目有点用,若要自己去实现这样一个案例也能实现,但是可能没有那么“妙”. 想法: 1.使用 ...
- HashMap源码阅读与解析
目录结构 导入语 HashMap构造方法 put()方法解析 addEntry()方法解析 get()方法解析 remove()解析 HashMap如何进行遍历 一.导入语 HashMap是我们最常见 ...
- OpenID Connect Core 1.0(六)使用隐式验证流
3.2 使用隐式验证流(Authentication using the Implicit Flow) 本节描述如何使用隐式流程执行验证.使用隐式流程时,所有令牌从授权终结点返回:不使用令牌终结点返回 ...