keepalived+mysql主主
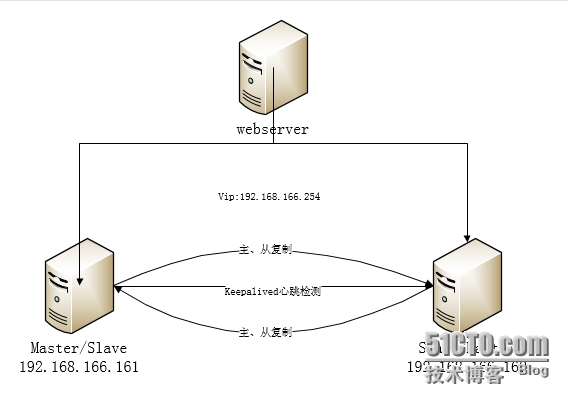
实验架构图:
一.mysql 5.5双机热备份 master-master
1.系统环境
操作系统:centos6.6
masterA IP:192.168.166.161
masterB ip:192.168.166.162
应用软件
mysql-5.5.42.tar.gz
keepalived-1.2.12.tar.gz
2.安装mysql
wget http://mirrors.sohu.com/mysql/MySQL-5.5/mysql-5.5.42.tar.gz
|
#useradd -r mysql -s /sbin/nologin #mkdir -p /data/mysql/{data,binlog,relaylog} #chown mysql:mysql -R /data/mysql #tar xf mysql-5.5.42.tar.gz #cd mysql-5.5.42 # cmake -DCMAKE_INSTALL_PREFIX=/usr/local/mysql \ -DMYSQL_DATADIR=/data/mysql/data \ -DMYSQL_DATADIR=/etc \ -DWITH_INNOBASE_STORAGE_ENGINE=1 \ -DWITH_ARCHIVE_STORAGE_ENGINE=1 \ -DWITH_BLACKHOLE_STORAGE_ENGINE=1 \ -DDEFAULT_CHARSET=utf8 \ -DDEFAULT_COLLATION=utf8_general_ci \ -DWITH_ZLIB=system \ -DMYSQL_UNIX_ADDR=/tmp/mysql.sock \ -DWITH_LIBWRAP=0 \ -DWITH_READLINE=1 \ -DSYSCONFDIR=/etc \ -DMYSQL_TCP_PORT=3306 # #会编译不过去,提示需要安装ncurses-devel #yum -y install ncurses-devel gcc gcc-c++ bison #rm -f CMakeCache.txt 重新执行cmake #make && make install #cd /usr/local/mysql #chown -R mysql:mysql * # cp support-files/mysql.server /etc/rc.d/init.d/mysqld #chmod +x /etc/init.d/mysqld #chkconfig -add mysqld #chkconfig mysqld on # vim /etc/profile 添加PATH=$PATH:/usr/local/mysql/bin # . /etc/profile(或者export PATH=$PATH:/usr/local/mysql/bin) # ln -sv /usr/local/mysql/include/ /usr/include/mysql # echo '/usr/local/mysql/lib' > /etc/ld.so.conf.d/mysql.conf 加载库文件 # ldconfig -v |grep mysql # vim /etc/man.config 添加一行MANPATH /usr/local/mysql/man # cd /usr/local/mysql # scripts/mysql_install_db --user=mysql --datadir=/data/mysql/data
|
3.配置master A
将如下配置拷贝到/etc/my.cnf
|
[client] default-character-set = utf8 port=3306 socket = /tmp/mysql.sock [mysqld] user = mysql port=3306 socket = /tmp/mysql.sock basedir = /usr/local/mysql datadir=/data/mysql/data pid-file = /data/mysql/mysql.pid log-error = /data/mysql/mysql-error.log #max_connections=1000 #log_slave_update =1 log-bin = /data/mysql/binlog/mysql-bin log-bin-index = /data/mysql/binlog/mysql-bin.index binlog_format = mixed binlog_cache_size = 4M max_binlog_cache_size = 8M max_binlog_size = 1G expire_logs_days = 30 #不需要同步的数据,且不记录到binlog中。 binlog-do-db=small binlog-ignore-db=mysql replicate-do-db=small replicate-ignore-db=mysql #同步参数: #保证slave挂在任何一台master上都会接收到另一个master的写入信息 log-slave-updates slave-skip-errors=all sync_binlog=1 auto_increment_offset=1 auto_increment_increment=2 key_buffer_size = 384M sort_buffer_size = 2M read_buffer_size = 2M read_rnd_buffer_size =16M join_buffer_size =2M thread_cache_size = 300 query_cache_limit = 2M query_cache_min_res_unit =2K thread_concurrency = 8 table_cache =614 table_open_cache = 512 open_files_limit = 10240 back_log = 600 max_connections = 5000 max_connect_errors = 6000 external-locking = FALSE max_allowed_packet =16M default_storage_engine = MyISAM #default_storage_engine = InnoDB thread_stack =192K transaction_isolation = REPEATABLE-READ tmp_table_size = 256M max_heap_table_size =512M bulk_insert_buffer_size = 64M myisam_sort_buffer_size = 64M myisam_max_sort_file_size = 10G myisam_repair_threads = 1 myisam_recover long_query_time = 2 slow_query_log = on slow_query_log_file = /data/mysql/slow.log log-queries-not-using-indexes =on log-slow-admin-statements skip-name-resolve skip-external_locking log_bin_trust_function_creators=1 #skip-networking #skip-innodb innodb_additional_mem_pool_size = 16M innodb_buffer_pool_size = 512M innodb_data_file_path = ibdata1:256M:autoextend innodb_file_io_threads = 4 innodb_thread_concurrency = 8 innodb_flush_log_at_trx_commit =2 innodb_log_file_size =128M innodb_log_files_in_group = 3 innodb_max_dirty_pages_pct = 90 innodb_lock_wait_timeout =240 innodb_file_per_table = 0 innodb_status_file = 1 interactive_timeout=120 wait_timeout=120 server-id=1 #innodb_flush_logs_at_trx_commit=1 [mysqldump] quick max_allowed_packet = 64M [mysql] no-auto-rehash [myisamchk] key_buffer_size = 256M sort_buffer_size = 256M read_buffer = 2M write_buffer = 2M
|
4.配置 master B
将如下配置拷贝到/etc/my.cnf
|
[client] default-character-set = utf8 port=3306 socket = /tmp/mysql.sock [mysqld] user = mysql port=3306 socket = /tmp/mysql.sock basedir = /usr/local/mysql datadir=/data/mysql/data pid-file = /data/mysql/mysql.pid log-error = /data/mysql/mysql-error.log #max_connections=1000 #log_slave_update =1 log-bin = /data/mysql/binlog/mysql-bin log-bin-index = /data/mysql/binlog/mysql-bin.index binlog_format = mixed binlog_cache_size = 4M max_binlog_cache_size = 8M max_binlog_size = 1G expire_logs_days = 30 #需要同步的数据库 binlog-do-db=small binlog-ignore-db=mysql replicate-do-db=small replicate-ignore-db=mysql log-slave-updates slave-skip-errors=all sync_binlog=1 auto_increment_increment=2 auto_increment_offset=2 key_buffer_size = 384M sort_buffer_size = 2M read_buffer_size = 2M read_rnd_buffer_size =16M join_buffer_size =2M thread_cache_size = 300 query_cache_limit = 2M query_cache_min_res_unit =2K thread_concurrency = 8 table_cache =614 table_open_cache = 512 open_files_limit = 10240 back_log = 600 max_connections = 5000 max_connect_errors = 6000 external-locking = FALSE max_allowed_packet =16M default_storage_engine = MyISAM #default_storage_engine = InnoDB thread_stack =192K transaction_isolation = REPEATABLE-READ tmp_table_size = 256M max_heap_table_size =512M bulk_insert_buffer_size = 64M myisam_sort_buffer_size = 64M myisam_max_sort_file_size = 10G myisam_repair_threads = 1 myisam_recover long_query_time = 2 slow_query_log = on slow_query_log_file = /data/mysql/slow.log log-queries-not-using-indexes =on log-slow-admin-statements skip-name-resolve skip-external_locking log_bin_trust_function_creators=1 #skip-networking #skip-innodb innodb_additional_mem_pool_size = 16M innodb_buffer_pool_size = 512M innodb_data_file_path = ibdata1:256M:autoextend innodb_file_io_threads = 4 innodb_thread_concurrency = 8 innodb_flush_log_at_trx_commit =2 innodb_log_file_size =128M innodb_log_files_in_group = 3 innodb_max_dirty_pages_pct = 90 innodb_lock_wait_timeout =240 innodb_file_per_table = 0 innodb_status_file = 1 interactive_timeout=120 wait_timeout=120 server-id=2 [mysqldump] quick max_allowed_packet = 64M [mysql] no-auto-rehash [myisamchk] key_buffer_size = 256M sort_buffer_size = 256M read_buffer = 2M write_buffer = 2M
|
5.创建授权用户
|
masterA: Mysql>grant replication slave on *.* to rpuser1@192.168.166.162 identified by '123456'; Mysql> flush privileges; masterB: Mysql>grant replication slave on *.* to rpuser2@192.168.166.161 identified by '123456'; Mysql> flush privileges;
|
6.准备复制
|
Master A: mysql> show master status\G *************************** 1. row *************************** File: mysql-bin.000001 Position: 347 Binlog_Do_DB: small Binlog_Ignore_DB: mysql 1 row in set (0.00 sec) master B: mysql> show master status\G *************************** 1. row *************************** File: mysql-bin.000001 Position: 347 Binlog_Do_DB: small Binlog_Ignore_DB: mysql 1 row in set (0.00 sec) |
7.配置同步
|
Master A: mysql> change master to -> master_host='192.168.166.162', -> master_user='rpuser2', -> master_password='123456', -> master_log_file='mysql-bin.000001', -> master_log_pos=347; Master B: mysql> change master to -> master_host='192.168.166.161', -> master_user='rpuser1', -> master_password='123456', -> master_log_file='mysql-bin.000001', -> master_log_pos=347; |
8.查看与验证
|
Master A: Mysql>show slave status \G Slave_IO_Running: Yes 这两个为yes表示正常 Slave_SQL_Running: Yes Master B: Mysql>show slave status \G Slave_IO_Running: Yes 这两个为yes表示正常 Slave_SQL_Running: Yes Master A: 创建数据库 create databases small; Master B: mysql> show databases; +--------------------+ | Database | +--------------------+ | information_schema | | mysql | | performance_schema | | small | | test | +--------------------+ 5 rows in set (0.05 sec) 可以发现数据库small Master B: 在small数据库里创建一张表,T1: mysql> create table T1 select * from mysql.user; Query OK, 7 rows affected (0.08 sec) Records: 7 Duplicates: 0 Warnings: 0 Master A: 查看small下面有T1这个表格: mysql> use small; No connection. Trying to reconnect... Connection id: 10 Current database: *** NONE *** Database changed mysql> show tables; +-----------------+ | Tables_in_small | +-----------------+ | T1 | +-----------------+ 1 row in set (0.00 sec) |
二.配置Keepalived实现MySQL双主高可用
1.下载软件
wget http://www.keepalived.org/software/keepalived-1.2.12.tar.gz
需要在两台服务器上安装keepalived,这里拿Master A安装过程举例
|
#tar xf keepalived-1.2.12.tar.gz #cd keepalived-1.2.12 #yum –y install openssl-devel kernel-devel #./configure --sysconf=/etc --with-kernel-dir=/usr/src/kernels/2.6.32-504.el6.x86_64/ #make #make install
|
2.配置keepalived
|
Master A: global_defs { notification_email { root@localhost } notification_email_from keepalived.example.com router_id MySQL_HA } vrrp_script check_mysqld { script "/etc/keepalived/check_slave.pl 127.0.0.1" interval 2 weight 21 } vrrp_instance HA_1 { state BACKUP //master A和master B上均配置为BACKUP interface eth0 virtual_router_id 80 priority 100 advert_int 2 nopreempt //不抢占模式,只在优先级高的机器上设置即可,优先级低的机器可以不设置。 authentication { auth_type PASS auth_pass 23b14455cd } track_script { check_mysqld } virtual_ipaddress { 192.168.166.254 } } 其中,/etc/keepalived/check_slave.sh 脚本内容为: #!/bin/bash ####################################### # this script function is : # check_mysql_slave_replication_status # # User YYYY-MM-DD - ACTION # mlx 2013-12-29 - Created # mail 552326439@qq.com ####################################### HOST_IP=localhost HOST_PORT=3306 MYUSER=root MYPASS="123456" MYSOCK=/tmp/mysql.sock MYSQL_PATH=/usr/local/mysql/bin MYSQL_CMD="$MYSQL_PATH/mysql -u$MYUSER -p$MYPASS -S $MYSOCK" CHECKNUM=123 MYSQL1=$($MYSQL_CMD -N -s -e "select ${CHECKNUM}") if [ $? -ne 0 ] || [ "${MYSQL1}" -ne "${CHECKNUM}" ];then /etc/init.d/keepalived stop exit 1 else SlaveStatusArr=($($MYSQL_CMD -e "show slave status \G"|egrep "_Behind|_Running"|awk '{print $NF}')) if [ "${SlaveStatusArr[0]}" = "No" ] || [ "${SlaveStatusArr[1]}" = "No" ];then /etc/init.d/keepalived stop fi fi 说明:此监控脚本可以检测mysql服务是否启动和mysql主从同步是否正常。 Master B: global_defs { notification_email { root@localhost } notification_email_from keepalived.example.com router_id MySQL_HA } vrrp_script check_mysqld { script "/etc/keepalived/check_slave.pl 127.0.0.1" interval 2 weight 21 } vrrp_instance HA_1 { state BACKUP //master A和master B上均配置为BACKUP interface eth0 virtual_router_id 80 priority 90 advert_int 2 authentication { auth_type PASS auth_pass 23b14455cd } track_script { check_mysqld } virtual_ipaddress { 192.168.166.254 } } 其中,/etc/keepalived/check_slave.pl 脚本内容为: #!/bin/bash ####################################### # this script function is : # check_mysql_slave_replication_status # # User YYYY-MM-DD - ACTION # mlx 2013-12-29 - Created # mail 552326439@qq.com ####################################### HOST_IP=localhost HOST_PORT=3306 MYUSER=root MYPASS="123456" MYSOCK=/tmp/mysql.sock MYSQL_PATH=/usr/local/mysql/bin MYSQL_CMD="$MYSQL_PATH/mysql -u$MYUSER -p$MYPASS -S $MYSOCK" CHECKNUM=123 MYSQL1=$($MYSQL_CMD -N -s -e "select ${CHECKNUM}") if [ $? -ne 0 ] || [ "${MYSQL1}" -ne "${CHECKNUM}" ];then /etc/init.d/keepalived stop exit 1 else SlaveStatusArr=($($MYSQL_CMD -e "show slave status \G"|egrep "_Behind|_Running"|awk '{print $NF}')) if [ "${SlaveStatusArr[0]}" = "No" ] || [ "${SlaveStatusArr[1]}" = "No" ];then /etc/init.d/keepalived stop fi fi |
3.启动keepalived
|
Master A: #cp /usr/local/sbin/keepalived /usr/sbin/ #service keepalived start #chkconfig –level 2345 keepalived on Master B: #cp /usr/local/sbin/keepalived /usr/sbin/ #service keepalived start #chkconfig –level 2345 keepalived on
|
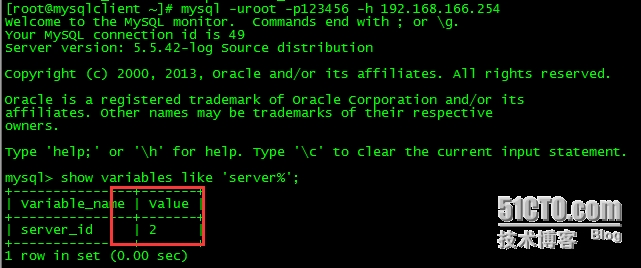
3.测试服务的高可用功能
我们在webserver这台主机上用mysql客户端连接vip:192.168.166.254
|
#mysql -uroot -p123456 -h 192.168.166.254
说明:此时vip地址在Master B 这台服务器上。 |


4.测试故障转移
故障模拟,我们这时手动停掉192.168.166.254的MySQL复制线程
|
mysql>stop slave;
这里可以看到,当停掉复制线程后,执行查询时连接中断了一次,马上再次连接上完成查询,显示的server_id已经变成1了,表示服务器已经切换了。 查看master A服务器的IP地址验证VIP是否转移过来了
|


5.模拟网线故障
|
手动停掉master A 服务武器eth0网卡 #ifdown eth0
说明:vip地址已经转到Master B服务器上,并且mysql服务已经做了故障转移 |


keepalived+mysql主主的更多相关文章
- MySQL 高可用性—keepalived+mysql双主
MySQL 高可用性—keepalived+mysql双主(有详细步骤和全部配置项解释) - 我的博客 - CSDN博客https://blog.csdn.net/qq_36276335/articl ...
- MySQL 高可用性—keepalived+mysql双主(有详细步骤和全部配置项解释)
博主QQ:819594300 博客地址:http://zpf666.blog.51cto.com/ 有什么疑问的朋友可以联系博主,博主会帮你们解答,谢谢支持! 前言:生产环境中一台mysql主机存在单 ...
- keepalived+MySQL双主搭建
keepalived+MySQL双主搭建过程 首先要简单了解一下keepalived: Keepalived是Linux下一个轻量级别的高可用解决方案.高可用(High Avalilability,H ...
- Keepalived+MySQL双主
一.Keepalived+MySQL Replication的应用场景 MySQL的高可用方案有cluster,MMM,MHA等,这些高可用方案都要三台服务器以上,成本有点高,今天介绍一个低成本高可用 ...
- keepalived+mysql双主复制高可用方案
MySQL双主复制,即互为Master-Slave(只有一个Master提供写操作),可以实现数据库服务器的热备,但是一个Master宕机后不能实现动态切换.而Keepalived通过虚拟IP,实现了 ...
- keepalived+mysql双主热备
这里使用keepalived实现mysql的双主热备高可用 实验环境: 主机名 IP 系统版本 软件版本 master 192.168.199.6/vip:192.168.199.111 Rhel7. ...
- Keepalived + Mysql 双主
VIP 192.168.1.41 Master 192.168.1.42 Slave 192.168.1.43 .配置 yum -y install mysql-server chkconfig -- ...
- Keepalived+MySQL双主架构
l 架构准备 Node1 192.168.15.3 Node2 192.168.15.4 VIP 192.168.15.254 l 软件 MySQL 5.6 Keepalive yum insta ...
- Mysql + keepalived 实现双主热备读写分离【转】
Mysql + keepalived 实现双主热备读写分离 2013年6月16日frankwong发表评论阅读评论 架构图 系统:CentOS6.4_X86_64软件版本:Mysql-5.6.12 ...
- mysql双主+keepalived
环境 OS: centos7Mysql 版本: mysql 5.7Keepalived: keepalived-1.2.20Mysql-vip:192.168.41.100Mysql-master1: ...
随机推荐
- php 使用 Memcache 例子
代码写成后不断的往数据库插入数据,可以发现 当set时:理论上速度变慢,但数据同步 当get时:理论上速度变快,但数据不同步,需要缓存失效后重新请求set方法 <?php $mem = new ...
- Java数据库连接——JDBC基础知识(操作数据库:增删改查)
一.JDBC简介 JDBC是连接java应用程序和数据库之间的桥梁. 什么是JDBC? Java语言访问数据库的一种规范,是一套API. JDBC (Java Database Connectivit ...
- API文档的阅读
API ——Application Programming Interface(应用程序编程接口) API是应用程序接口的意思,API是Java提供的基本编程接口,当使用Java语言进行编程时,不可能 ...
- 点云匹配和ICP算法概述
Iterative Closest Point (ICP) [1][2][3] is an algorithm employed to minimize the difference between ...
- html 把左框的选中项添加到右框
<!DOCTYPE html> <html> <head> <meta charset="UTF-8"> <title> ...
- mini install centOS log
no ifconfig yum install net-tools ------------------------------------------------------------------ ...
- HTML语言的一些元素(二)
3)表示元素:<b>,<i>,<u>,<s>,<tt>,<sup>,<sub>,<strike>,< ...
- j2ee Servlet、Filter、Listener
首先,JSP/Servlet规范中定义了Servlet.Filter.Listener这三种角色,并没有定义Interceptor这个角色,Interceptor是某些MVC框架中的角色,比如Stru ...
- ssh两台机器建立信任关系无密码登陆
在建立信任关系之前先看看基于公钥.私钥的加密和认证. 私钥签名过程 消息-->[私钥]-->签名-->[公钥]-->认证 私钥数字签名,公钥验证 Alice生成公钥和私钥,并将 ...
- SQL order by 两个字段排序
select * from emp;