
详解intellij idea搭建SSM框架(spring+maven+mybatis+mysql+junit)(下)
在上一篇(详解intellij idea 搭建SSM框架(spring+maven+mybatis+mysql+junit)(上))博文中已经介绍了关于SSM框架的各种基础配置,(对于SSM配置不熟悉的朋友,可以先看看上一篇博文)那么本篇博文介绍介绍springmvc前后台的交互。
v简单页面跳转
我们首先修改index.jsp文件,实现一个页面跳转。
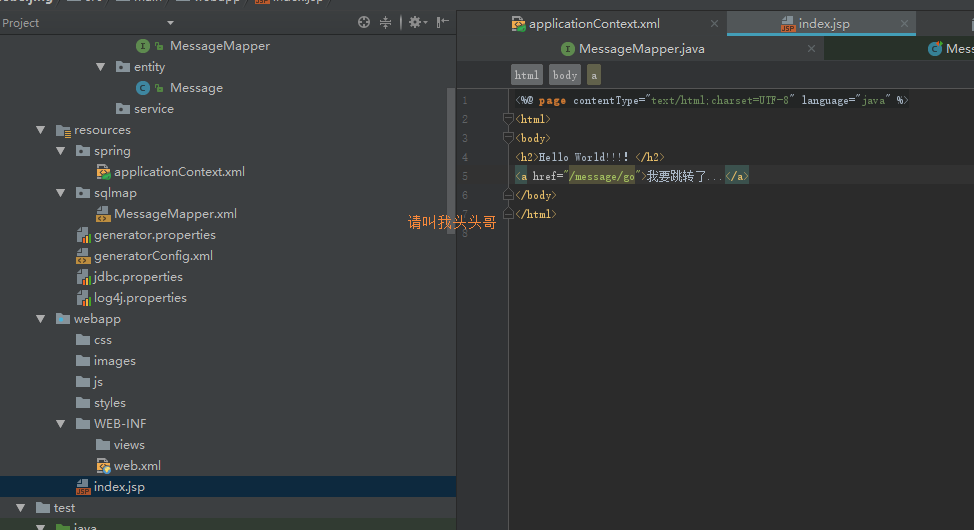
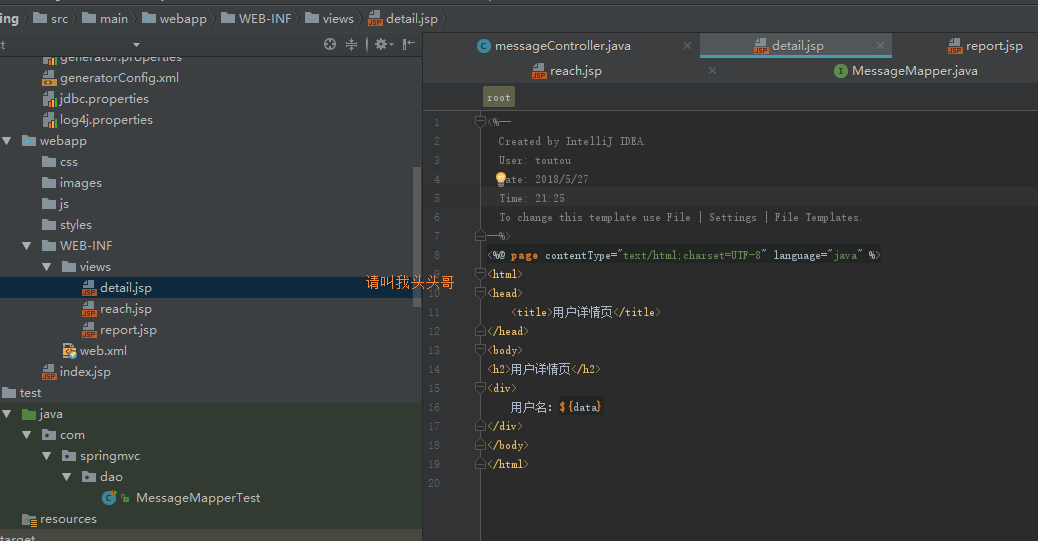
在views文件夹下面建一个jsp文件,就是上面所需要跳转的页面。
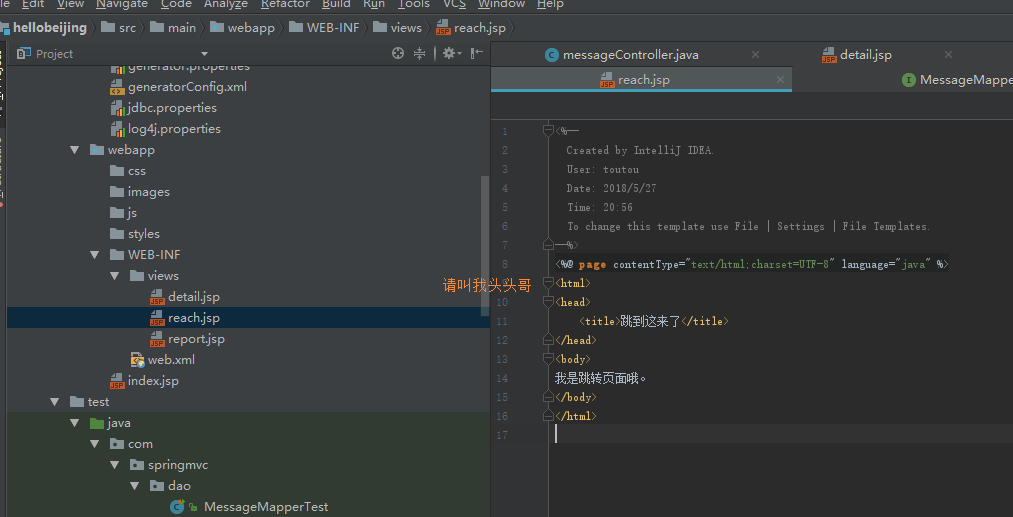
对应的实现页面跳转,完善这个功能,增加映射,可以处理对跳转中的/message/go作出响应,在controller包里面新建java文件,格式:Controller.java,以示他是用来控制请求的,这里新建文件messageController.java
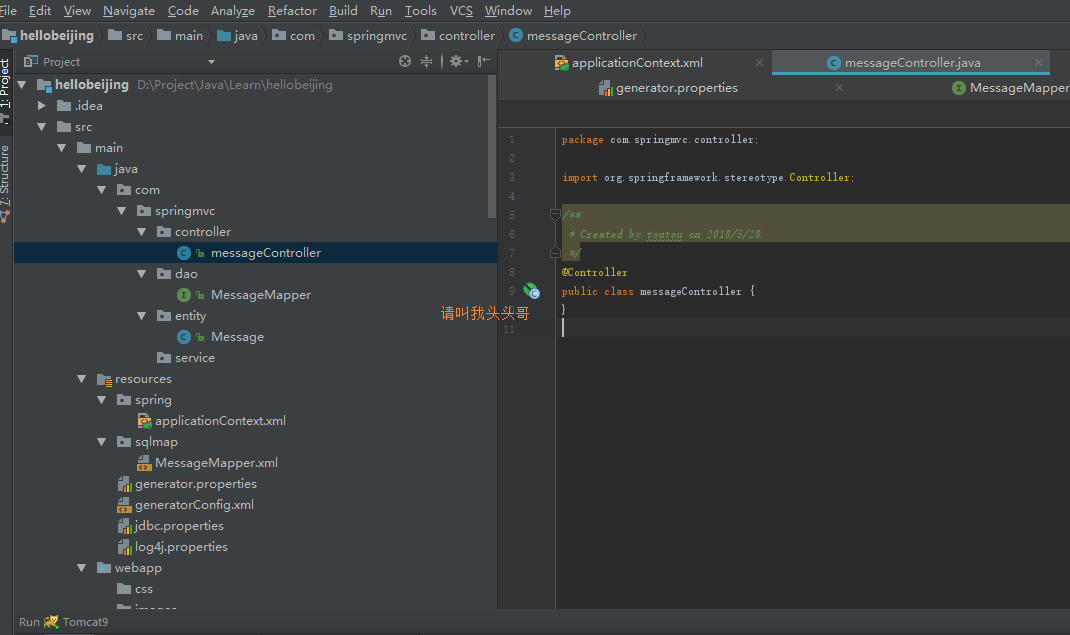
注意在开头加一个"@Controller",@Controller标识一个Spring类是Spring MVC controller处理器, 也就是加了@Controller,这个文件就会被spring认为是处理请求的
接着开始写函数,@RequestMapping() 里面写链接,@RequestMapping() 注解可以在控制器类的级别和/或其中的方法的级别上使用。

注意函数名称可以随便起,重要的是需要对应的url映射和返回的文件 。点击运行启动项目。效果如下图:
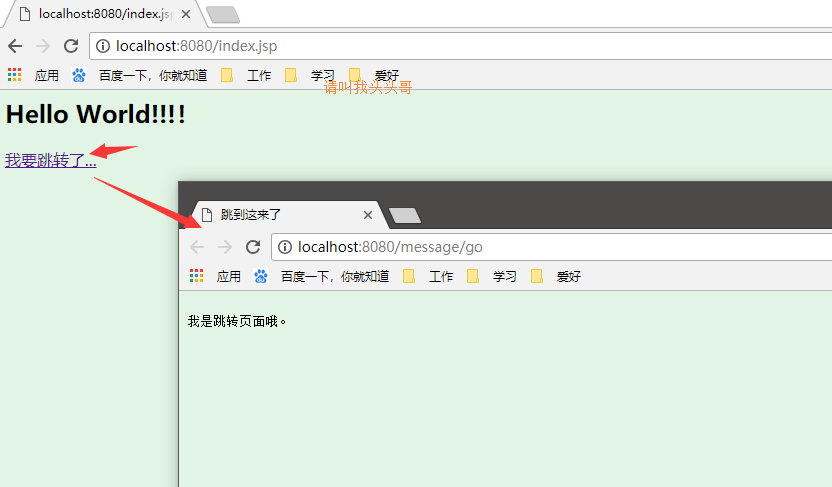
点击"我要跳转了...", 跳转至新建的jsp页面。OK,跳转页面的小目标就此实现。
v综合页面跳转
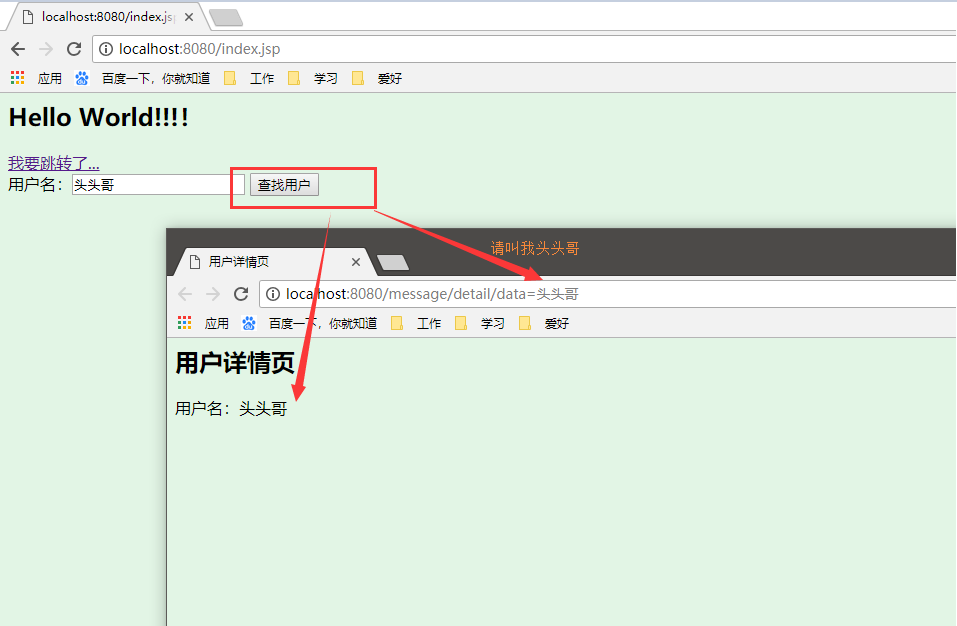
需求:在页面上输入一个用户名,然后根据这个用户名跳转到这个用户的详情页。
改造index.jsp, 增加可以输入用户名的框框。
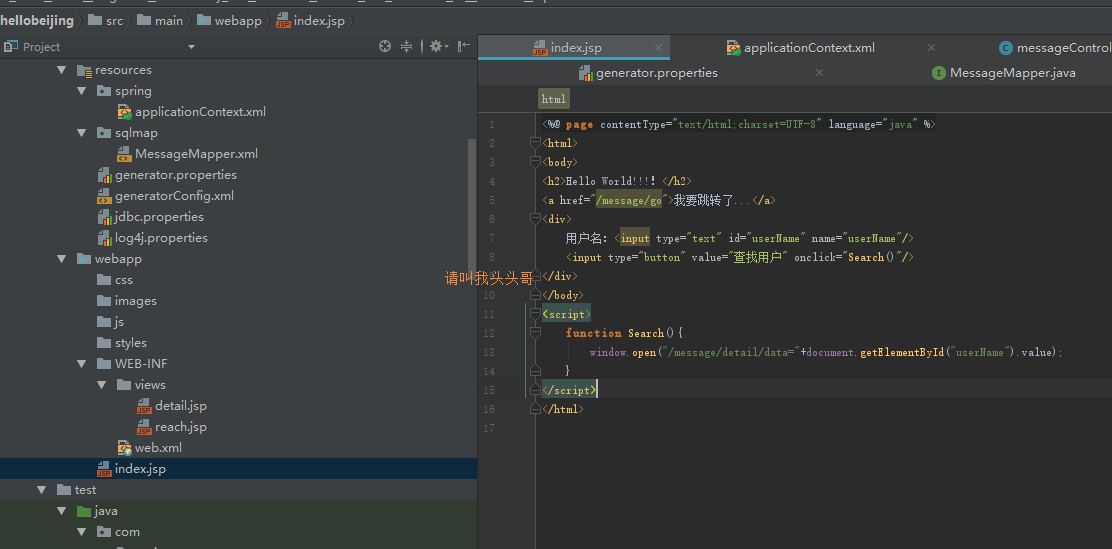
添加控制的跳转函数,
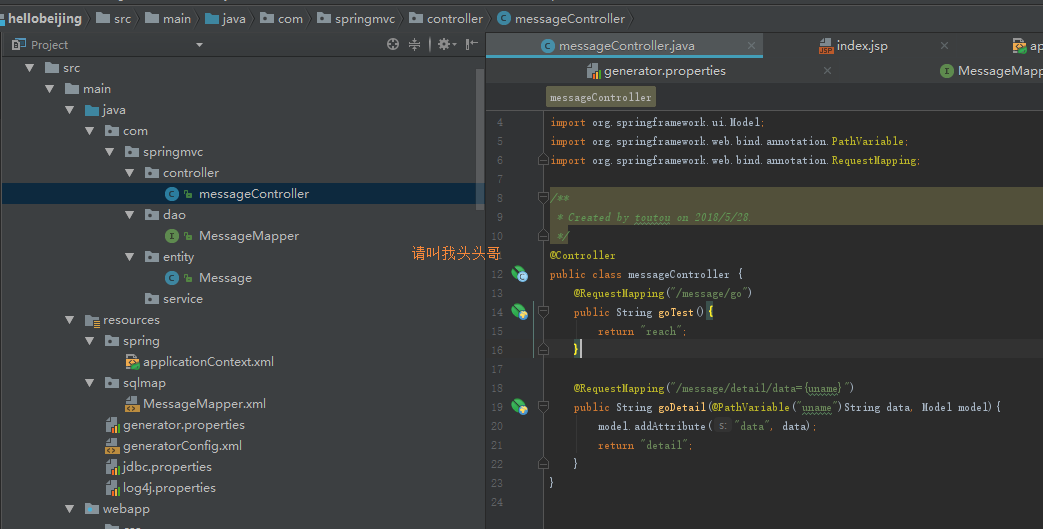
@PathVariable可以将 URL 中占位符参数绑定到控制器处理方法的入参中:URL 中的 {xxx} 占位符可以通过,@PathVariable("xxx") 绑定到操作方法的入参中。
新建用户详情页
点击运行,实现效果如下:
vform表单
1、GET请求会向数据库发索取数据的请求,从而来获取信息,该请求就像数据库的select操作一样,只是用来查询一下数据,不会修改、增加数据,不会影响资源的内容,即该请求不会产生副作用。无论进行多少次操作,结果都是一样的。
2、与GET不同的是,PUT请求是向服务器端发送数据的,从而改变信息,该请求就像数据库的update操作一样,用来修改数据的内容,但是不会增加数据的种类等,也就是说无论进行多少次PUT操作,其结果并没有不同。
3、POST请求同PUT请求类似,都是向服务器端发送数据的,但是该请求会改变数据的种类等资源,就像数据库的insert操作一样,会创建新的内容。几乎目前所有的提交操作都是用POST请求的。
4、DELETE请求顾名思义,就是用来删除某一个资源的,该请求就像数据库的delete操作。
在实际操作的时候,就get和post两种用的比较多。这里主要介绍get和post
GET
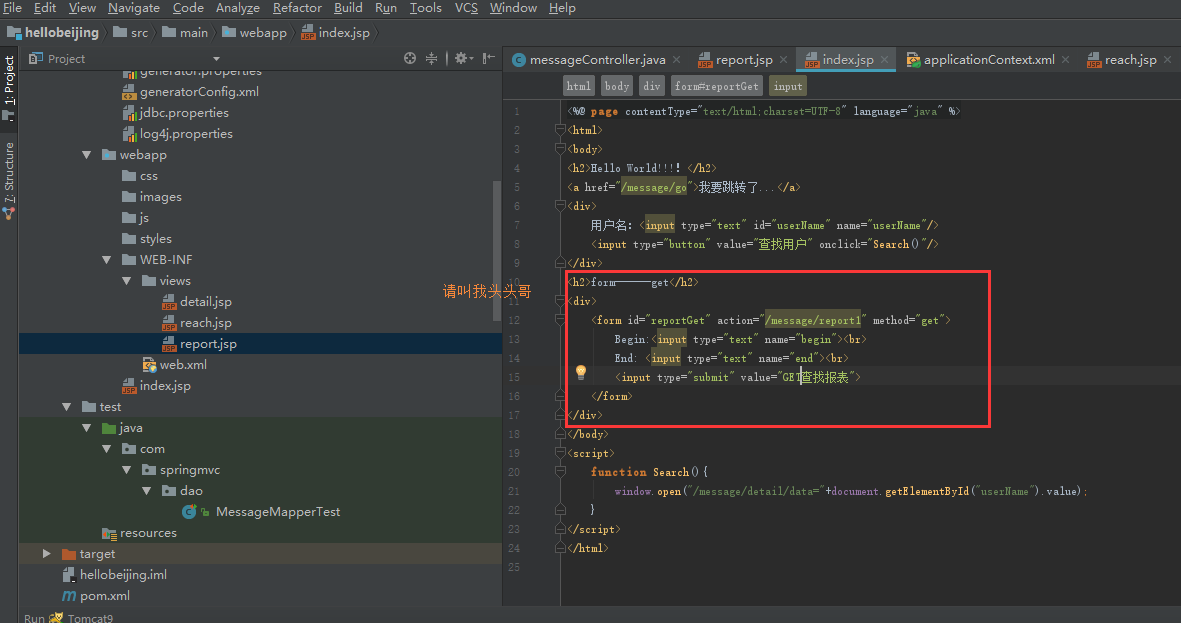
1.改造index.jsp,添加get方式的form表单
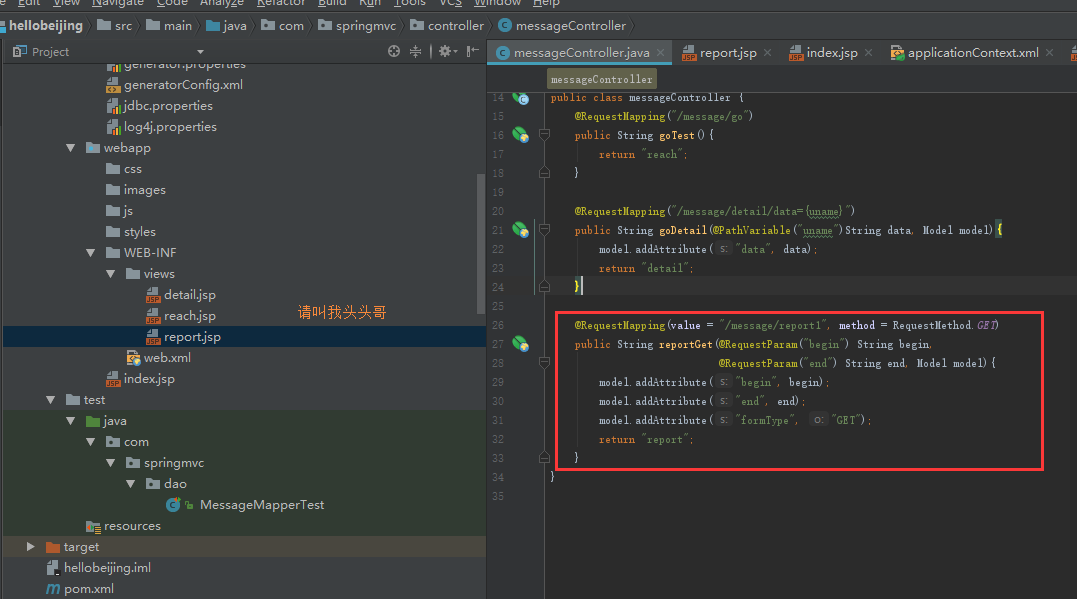
2.添加处理get请求的函数
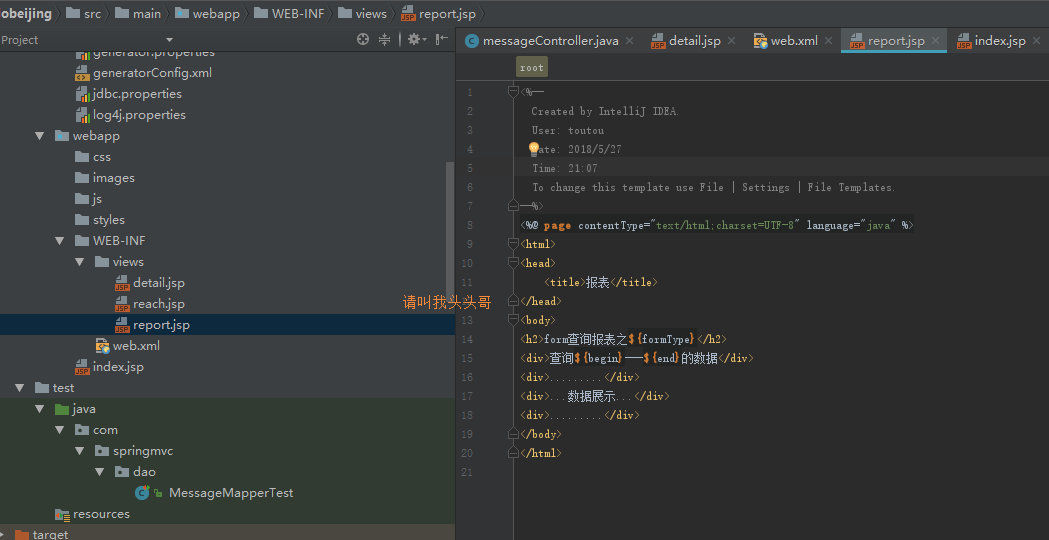
3.根据get请求最终展示数据的报表页
4.点击运行,效果如下:
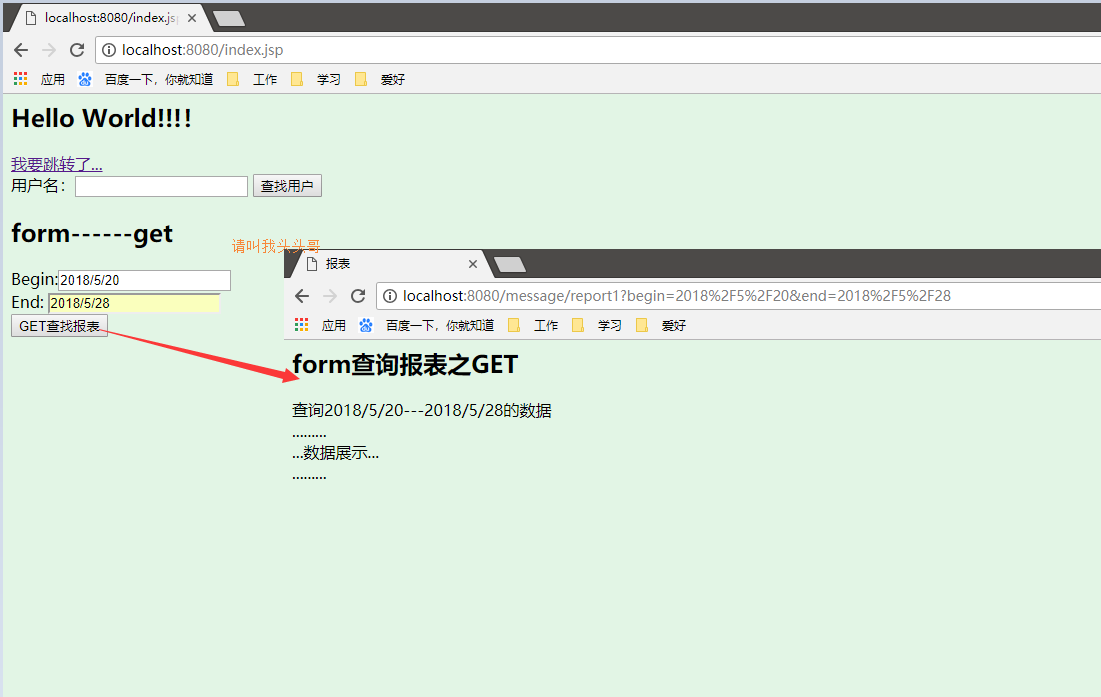
输入开始和结束时间,点击查找报表
POST
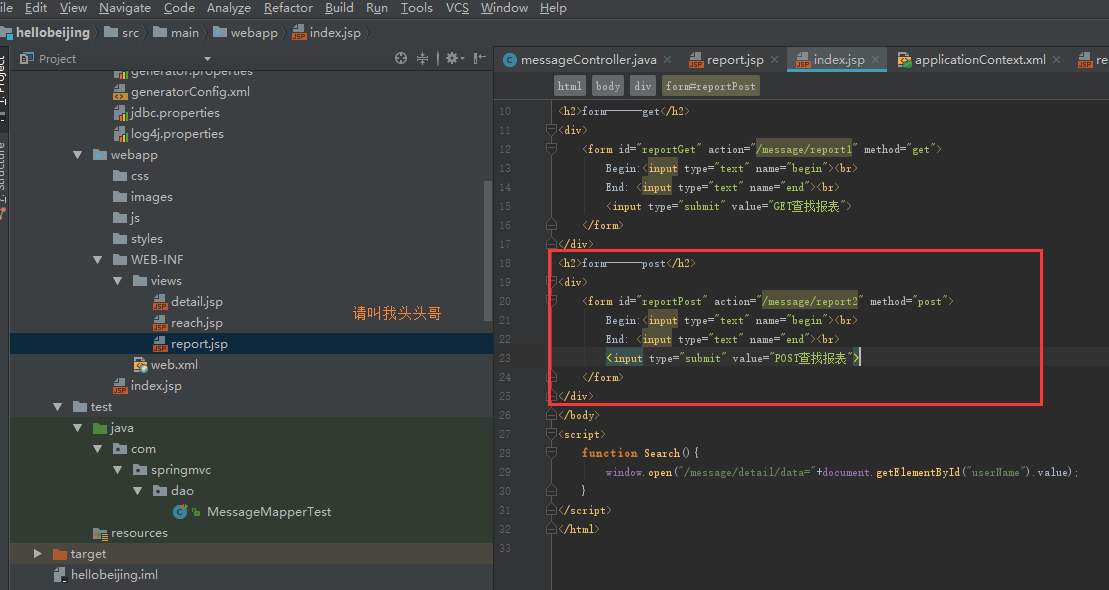
1.改造index.jsp,添加post方式的form表单
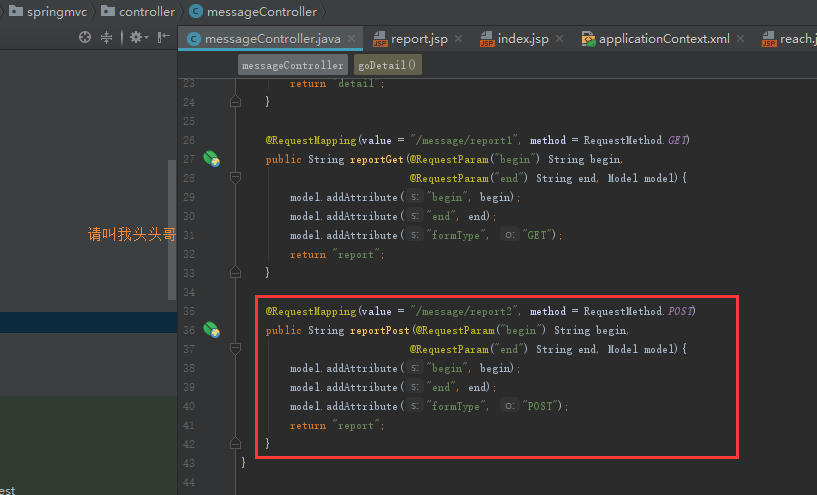
2.添加处理post请求的函数
3.根据post请求最终展示数据的报表页
报表页共用GET方式的报表页。
4.点击运行,效果如下:
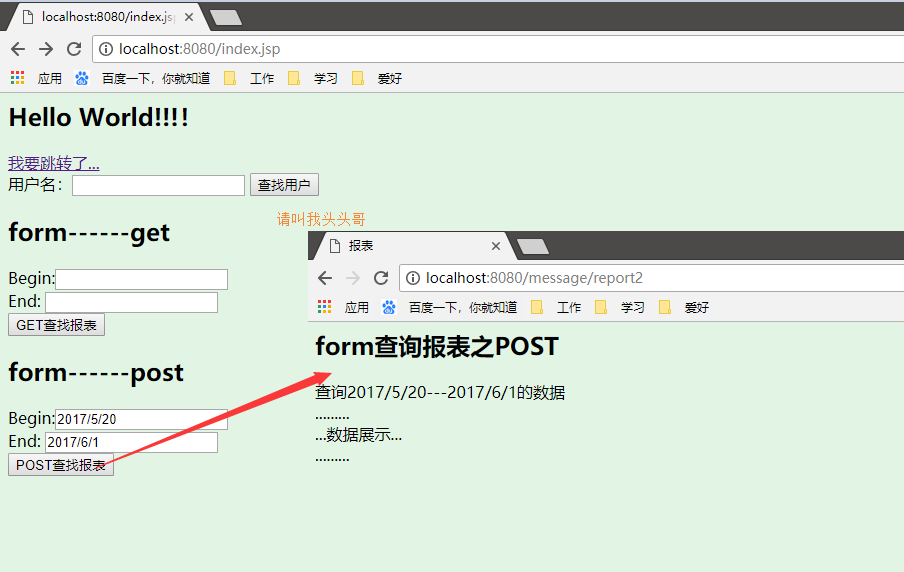
输入开始和结束时间,点击查找报表
v注册登录
大部分网站都绕不开登录和注册,那就来讲讲springmvc登录注册的简单实现。
首先创建一个用户表
再用mybatis-generator自动生成的实体类,UserInfo
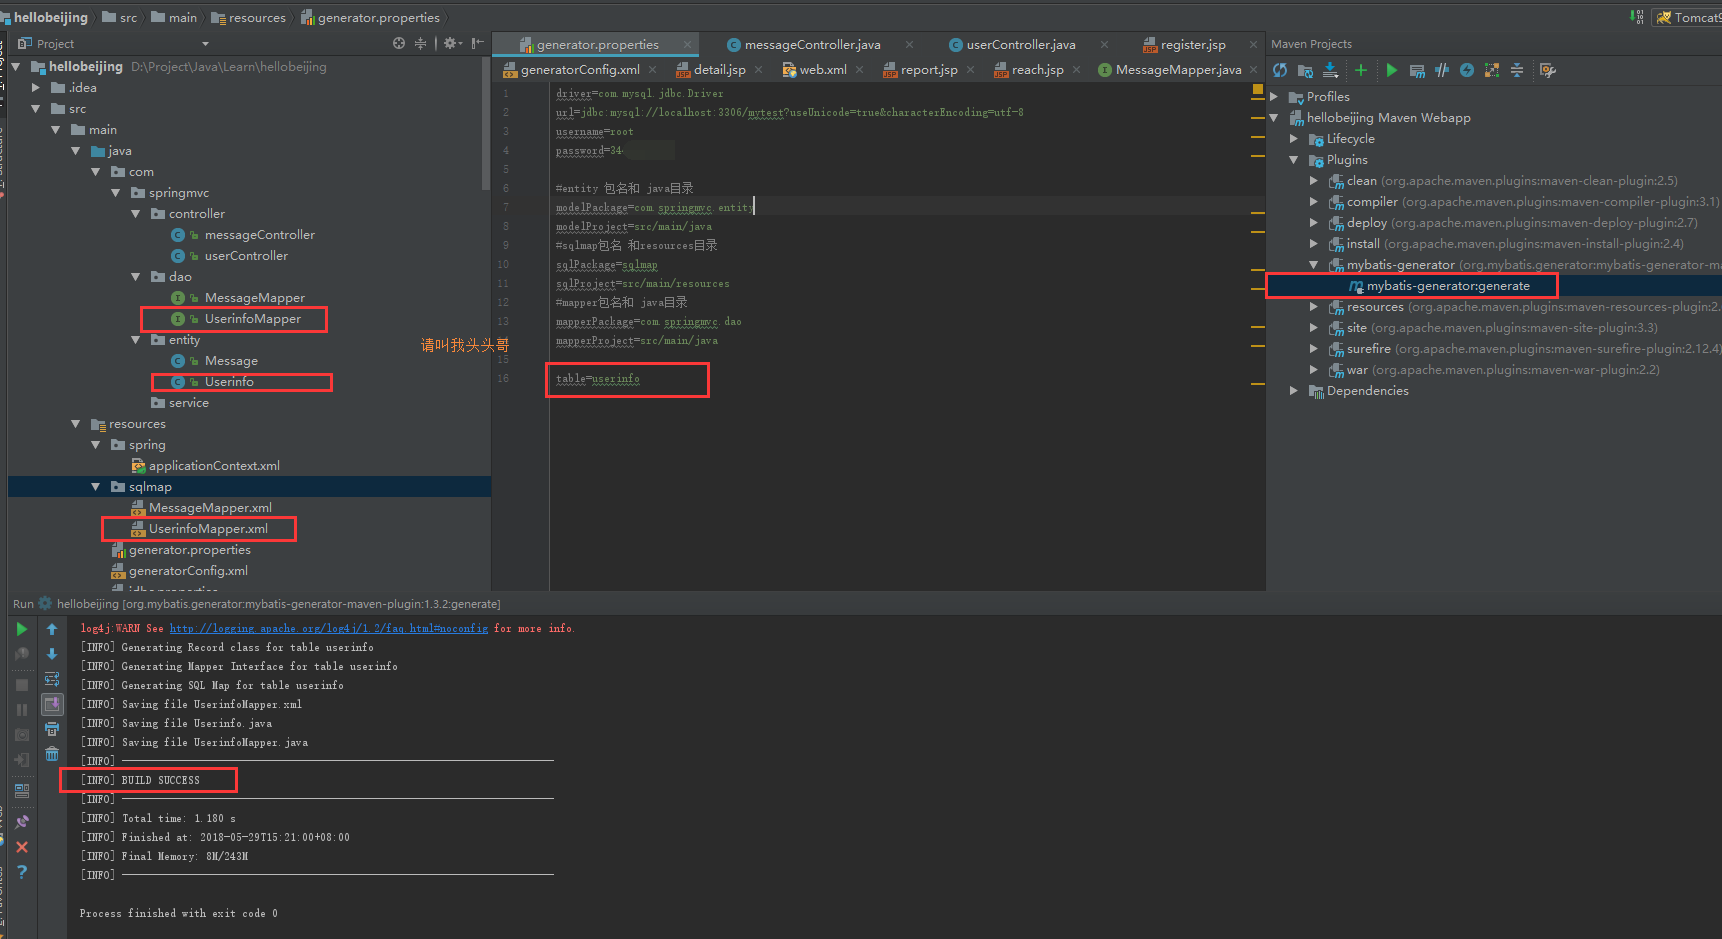
添加service层
UserinfoService
package com.springmvc.service;

import com.springmvc.entity.Userinfo;

import java.util.ArrayList;

/**

 * Created by toutou on 2018/5/27.

 */

public interface UserinfoService {

    int insert(Userinfo record);

    ArrayList<Userinfo> selectSelective(Userinfo record);

}
UserinfoServiceImpl
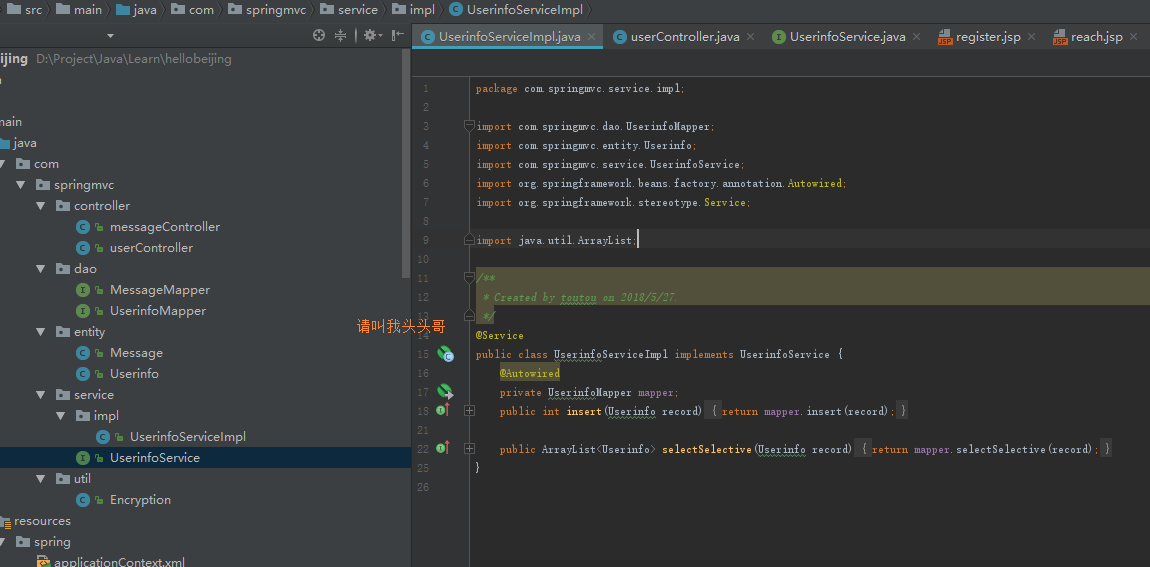
出于用户账号安全的考虑,一般用户密码都需要进行加密,这样只有用户自己知道自己的密码,采用MD5加密,附上方法。(简单的加密网上一搜一大堆,我这也是网上搜的)
package com.springmvc.util;

import java.security.MessageDigest;

/**

 * Created by toutou on 2018/5/27.

 */

public class Encryption {

    // MD5加码。32位

    public static String MD5(String inStr) {

        MessageDigest md5 = null;

        try {

            md5 = MessageDigest.getInstance("MD5");

        } catch (Exception e) {

            System.out.println(e.toString());

            e.printStackTrace();

            return "";

        }

        char[] charArray = inStr.toCharArray();

        byte[] byteArray = new byte[charArray.length];

        for (int i = 0; i < charArray.length; i++)

            byteArray[i] = (byte) charArray[i];

        byte[] md5Bytes = md5.digest(byteArray);

        StringBuffer hexValue = new StringBuffer();

        for (int i = 0; i < md5Bytes.length; i++) {

            int val = ((int) md5Bytes[i]) & 0xff;

            if (val < 16)

                hexValue.append("0");

            hexValue.append(Integer.toHexString(val));

        }

        return hexValue.toString();

    }

    // 可逆的加密算法

    public static String KL(String inStr) {

        // String s = new String(inStr);

        char[] a = inStr.toCharArray();

        for (int i = 0; i < a.length; i++) {

            a[i] = (char) (a[i] ^ 't');

        }

        String s = new String(a);

        return s;

    }

    // 加密后解密

    public static String JM(String inStr) {

        char[] a = inStr.toCharArray();

        for (int i = 0; i < a.length; i++) {

            a[i] = (char) (a[i] ^ 't');

        }

        String k = new String(a);

        return k;

    }

    /*// 测试主函数

    public static void main(String args[]) {

        String s = new String("123123");

        System.out.println("原始:" + s);

        System.out.println("MD5后:" + MD5(s));

        System.out.println("MD5后再加密:" + KL(MD5(s)));

        System.out.println("解密为MD5后的:" + JM(KL(MD5(s))));

    }*/

    /**

     * 创建指定数量的随机字符串

     *

     * @param numberFlag

     *            是否是数字

     * @param length

     * @return

     */

    public static String generateQC(boolean numberFlag, int length) {

        String retStr = "";

        String strTable = numberFlag ? "1234567890"

                : "1234567890abcdefghijkmnpqrstuvwxyz";

        int len = strTable.length();

        boolean bDone = true;

        do {

            retStr = "";

            int count = 0;

            for (int i = 0; i < length; i++) {

                double dblR = Math.random() * len;

                int intR = (int) Math.floor(dblR);

                char c = strTable.charAt(intR);

                if (('0' <= c) && (c <= '9')) {

                    count++;

                }

                retStr += strTable.charAt(intR);

            }

            if (count >= 2) {

                bDone = false;

            }

        } while (bDone);

        return retStr;

    }

}
注册
添加userController注册函数
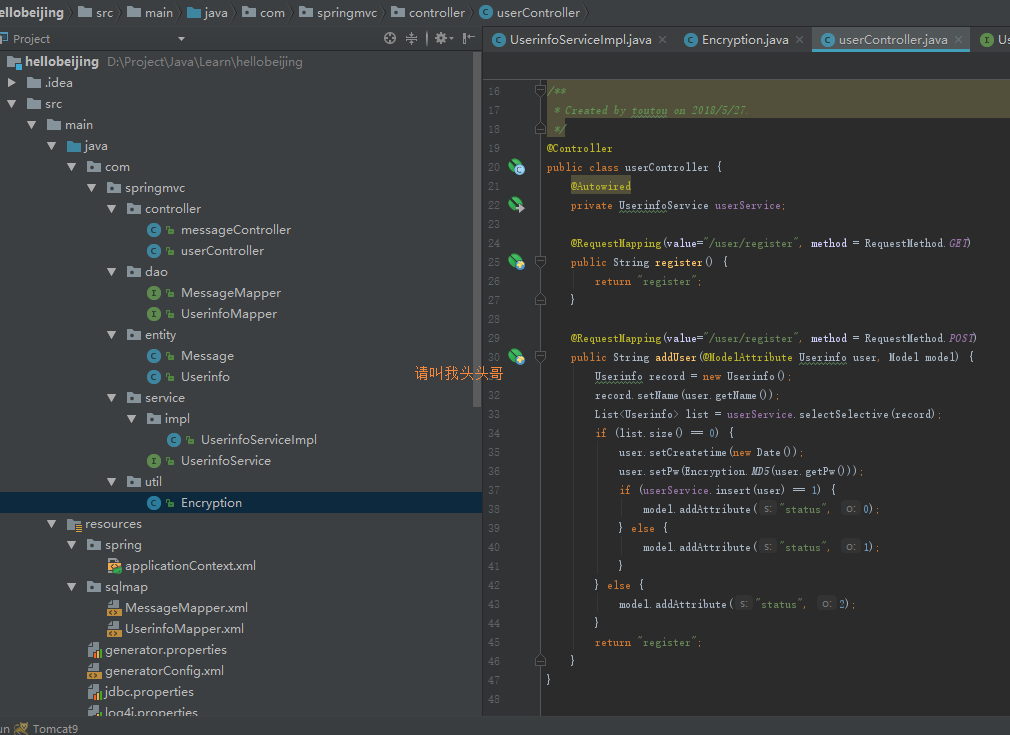
添加注册页面register.jsp
登录
添加userController登录函数
package com.springmvc.controller;

import com.springmvc.entity.Userinfo;

import com.springmvc.service.UserinfoService;

import com.springmvc.util.Encryption;

import org.springframework.beans.factory.annotation.Autowired;

import org.springframework.stereotype.Controller;

import org.springframework.ui.Model;

import org.springframework.web.bind.annotation.ModelAttribute;

import org.springframework.web.bind.annotation.RequestMapping;

import org.springframework.web.bind.annotation.RequestMethod;

import javax.servlet.http.HttpSession;

import java.util.ArrayList;

import java.util.Date;

import java.util.List;

/**

 * Created by toutou on 2018/5/27.

 */

@Controller

public class userController {

    @Autowired

    private UserinfoService userService;

    @RequestMapping(value="/user/login", method = RequestMethod.GET)

    public String login() {

        return "login";

    }

    @RequestMapping(value = "/user/login", method = RequestMethod.POST)

    public String loginValidate(HttpSession session, Model model, @ModelAttribute Userinfo user) {

        List<Userinfo> list = new ArrayList<Userinfo>();

        Userinfo record  = new Userinfo();

        record.setName(user.getName());

        list = userService.selectSelective(record);

        if (list.size() == 0) {

            model.addAttribute("status", 1);

        } else {

            record.setPw(Encryption.MD5(user.getPw()));

            list = userService.selectSelective(record);

            if (list.size() == 0) {

                model.addAttribute("status", 2);

            }

            record = list.get(0);

            session.setAttribute("userinfo", record);

            model.addAttribute("status", 0);

        }

        return "login";

    }

}
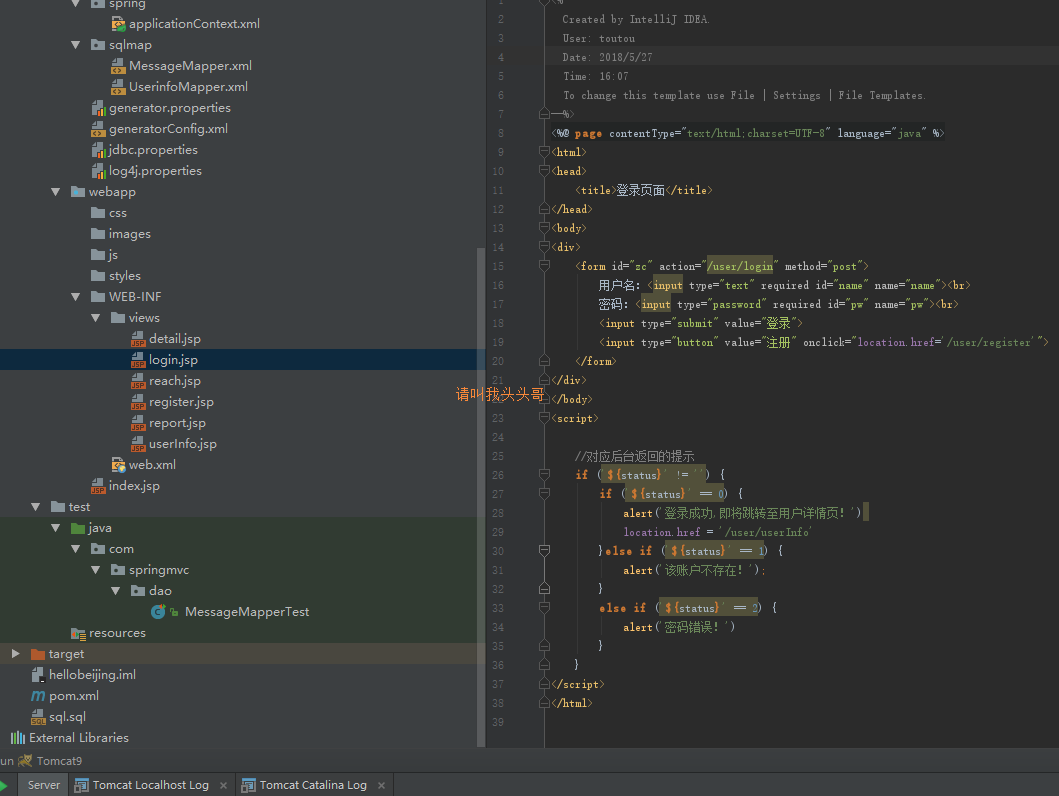
添加登录页面login.jsp
<%--

  Created by IntelliJ IDEA.

  User: toutou

  Date: 2018/5/27

  Time: 16:07

  To change this template use File | Settings | File Templates.

--%>

<%@ page contentType="text/html;charset=UTF-8" language="java" %>

<html>

<head>

    <title>登录页面</title>

</head>

<body>

<div>

    <form id="zc" action="/user/login" method="post">

        用户名:<input type="text" required id="name" name="name"><br>

        密码:<input type="password" required id="pw" name="pw"><br>

        <input type="submit" value="登录">

        <input type="button" value="注册" onclick="location.href='/user/register'">

    </form>

</div>

</body>

<script>

    //对应后台返回的提示

    if ('${status}' != '') {

        if ('${status}' == 0) {

            alert('登录成功,即将跳转至用户详情页!')

            location.href = '/user/userInfo'

        }else if ('${status}' == 1) {

            alert('该账户不存在!');

        }

        else if ('${status}' == 2) {

            alert('密码错误!')

        }

    }

</script>

</html>
添加userControlle个人中心函数
@RequestMapping(value="/user/userInfo", method = RequestMethod.GET)

    public String userInfo(Model model, HttpSession session) {

        Userinfo user = (Userinfo) session.getAttribute("userinfo");

        if(user != null){

            model.addAttribute("user", user);

        }

        return "userInfo";

    }
添加个人中心页面userInfo.jsp
<%@ taglib prefix="c" uri="http://java.sun.com/jsp/jstl/core" %>

<%--

  Created by IntelliJ IDEA.

  User: toutou

  Date: 2018/5/27

  Time: 22:09

  To change this template use File | Settings | File Templates.

--%>

<%@ page contentType="text/html;charset=UTF-8" language="java" %>

<html>

<head>

    <title>个人中心</title>

</head>

<body>

<div>

    <c:if test="${not empty user}">

        <div>欢迎您,${user.name}${user.sex?'女士':'先生'}             <a href="/user/logout">注销</a></div></div>

    </c:if>

    <c:if test="${ empty user}">

        对不起,请先<a href="/user/login">登录</a>

    </c:if>

</div>

</body>

</html>
注销
@RequestMapping(value = "/user/logout", method = RequestMethod.GET)

    public String logout(HttpSession session) {

        session.invalidate();

        //session.removeAttribute("user");

        return "login";

    }
v源码地址
https://github.com/toutouge/javademosecond/tree/master/hellobeijing
v博客总结
关于《详解intellij idea 搭建SSM框架》共分为上下两集,大概就介绍这么多了,每个功能(操作)都是尽量介绍到最细节,如有遗漏欢迎补充。
作 者:请叫我头头哥
出 处:http://www.cnblogs.com/toutou/
关于作者:专注于基础平台的项目开发。如有问题或建议,请多多赐教!
版权声明:本文版权归作者和博客园共有,欢迎转载,但未经作者同意必须保留此段声明,且在文章页面明显位置给出原文链接。
特此声明:所有评论和私信都会在第一时间回复。也欢迎园子的大大们指正错误,共同进步。或者直接私信我
声援博主:如果您觉得文章对您有帮助,可以点击文章右下角【推荐】一下。您的鼓励是作者坚持原创和持续写作的最大动力!
详解intellij idea搭建SSM框架(spring+maven+mybatis+mysql+junit)(下)的更多相关文章
- 详解intellij idea搭建SSM框架(spring+maven+mybatis+mysql+junit)(上)
SSM(Spring+SpringMVC+MyBatis)框架集由Spring.SpringMVC.MyBatis三个开源框架整合而成,常作为数据源较简单的web项目的框架. 其中spring是一个轻 ...
- Maven 搭建 SSM框架——Spring+SpringMVC+Mybatis的搭建教程
一:概述 SSM框架在项目开发中经常使用到,相比于SSH框架,它在仅几年的开发中运用的更加广泛. Spring作为一个轻量级的框架,有很多的拓展功能,最主要的我们一般项目使用的就是IOC和AOP.Sp ...
- 一步一步教你用IntelliJ IDEA 搭建SSM框架(3)——实现用户登录功能
上面两篇博客已经详细的介绍了在IntelliJ IDEA 搭建SSM框架的整个过程,下面我们就要在搭建好的环境里实现我们想要的功能了.本文完成用户的登录功能,主要包括:用户注册,登录,编辑,退出,注销 ...
- Maven+SSM框架(Spring+SpringMVC+MyBatis) - Hello World(转发)
[JSP]Maven+SSM框架(Spring+SpringMVC+MyBatis) - Hello World 来源:http://blog.csdn.net/zhshulin/article/de ...
- 一步一步教你用IntelliJ IDEA 搭建SSM框架(1)
1.基本概念 SSM框架指:Spring MVC + Spring + MyBatis Spring MVC是一种web层mvc框架,用于替代servlet,处理|响应请求,获取表单参数,表单校验等 ...
- 一步一步教你用IntelliJ IDEA 搭建SSM框架(2)——配置mybatis-geneator
我们要搭建整个SSM框架,所以要继续上篇文章没有完成的工作,下面配置mybatis-geneator,自动生成mybatis代码. 在上篇文章中的pom.xml的配置文件中已经加了mybatis-ge ...
- SSM框架——Spring+SpringMVC+Mybatis的搭建教程
一:概述 SSM框架在项目开发中经常使用到,相比于SSH框架,它在仅几年的开发中运用的更加广泛. Spring作为一个轻量级的框架,有很多的拓展功能,最主要的我们一般项目使用的就是IOC和AOP. S ...
- SSM框架——Spring+SpringMVC+Mybatis的搭建
1.基本概念 1.1.Spring Spring是一个开源框架,Spring是于2003 年兴起的一个轻量级的Java 开发框架,由Rod Johnson 在其著作Expert One-On-One ...
- [JSP]Maven+SSM框架(Spring+SpringMVC+MyBatis) - Hello World
来源:http://blog.csdn.net/zhshulin/article/details/37956105?utm_source=tuicool&utm_medium=referral ...
随机推荐
- 起泡排序(Bubble sort)
局部有序和整体有序 在由一组整数组成的序列A[0, n-1]中,满足 $ A[i - 1] \leq A[i] $ 的相邻元素称为顺序的:否则是逆序的. 扫描交换 由有序序列的特征,我们可以通过不断改 ...
- 在Ubuntu下开启我的第一个Android工程
目录 环境 流程 Phone PC端 我踩到坑 1.device offline Error while Installing APK 2.NO MODULE 3.应用无法安装 环境 小米Note4: ...
- Mix 导航
Mix 导航 一.程序员必备技能 Markdonw 使用 Git 常用命令 二.分析设计 UML 三.其他 博客园代码样式修改
- 2018-2019-2 网络对抗技术 20162329 Exp6 信息搜集与漏洞扫描
目录 Exp6 信息搜集与漏洞扫描 一.实践原理 1. 间接收集 2. 直接收集 3. 社会工程学 二.间接收集 1. Zoomeye 2. FOFA 3. GHDB 4. whois 5. dig ...
- NOI2017总结
时光剥离你我像一袭华美衣衫 却要被追悔爬满 退役之战,去得匆匆,看得蒙蒙. 第三次全国赛,曾经的APIO初二选手也走到了时间的尽头. 第一次走向全国舞台的激动与忐忑,第一次在大赛中失利的沮丧与绝望,第 ...
- [jzoj]5478.【NOIP2017提高组正式赛】列队
Link https://jzoj.net/senior/#main/show/5478 Description Sylvia 是一个热爱学习的女孩子. 前段时间,Sylvia 参加了学校 ...
- 在Linux上搭建测试环境常用命令(转自-测试小柚子)
一.搭建测试环境: 二.查看应用日志: (1)vivi/vim 原本是指修改文件,同时可以使用vi 日志文件名,打开日志文件(2)lessless命令是查看日志最常用的命令.用法:less 日志文件名 ...
- 你不知道的JS之作用域和闭包(五)作用域闭包
原文:你不知道的js系列 一个简单粗暴的定义 闭包就是即使一个函数在它所在的词法作用域外部被执行,这个函数依然可以访问这个作用域. 比如: function foo() { var a = 2; fu ...
- Session Cookie介绍和使用
Cookie机制 Cookie机制 Cookie是服务器存储在本地计算机上的小块文本,并随每个请求发送到同一服务器. IETF RFC 2965 HTTP状态管理机制是一种通用的cookie规范. W ...
- 线程(Thread、ThreadPool)
多线程的操作,推荐使用线程池线程而非新建线程.因为就算只是单纯的新建一个线程,这个线程什么事情也不做,都大约需要1M的内存空间来存储执行上下文数据结构,并且线程的创建与回收也需要消耗资源,耗费时间.而 ...