v当我们构建成功了viz,就可以使用3维效果给我们提供的便利,进一步进行一些3维的操作。

在这个动画中,注意图片后面的那个黑线,对应的是相机的位置。
/*------------------------------------------------------------------------------------------*\
This file contains material supporting chapter 11 of the book:
OpenCV3 Computer Vision Application Programming Cookbook
Third Edition
by Robert Laganiere, Packt Publishing, 2016.
This program is free software; permission is hereby granted to use, copy, modify,
and distribute this source code, or portions thereof, for any purpose, without fee,
subject to the restriction that the copyright notice may not be removed
or altered from any source or altered source distribution.
The software is released on an as-is basis and without any warranties of any kind.
In particular, the software is not guaranteed to be fault-tolerant or free from failure.
The author disclaims all warranties with regard to this software, any use,
and any consequent failure, is purely the responsibility of the user.
Copyright (C) 2016 Robert Laganiere, www.laganiere.name
\*------------------------------------------------------------------------------------------*/
#include "stdafx.h"
#include <opencv2/core.hpp>
#include <opencv2/highgui.hpp>
#include <opencv2/imgproc.hpp>
#include <opencv2/viz.hpp>
#include <opencv2/calib3d.hpp>
#include <iostream>
int main()
{
    // Read the camera calibration parameters
    cv::Mat cameraMatrix;
    cv::Mat cameraDistCoeffs;
    cv::FileStorage fs("calib.xml", cv::FileStorage::READ);
    fs["Intrinsic"] >> cameraMatrix;
    fs["Distortion"] >> cameraDistCoeffs;
    std::cout << " Camera intrinsic: " << cameraMatrix.rows << "x" << cameraMatrix.cols << std::endl;
    std::cout << cameraMatrix.at<double>(0, 0) << " " << cameraMatrix.at<double>(0, 1) << " " << cameraMatrix.at<double>(0, 2) << std::endl;
    std::cout << cameraMatrix.at<double>(1, 0) << " " << cameraMatrix.at<double>(1, 1) << " " << cameraMatrix.at<double>(1, 2) << std::endl;
    std::cout << cameraMatrix.at<double>(2, 0) << " " << cameraMatrix.at<double>(2, 1) << " " << cameraMatrix.at<double>(2, 2) << std::endl << std::endl;
    cv::Matx33d cMatrix(cameraMatrix);
    // Input image points
    std::vector<cv::Point2f> imagePoints;
    imagePoints.push_back(cv::Point2f(136, 113));
    imagePoints.push_back(cv::Point2f(379, 114));
    imagePoints.push_back(cv::Point2f(379, 150));
    imagePoints.push_back(cv::Point2f(138, 135));
    imagePoints.push_back(cv::Point2f(143, 146));
    imagePoints.push_back(cv::Point2f(381, 166));
    imagePoints.push_back(cv::Point2f(345, 194));
    imagePoints.push_back(cv::Point2f(103, 161));
    // Input object points
    std::vector<cv::Point3f> objectPoints;
    objectPoints.push_back(cv::Point3f(0, 45, 0));
    objectPoints.push_back(cv::Point3f(242.5, 45, 0));
    objectPoints.push_back(cv::Point3f(242.5, 21, 0));
    objectPoints.push_back(cv::Point3f(0, 21, 0));
    objectPoints.push_back(cv::Point3f(0, 9, -9));
    objectPoints.push_back(cv::Point3f(242.5, 9, -9));
    objectPoints.push_back(cv::Point3f(242.5, 9, 44.5));
    objectPoints.push_back(cv::Point3f(0, 9, 44.5));
    // Read image
    cv::Mat image = cv::imread("e:/template/bench2.jpg");
    // Draw image points
    for (int i = 0; i < 8; i++) {
        cv::circle(image, imagePoints[i], 3, cv::Scalar(0, 0, 0),2);
    }
    cv::imshow("An image of a bench", image);
    // Create a viz window
    cv::viz::Viz3d visualizer("Viz window");
    visualizer.setBackgroundColor(cv::viz::Color::white());
    /// Construct the scene
    // Create a virtual camera
    cv::viz::WCameraPosition cam(cMatrix,  // matrix of intrinsics
        image,    // image displayed on the plane
        30.0,     // scale factor
        cv::viz::Color::black());
    // Create a virtual bench from cuboids
    cv::viz::WCube plane1(cv::Point3f(0.0, 45.0, 0.0), 
        cv::Point3f(242.5, 21.0, -9.0), 
        true,  // show wire frame 
        cv::viz::Color::blue());
    plane1.setRenderingProperty(cv::viz::LINE_WIDTH, 4.0);
    cv::viz::WCube plane2(cv::Point3f(0.0, 9.0, -9.0), 
        cv::Point3f(242.5, 0.0, 44.5), 
        true,  // show wire frame 
        cv::viz::Color::blue());
    plane2.setRenderingProperty(cv::viz::LINE_WIDTH, 4.0);
    // Add the virtual objects to the environment
    visualizer.showWidget("top", plane1);
    visualizer.showWidget("bottom", plane2);
    visualizer.showWidget("Camera", cam);
    // Get the camera pose from 3D/2D points
    cv::Mat rvec, tvec;
    cv::solvePnP(objectPoints, imagePoints,      // corresponding 3D/2D pts 
        cameraMatrix, cameraDistCoeffs, // calibration 
        rvec, tvec);                    // output pose
    std::cout << " rvec: " << rvec.rows << "x" << rvec.cols << std::endl;
    std::cout << " tvec: " << tvec.rows << "x" << tvec.cols << std::endl;
    cv::Mat rotation;
    // convert vector-3 rotation
    // to a 3x3 rotation matrix
    cv::Rodrigues(rvec, rotation);
    // Move the bench    
    cv::Affine3d pose(rotation, tvec);
    visualizer.setWidgetPose("top", pose);
    visualizer.setWidgetPose("bottom", pose);
    // visualization loop
    while(cv::waitKey(100)==-1 && !visualizer.wasStopped())
    {
        visualizer.spinOnce(1,     // pause 1ms 
            true); // redraw
    }
    return 0;
}

三维重建这块,我也运行成功书本的例子:


附件列表

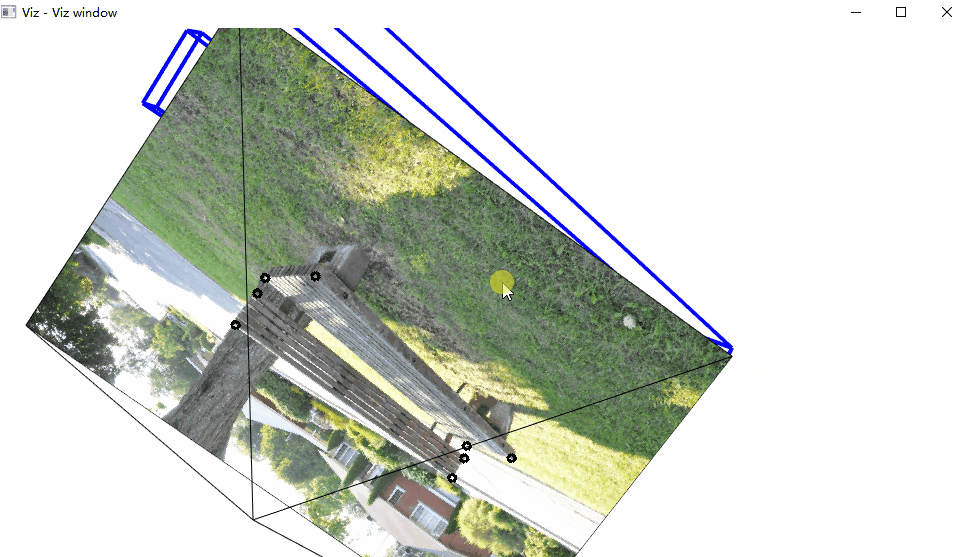
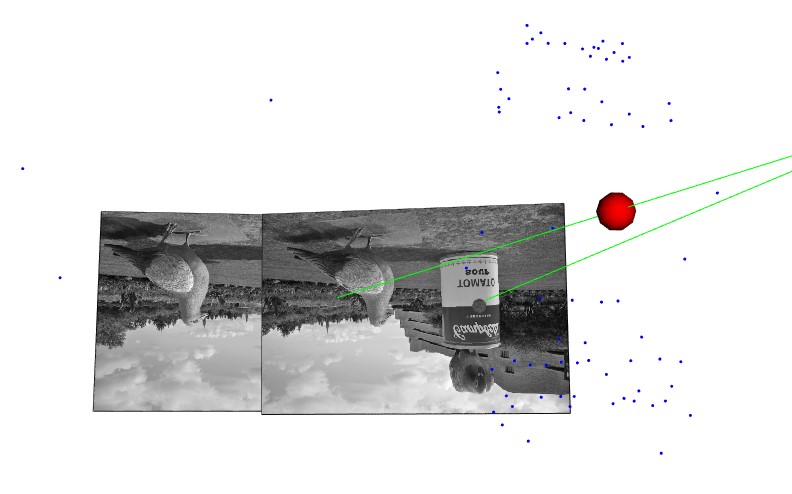
基于OpenCV做“三维重建”(4)--相机姿态还原和实现三维重建的更多相关文章

  1. 基于OpenCV做“三维重建”(1)--找到并绘制棋盘

    <OpenCV计算机视觉编程攻略(第3版)>这套书已经出到第3版了,如果你非要我说这本书有多好,我说不出来:只是很多我第一手的例子都是来源于这本书的-相比较OpenCV官方提供的代码,这本 ...

  2. 基于OpenCV做“三维重建”(3)--相机参数矩阵

    通过前面的相机标定,我们能够获得一些参数模型.但是这些相机的参数矩阵到底是什么意思?怎样才能够判断是否正确?误差都会来自哪里?这里就必须要通过具体实验来加深认识.采集带相机参数的图片具有一定难度,幸好 ...

  3. 基于OpenCV做“三维重建”(0)-- OpenCV3.2+VIZ6.3.0在vs2012下的编译和使用

    一.问题提出         ViZ对于显示3维的效果图来说,非常有帮助:我在使用OpenCV进行双目测距的过程中,有一些参数希望能够通过可视化的方法显示出来,所以参考了这方面相关的资料.做了一些实验 ...

  4. 基于OpenCV做“三维重建”(2)--封装标定过程

    既然已经能够找到了标定点,那么下边的工作就是使用标定结果了.[这本书在这里的内容组织让人莫名其妙]但是通过阅读代码能够很方便地串起来. /*------------------------------ ...

  5. OpenCV Using Python——基于SURF特征提取和金字塔LK光流法的单目视觉三维重建 (光流、场景流)

    https://blog.csdn.net/shadow_guo/article/details/44312691 基于SURF特征提取和金字塔LK光流法的单目视觉三维重建 1. 单目视觉三维重建问题 ...

  6. 基于 OpenCV 的人脸识别

    基于 OpenCV 的人脸识别 一点背景知识 OpenCV 是一个开源的计算机视觉和机器学习库.它包含成千上万优化过的算法,为各种计算机视觉应用提供了一个通用工具包.根据这个项目的关于页面,OpenC ...

  7. 基于OpenCV的双目视觉匹配测距系统

    刚读研究生的时候,自己导师研究的方向是双目视觉,于是让自己研究OpenCV,折腾了几个月,算法上没啥突破,不过工程上还是折腾出了一个能用的小玩意,基于OpenCV实现了相机的标定.双目视觉图片的矫正. ...

  8. [转载]卡尔曼滤波器及其基于opencv的实现

    卡尔曼滤波器及其基于opencv的实现 源地址:http://hi.baidu.com/superkiki1989/item/029f65013a128cd91ff0461b 这个是维基百科中的链接, ...

  9. 每日一练之自适应中值滤波器(基于OpenCV实现)

    本文主要介绍了自适应的中值滤波器,并基于OpenCV实现了该滤波器,并且将自适应的中值滤波器和常规的中值滤波器对不同概率的椒盐噪声的过滤效果进行了对比.最后,对中值滤波器的优缺点了进行了总结. 空间滤 ...

随机推荐

  1. Good Introduction of Kerberos and RADIUS

    1. RADIUS https://baike.baidu.com/item/RADIUS/3073981?fr=aladdin http://www.h3c.com/cn/d_201309/9220 ...

  2. 2018-2019-2 20165317《网络对抗技术》Exp1 PC平台逆向破解

    2018-2019-2 20165317<网络对抗技术>Exp1 PC平台逆向破解 实验目的 掌握NOP, JNE, JE, JMP, CMP汇编指令的机器码 NOP:无作用,英文&quo ...

  3. Windows命令行设置dns

    管理员运行cmd 1.dns配置成192.168.1.200 netsh interface ip set dns name="以太网" source=static addr=19 ...

  4. 用node在本机搭建一个极其简单的服务器

    首先安装node, 建一个文件夹server, 在里面创建一个server.js,内容如下: var http = require("http"); http.createServ ...

  5. Python004-数据处理示例:以某个数据(字段)为基准从数据中获取不同的字段行数

    数据源样式如下所示: 需求: 读取文本,以第一列为基准参考系,每个基准仅输出满足需要条数的数据:不满足,全部输出. 比如,基准为 6236683970000018780,输出条数要求为 5.若文本中含 ...

  6. C# 使用MongoDB遇到的问题

    错误:缺少 System.Runtime.InteropServices.RuntimeInformation.dll version = 4.0.0 解决方法: 下载了System.Runtime. ...

  7. C和C++字符串处理整理

    在刷leetcode题目的过程中,发现自己对于c和c++字符串的处理并不是很拿手,处理起来比较费劲,而且,算法题似乎很中意字符串的处理,有很多题目都涉及到它.字符串处理比较基础,但是很重要,因此,整理 ...

  8. Servlet学习1

    1.首先在Tomcat的webapp目录下新建文件夹myWebapp,作为自己的web应用. 2.myWebapp下新建WEB-INF(必须这个名)目录,WEB-INF下新建classes目录放置se ...

  9. file_get_contents("php://input")的用法

    $data = file_get_contents("php://input"); php://input 是个可以访问请求的原始数据的只读流. POST 请求的情况下,最好使用 ...

  10. Jsoup解析XML

    先导入jsoup.jar  包 方法1:不推荐,了解即可 方法 方法3: 后期学习主流