
UITouch - BNR
本节任务:创建一个视图,让用户在视图上拖动手指来画线。
UIView类能够重载4个方法来处理不同的触摸事件。
- (void)touchesBegan:(NSSet *)touches withEvent:(UIEvent *)event // 一个手指或多个手指触摸屏幕。
- (void)touchesMoved:(NSSet *)touches withEvent:(UIEvent *)event //一个或多个手指在视图上移动
- (void)touchesEnded:(NSSet *)touches withEvent:(UIEvent *)event //一个或多个手指抬离屏幕时。
- (void)touchesCancelled:(NSSet *)touches withEvent:(UIEvent *)event //系统事件,在触摸结束前被其打断。
@property(nonatomic, getter=isMultipleTouchEnabled) BOOL multipleTouchEnabled // 默认为NO,如果想要处理多手指触摸事件,则需设置为YES。
一个UITouch对应在屏幕上的一个手指。如果一个视图开始拥有触摸对象,该视图将拥有触摸对象的生命周期。你不应该引用触摸对象。
创建一个新的Single View Application工程,命名为TouchTracker。
首先,需要一个模型对象来描述line。创建一个NSObject的子类,取名为BNRLine。
再创建一个UIView的子类,取名为BNRDrawView。BNRDrawView用来追踪全部画好了的线条以及目前正在画的线条。
再创建一个UIViewController的子类来管理BNRDrawView对象,取名为BNRDrawViewController。
在BNRLine.h头文件中,声明两个CGPoint属性,如下:
 @property (nonatomic) CGPoint begin;

 @property (nonatomic) CGPoint end;
同时,将 #import <Foundation/Foundation.h> 改为 #import <UIKit/UIKit.h> 。
打开BNRDrawViewController.m文件,重载loadView方法,将BNRDrawView对象设置为BNRDrawViewController的view。
当请求显示控制器的view时,但是为nil,则视图控制器会自动调用loadView方法。该方法应加载或创建一个视图,并将其赋给控制器的view属性。如果视图控制器有一个相对于的nib文件,loadView方法将从该nib文件加载view。如果你使用了Interface Builder创建了视图并初始化了视图控制器,你一定不能重载该方法。
如果使用Interface Builder设计用户界面时,当视图对象从nib文件中加载视图时,initWithFrame:方法将不会被调用。
 - (void)loadView {

     self.view = [[BNRDrawView alloc] initWithFrame:CGRectZero];

 }
同时,在实现文件顶部导入BNRDrawView头文件,如下:
#import "BNRDrawView.h"
打开AppDelegate.m文件,创建一个BNRDrawViewController对象,将其作为window的rootViewController。同时导入BNRDrawViewController的头文件, #import "BNRDrawViewController.h" 。
方法application:didFinishLaunchingWithOptions:方法修改如下:
 - (BOOL)application:(UIApplication *)application didFinishLaunchingWithOptions:(NSDictionary *)launchOptions {

     // Override point for customization after application launch.

     self.window = [[UIWindow alloc] initWithFrame:[[UIScreen mainScreen] bounds]];

     BNRDrawViewController *dvc = [[BNRDrawViewController alloc] init];

     self.window.rootViewController = dvc;

     self.window.backgroundColor = [UIColor yellowColor];

     [self.window makeKeyAndVisible];

     return YES;

 }
打开BNRDrawView.m,导入BNRLine头文件,并在类扩展中声明两个属性,如下:
 #import "BNRLine.h"

 @interface BNRDrawView ()

 @property (nonatomic, strong) BNRLine *currentLine;

 @property (nonatomic, strong) NSMutableArray *finishedLines;

 @end
同时,添加initWithFrame:代码如下:
 - (instancetype)initWithFrame:(CGRect)r {

     self = [super initWithFrame:r];

     if (self) {

         self.finishedLines = [[NSMutableArray alloc] init];

         self.backgroundColor = [UIColor grayColor];

     }

     return self;

 }
同时,需要实现对finishedLine和currentLine的绘制。
当一个视图第一次显示或者一个事件的发生使得视图可见的部分失效了,则drawRect:方法会被调用。绝对不能直接调用该方法。为了使失效的部分重新绘制,需调用setNeedsDisplay或setNeedsDisplayInRect:方法。如下:
 - (void)strokeLike:(BNRLine *)line {

     UIBezierPath *bp = [UIBezierPath bezierPath];

     bp.lineWidth = ;

     bp.lineCapStyle = kCGLineCapRound;

     [bp moveToPoint:line.begin];

     [bp addLineToPoint:line.end];

     [bp stroke];

 }

 - (void)drawRect:(CGRect)rect {

     [[UIColor blackColor] set];

     for (BNRLine *line in self.finishedLines) {

         [self strokeLike:line];

     }

     if (self.currentLine) {

         [[UIColor redColor] set];

         [self strokeLike:self.currentLine];

     }

 }
该工程的对象关系如下所示:
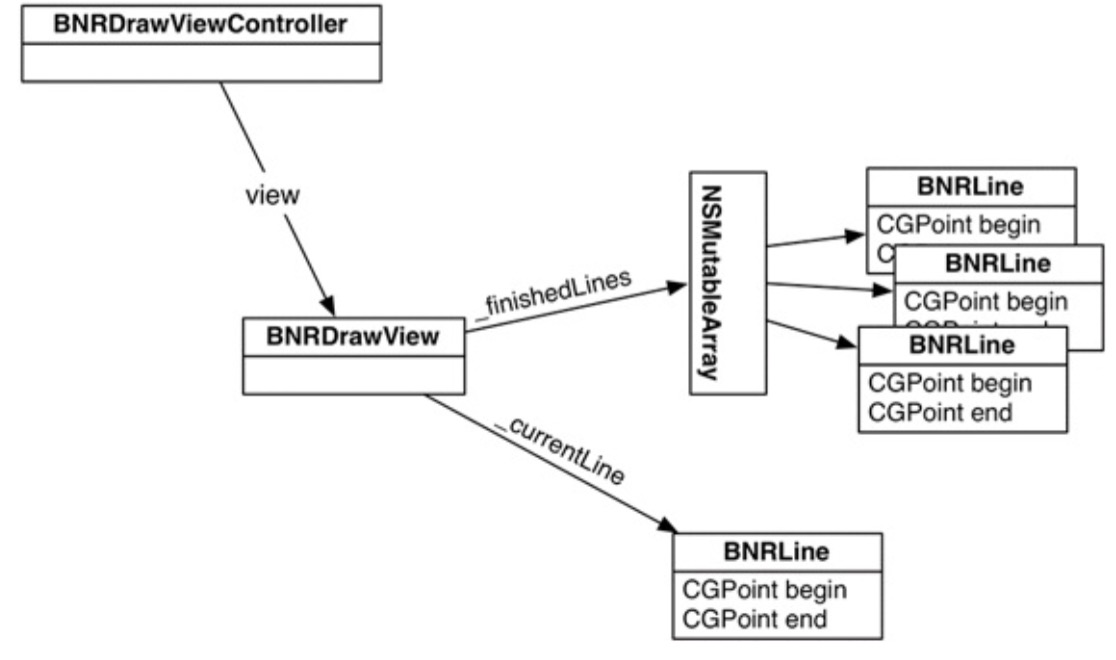
当触摸事件开始时,需要创建一个line,将begin和end设置为触摸开始的点位置处。当手指移动时,将更新end。因此,打开BNRDrawView.m文件,touchesBegin:withEvent:方法实现如下:
 - (void)touchesBegan:(NSSet<UITouch *> *)touches withEvent:(UIEvent *)event {

     UITouch *t = [touches anyObject];

     CGPoint location = [t locationInView:self];

     self.currentLine = [[BNRLine alloc] init];

     self.currentLine.begin = location;

     self.currentLine.end = location;

     [self setNeedsDisplay];

 }
touchesMoved:withEvent:方法实现如下:
 - (void)touchesMoved:(NSSet<UITouch *> *)touches withEvent:(UIEvent *)event {

     UITouch *t = [touches anyObject];

     CGPoint location = [t locationInView:self];

     self.currentLine.end = location;

     [self setNeedsDisplay];

 }
当触摸事件结束时,将currentLine添加到finishedLines,touchesEnded:withEvent:实现如下:
 - (void)touchesEnded:(NSSet<UITouch *> *)touches withEvent:(UIEvent *)event {

     [self.finishedLines addObject:self.currentLine];

     self.currentLine = nil;

     [self setNeedsDisplay];

 }
启动程序,当正在画线时,线条显示红色。当画线结束,将变为黑色。
默认情况下,一个视图将一次只接受一个触摸。
此时,需要一个属性来包含尽可能多的将在屏幕上画出的线条。打开BNRDrawView.m,用下列的属性代替currentLine。
@property (nonatomic, strong) NSMutableDictionary *linesInProgress;
修改BNRDrawView中initWithFrame:方法使其能接收多点触摸,并初始化linesInProgress属性,如下:
 - (instancetype)initWithFrame:(CGRect)r {

     self = [super initWithFrame:r];

     if (self) {

         self.linesInProgress = [[NSMutableDictionary alloc] init];

         self.finishedLines = [[NSMutableArray alloc] init];

         self.backgroundColor = [UIColor grayColor];

         self.multipleTouchEnabled = YES;

     }

     return self;

 }
修改触摸响应事件如下:
 - (void)touchesBegan:(NSSet<UITouch *> *)touches withEvent:(UIEvent *)event {

     NSLog(@"%@", NSStringFromSelector(_cmd));

     for (UITouch *t in touches) {

         CGPoint location = [t locationInView:self];

         BNRLine *line = [[BNRLine alloc] init];

         line.begin = location;

         line.end = location;

         NSValue *key = [NSValue valueWithNonretainedObject:t];

         self.linesInProgress[key] = line;

     }

     [self setNeedsDisplay];

 }

 - (void)touchesMoved:(NSSet<UITouch *> *)touches withEvent:(UIEvent *)event {

     NSLog(@"%@", NSStringFromSelector(_cmd));

     for (UITouch *t in touches) {

         NSValue *key = [NSValue valueWithNonretainedObject:t];

         BNRLine *line = self.linesInProgress[key];

         line.end = [t locationInView:self];

     }

     [self setNeedsDisplay];

 }

 - (void)touchesEnded:(NSSet<UITouch *> *)touches withEvent:(UIEvent *)event {

     NSLog(@"%@", NSStringFromSelector(_cmd));

     for (UITouch *t in touches) {

         NSValue *key = [NSValue valueWithNonretainedObject:t];

         BNRLine *line = self.linesInProgress[key];

         [self.finishedLines addObject:line];

         [self.linesInProgress removeObjectForKey:key];

     }

     [self setNeedsDisplay];

 }
其中,我们使用valueWithNonretainedObject:方法来产生key用于保存BNRLine。该方法产生的NSValue对象将拥有与该lian有关的UITouch对象的地址。在每次触摸事件中。UITouch对象的地址是保持不变的。
在一个NSDictionary中,object使用的key必须遵守NSCopying协议,该协议允许他们接收copy方法。
最后,修改drawRect:方法:
 - (void)drawRect:(CGRect)rect {

     [[UIColor blackColor] set];

     for (BNRLine *line in self.finishedLines) {

         [self strokeLike:line];

     }

     [[UIColor redColor] set];

     for (NSValue *key in self.linesInProgress) {

         [self strokeLike:self.linesInProgress[key]];

     }

 }
最后,添加touchesCancelled:withEvent:方法。当一个触摸事件取消时,应将在linesInProgress中的线条全部移除。如下:
 - (void)touchesCancelled:(NSSet<UITouch *> *)touches withEvent:(UIEvent *)event {

     NSLog(@"%@", NSStringFromSelector(_cmd));

     for (UITouch *t in touches) {

         NSValue *key = [NSValue valueWithNonretainedObject:t];

         [self.linesInProgress removeObjectForKey:key];

     }

     [self setNeedsDisplay];

 }
程序代码:http://pan.baidu.com/s/1jGKYYt4
UITouch - BNR的更多相关文章
- UIGestureRecognizer - BNR
继续上篇UITouch - BNR.该篇将实现线条选择.移动和删除操作. UIGestureRecognizer有一系列子类,每一个子类都用于识别特定的手势.当识别出一个手势时,手势识别器会拦截视图的 ...
- 你真的了解UIEvent、UITouch吗?
一:首先查看一下关于UIEvent的定义 //事件类型 typedef NS_ENUM(NSInteger, UIEventType) { UIEventTypeTouches, UIEventTyp ...
- iOS开发——UI进阶篇(十二)事件处理,触摸事件,UITouch,UIEvent,响应者链条,手势识别
触摸事件 在用户使用app过程中,会产生各种各样的事件 一.iOS中的事件可以分为3大类型 触摸事件加速计事件远程控制事件 响应者对象在iOS中不是任何对象都能处理事件,只有继承了UIResponde ...
- iOS - UITouch
前言 NS_CLASS_AVAILABLE_IOS(2_0) @interface UITouch : NSObject @available(iOS 2.0, *) public class UIT ...
- UITouch的用法
UITouch一般无法直接获取,是通过UIView的touchesBegan等函数获得. //这四个方法是UIResponder中得方法 // Generally, all responders wh ...
- 触摸事件UITouch的用法
触摸屏幕是iOS设备接受用户输入的主要方式,包括单击.双击.拨动以及多点触摸等,这些操作都会产生触摸事件. 在Cocoa中,代表触摸对象的类是UITouch.当用户触摸屏幕后,就会产生相应的事件,所有 ...
- UITouch 触摸事件处理(实例)
来源:http://www.open-open.com/lib/view/open1341882439838.html 1. UITouch 的主要方法: - (void)touchesBegan:( ...
- UITouch触摸事件
UITouch触摸事件 主要为三个方法 1.-(void)touchesBegan:(NSSet *)touches withEvent:(UIEvent *)event{2.3. UITouch * ...
- UITouch附加
框架 /System/Library/Frameworks/SpriteKit.framework 可用性 可用于iOS 7.0或者更晚的版本 声明于 SKNode.h 概览 重要提示:这是一个初步的 ...
随机推荐
- CentOS 7 镜像文件各个版本区别
CentOS ISO 镜像文件的功能 引导安装 CentOS ISO 镜像文件包含有安装程序,官方称其为 Anaconda,用来引导安装 CentOS 提供 CentOS 的安装文件 镜像文件不一定包 ...
- BEAMER中 Package Listings Warning: Text dropped after begin of listing on input line xx
Latex Beamer 模板 frame 中使用 listings package时总出现标题所示错误,无法前进.解决方法是在\begin{frame}后加上一个选项,即:\begin{frame} ...
- Linux find常用用法示例
在此处只给出find的基本用法示例,都是平时我个人非常常用的搜索功能.如果有不理解的部分,则看后面的find运行机制详解对于理论的说明,也建议在看完这些基本示例后阅读一遍理论说明,它是本人翻译自fin ...
- PhpStorm 安装ApiDebugger
ApiDebugger,是一个开源的接口调试IntelliJ IDEA插件,具有与IDEA一致的界面,无需切换程序即可完成网络API请求,让你的code更加沉浸式. 安装 File->Setti ...
- STM32-FreeRTOS快速学习之总结1
1. 基础知识注意:在RTOS中是优先值越高则优先级越高(和ucos/linux的相反) 在移植的时候,主要裁剪FreeRTOS/Source/portable文件夹,该文件夹用来针对不同MCU做的一 ...
- php编写生成酷炫验证码
<?php $im=imagecreate(200,100);//生成画布 imagecolorallocate($im,0,0,0);//背景色 $white=imagecoloralloca ...
- 使用String. localeCompare比较字符串
javascript提供stringA.localeCompare(stringB)方法,来判断一个字符串stringB是否排在stringA的前面. 返回值: 如果引用字符存在于比较字符之前则 ...
- Redis过期策略
一.设置过期时间 expire key time(以秒为单位) -- 这是最常用的方式 setex(String key, int seconds, String value) -- 字符串独有的方式 ...
- centos7 + python 2.7 + pip + openvswitch 杂项问题
问题1: virtual box 安装centos7 后,网口无ip, 解决方法是:配置网口上电后,默认状态为down, 修改“onboot=yes”, 修改后保存配置重启系统. 2. 安装pip的 ...
- Android中将一个图片切割成多个图片
有种场景,我们想将一个图片切割成多个图片.比如我们在开发一个拼图的游戏,就首先要对图片进行切割. 以下是封装好的两个类,可以实现图片的切割.仅供参考和学习. 一个是ImagePiece类,此类保存了一 ...