
UIGestureRecognizer - BNR
继续上篇UITouch - BNR。该篇将实现线条选择、移动和删除操作。
UIGestureRecognizer有一系列子类,每一个子类都用于识别特定的手势。当识别出一个手势时,手势识别器会拦截视图的触摸事件。
使用UITapGestureRecognizer类,实现当用户连续点击屏幕两次时,全部线条都被清空。
修改BNRDrawView类的initWithFrame:方法如下:
 - (instancetype)initWithFrame:(CGRect)r {

     self = [super initWithFrame:r];

     if (self) {

         self.linesInProgress = [[NSMutableDictionary alloc] init];

         self.finishedLines = [[NSMutableArray alloc] init];

         self.backgroundColor = [UIColor grayColor];

         self.multipleTouchEnabled = YES;

         UITapGestureRecognizer *doubleTapRecognizer = [[UITapGestureRecognizer alloc]

                                                        initWithTarget:self

                                                        action:@selector(doubleTap:)];

         doubleTapRecognizer.numberOfTapsRequired = ;

         doubleTapRecognizer.delaysTouchesBegan = YES;  //使第一次点击不产生红点         [self addGestureRecognizer:doubleTapRecognizer];

     }

     return self;

 }
实现连续两次点击的doubleTap:响应事件,如下:
 - (void)doubleTap:(UIGestureRecognizer *)gr {

     NSLog(@"Recognized Double Tap");

     [self.linesInProgress removeAllObjects];

     [self.finishedLines removeAllObjects];

     [self setNeedsDisplay];

 }
添加手势识别,允许用户删除一条选定的线条。修改BNRDrawView类的initWithFrame:方法如下:
 - (instancetype)initWithFrame:(CGRect)r {

     self = [super initWithFrame:r];

     if (self) {

         self.linesInProgress = [[NSMutableDictionary alloc] init];

         self.finishedLines = [[NSMutableArray alloc] init];

         self.backgroundColor = [UIColor grayColor];

         self.multipleTouchEnabled = YES;

         UITapGestureRecognizer *doubleTapRecognizer = [[UITapGestureRecognizer alloc]

                                                        initWithTarget:self

                                                        action:@selector(doubleTap:)];

         doubleTapRecognizer.numberOfTapsRequired = ;

         doubleTapRecognizer.delaysTouchesBegan = YES;

         [self addGestureRecognizer:doubleTapRecognizer];

         UITapGestureRecognizer *tapRecognizer = [[UITapGestureRecognizer alloc]

                                                  initWithTarget:self

                                                  action:@selector(tap:)];

         tapRecognizer.delaysTouchesBegan = YES;

         [tapRecognizer requireGestureRecognizerToFail:doubleTapRecognizer]; //区别点击与双击手势

         [self addGestureRecognizer:tapRecognizer];

     }

     return self;

 }
实现单击的tap:响应事件,如下:
 - (void)tap:(UIGestureRecognizer *)gr {

     NSLog(@"Recognized Tap");

 }
在BNRDrawView.m文件的类扩展中声明selectedLine属性,用来表示被用户选中的线条,如下:
@property (nonatomic, weak) BNRLine *selectedLine;
其中,finishedLines数组拥有对selectedLine的强引用。当selectedLine从finishedLines中被删除时,将变为nil。
修改BNRDrawView类中drawRect:方法,使selectedLine显示绿色,如下:
 - (void)drawRect:(CGRect)rect {

     [[UIColor blackColor] set];

     for (BNRLine *line in self.finishedLines) {

         [self strokeLike:line];

     }

     [[UIColor redColor] set];

     for (NSValue *key in self.linesInProgress) {

         [self strokeLike:self.linesInProgress[key]];

     }

     if(self.selectedLine) {

         [[UIColor greenColor] set];

         [self strokeLike:self.selectedLine];

     }

 }
获取接近点击处的线条:
 - (BNRLine *)lineAtPoint:(CGPoint)p {

     for(BNRLine *l in self.finishedLines) {

         CGPoint start = l.begin;

         CGPoint end = l.end;

         for (float t = 0.0; t <= 1.0; t += 0.05) {

             float x = start.x + t * (end.x - start.x);

             float y = start.y + t * (end.y - start.y);

             if (hypot(x - p.x, y - p.y) < 20.0) {

                 return l;

             }

         }

     }

     return nil;

 }
最后修改点击手势响应事件tap:方法如下:
 - (void)tap:(UIGestureRecognizer *)gr {

     NSLog(@"Recognized Tap");

     CGPoint point = [gr locationInView:self];

     self.selectedLine = [self lineAtPoint:point];

     [self setNeedsDisplay];

 }
接下来实现,当用户已经选中一条线条之后,将显示一个菜单提供对该线条的删除操作。
修改tap:方法如下:
 - (void)tap:(UIGestureRecognizer *)gr {

     NSLog(@"Recognized Tap");

     CGPoint point = [gr locationInView:self];

     self.selectedLine = [self lineAtPoint:point];

     if(self.selectedLine) {

         //使该视图成为menu item响应方法的目标

         [self becomeFirstResponder];

         UIMenuController *menu = [UIMenuController sharedMenuController];

         //创建一个新的删除UIMenuItem

         UIMenuItem *deleteItem = [[UIMenuItem alloc] initWithTitle:@"Delete" action:@selector(deleteLine:)];

         menu.menuItems = @[deleteItem];

         //设置menu的显示位置

         [menu setTargetRect:CGRectMake(point.x, point.y, , ) inView:self];

         [menu setMenuVisible:YES animated:YES];

     } else {

         [[UIMenuController sharedMenuController] setMenuVisible:NO animated:YES];

     }

     [self setNeedsDisplay];

 }
当自定义的视图类需要成为第一响应者时,必须重载canBecomeFirstResponder方法,在BNRDrawView.m中添加如下方法:
 - (BOOL)canBecomeFirstResponder {

     return YES;

 }
如果menu items的响应方法没有实现,该menu就不会显示。实现deleteLine:方法如下:
 - (void)deleteLine:(id)sender {

     [self.finishedLines removeObject:self.selectedLine];

     [self setNeedsDisplay];

 }
运行程序,效果如下:
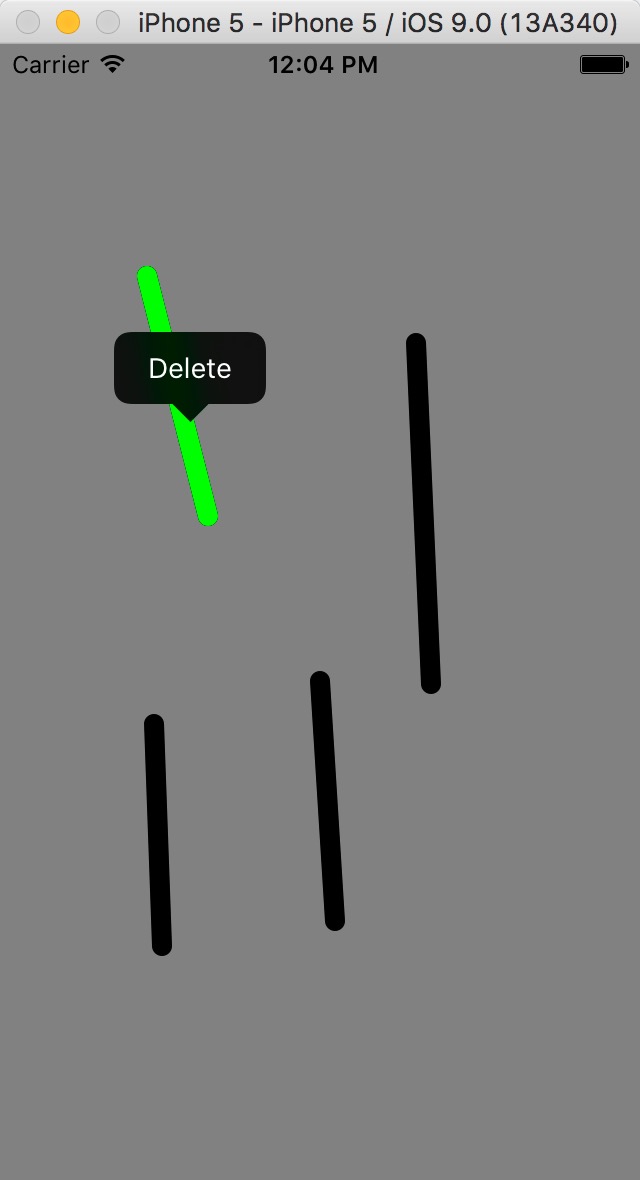
接下来,实现如下功能,当用户长按住一条线时,该线将被选中,用户能够用手指拖动该线条。修改initWithFrame:方法如下:
 - (instancetype)initWithFrame:(CGRect)r {

     self = [super initWithFrame:r];

     if (self) {

         self.linesInProgress = [[NSMutableDictionary alloc] init];

         self.finishedLines = [[NSMutableArray alloc] init];

         self.backgroundColor = [UIColor grayColor];

         self.multipleTouchEnabled = YES;

         UITapGestureRecognizer *doubleTapRecognizer = [[UITapGestureRecognizer alloc]

                                                        initWithTarget:self

                                                        action:@selector(doubleTap:)];

         doubleTapRecognizer.numberOfTapsRequired = ;

         doubleTapRecognizer.delaysTouchesBegan = YES;

         [self addGestureRecognizer:doubleTapRecognizer];

         UITapGestureRecognizer *tapRecognizer = [[UITapGestureRecognizer alloc]

                                                  initWithTarget:self

                                                  action:@selector(tap:)];

         tapRecognizer.delaysTouchesBegan = YES;

         [tapRecognizer requireGestureRecognizerToFail:doubleTapRecognizer]; //区别点击与双击手势

         [self addGestureRecognizer:tapRecognizer];

         UILongPressGestureRecognizer *pressRecognizer = [[UILongPressGestureRecognizer alloc]

                                                          initWithTarget:self

                                                          action:@selector(longPress:)];

         [self addGestureRecognizer:pressRecognizer];

     }

     return self;

 }
手势识别器处理长按时,其state属性会经历三种变化,其为 UIGestureRecognizerStatePossible UIGestureRecognizerStateBegan UIGestureRecognizerStateEnded 。
实现长按的响应方法longPress:如下:
 - (void)longPress:(UIGestureRecognizer *)gr {

     if (gr.state == UIGestureRecognizerStateBegan) {

         CGPoint point = [gr locationInView:self];

         self.selectedLine = [self lineAtPoint:point];

         if (self.selectedLine) {

             [self.linesInProgress removeAllObjects];

         }

     } else if (gr.state == UIGestureRecognizerStateEnded) {

             self.selectedLine = nil;

     }

     [self setNeedsDisplay];

 }
让BNRDrawView遵守UIGestureRecognizerDelegate协议,并添加一个UIPanGestureRecognizer属性,如下:
 @interface BNRDrawView () <UIGestureRecognizerDelegate>

 @property (nonatomic, strong) UIPanGestureRecognizer *moveRecognizer;

 @property (nonatomic, strong) NSMutableDictionary *linesInProgress;

 @property (nonatomic, strong) NSMutableArray *finishedLines;

 @property (nonatomic, weak) BNRLine *selectedLine;

 @end
修改initWithFrame:方法。此处cancelsTouchesInView属性默认为YES,意味着手势识别器将吞没任何它识别出的手势,这样的话,视图将没有机会对UIRespnder方法做出响应。将其设置为NO,这样,手势识别器能识别的触摸事件也会被UIResponder识别。代码如下:
 - (instancetype)initWithFrame:(CGRect)r {

     self = [super initWithFrame:r];

     if (self) {

         self.linesInProgress = [[NSMutableDictionary alloc] init];

         self.finishedLines = [[NSMutableArray alloc] init];

         self.backgroundColor = [UIColor grayColor];

         self.multipleTouchEnabled = YES;

         UITapGestureRecognizer *doubleTapRecognizer = [[UITapGestureRecognizer alloc]

                                                        initWithTarget:self

                                                        action:@selector(doubleTap:)];

         doubleTapRecognizer.numberOfTapsRequired = ;

         doubleTapRecognizer.delaysTouchesBegan = YES;

         [self addGestureRecognizer:doubleTapRecognizer];

         UITapGestureRecognizer *tapRecognizer = [[UITapGestureRecognizer alloc]

                                                  initWithTarget:self

                                                  action:@selector(tap:)];

         tapRecognizer.delaysTouchesBegan = YES;

         [tapRecognizer requireGestureRecognizerToFail:doubleTapRecognizer]; //区别点击与双击手势

         [self addGestureRecognizer:tapRecognizer];

         UILongPressGestureRecognizer *pressRecognizer = [[UILongPressGestureRecognizer alloc]

                                                          initWithTarget:self

                                                          action:@selector(longPress:)];

         [self addGestureRecognizer:pressRecognizer];

         self.moveRecognizer = [[UIPanGestureRecognizer alloc] initWithTarget:self action:@selector(moveLine:)];

         self.moveRecognizer.delegate = self;

         self.moveRecognizer.cancelsTouchesInView = NO;

         [self addGestureRecognizer:self.moveRecognizer];

     }

     return self;

 }
实现UIGestureRecognizerDelegate协议的gestureRecognizer:shouldRecognizeSimultaneouslyWithGestureRecognizer:方法,如果该方法返回YES,手势识别器将与其它的识别器分享该触摸事件。如下:
 - (BOOL)gestureRecognizer:(UIGestureRecognizer *)gestureRecognizer shouldRecognizeSimultaneouslyWithGestureRecognizer:(UIGestureRecognizer *)otherGestureRecognizer {

     if (gestureRecognizer == self.moveRecognizer) {

         return YES;

     }

     return NO;

 }
实现移动手势的响应事件moveLine:,如下:
 - (void)moveLine:(UIPanGestureRecognizer *)gr {

     if (!self.selectedLine) {

         return;

     }

     if (gr.state == UIGestureRecognizerStateChanged) {

         CGPoint translation = [gr translationInView:self];

         CGPoint begin = self.selectedLine.begin;

         CGPoint end = self.selectedLine.end;

         begin.x += translation.x;

         begin.y += translation.y;

         end.x += translation.x;

         end.y += translation.y;

         self.selectedLine.begin = begin;

         self.selectedLine.end = end;

         [self setNeedsDisplay];

         [gr setTranslation:CGPointZero inView:self];

     }

 }
程序代码链接:http://pan.baidu.com/s/1o6Dz5xg
UIGestureRecognizer - BNR的更多相关文章
- iOS UIGestureRecognizer与UIMenuController(内容根据iOS编程)
UIGestureRecognizer 对象会截取本应由视图处理的触摸事件.当某个UIGestureRecognizer对象识别出特定的手势后,就会向指定的对象发送指定的消息.iOS SDK默认提供若 ...
- iOS 手势识别器(UIGestureRecognizer)
UIGestureRecognizer是一个抽象类,定义了所有手势的基本行为,使用它的子类才能处理具体的手势. UIGestureRecognizer的子类有: UITapGestureRecogni ...
- 手势(UIGestureRecognizer)
通过继承 UIGestureRecognizer 类,实现自定义手势(手势识别器类). PS:自定义手势时,需要 #import <UIKit/UIGestureRecognizerSubcla ...
- UIKit框架之UIGestureRecognizer
---恢复内容开始--- 1.继承链:NSObject 2.UIGestureRecognizer的子类有以下: UITapGestureRecognizer :点击 UIPinchGestureRe ...
- 你真的了解UIGestureRecognizer吗?
一:首先查看一下关于UIGestureRecognizer的定义 //当前手势状态 typedef NS_ENUM(NSInteger, UIGestureRecognizerState) { //尚 ...
- UIGestureRecognizer
•为了完成手势识别,必须借助于手势识别器----UIGestureRecognizer • •利用UIGestureRecognizer,能轻松识别用户在某个view上面做的一些常见手势 • •UIG ...
- IOS手势UIGestureRecognizer
UIGestureRecognizer是一个抽象类,定义了所有手势的基本行为,它有6个子类处理具体的手势: 1.UITapGestureRecognizer (任意手指任意次数的点击) // 点击次数 ...
- iOS基础篇(十七)——UIGestureRecognizer用法
UIGestureRecognizer(手势识别)在iOS 中非常重要,他极大地提高了移动设备的使用便捷性: 在3.2之前是主要使用的是由UIResponder而来的如下4种方式: - (void)t ...
- 点击事件touches与ios的手势UIGestureRecognizer
.h文件 @property (weak,nonatomic) IBOutlet UILabel *messageLabel;@property (weak,nonatomic) IBOutlet U ...
随机推荐
- Python+AutoIt实现界面工具开发
前言 不同于Linux服务器上的命令行操作,在windows系统上用户的使用习惯还是倾向于使用有界面的工具.如果工具是命令行交互操作的方式,可能是有悖于在windows上使用的操作习惯,往往不容易推广 ...
- c# ?? 和?
static void Main(string[] args) { double? num1 = null; // ? 说明num1可以为空 ...
- Java实现登录验证码
登录验证码 Servlet /* 从请求中获取数据,获取验证码的session的值转为String类型, 销毁,防止返回后验证码不刷新,重新验证成功 判断验证码是否相同(忽略大 ...
- max-width和width的区别
width为宽度 max-width为最大宽度 如果设置了width,那宽度就定死了,不能动态的改变,显得僵硬 而设置了max-width,实际宽度可以在0~max-width之间,当元素内部宽度不足 ...
- IBM Watson启示录:AI不应该仅仅是炫技
IBM Watson启示录:AI不应该仅仅是炫技 https://mp.weixin.qq.com/s/oNp8QS7vQupbi8fr5RyLxA 导 ...
- arcgis for js学习之Graphic类
arcgis for js学习之Graphic类 <title>Graphic类</title> <meta charset="utf-8" /> ...
- C#:在匿名方法中捕获外部变量
先来一段代码引入主题.如果你可以直接说出代码的输出结果,说明本文不适合你.(代码引自<深入理解C#>第三版) class Program { private delegate void T ...
- axios与ajax区别
1.jQuery ajax $.ajax({ type: 'POST', url: url, data: data, dataType: dataType, success: function () ...
- 【已解决】报异常:java.lang.ArithmeticException: / by zero
异常名称如下:java.lang.ArithmeticException: / by zero 原因:当我们定义的被除数为整形时候(short int long)会抛出此异常,被除数为整形时不可以 ...
- centos7个人shell编写环境
一.配置存放文件/root/wang 存放常用的文件/root/wang/shell 存放练习的shell文件/root/wang/succeed_shell 存放有用shell文件/root/bak ...