spring源码解析之前置知识点
本文是作者原创,版权归作者所有.若要转载,请注明出处.
最近在看spring源码,但是spring的体系太庞大了,在这里记录一下阅读源码中遇到知识点
@PostConstruct
被注解的方法,在对象加载完依赖注入后执行
看个demo
package com.day01.config;

import org.springframework.context.annotation.ComponentScan;

import org.springframework.context.annotation.Configuration;

@Configuration

@ComponentScan("com.day01")

public class SpringConfig {

}
IndexDao
package com.day01.service;

import org.springframework.stereotype.Component;

@Component

public class IndexDao {

    public IndexDao(){

        System.out.println("IndexDao  构造方法");

    }

}
IndexService
@Service

public class IndexService {

    @Autowired

    private IndexDao indexDao;

    public IndexService(){

        System.out.println("IndexService  构造方法");

    }

    @PostConstruct

    public void init(){

        System.out.println("IndexService  init方法");

    }

    public void hello(){

        System.out.println("IndexService");

    }

}
Testday01
public static void main(String[] args) {

        AnnotationConfigApplicationContext applicationContext=new AnnotationConfigApplicationContext(SpringConfig.class);

        IndexService indexService = (IndexService) applicationContext.getBean("indexService");

        indexService.hello();

    }
看结果

可以看出在spring项目中,在一个bean的初始化过程中,方法执行先后顺序为Constructor > @Autowired > @PostConstruct
BeanPostProcessor
BeanPostProcessor是Spring框架的提供的一个扩展点,通过实现BeanPostProcessor接口,程序员就可插手bean实例化的过程
看demo
@Component

public class TestBeanPostProcessor implements BeanPostProcessor {

    /**

     * 在bean初始化之前执行

     */

    @Override

    public Object postProcessBeforeInitialization(Object bean, String beanName) throws BeansException {

        if (beanName.equals("indexService")){

            System.out.println("indexService  postProcessBeforeInitialization");

        }

        //这里也可以产生代理对象 Proxy.newProxyInstance(),也是aop实现的原理

        return bean;

    }

    /**

     * 初始化之后

     */

    @Override

    public Object postProcessAfterInitialization(Object bean, String beanName) throws BeansException {

        if (beanName.equals("indexService")){

            System.out.println("indexService  postProcessAfterInitialization");

        }

        return bean;

    }

}
运行上文的Testday01,看下结果
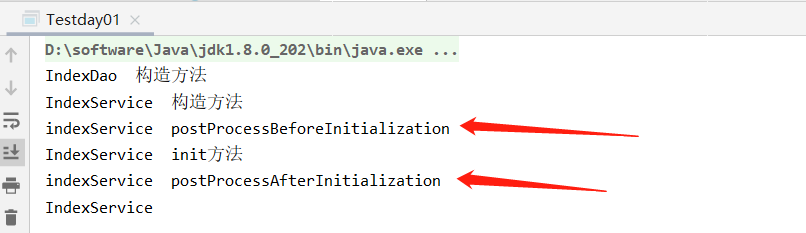
可以看出
===Spring IOC容器实例化Bean===

===调用BeanPostProcessor的postProcessBeforeInitialization方法===

===调用bean实例的初始化方法===

===调用BeanPostProcessor的postProcessAfterInitialization方法===
值得说明的是这个接口可以设置多个,会形成一个列表,那么如何确定他们的执行顺序呢?
Ordered和PriorityOrdered
Spring提供了Ordered和PriorityOrdered接口,来处理相同接口实现类的优先级问题
看个demo
TestBeanPostProcessor
@Component

public class TestBeanPostProcessor implements BeanPostProcessor , PriorityOrdered {

    /**

     * 在bean初始化之前执行

     */

    @Override

    public Object postProcessBeforeInitialization(Object bean, String beanName) throws BeansException {

        if (beanName.equals("indexService")){

            System.out.println("indexService  postProcessBeforeInitialization");

        }

        //这里也可以产生代理对象 Proxy.newProxyInstance(),也是aop实现的原理

        return bean;

    }

    /**

     * 在bean初始化之前执行

     */

    @Override

    public Object postProcessAfterInitialization(Object bean, String beanName) throws BeansException {

        if (beanName.equals("indexService")){

            System.out.println("indexService  postProcessAfterInitialization");

        }

        return bean;

    }

    @Override

    public int getOrder() {

        return 100;//注意这里

    }

}
TestBeanPostProcessor2
@Component

public class TestBeanPostProcessor2 implements BeanPostProcessor , PriorityOrdered {

    /**

     * 在bean初始化之前执行

     */

    @Override

    public Object postProcessBeforeInitialization(Object bean, String beanName) throws BeansException {

        if (beanName.equals("indexService")){

            System.out.println("indexService  postProcessBeforeInitialization2");

        }

        //这里也可以产生代理对象 Proxy.newProxyInstance(),也是aop实现的原理

        return bean;

    }

    /**

     * 在bean初始化之前执行

     */

    @Override

    public Object postProcessAfterInitialization(Object bean, String beanName) throws BeansException {

        if (beanName.equals("indexService")){

            System.out.println("indexService  postProcessAfterInitialization2");

        }

        return bean;

    }

    @Override

    public int getOrder() {

        return 99;

    }

}
运行test类,看结果
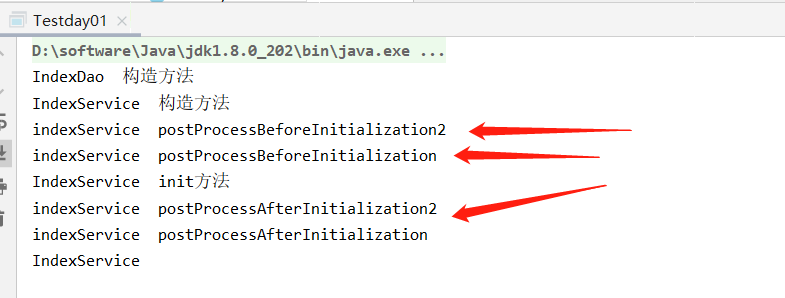
这段代码的逻辑:
1. 若对象o1是Ordered接口类型,o2是PriorityOrdered接口类型,那么o2的优先级高于o1
2. 若对象o1是PriorityOrdered接口类型,o2是Ordered接口类型,那么o1的优先级高于o2
3. 其他情况,若两者都是Ordered接口类型或两者都是PriorityOrdered接口类型,调用Ordered接口的getOrder方法得到order值,order值越大,优先级越小
若2个对象中有一个对象实现了PriorityOrdered接口,那么这个对象的优先级更高。
若2个对象都是PriorityOrdered或Ordered接口的实现类,那么比较Ordered接口的getOrder方法得到order值,值越低,优先级越高
BeanFactoryPostProcessor
spring的扩展点之一:实现该接口,可以在spring的bean创建之前修改beandefinitions属性。
例如可以把bean的scope从singleton改为prototype,也可以把property的值给修改掉。
可以同时配置多个BeanFactoryPostProcessor,并通过设置'order'属性来控制各个BeanFactoryPostProcessor的执行次序
看个demo
@Component

public class TestBeanFactoryPostProcessor implements BeanFactoryPostProcessor {

    @Override

    public void postProcessBeanFactory(ConfigurableListableBeanFactory beanFactory) throws BeansException {

        System.out.println("===============TestBeanFactoryPostProcessor============");

    }

}
测试类
public static void main(String[] args) {

        AnnotationConfigApplicationContext applicationContext=new AnnotationConfigApplicationContext(SpringConfig.class);

        //AnnotationConfigApplicationContext applicationContext=new AnnotationConfigApplicationContext(IndexService.class);

        IndexService indexService = (IndexService) applicationContext.getBean("indexService");

        indexService.hello();

        IndexService indexService2 = (IndexService) applicationContext.getBean("indexService");

        System.out.println(indexService);

        System.out.println(indexService2);

    }
运行一下,看结果

可以看到,spring管理的bean默认是单例的,我们把indexService改成prototype试一下
@Component

public class TestBeanFactoryPostProcessor implements BeanFactoryPostProcessor {

    @Override

    public void postProcessBeanFactory(ConfigurableListableBeanFactory beanFactory) throws BeansException {

        System.out.println("===============TestBeanFactoryPostProcessor============");

        BeanDefinition indexService = beanFactory.getBeanDefinition("indexService");

        String scope = indexService.getScope();

        System.out.println(scope);//singleton

        //indexService.setScope("singleton");

        indexService.setScope("prototype");//设置为原型

        System.out.println(scope);//singleton

    }

}
看下结果

BeanDefinitionRegistryPostProcessor
BeanDefinitionRegistryPostProcessor继承了BeanFactoryPostProcessor接口,并可以注册bean到spring容器中,一共要实现以下两个方法:
void postProcessBeanFactory(ConfigurableListableBeanFactory beanFactory) throws BeansException:

该方法的实现中,主要用来对bean定义做一些改变。

void postProcessBeanDefinitionRegistry(BeanDefinitionRegistry registry) throws BeansException:

该方法用来注册更多的bean到spring容器中,详细观察入参BeanDefinitionRegistry接口,看看这个参数能带给我们什么能力。
看个demo
public class IndexService2  {

    private ApplicationContext applicationContext;

    public IndexService2(){

        System.out.println("IndexService2  构造方法");

    }

    @PostConstruct

    public void init(){

        System.out.println("IndexService2  init方法");

    }

    public void hello(){

        System.out.println("IndexService2 hello");

    }

}
注意:IndexService2并没有@Component注解,说明这个类并没有交给spring管理,继续
@Component

public class MyBeanDefinitionRegistryPostProcessor implements BeanDefinitionRegistryPostProcessor {

    @Override

    public void postProcessBeanDefinitionRegistry(BeanDefinitionRegistry registry) throws BeansException {

        GenericBeanDefinition genericBeanDefinition = new GenericBeanDefinition();

        genericBeanDefinition.setScope("singleton");

        genericBeanDefinition.setBeanClass(IndexService2.class);//将IndexService2交给spring管理

        registry.registerBeanDefinition("indexService2",genericBeanDefinition);

    }

    @Override

    public void postProcessBeanFactory(ConfigurableListableBeanFactory beanFactory) throws BeansException {

        System.out.println("===============MyBeanDefinitionRegistryPostProcessor============");

    }

}
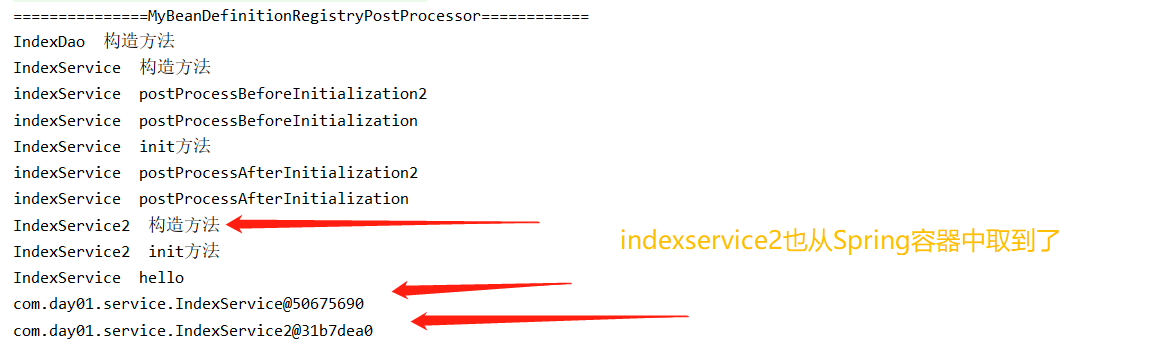
注意上述代码中通过BeanDefinitionRegistryPostProcessor 将IndexService2手动注册交给spring管理
运行test类
public static void main(String[] args) {

        AnnotationConfigApplicationContext applicationContext=new AnnotationConfigApplicationContext(SpringConfig.class);

        //AnnotationConfigApplicationContext applicationContext=new AnnotationConfigApplicationContext(IndexService.class);

        IndexService indexService = (IndexService) applicationContext.getBean("indexService");

        indexService.hello();

        IndexService2 indexService2 = (IndexService2) applicationContext.getBean("indexService2");

        System.out.println(indexService);

        System.out.println(indexService2);

    }
看结果
ApplicationContextAware
我们可以通过注解@Autowired 很简单方便获取bean,虽然这种方法很简单方便,但是有些特殊场景用不了,比如静态方法中不能使用

此时可以借助ApplicationContextAware获取bean
看个demo
@Service

public class TestServiceImpl {

    public String hello(){

        return "hello world";

    }

}
这里无法注入TestServiceImpl 无法使用,看demo
@Component

public class ApplicationContextUtil implements ApplicationContextAware {

    private static ApplicationContext applicationContext = null;

    @Autowired

    private TestServiceImpl testService;

    /**

     * 实现ApplicationContextAware接口, 注入Context到静态变量中.

     */

    @Override

    public void setApplicationContext(ApplicationContext applicationContext) throws BeansException {

        ApplicationContextUtil.applicationContext = applicationContext;

    }

    /**

     * 获取静态变量中的ApplicationContext.

     */

    public static ApplicationContext getApplicationContext() {

        return applicationContext;

    }

    /**

     * 从静态变量applicationContext中得到Bean, 自动转型为所赋值对象的类型.

     */

    @SuppressWarnings("unchecked")

    public static <T> T getBean(String name) {

        return (T) applicationContext.getBean(name);

    }

    /**

     * 从静态变量applicationContext中得到Bean, 自动转型为所赋值对象的类型.

     */

    public static <T> T getBean(Class<T> requiredType) {

        return applicationContext.getBean(requiredType);

    }

    /*public static String test(){

        String hello = testService.hello();

    }*/

}
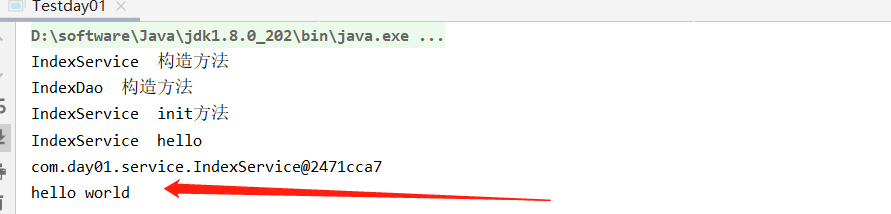
看测试类
public static void main(String[] args) {

        AnnotationConfigApplicationContext applicationContext=new AnnotationConfigApplicationContext(SpringConfig.class);

        //AnnotationConfigApplicationContext applicationContext=new AnnotationConfigApplicationContext(IndexService.class);

        IndexService indexService = (IndexService) applicationContext.getBean("indexService");

        indexService.hello();

        System.out.println(indexService);

        /*IndexService2 indexService2 = (IndexService2) applicationContext.getBean("indexService2");

        System.out.println(indexService2);*/

        String testServiceImpl = ((TestServiceImpl) ApplicationContextUtil.getBean("testServiceImpl")).hello();

        System.out.println(testServiceImpl);

    }
看结果
ok,今天就先到这里,以后有新的内容随时补充吧
spring源码解析之前置知识点的更多相关文章
- spring 源码解析
1. [文件] spring源码.txt ~ 15B 下载(167) ? 1 springн┤┬вио╬Ш: 2. [文件] spring源码分析之AOP.txt ~ 15KB 下载( ...
- Spring源码解析之八finishBeanFactoryInitialization方法即初始化单例bean
Spring源码解析之八finishBeanFactoryInitialization方法即初始化单例bean 七千字长文深刻解读,Spirng中是如何初始化单例bean的,和面试中最常问的Sprin ...
- Spring源码解析 - AbstractBeanFactory 实现接口与父类分析
我们先来看类图吧: 除了BeanFactory这一支的接口,AbstractBeanFactory主要实现了AliasRegistry和SingletonBeanRegistry接口. 这边主要提供了 ...
- Spring源码解析——循环依赖的解决方案
一.前言 承接<Spring源码解析--创建bean>.<Spring源码解析--创建bean的实例>,我们今天接着聊聊,循环依赖的解决方案,即创建bean的ObjectFac ...
- Spring源码解析-ioc容器的设计
Spring源码解析-ioc容器的设计 1 IoC容器系列的设计:BeanFactory和ApplicatioContext 在Spring容器中,主要分为两个主要的容器系列,一个是实现BeanFac ...
- Spring源码解析系列汇总
相信我,你会收藏这篇文章的 本篇文章是这段时间撸出来的Spring源码解析系列文章的汇总,总共包含以下专题.喜欢的同学可以收藏起来以备不时之需 SpringIOC源码解析(上) 本篇文章搭建了IOC源 ...
- Spring源码解析之PropertyPlaceholderHelper(占位符解析器)
Spring源码解析之PropertyPlaceholderHelper(占位符解析器) https://blog.csdn.net/weixin_39471249/article/details/7 ...
- Spring源码解析之BeanFactoryPostProcessor(三)
在上一章中笔者介绍了refresh()的<1>处是如何获取beanFactory对象,下面我们要来学习refresh()方法的<2>处是如何调用invokeBeanFactor ...
- Spring源码解析之ConfigurationClassPostProcessor(二)
上一个章节,笔者向大家介绍了spring是如何来过滤配置类的,下面我们来看看在过滤出配置类后,spring是如何来解析配置类的.首先过滤出来的配置类会存放在configCandidates列表, 在代 ...
随机推荐
- PostMan接口测试(很全面的接口测试教程)
一:理论部分 1. 前言 在前后端分离开发时,后端工作人员完成系统接口开发后,需要与前端人员对接,测试调试接口,验证接口的正确性可用性.而这要求前端开发进度和后端进度保持基本一致,任何一方的进度跟不上 ...
- sqlilabs less18-22 HTTP头的注入
less18 user-agent的注入 源码分析: check_input对name,password进行了过滤 function check_input($value) { if(!empty($ ...
- java 8 lambda表达式中的异常处理
目录 简介 处理Unchecked Exception 处理checked Exception 总结 java 8 lambda表达式中的异常处理 简介 java 8中引入了lambda表达式,lam ...
- Linux系统管理第二次作业 目录和文件管理 rpm安装 创建yum仓库
chapter02 - 03 作业 1.分别用cat \tac\nl三个命令查看文件/etc/ssh/sshd_config文件中的内容,并用自己的话总计出这三个文档操作命令的不同之处? [ ...
- Struts2漏洞利用
Struts漏洞合集 Struts-S2-013漏洞利用 受影响版本 Struts 2.0.0 - Struts 2.3.14.1 漏洞利用 任意命令执行POC: ${(#_memberAccess[ ...
- INTERVIEW #0
一.造成网络延迟的可能原因 1,WiFi所有用户上下行流量共用一个信道,当用户太多或者有人在下载大的资源时带宽不够,丢包: 2,线路质量不佳导致信噪比太低,比如光纤损耗太大等. 二.IPv6优势 1, ...
- C语言入门经典题目及其答案
写在开始: 我叫风骨散人,名字的意思是我多想可以不低头的自由生活,可现实却不是这样.家境贫寒,总得向这个世界低头,所以我一直在奋斗,想改变我的命运给亲人好的生活,希望同样被生活绑架的你可以通过自己的努 ...
- KNN (K近邻算法) - 识别手写数字
KNN项目实战——手写数字识别 1. 介绍 k近邻法(k-nearest neighbor, k-NN)是1967年由Cover T和Hart P提出的一种基本分类与回归方法.它的工作原理是:存在一个 ...
- 虚拟化云计算平台Proxmox VE
1.虚拟化技术介绍 1.1.OpenVZ 简介 OpenVZ 是开源软件, 是基于Linux平台的操作系统级服务器虚拟化解决方案,它是基于Linux内核和作业系统的操作系统级虚拟化技术. OpenVZ ...
- 【T-SQL】基础 —— 语法(1)
USE master--检查是否已经存在一个表,如果有就删除IF(EXISTS(SELECT * FROM INFORMATION_SCHEMA.TABLES WHERE TABLE_NAME = ' ...