『Python』 多线程 端口扫描器
0x 00 Before Coding
当端口打开时,向端口发送 TCP SYN 请求,会返回一个 ACK 响应:

当端口关闭,返回的是 RST 响应:

0x 01 Coding
可以用 socket 编写一个小脚本来测试主机端口的开启情况,基本代码如下:
 # coding: utf-8

 import socket

 from datetime import datetime

 # Set time-out to get the scanning fast

 socket.setdefaulttimeout(0.5)

 # Ask for input

 remote_server = raw_input("Enter a remote host to scan:")

 remote_server_ip = socket.gethostbyname(remote_server)

 # Print a nice banner with info on which host we are about to scan

 print '-' * 60

 print 'Please wait, scanning remote host ', remote_server_ip

 print '-' * 60

 # Check what time the scan started

 t1 = datetime.now()

 # Using the range function to specify ports(1 - 1024)

 # We also put in some error handling for catching errors

 try:

     for port in range(1,1025):

         sock = socket.socket(2,1) # 2:socket.AF_INET 1:socket.SOCK_STREAM

         res = sock.connect_ex((remote_server_ip,port))

         if res == 0:

             print 'Port {}: OPEN'.format(port)

         sock.close()

 except socket.gaierror:

     print 'Hostname could not be resolved.Exiting'

 except socket.error:

     print "Could't connect to the server"

 # Check the time now

 t2 = datetime.now()

 # Calculates the difference of time

 total = t2 - t1

 # Print the info to screen

 print 'Scanning Completed in: ', total
参考:http://www.pythonforbeginners.com/code-snippets-source-code/port-scanner-in-python/
程序测试结果如下:

看出来 在 socket 的超时时间设置为0.5的前提下 依然需要花费 8分27秒才能够把周知端口号扫完,有没有其他方式加快扫描速度?答案是有的。
//////////////////// ******************** 该部分可以略过,一个小坑 ************************ ////////////////////
打开 抓到的数据包列表,发现 timeout 包都会发送2个“伪重传”,发送这两个一般没什么用的数据包会占用 CPU的处理时间,
所以在想能不能不让程序发这两个包来提高效率??
自己分析连续两个端口的时间间隔就会发现:间隔是0.5s(由 39号、46号、53号数据包分析得出),这恰好是在程序中设置的超时时间,
也就是说超时重传的包并不会占用专门的时间,所以这种想法就被干掉了。

这样的话,1个端口0.5的超时等待,扫描一个主机的 1- 1024 号端口所用时间是可以大致估算下的:
1024 * 0.5 / 60 = 8.53 分钟左右。和上面程序实际扫描的时间(8分27秒)相符合。
//////////////////// ******************** 坑结束 ************************ ////////////////////
0x 02 Better Coding
所以对于这种时间主要花费在 socket 连接( 非 CPU 计算密集型 )的程序 可以使用 多线程来提升效率,
这里选择使用内建的库 multiprocessing.dummy 来实现多线程扫描:
# coding: utf-8

'''
  多线程 Socket TCP 端口扫描器  by: EvilCLAY
'''

import socket

from datetime import datetime

from multiprocessing.dummy import Pool as ThreadPool

remote_server = raw_input("Enter a remote host to scan:")

remote_server_ip = socket.gethostbyname(remote_server)

ports = []

print '-' * 60

print 'Please wait, scanning remote host ', remote_server_ip

print '-' * 60

socket.setdefaulttimeout(0.5)

def scan_port(port):

    try:

        s = socket.socket(2,1)

        res = s.connect_ex((remote_server_ip,port))

        if res == 0: # 如果端口开启 发送 hello 获取banner

            print 'Port {}: OPEN'.format(port)

        s.close()

    except Exception,e:

        print str(e.message)

for i in range(1,1025):

    ports.append(i)

# Check what time the scan started

t1 = datetime.now()

pool = ThreadPool(processes = 8)

results = pool.map(scan_port,ports)

pool.close()

pool.join()

print 'Multiprocess Scanning Completed in  ', datetime.now() - t1
扫描的结果如下:
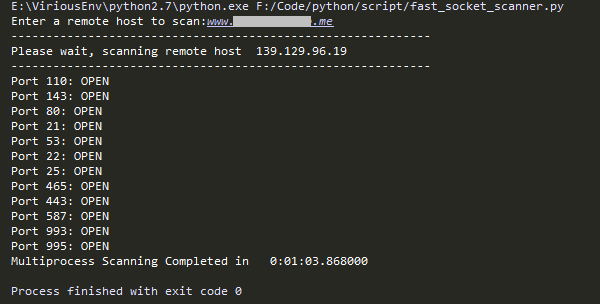
可以发现 8 个线程并行发起请求,效率有很大的提升。
在被扫描主机未安装连接限制软件的前提下,测试了开启不同线程扫描所花费的时间 :
  16 个线程 使用 32 秒扫完;
  32个线程,使用 16 秒扫完;
  64个线程,使用 8 秒扫完;
  128个线程,使用 4 秒扫完;
  256个线程,使用 2 秒扫完;
  512个线程,使用 1.50 秒扫完;
  1024个线程,使用 1.25 秒扫完;

  获取 Banner
  把 函数修改成如下 即可:
def scan_port(port):

    try:

        s = socket.socket(2,1)

        res = s.connect_ex((remote_server_ip,port))

        if res == 0: # 如果端口开启 发送 hello 获取banner

            try:

                s.send('hello')

                banner = s.recv(1024)

            except Exception,e:

                print 'Port {}: OPEN'.format(port)

                print str(e.message)

            else:

                print 'Port {}: OPEN'.format(port)

                print 'Banner {}'.format(banner)

        s.close()

    except Exception,e:

        print str(e.message)
晚上研究下 Zmap 与 ZGrab 分析下 这两款神器牛在什么地方 ~~
『Python』 多线程 端口扫描器的更多相关文章
- 『Python』 多线程 共享变量的实现
简介: 对于Python2而言,对于一个全局变量,你的函数里如果只使用到了它的值,而没有对其赋值(指a = XXX这种写法)的话,就不需要声明global. 相反,如果你对其赋了值的话,那么你就需要声 ...
- 再议perl写多线程端口扫描器
再议perl写多线程端口扫描器 http://blog.csdn.net/sx1989827/article/details/4642179 perl写端口多线程扫描器 http://blog.csd ...
- Python脚本写端口扫描器(socket,python-nmap)
目录 Socket模块编写 扫描给定主机是否开放了指定的端口 python-nmap模块编写 扫描给定ip或给定网段内指定端口是否开放 一个用python写的简单的端口扫描器,python环境为 3. ...
- 『Python』__getattr__()特殊方法
self的认识 & __getattr__()特殊方法 将字典调用方式改为通过属性查询的一个小class, class Dict(dict): def __init__(self, **kw) ...
- 『Python』 ThreadPool 线程池模板
Python 的 简单多线程实现 用 dummy 模块 一句话就可以搞定,但需要对线程,队列做进一步的操作,最好自己写个线程池类来实现. Code: # coding:utf-8 # version: ...
- 『Python』多进程处理
尝试学习python的多进程模组,对比多线程,大概的区别在: 1.多进程的处理速度更快 2.多进程的各个子进程之间交换数据很不方便 多进程调用方式 进程基本使用multicore() 进程池优化进程的 ...
- 『Python』多进程
Python中的多线程无法利用多核优势,如果想要充分地使用多核CPU的资源(os.cpu_count()查看),在Python中大部分情况需要使用多进程.Python提供了multiprocessin ...
- 『Python』 爬取 WooYun 论坛所有漏洞条目的相关信息
每个漏洞条目包含: 乌云ID,漏洞标题,漏洞所属厂商,白帽子,漏洞类型,厂商或平台给的Rank值 主要是做数据分析使用:可以分析某厂商的各类型漏洞的统计:或者对白帽子的能力进行分析..... 数据更新 ...
- 『Python』Python 调用 ZoomEye API 批量获取目标网站IP
#### 20160712 更新 原API的访问方式是以 HTTP 的方式访问的,根据官网最新文档,现在已经修改成 HTTPS 方式,测试可以正常使用API了. 0x 00 前言 ZoomEye 的 ...
随机推荐
- UVALIVE 5893 计算几何+搜索
题意:很复杂的题意,我描述不清楚. 题目链接:http://acm.bnu.edu.cn/bnuoj/contest_show.php?cid=3033#problem/33526 大致是,给定一个起 ...
- Struts2获取request三种方法
Struts2获取request三种方法 struts2里面有三种方法可以获取request,最好使用ServletRequestAware接口通过IOC机制注入Request对象. 在Actio ...
- AS3 Graphics 多次绘制
AS3中 Sprite和Shape类都持有一个Graphics对象,利用Graphics对象可以方便的利用内置的绘图方法绘制一些简单的图形. 之前在游戏中做新手引导的时候利用显示对象的BlendMod ...
- Android ExpandableListView实例Demo
前几篇文章介绍了Listview.但在实际开发中也常常会用到多层的Listview来展示数据,比方qq中的好友展示,所以这张来了解一下ExpandableListview.基本思想与Listview大 ...
- CodeForces 55D Beautiful numbers(数位dp)
数位dp,三个状态,dp[i][j][k],i状态表示位数,j状态表示各个位上数的最小公倍数,k状态表示余数 其中j共有48种状态,最大的是2520,所以状态k最多有2520个状态. #include ...
- Android项目实战--手机卫士20--拿到已经安装了的程序以及程序管理主界面
好了,之前我们就讲了高级工具里面的短信备份与还原,那么我们高级工具里面的功能就基本上完成的啦,还有一个叫程序锁的功能而已,但我们今天先不做它先,我们先把我们的程序管理这个功能完成先. 先让大家看一下我 ...
- 把安卓源代码中的system app独立出来,像开发普通app那样开发
个人建议首先依照android源码的ide/eclipse中的格式化xml和import导入到你编译的eclipse中,假设你编译的android源码是2.3以上的版本号的,建议用JDK6 ...
- gcc -I -L -l区别
我们用gcc编译程序时,可能会用到“-I”(大写i),“-L”(大写l),“-l”(小写l)等参数,下面做个记录: 例: gcc -o hello hello.c -I /home/hello/inc ...
- Android Studio 快捷键(转)
Android Studio 快捷键 操作 Mac OSX Win/Linux 注释代码(//) Cmd + / Ctrl + / 注释代码(/**/) Cmd + Option + / Ctrl + ...
- Exception in thread "main" brut.androlib.err.UndefinedResObject: resource spec: 0x01030200(转)
反编译时遇到标题中的异常,根据描述,原因是找不到资源文件,最有可能的原因是apk中使用了系统资源. 解决办法如下: 从手机中导出framework-res.apk文件,该文件在/system/fram ...