
Android 布局 ViewGroup
布局
res/layout
命名规则(全部小写)
activity_
fragment_
item_
基础组件
com.android.widget包下
父类View
view:屏幕上一块矩阵区域
能在xml中设置的都是view,除了特殊标签。
引用使用@符号
1、background:@drawable引用图片 @android:color引用颜色
2、android:clickable可以响应点击事件
3、android:id 每一个组件都可以设置一个在当前xml中唯一的id号,使用@+id/来创建一个R文件中的id号,用来在java代码或xml中引用
4、android:padding自己与自己的内部之间的距离
5、android:layout_margin 布局管理器自己与外部之间的距离
6、android:visibility是否显示组件,visible显示,inVisible不显示但是占位,gone不显示也不占位
TextView文本框
用来显示文本String
所有的组件都包含有的属性
android:表明属于android标准属性
使用android标准命名空间
xmlns:android="http://schemas.android.com/apk/res/android
前面加layout的所有属性,都属于布局
所有组件都必须加上的(TableLayout除外)
layout_width 宽度
layout_height 高度
match_parent 常量 与父布局相同大小,如果在根布局上,表明全屏,fill_arent过期和match_parent一样
wrap_content 常量 根据内容来确定组件的大小
TextView独有的属性
text 显示文本信息
drawableTop在四边设置一张图片
android:gravity 对齐
singleLine 单行模式
textColor 设置文本显示的颜色
textSize 设置文本大小,单位:sp 跟随用户手机字体的首选项进行调整
textStyle 设置文本显示样式,粗体和斜体 多个常量可以使用|连接
Button 与TextView相同
跑马灯
1、必须内容大于宽度
2、必须单行
3、设置焦点
android:ellipsize="marquee"
android:focusable="true"
android:focusableInTouchMode="true"
android:singleLine="true"
View一般用于划线
<View
android:layout_width="match_parent"
android:layout_height="1px"
android:background="@android:color/black" />
LinearLayout线性布局
一行或者一列只有一个元素
超过一个组件或者给了id必须设置方向orientation属性
vertical垂直 一行只有一个组件
horizontal水平 一列只有一个组件
布局可以嵌套布局
layout_gravity线性布局特有属性:水平时只能设置上下,垂直时只能设置水平
layout_weight设置按权重来调整组件大小,设置为0dp
 <LinearLayout xmlns:android="http://schemas.android.com/apk/res/android"

     android:layout_width="match_parent"

     android:background="@android:color/holo_purple"

     android:layout_height="match_parent"

     android:orientation="vertical" >

     <LinearLayout

         android:layout_width="match_parent"

         android:layout_height="0dp"

         android:layout_margin="2dp"

         android:orientation="horizontal"

         android:layout_weight="1">

         <Button

             android:layout_width="0dp"

             android:layout_weight="1"

             android:layout_height="match_parent"

             android:layout_margin="1dp"

             android:textStyle="bold"

             android:textSize="20sp"

             android:text="MC"/>

     </LinearLayout>

 </LinearLayout>
TableLayout 表格布局
TableLayout 继承于LinearLayout,支持所有LinearLayout属性
添加多个TableRow,每个TableRow占一行,如果不添加TableRow直接添加组件,那么每个组件单独占一行,TableRow也是容器,每添加一个组件,就可以添加一列
唯一一个不需要宽高的组件
initTableLayout()初始化时,setOrientation(VERTICAL);默认设置了方向为垂直方向,所以这里设置方向无意义
 <TableLayout xmlns:android="http://schemas.android.com/apk/res/android"

     android:layout_width="match_parent"

        android:stretchColumns="1"

        android:shrinkColumns="0"

     android:layout_height="match_parent" >

     <Button android:text="你好"/>

     <Button android:text="你好"/>

     <TableRow>

         <TextView android:text="用户名:"/>

         <EditText

             android:hint="6-16个字符"

             android:layout_weight="1"/>

     </TableRow>

     <TableRow>

         <TextView android:text="密码:"/>

         <EditText

             android:hint="6-14个字母"

             android:layout_weight="1"/>

     </TableRow>

       <TableRow

           >

           <!-- 填满整行,还用weight分配宽度 -->

           <Button android:text="1"/>

           <Button android:text="2"/>

           <Button android:text="3" />

           <Button android:text="4" />

        </TableRow>

       <TableRow>

         <!-- android:layout_span="4" 跨越4列 -->

         <!-- <Button android:text="5"

             android:layout_span="4" /> -->

         <Button android:text="6" />

         <Button android:text="7" />

         <Button android:text="8" />

       </TableRow>

       <TableRow>

        <!--  android:layout_column="1"指定显示在第1列上,后面的组件会跟着走 -->

           <!-- <Button android:text="11"

               android:layout_column="1"/> -->

           <Button android:text="22" />

           <Button android:text="33" />

           <Button android:text="44" />

        </TableRow>

 </TableLayout>
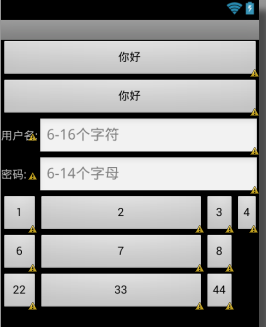
效果图如下:
FrameLayout 帧布局 也叫层布局
 <FrameLayout xmlns:android="http://schemas.android.com/apk/res/android"

     android:layout_width="match_parent"

     android:layout_height="match_parent"

     android:orientation="vertical" >

     <!-- 一般作为容器(碎片的容器) -->

     <!-- 特效 -->

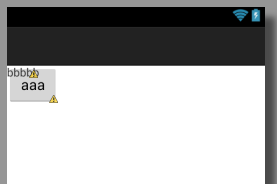
     <!--FrameLayout中的子元素总是以屏幕的左上角层叠在一起  -->

     <Button

         android:layout_width="wrap_content"

         android:layout_height="wrap_content"

         android:text="aaa"/>

     <TextView android:layout_width="wrap_content"

         android:layout_height="wrap_content"

         android:text="bbbbb"/>

 </FrameLayout>
效果图如下
AbsoluteLayout 绝对布局 已过期
RelativeLayout相对布局
 <!-- 默认以左上角为原点 -->

 <!-- 4组方法 -->

 <RelativeLayout xmlns:android="http://schemas.android.com/apk/res/android"

     android:layout_width="match_parent"

     android:layout_height="match_parent" >

 <!-- 1、居中方式  相对于父窗体   三种居中方式-->

 <!--   android:layout_centerInParent="true"  布局的正中心 -->

 <!-- android:layout_centerVertical="true"  布局的垂直居中 -->

 <!-- android:layout_centerHorizontal="true" 布局的水平居中 -->

     <Button

         android:id="@+id/center"

         android:layout_width="wrap_content"

         android:layout_height="wrap_content"

         android:layout_centerInParent="true"

         android:text="正中心"/>

     <Button android:layout_width="wrap_content"

         android:layout_height="wrap_content"

         android:layout_centerVertical="true"

         android:text="垂直居中" />

      <Button android:layout_width="wrap_content"

         android:layout_height="wrap_content"

         android:layout_centerHorizontal="true"

         android:text="水平居中" />

 <!--2、与父窗体的对齐方式   在父窗体的左右上下  -->

 <!-- android:layout_alignParentLeft="true"  -->

 <!-- android:layout_alignParentRight="true" -->

 <!-- android:layout_alignParentTop="true" -->

 <!-- android:layout_alignParentBottom="true" -->

    <Button android:layout_width="wrap_content"

         android:layout_height="wrap_content"

         android:layout_alignParentLeft="true"

         android:layout_alignParentTop="true"

         android:text="左上角"/>

    <Button android:layout_width="wrap_content"

         android:layout_height="wrap_content"

         android:layout_alignParentRight="true"

         android:layout_alignParentTop="true"

         android:text="右上角"/>

    <Button android:layout_width="wrap_content"

         android:layout_height="wrap_content"

         android:layout_alignParentLeft="true"

         android:layout_alignParentBottom="true"

         android:text="左下角"/>

    <Button android:layout_width="wrap_content"

         android:layout_height="wrap_content"

         android:layout_alignParentBottom="true"

         android:layout_alignParentRight="true"

         android:text="右下角"/>

 <!-- 3、相对其他组件的位置 -->

 <!-- android:layout_above="@id/center"  在id的上面 -->

 <!-- android:layout_below="@id/center" 在id的下面 -->

 <!-- android:layout_toLeftOf="@id/center" 在id的左边-->

 <!-- android:layout_toRightOf="@id/center" 在id的右边 -->

    <Button

        android:id="@+id/top"

        android:layout_width="wrap_content"

         android:layout_height="wrap_content"

         android:layout_above="@id/center"

         android:layout_centerHorizontal="true"

         android:text="上"/>

    <Button

        android:id="@+id/down"

        android:layout_width="wrap_content"

         android:layout_height="wrap_content"

         android:layout_below="@id/center"

         android:layout_centerHorizontal="true"

         android:text="下"/>

    <Button

        android:id="@+id/left"

        android:layout_width="wrap_content"

         android:layout_height="wrap_content"

         android:layout_toLeftOf="@id/center"

         android:layout_centerVertical="true"

         android:text="左"/>

     <Button

         android:id="@+id/right"

         android:layout_width="wrap_content"

         android:layout_height="wrap_content"

         android:layout_toRightOf="@id/center"

         android:layout_centerVertical="true"

         android:text="右"/>

 <!-- 4、相对于其他组件的对齐方式 -->

 <!--android:layout_alignLeft="@id/left" 与id组件左对齐  -->

 <!--android:layout_alignRight="@id/right" 与id组件右对齐  -->

 <!--android:layout_alignTop="@id/top" 与id组件上对齐  -->

 <!--android:layout_alignBottom="@id/down" 与id组件下对齐  -->

     <Button android:layout_width="wrap_content"

         android:layout_height="wrap_content"

         android:layout_above="@id/left"

         android:layout_alignLeft="@id/left"

         android:layout_alignTop="@id/top"

         android:text="A"/>

     <Button android:layout_width="wrap_content"

         android:layout_height="wrap_content"

         android:layout_above="@id/right"

         android:layout_alignRight="@id/right"

         android:layout_alignTop="@id/top"

         android:text="B"/>

     <Button android:layout_width="wrap_content"

         android:layout_height="wrap_content"

         android:layout_below="@id/left"

         android:layout_alignLeft="@id/left"

         android:layout_alignBottom="@id/down"

         android:text="C"/>

     <Button android:layout_width="wrap_content"

         android:layout_height="wrap_content"

         android:layout_below="@id/right"

         android:layout_alignRight="@id/right"

         android:layout_alignBottom="@id/down"

         android:text="D"/>

 </RelativeLayout>
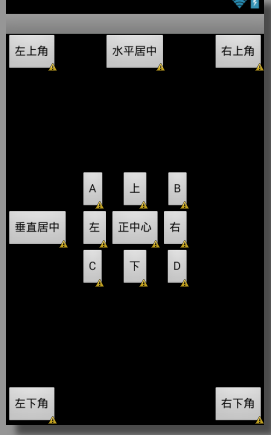
效果图如下:
GridLayout网格布局 4.0新增特性
 <GridLayout xmlns:android="http://schemas.android.com/apk/res/android"

     android:layout_width="match_parent"

     android:layout_height="match_parent"

     android:columnCount="5" >

     <!-- 设置列数 -->

     <Button android:layout_width="wrap_content"

         android:layout_height="wrap_content"

         android:text="1"/>

     <Button android:layout_width="wrap_content"

         android:layout_height="wrap_content"

         android:text="2"/>

     <Button android:layout_width="wrap_content"

         android:layout_height="wrap_content"

         android:text="3"/>

     <Button android:layout_width="wrap_content"

         android:layout_height="wrap_content"

         android:text="4"/>

     <Button android:layout_width="wrap_content"

         android:layout_height="wrap_content"

         android:text="5"/>

     <Button android:layout_width="wrap_content"

         android:layout_height="wrap_content"

         android:text="6"/>

     <Button android:layout_width="wrap_content"

         android:layout_height="wrap_content"

         android:text="7"/>

     <Button android:layout_width="wrap_content"

         android:layout_height="wrap_content"

         android:text="8"/>

 </GridLayout>
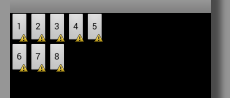
效果图如下:
Android 布局 ViewGroup的更多相关文章
- android自定义viewgroup实现等分格子布局
先上效果图: 实现这样的效果: 一般的思路就是,直接写布局文件,用LinearLayout 嵌套多层子LinearLayout,然后根据权重layout_weight可以达到上面的效果 还有就是利用g ...
- Android自定义ViewGroup,实现自动换行
学习<Android开发艺术探索>中自定义ViewGroup章节 自定义ViewGroup总结的知识点 一.自定义ViewGroup中,onMeasure理解 onMeasure(int ...
- 从头学Android之Android布局管理:LinerLayout线性布局
LinerLayout线性布局: 这种布局方式是指在这个里面的控件元素显线性,我们可以通过setOrientation(int orientation)来指定线性布局的显示方式,其值有:HORIZON ...
- 【转】Android布局优化之ViewStub
ViewStub是Android布局优化中一个很不错的标签/控件,直接继承自View.虽然Android开发人员基本上都听说过,但是真正用的可能不多. ViewStub可以理解成一个非常轻量级的Vie ...
- android自定义viewgroup之我也玩瀑布流
先看效果图吧, 继上一篇<android自定义viewgroup实现等分格子布局>中实现的布局效果,这里稍微有些区别,每个格子的高度不规则,就是传说的瀑布流布局,一般实现这种效果,要么用第 ...
- Android 布局之GridLayout
Android 布局之GridLayout 1 GridLayout简介 GridLayout是Android4.0新提供的网格矩阵形式的布局控件. GridLayout的继承关系如下:java.la ...
- (转载)【Android】ViewGroup全面分析
转载自:http://www.cnblogs.com/lqminn/archive/2013/01/23/2866543.html 一个Viewgroup基本的继承类格式如下: import andr ...
- android布局太深导致的 java.lang.StackOverflowError
E/AndroidRuntime( 1900): java.lang.StackOverflowError E/AndroidRuntime( 1900): at android.graphi ...
- android 自定义ViewGroup和对view进行切图动画实现滑动菜单SlidingMenu
示意图就不展示了,和上一节的一样,滑动菜单SlidingMenu效果如何大家都比较熟悉,在这里我简单说明一下用自定义ViewGroup来实现. 实现方法:我们自定义一个ViewGroup实现左右滑动, ...
随机推荐
- ODAC的安装以及Entity Framework for Oracle 基本配置
1.安装ODAC 根据自己操作系统x86,x64来判断下载的ODAC版本 http://www.oracle.com/technetwork/database/windows/downloads/ut ...
- MTP设备无法安装驱动的解决办法
1,进入设备管理器右击带黄色问号的MTP,选择“属性”,“详细信息”“设备范例 ID”(用Ctrl+C复制). 2,找到c:\windows\inf\wpdmtp.inf打开(或者通过运行打开),找到 ...
- Spring AOP (下)
4.方式二:schema配置 a.业务类: /** * 业务类 * * @author yanbin * */ public class AspectBusiness { /** * 切入点 */ p ...
- TCP/IP-IP
A contented mind is a perpetual feast. "知足长乐" 参考资料:TCP/IP入门经典 (第五版) TCP/IP详解 卷一:协议 一.简介 IP ...
- bash shell学习-shell script基础 (笔记)
A chain no stronger than its weakest link. "一着不慎,满盘皆输" 参考资料:鸟哥的Linux私房菜 基础学习篇(第三版) Linux ...
- Oracle Pl/SQL编程基础
Pl/SQL简介 提高应用程序的运行性能, 提供模块化的程序设计, 自定义标示符, 具有过程语言控制结构, 良好的兼容性, 处理运行错误. Pl/SQL语言基础 sql是关系数据库的基本操作语言. s ...
- python logging模块使用
近来再弄一个小项目,已经到收尾阶段了.希望加入写log机制来增加程序出错后的判断分析.尝试使用了python logging模块. #-*- coding:utf-8 -*- import loggi ...
- python序列化之pickle
来自引用: 1.什么东西能用pickle模块存储? 所有Python支持的 原生类型 : 布尔, 整数, 浮点数, 复数, 字符串, bytes(字节串)对象, 字节数组, 以及 None. 由任何原 ...
- int string convert
C++ int与string的转化 int本身也要用一串字符表示,前后没有双引号,告诉编译器把它当作一个数解释.缺省 情况下,是当成10进制(dec)来解释,如果想用8进制,16进制,怎么办?加上前缀 ...
- 一个md5加密的工具类,用的虚拟机的包,不需要额外导包
package com.yun.park.service.utils;import org.slf4j.Logger;import org.slf4j.LoggerFactory;import jav ...