遮罩 HUD 指示器 蒙板 弹窗
遮罩 HUD 指示器 蒙板 弹窗
UIAlertView的使用<代理方法处理按钮点击>
UIAlertView *alertView = [[UIAlertView alloc] initWithTitle:@"警告" message:@"是否要删除它?" delegate:self cancelButtonTitle:@"是" otherButtonTitles:@"否", nil];

//加登录框

    alertView.alertViewStyle = UIAlertViewStyleLoginAndPasswordInput;

    [alertView show];

/hud/HUDimage/iOS%20Simulator%20Screen%20Shot%202015年7月7日%20下午3.34.43.png)
UIActionSheet的使用 <代理方法处理按钮点击>
UIActionSheet *sheet = [[UIActionSheet alloc] initWithTitle:@"警告:确定要删除它?" delegate:self cancelButtonTitle:@"取消" destructiveButtonTitle:@"确定" otherButtonTitles:@"随便", nil];

    [sheet showInView:self.view];

/hud/HUDimage/iOS%20Simulator%20Screen%20Shot%202015年7月7日%20下午3.37.52.png)
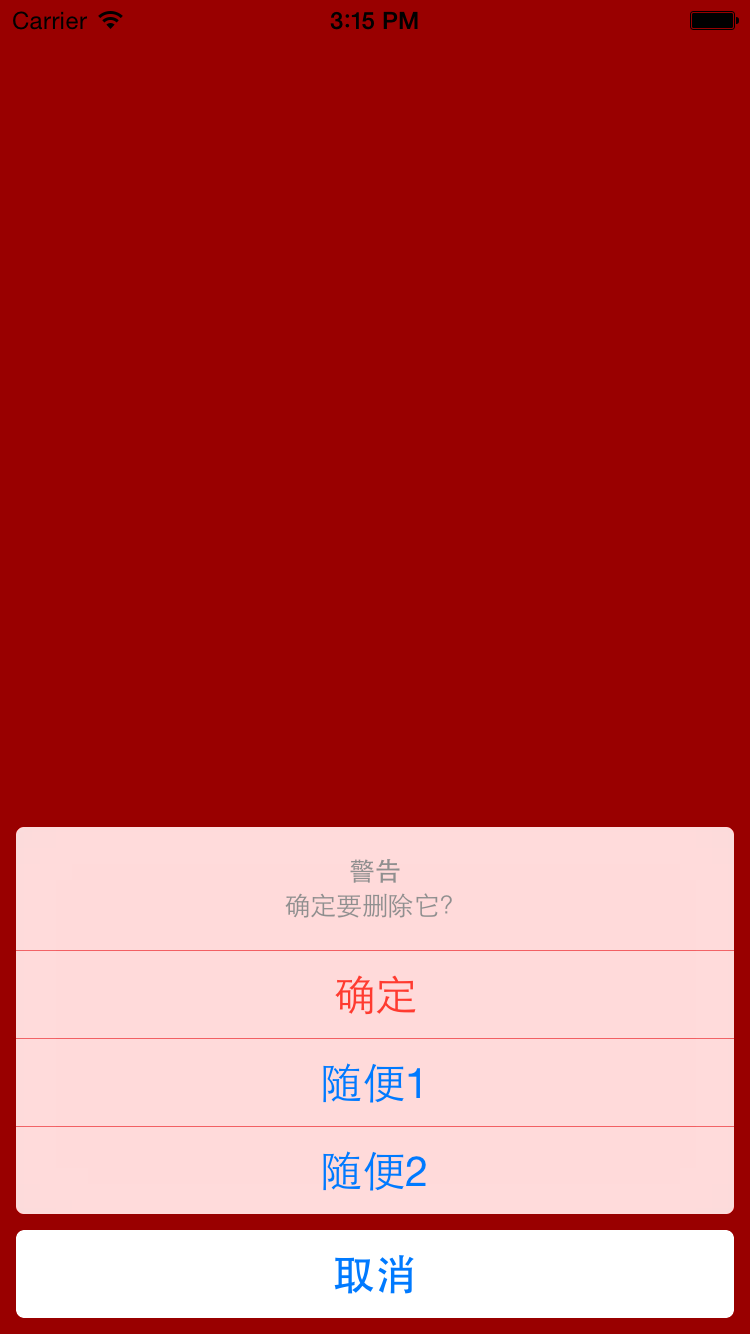
UIAlertController的使用:UIAlertControllerStyleActionSheet
UIAlertController *alertController = [UIAlertController alertControllerWithTitle:@"警告" message:@"确定要删除它?" preferredStyle:UIAlertControllerStyleActionSheet];

    // 添加按钮 <UIAlertActionStyleDestructive>

    UIAlertAction *sure = [UIAlertAction actionWithTitle:@"确定" style:UIAlertActionStyleDestructive handler:^(UIAlertAction *action) {

        NSLog(@"点击了【确定】按钮");

    }];

    [alertController addAction:sure];

    [alertController addAction:[UIAlertAction actionWithTitle:@"随便1" style:UIAlertActionStyleDefault handler:^(UIAlertAction *action) {

        NSLog(@"点击了【随便1】按钮");

    }]];

    [alertController addAction:[UIAlertAction actionWithTitle:@"随便2" style:UIAlertActionStyleDefault handler:^(UIAlertAction *action) {

        NSLog(@"点击了【随便2】按钮");

    }]];

    [alertController addAction:[UIAlertAction actionWithTitle:@"取消" style:UIAlertActionStyleCancel handler:^(UIAlertAction *action) {

        NSLog(@"点击了【取消】按钮");

    }]];

    // 在当前控制器上面弹出另一个控制器:alertController  显示

    [self presentViewController:alertController animated:YES completion:nil];
/hud/HUDimage/iOS%20Simulator%20Screen%20Shot%202015年7月7日%20下午3.15.07.png)
UIAlertController的使用:UIAlertControllerStyleAlert<一>
 UIAlertController *alertController = [UIAlertController alertControllerWithTitle:@"警告" message:@"message:确定?" preferredStyle:UIAlertControllerStyleAlert];

    // 添加按钮

    UIAlertAction *sure = [UIAlertAction actionWithTitle:@"确定" style:UIAlertActionStyleDestructive handler:^(UIAlertAction *action) {

        NSLog(@"点击了【确定】按钮");

    }];

    [alertController addAction:sure];

    [alertController addAction:[UIAlertAction actionWithTitle:@"取消" style:UIAlertActionStyleCancel handler:^(UIAlertAction *action) {

        NSLog(@"点击了【取消】按钮");

    }]];

    [alertController addAction:[UIAlertAction actionWithTitle:@"按钮" style:UIAlertActionStyleDefault handler:^(UIAlertAction *action) {

        NSLog(@"点击了【按钮】按钮");

    }]];

    // 还可以添加文本框

    [alertController addTextFieldWithConfigurationHandler:^(UITextField *textField) {

        textField.textColor = [UIColor redColor];

        textField.secureTextEntry = YES; // 暗文

        textField.placeholder = @"请输入密码";

    }];

    // 在当前控制器上面弹出另一个控制器:alertController

    [self presentViewController:alertController animated:YES completion:nil];
/hud/HUDimage/iOS%20Simulator%20Screen%20Shot%202015年7月7日%20下午3.24.29.png)

UIAlertController的使用:UIAlertControllerStyleAlert<二>
 UIAlertController *alertController = [UIAlertController alertControllerWithTitle:@"警告" message:@"message:确定?" preferredStyle:UIAlertControllerStyleAlert];

    // 添加按钮

    UIAlertAction *sure = [UIAlertAction actionWithTitle:@"确定" style:UIAlertActionStyleDestructive handler:^(UIAlertAction *action) {

        NSLog(@"点击了【确定】按钮");

    }];

    [alertController addAction:sure];

    [alertController addAction:[UIAlertAction actionWithTitle:@"取消" style:UIAlertActionStyleCancel handler:^(UIAlertAction *action) {

        NSLog(@"点击了【取消】按钮");

    }]];

    // 在当前控制器上面弹出另一个控制器:alertController

    [self presentViewController:alertController animated:YES completion:nil];
/hud/HUDimage/iOS%20Simulator%20Screen%20Shot%202015年7月7日%20下午3.27.40.png)

介绍框架<一> SVProgressHUD
// 下面这些消息需要主动调用dismiss方法来隐藏

    [SVProgressHUD show];

    [SVProgressHUD showWithMaskType:SVProgressHUDMaskTypeBlack]; // 增加灰色蒙板

    [SVProgressHUD showWithStatus:@"正在加载中..."];//下面添加提醒文字

    // 延迟2秒后 取消显示

    dispatch_after(dispatch_time(DISPATCH_TIME_NOW, (int64_t)(2.0 * NSEC_PER_SEC)), dispatch_get_main_queue(), ^{

        [SVProgressHUD dismiss];

    });

    // 下面这些消息会自动消失

//    [SVProgressHUD showInfoWithStatus:@"数据加载完毕!"];

//    [SVProgressHUD showSuccessWithStatus:@"成功加载到4条新数据!"];

//    [SVProgressHUD showErrorWithStatus:@"网络错误,请稍等!"];

    // 延迟2秒后做一些事情

//    dispatch_after(dispatch_time(DISPATCH_TIME_NOW, (int64_t)(2.0 * NSEC_PER_SEC)), dispatch_get_main_queue(), ^{

//        [SVProgressHUD dismiss];

//    });

//   [SVProgressHUD showProgress:progress status:[NSString stringWithFormat:@"已下载%.0f%%", progress * 100]];
另一框架 MBProgressHUD
遮罩 HUD 指示器 蒙板 弹窗的更多相关文章
- WPF蒙板弹窗
由于界面设计需要,要给弹窗添加蒙板效果,在百度和google搜索了半天,竟然没有一个满意的方案,最后只能自己想办法实现了一个,原理还是比较简单的,现在分享给大家. 先看一下效果.. 原理其实 ...
- SVG 2D入门9 - 蒙板
SVG支持的蒙板 SVG支持多种蒙板特效,使用这些特性,我们可以做出很多很炫的效果.至于中文中把mask叫做"蒙板"还是"遮罩"就不去区分了,这里都叫做蒙板吧. ...
- WPF通过不透明蒙板切割显示子控件
版权声明:本文为博主原创文章,遵循 CC 4.0 BY-SA 版权协议,转载请附上原文出处链接和本声明.本文链接:https://blog.csdn.net/Backspace110/article/ ...
- WPF弹出带蒙板的消息框
效果图 思路 拿到父级窗体的内容,放入一个容器里,再在容器里放入一个半透明层.将整个容器赋给父级窗体的内容. 关闭时反向操作. 代码 消息窗弹出时 /// <summary> /// 弹出 ...
- NeHe OpenGL教程 第二十课:蒙板
转自[翻译]NeHe OpenGL 教程 前言 声明,此 NeHe OpenGL教程系列文章由51博客yarin翻译(2010-08-19),本博客为转载并稍加整理与修改.对NeHe的OpenGL管线 ...
- 利用 js 实现弹出蒙板(model)功能
关于 js 实现一个简单的蒙板功能(model) 思路: 创建一个蒙板, 设置蒙板的堆叠顺序保证能将其它元素盖住 position: absolute; top: 0; left: 0; displa ...
- CLIP PATH (MASK) GENERATOR是一款在线制作生成clip-path路径的工具,可以直接生成SVG代码以及配合Mask制作蒙板。
CLIP PATH (MASK) GENERATOR是一款在线制作生成clip-path路径的工具,可以直接生成SVG代码以及配合Mask制作蒙板. CLIP PATH (MASK) GENERATO ...
- cocos2d-x之蒙板,局部高亮可点,CCRenderTexture
转自:http://www.2cto.com/kf/201207/144656.html 蒙板,局部高亮可点的用处大多是在新手引导的时候,引导玩家一步一步的走游戏的操作流程. 之前写了一个cocos2 ...
- Android 图片合成:添加蒙板效果 不规则相框 透明度渐变效果的实现
Android 图片合成:添加蒙板效果 不规则相框 透明度渐变效果的实现 暂时还未有时间开发这效果,所以先贴出来. 先贴一张效果图,这是一张手机截屏: 左上方的风景图:背景图片 右上方的人物图:前景图 ...
随机推荐
- [读书笔记]流畅的Python(Fluent Python)
<流畅的Python>这本书是图灵科技翻译出版的一本书,作者Luciano Ramalho. 作者从Python的特性角度出发,以Python的数据模型和特殊方法为主线,主要介绍了pyth ...
- flask的路由配置,特殊装饰器
1,flask中的路由 endpoint-url_for反向地址 endpoint默认是视图函数名endpoint="雪雪" methods 指定视图函数的请求方式,默认GET d ...
- 6.游戏特别离不开脚本(3)-JS脚本操作java(2)(直接解析JS公式,并非完整JS文件或者函数)
在游戏中可以考虑数据由javabean保存,逻辑方法由JS提供. public class Bean4JS { private int id; private String name; private ...
- jquery ajax 回调函数
function test(callback){ $.ajax({ url:'/mall/credit', type: 'get', dataType:'json', processData: fal ...
- 解决Linux环境Oracle显示乱码
首先查看当前的编码格式 select userenv('language') from dual; 解决方法: 一.临时解决方法 切换到Oracle用户,执行 export NLS_LAN ...
- ORACLE 创建视图索引序列
/* 视图View 视图是从若干基本表和(或)其他视图构造出来的表 视图存放的都是查询语句,并没有真实的数据 虚表 作用 限制对数据的操作 复杂查询变简单 提供相同数据的不同显示 UNION ALL ...
- 并不对劲的uoj276. [清华集训2016]汽水
想要很对劲的讲解,请点击这里 题目大意 有一棵\(n\)(\(n\leq 50000\))个节点的树,有边权 求一条路径使该路径的边权平均值最接近给出的一个数\(k\) 输出边权平均值下取整的整数部分 ...
- JAVA JVM 流程二
作为一名Java使用者,掌握JVM的体系结构也是必须的.说起Java,人们首先想到的是Java编程语言,然而事实上,Java是一种技术,它由四方面组成:Java编程语言.Java类文件格式.Java虚 ...
- bzoj4631
4631: 踩气球 Time Limit: 10 Sec Memory Limit: 256 MBSubmit: 260 Solved: 133[Submit][Status][Discuss] ...
- LA 4670 Dominating Patterns (AC自动机)
题意:给定一个一篇文章,然后下面有一些单词,问这些单词在这文章中出现过几次. 析:这是一个AC自动机的裸板,最后在匹配完之后再统计数目就好. 代码如下: #pragma comment(linker, ...